Blog
Blog
Blog
All
Insights
Tutorials
Community
Usecase
Product

Tutorials
BizCrush Enterprise Plan: Payment and Team Management Guide
This guide walks you through proceeding with the Enterprise Plan from your admin account and shows you how to add and manage team members in it.
The BizCrush Enterprise plan is designed for companies and teams that want to use BizCrush together under one shared workspace.
This guide walks you through how to review and pay for your Enterprise plan after your plan terms have been confirmed with the BizCrush sales team. You’ll also learn how to add or remove team members after payment is complete.
Before you begin
This guide is for customers whose Enterprise plan has already been configured by the BizCrush team.
Before starting payment, make sure you have completed the following:
You have discussed and confirmed your Enterprise plan terms with the BizCrush sales team.
You have shared the email address that will be used as the admin account.
You can sign up or log in to BizCrush using that admin email address.
If your plan terms have not been finalized yet, or if you do not see the payment button in your account, do not proceed with payment. Contact your BizCrush representative first.
For help, contact business@bizcrush.ai.
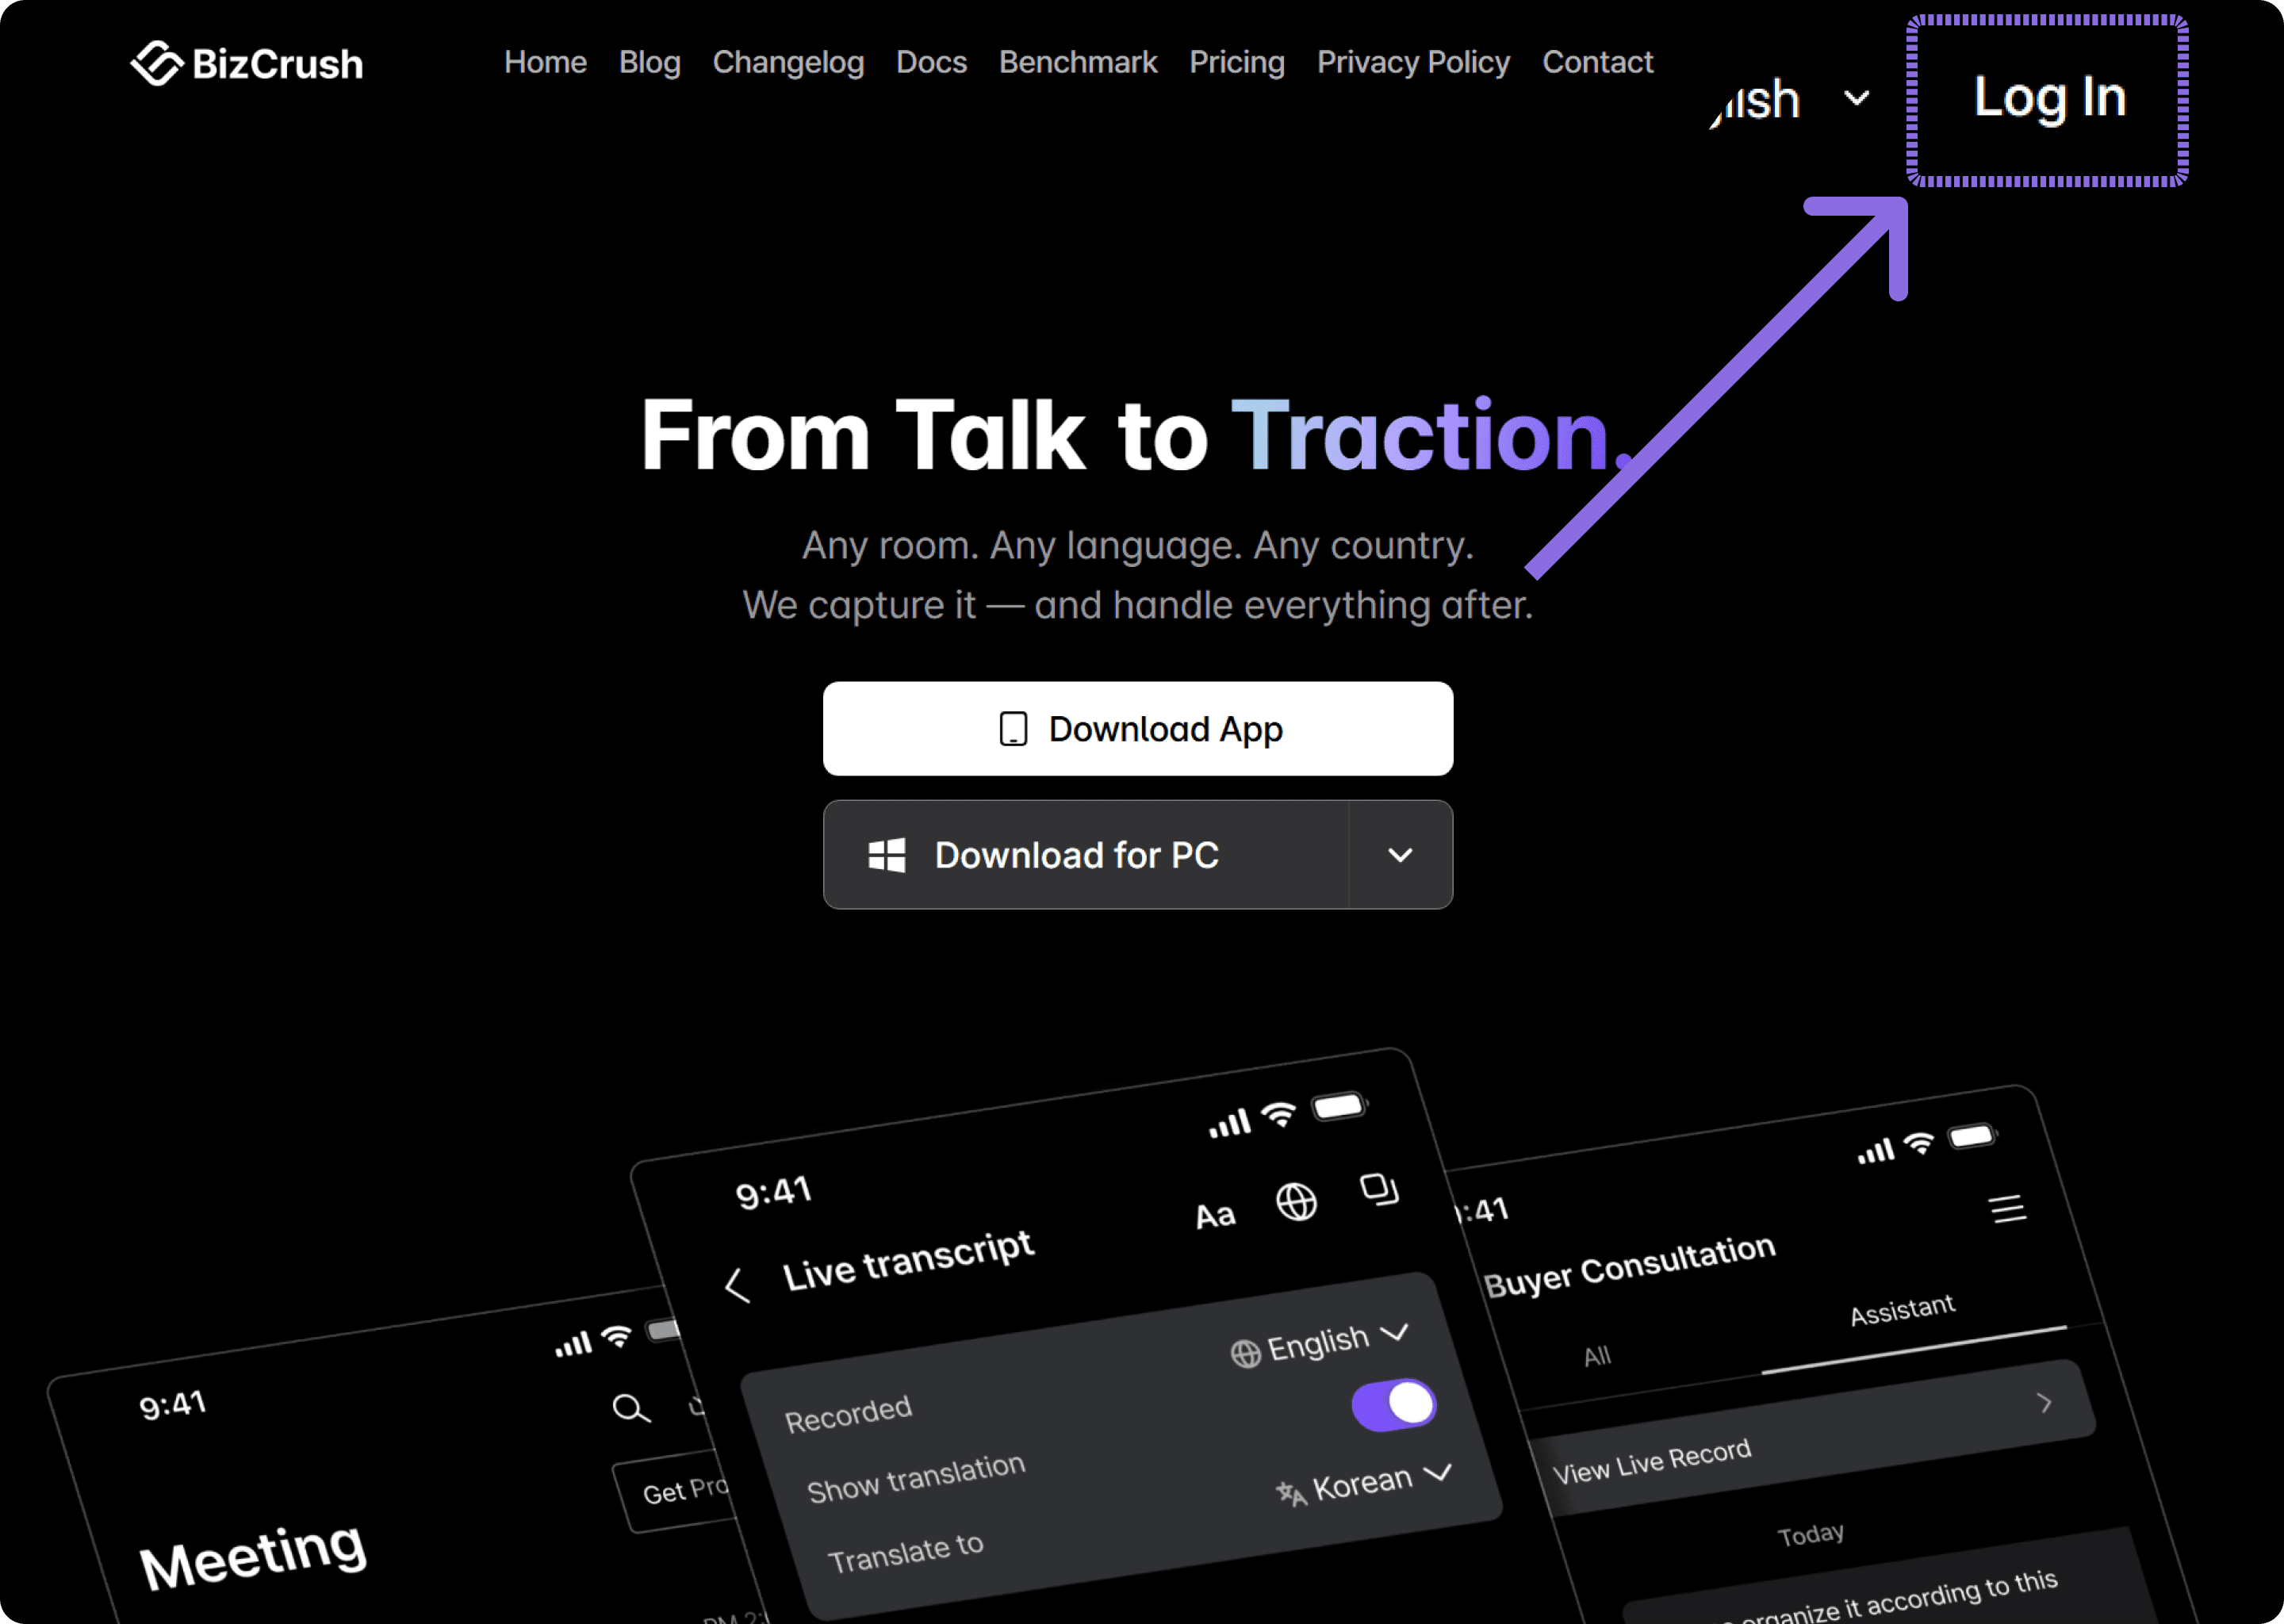
1. Log in with your admin account
Enterprise plan details and the payment button are only available from the admin account that was configured in advance.
Go to the BizCrush website and log in with the email address you provided to the BizCrush team as your admin account.
If you log in with a different email address, the Enterprise payment button may not appear. Make sure you are using the correct admin email before continuing.
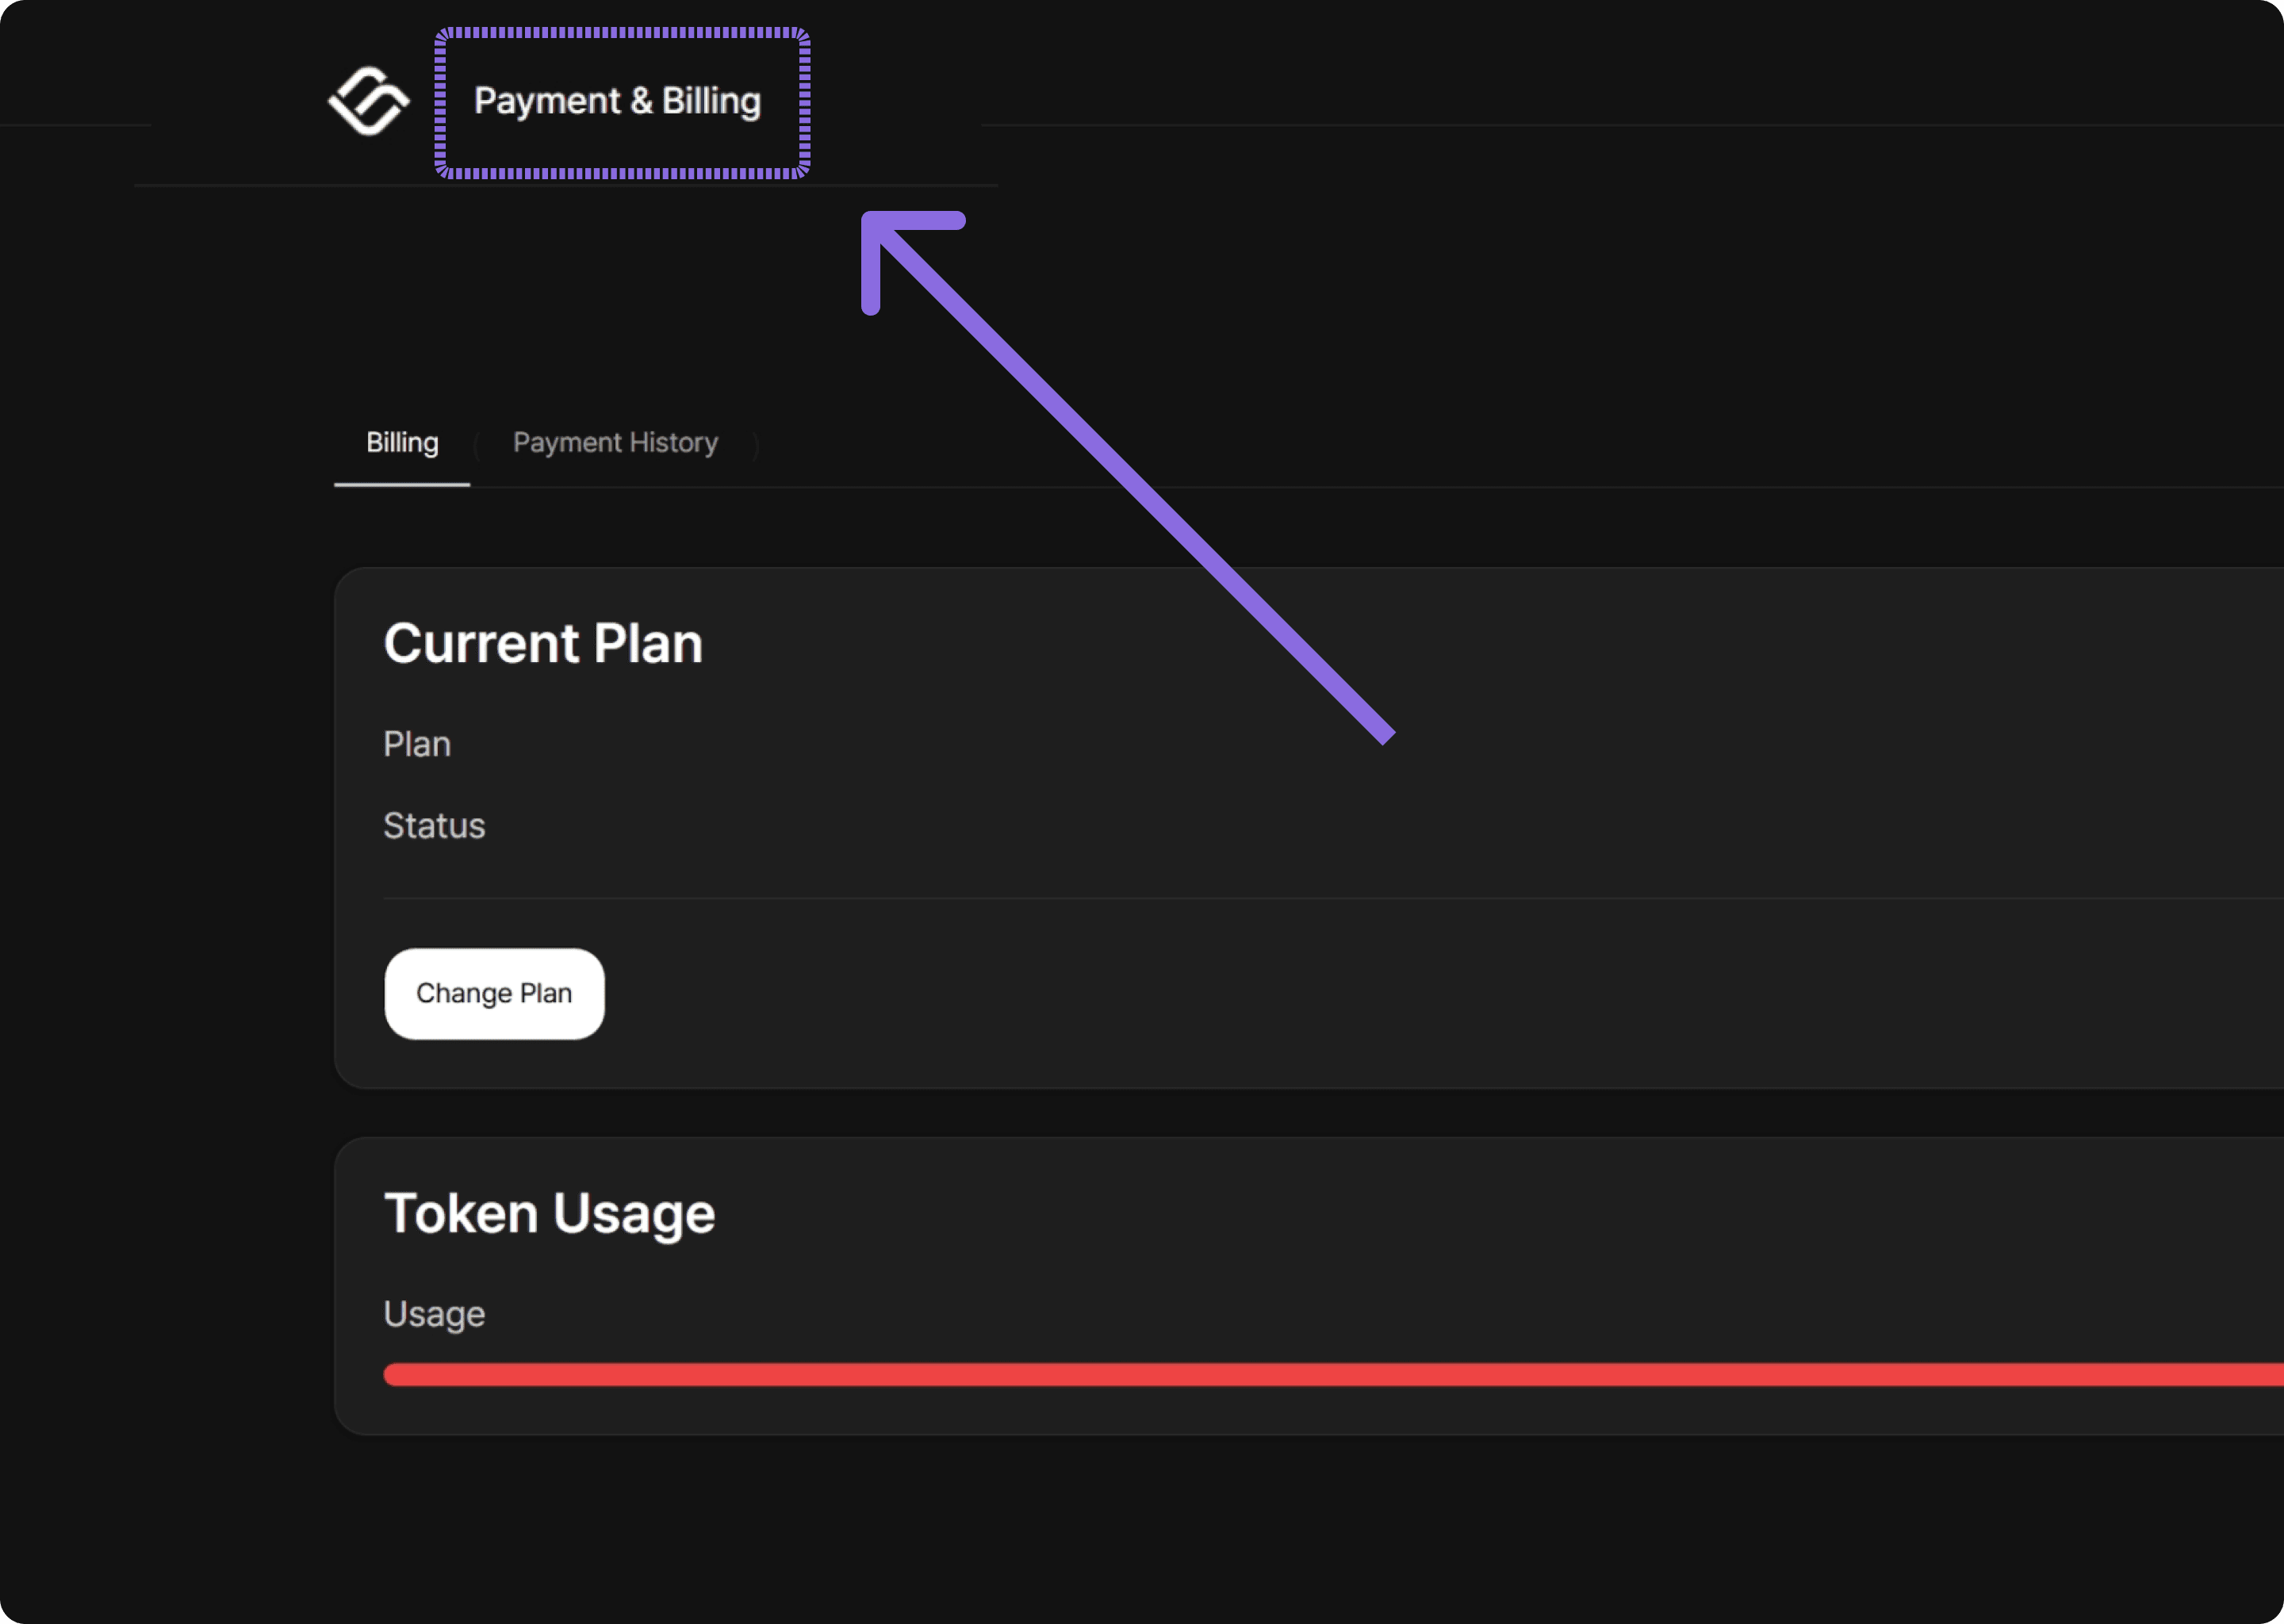
2. Open the Billing page
After logging in, go to the Payment & Billing page from the top navigation menu.
On this page, you can review your current plan, Enterprise details, usage, member list, and payment status.
3. Review your Enterprise plan
On the Billing page, review the Enterprise plan details configured for your account.
You should see information such as:
Company name
Plan status
Billing period
Subscription change button
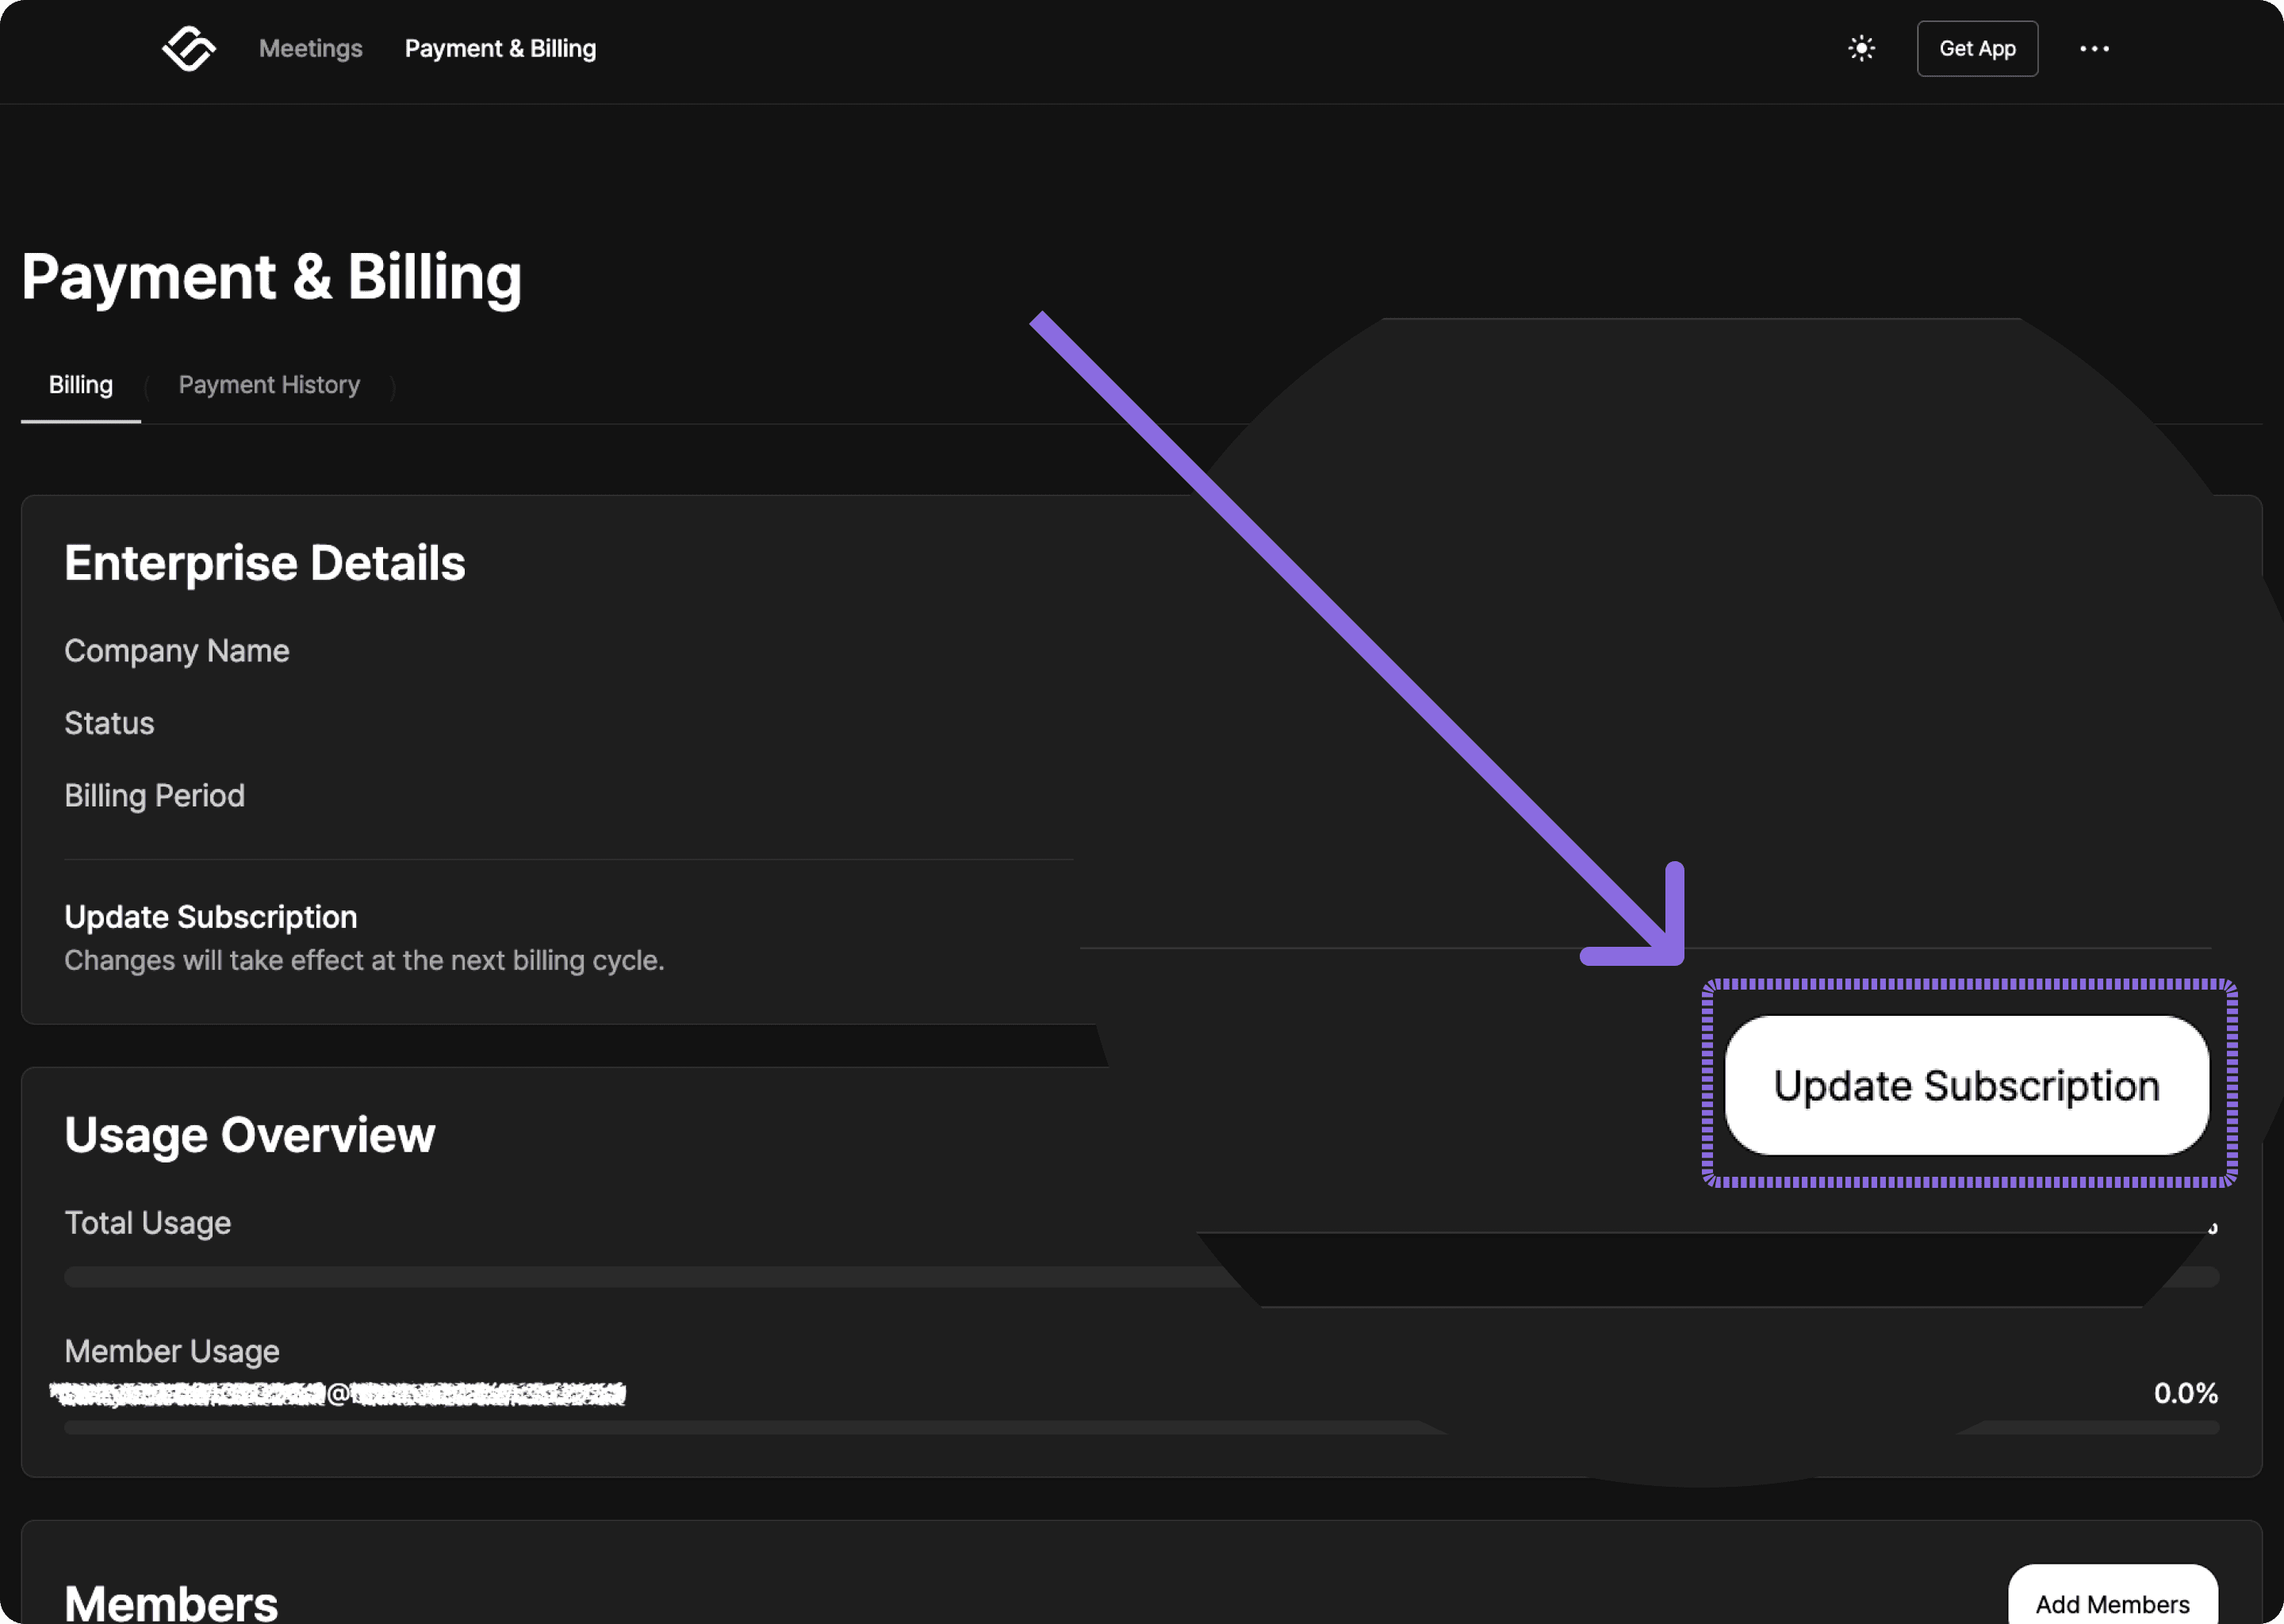
Click Update subscription, then select the Enterprise Plan card on the right.
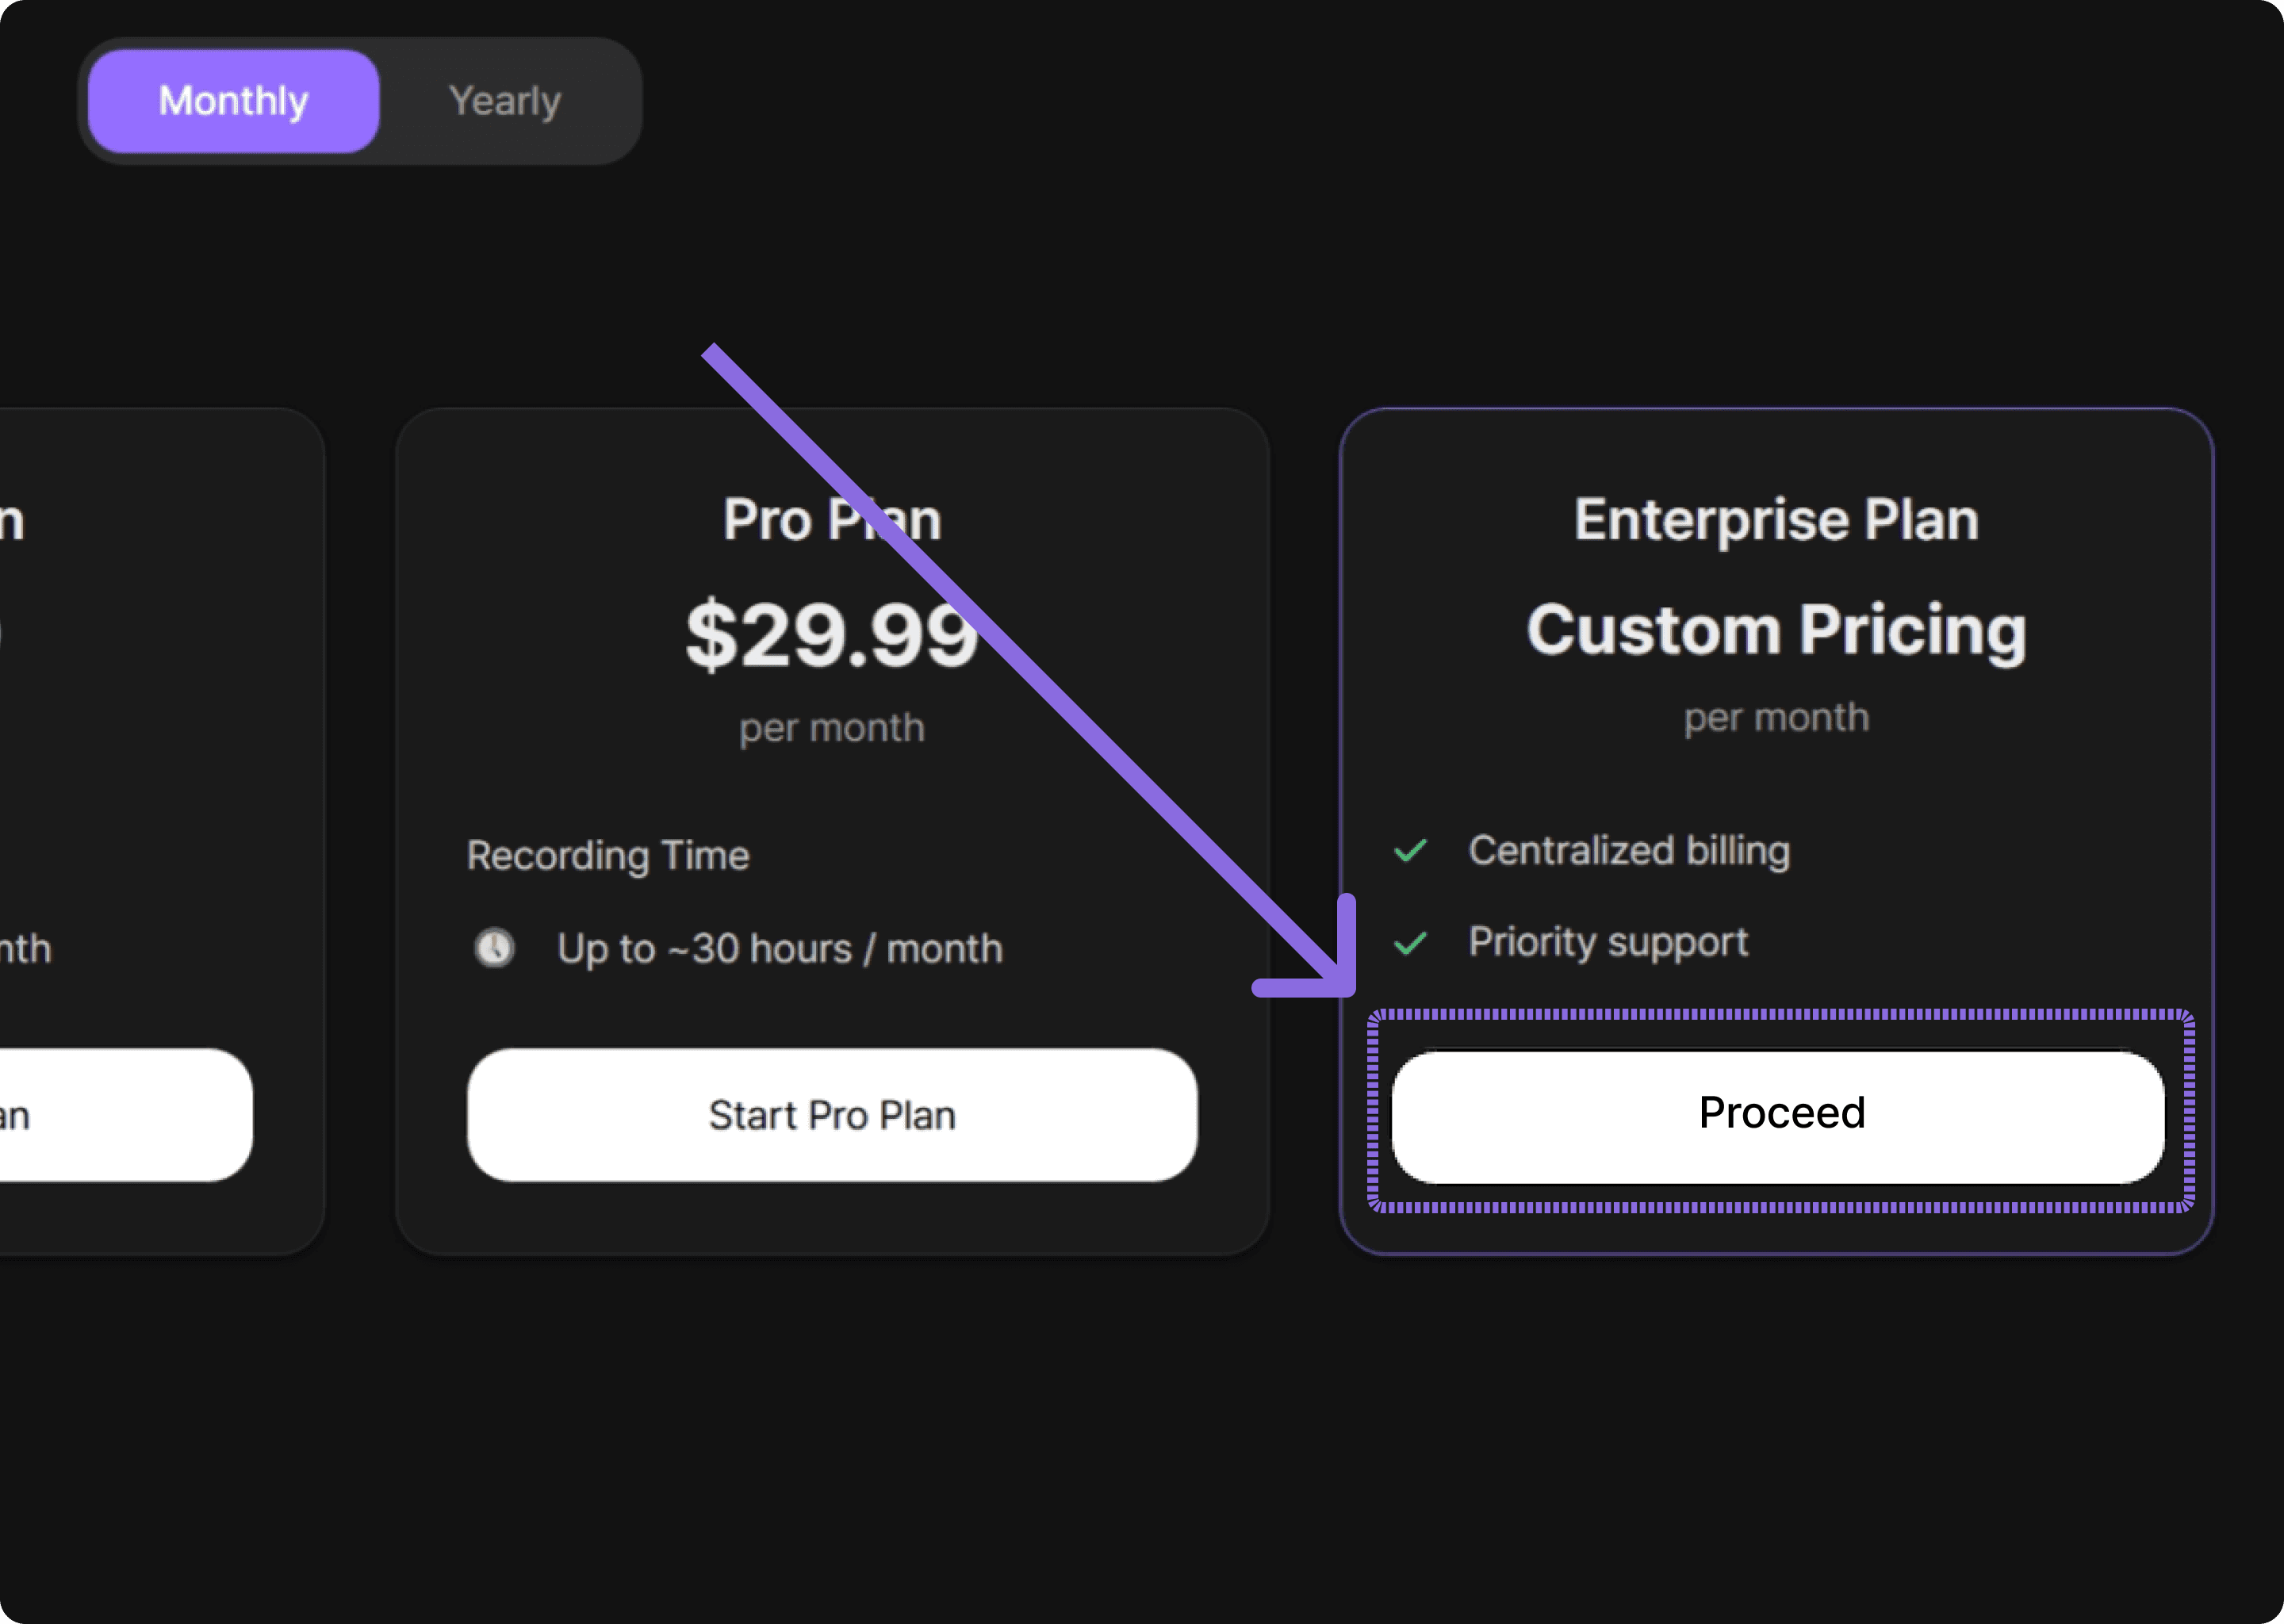
Before continuing, make sure the plan details match the terms you discussed with the BizCrush sales team.
4. Complete payment through Stripe
Once you have reviewed the plan details, click the payment button.
You will be redirected to Stripe, where you can enter your company’s payment information and complete the transaction.
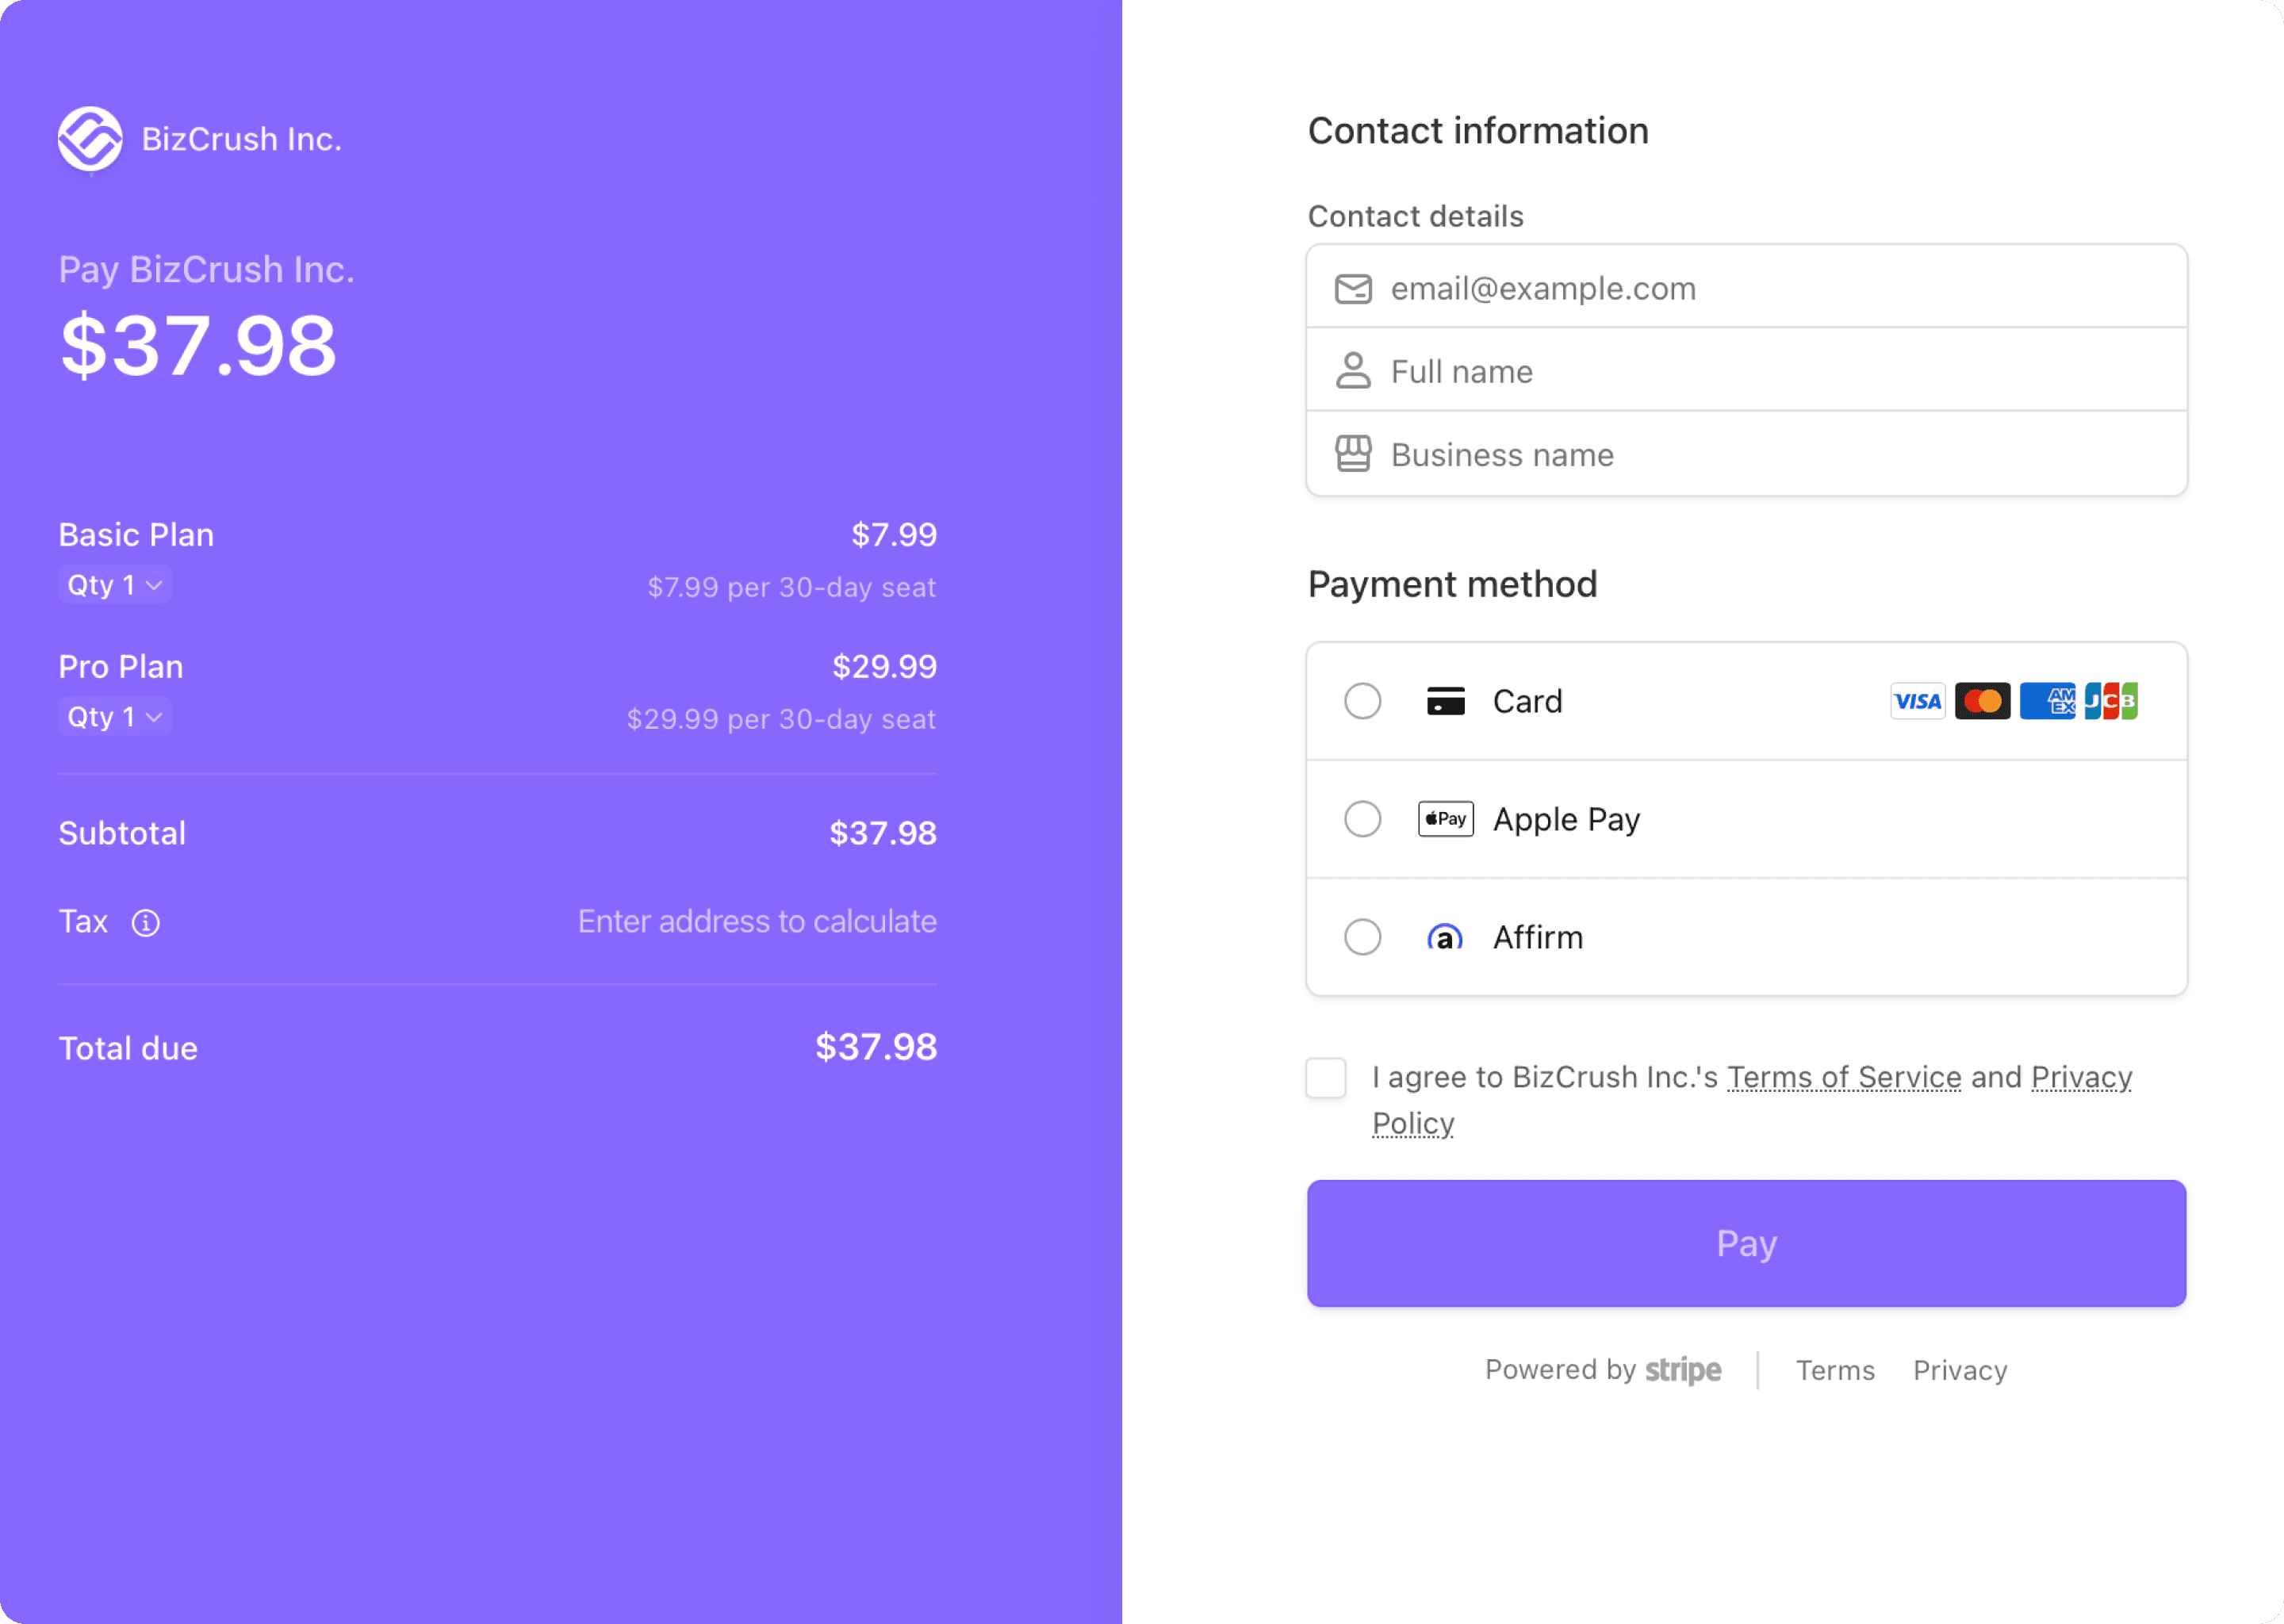
Before paying, confirm that the following details match your agreed Enterprise terms:
Plan status
Payment amount
If anything looks different from what you discussed with the BizCrush sales team, do not complete payment. Contact your BizCrush representative first.
After payment is completed, your Enterprise plan will be activated, and the admin account will be able to manage team members.
Important
Enterprise plan details and the payment button are only shown in the admin account that was configured by the BizCrush team. If you do not see the payment button, check whether you are logged in with the correct admin email address.
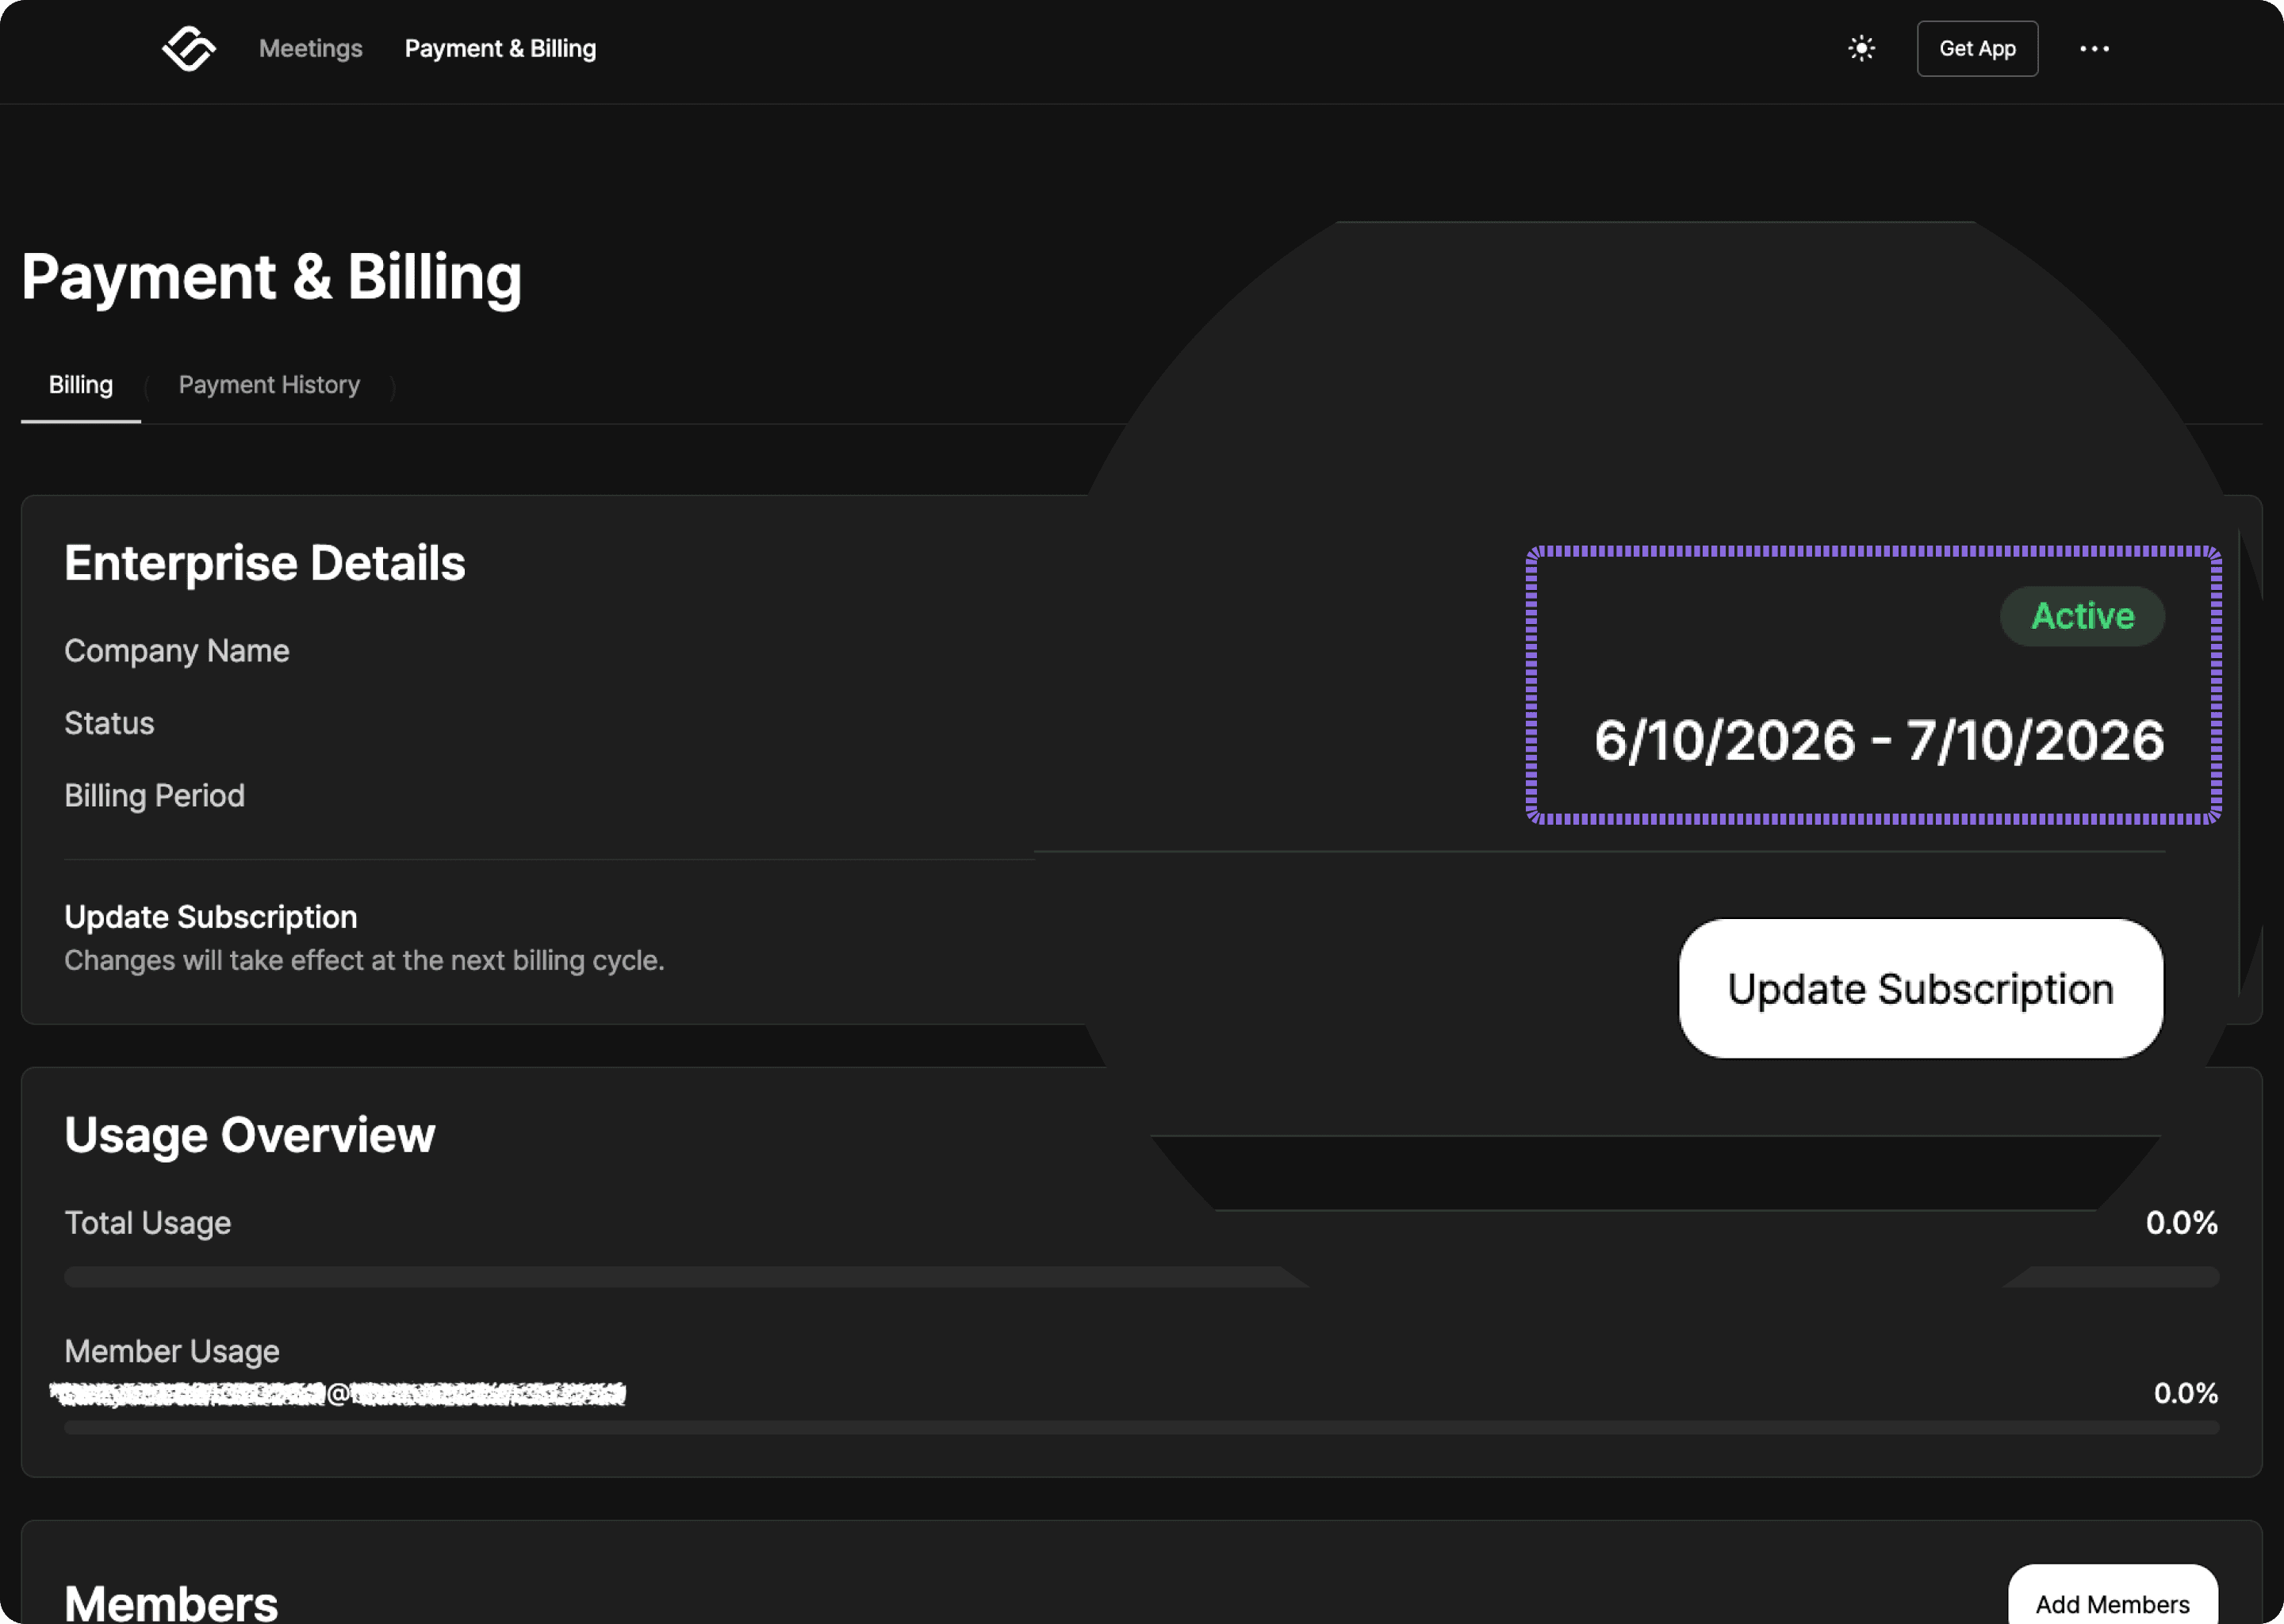
5. Confirm that your Enterprise plan is active
After completing payment, return to the Payment & Billing page and check your Enterprise plan status.
If payment was successful, the Enterprise details section should show that your plan is active. You should also be able to see the usage overview, member list, and Add member button.
After payment, check the following:
The Enterprise plan status is shown as active.
The billing period is correct.
The usage overview is visible.
The member list and Add member button are visible.
The admin account is shown as the owner or as an active member.
Important
Make sure you complete payment using the Enterprise payment button shown in the admin account. If you purchase an individual Basic or Pro Plan separately, team-wide shared usage and member management will not be applied.
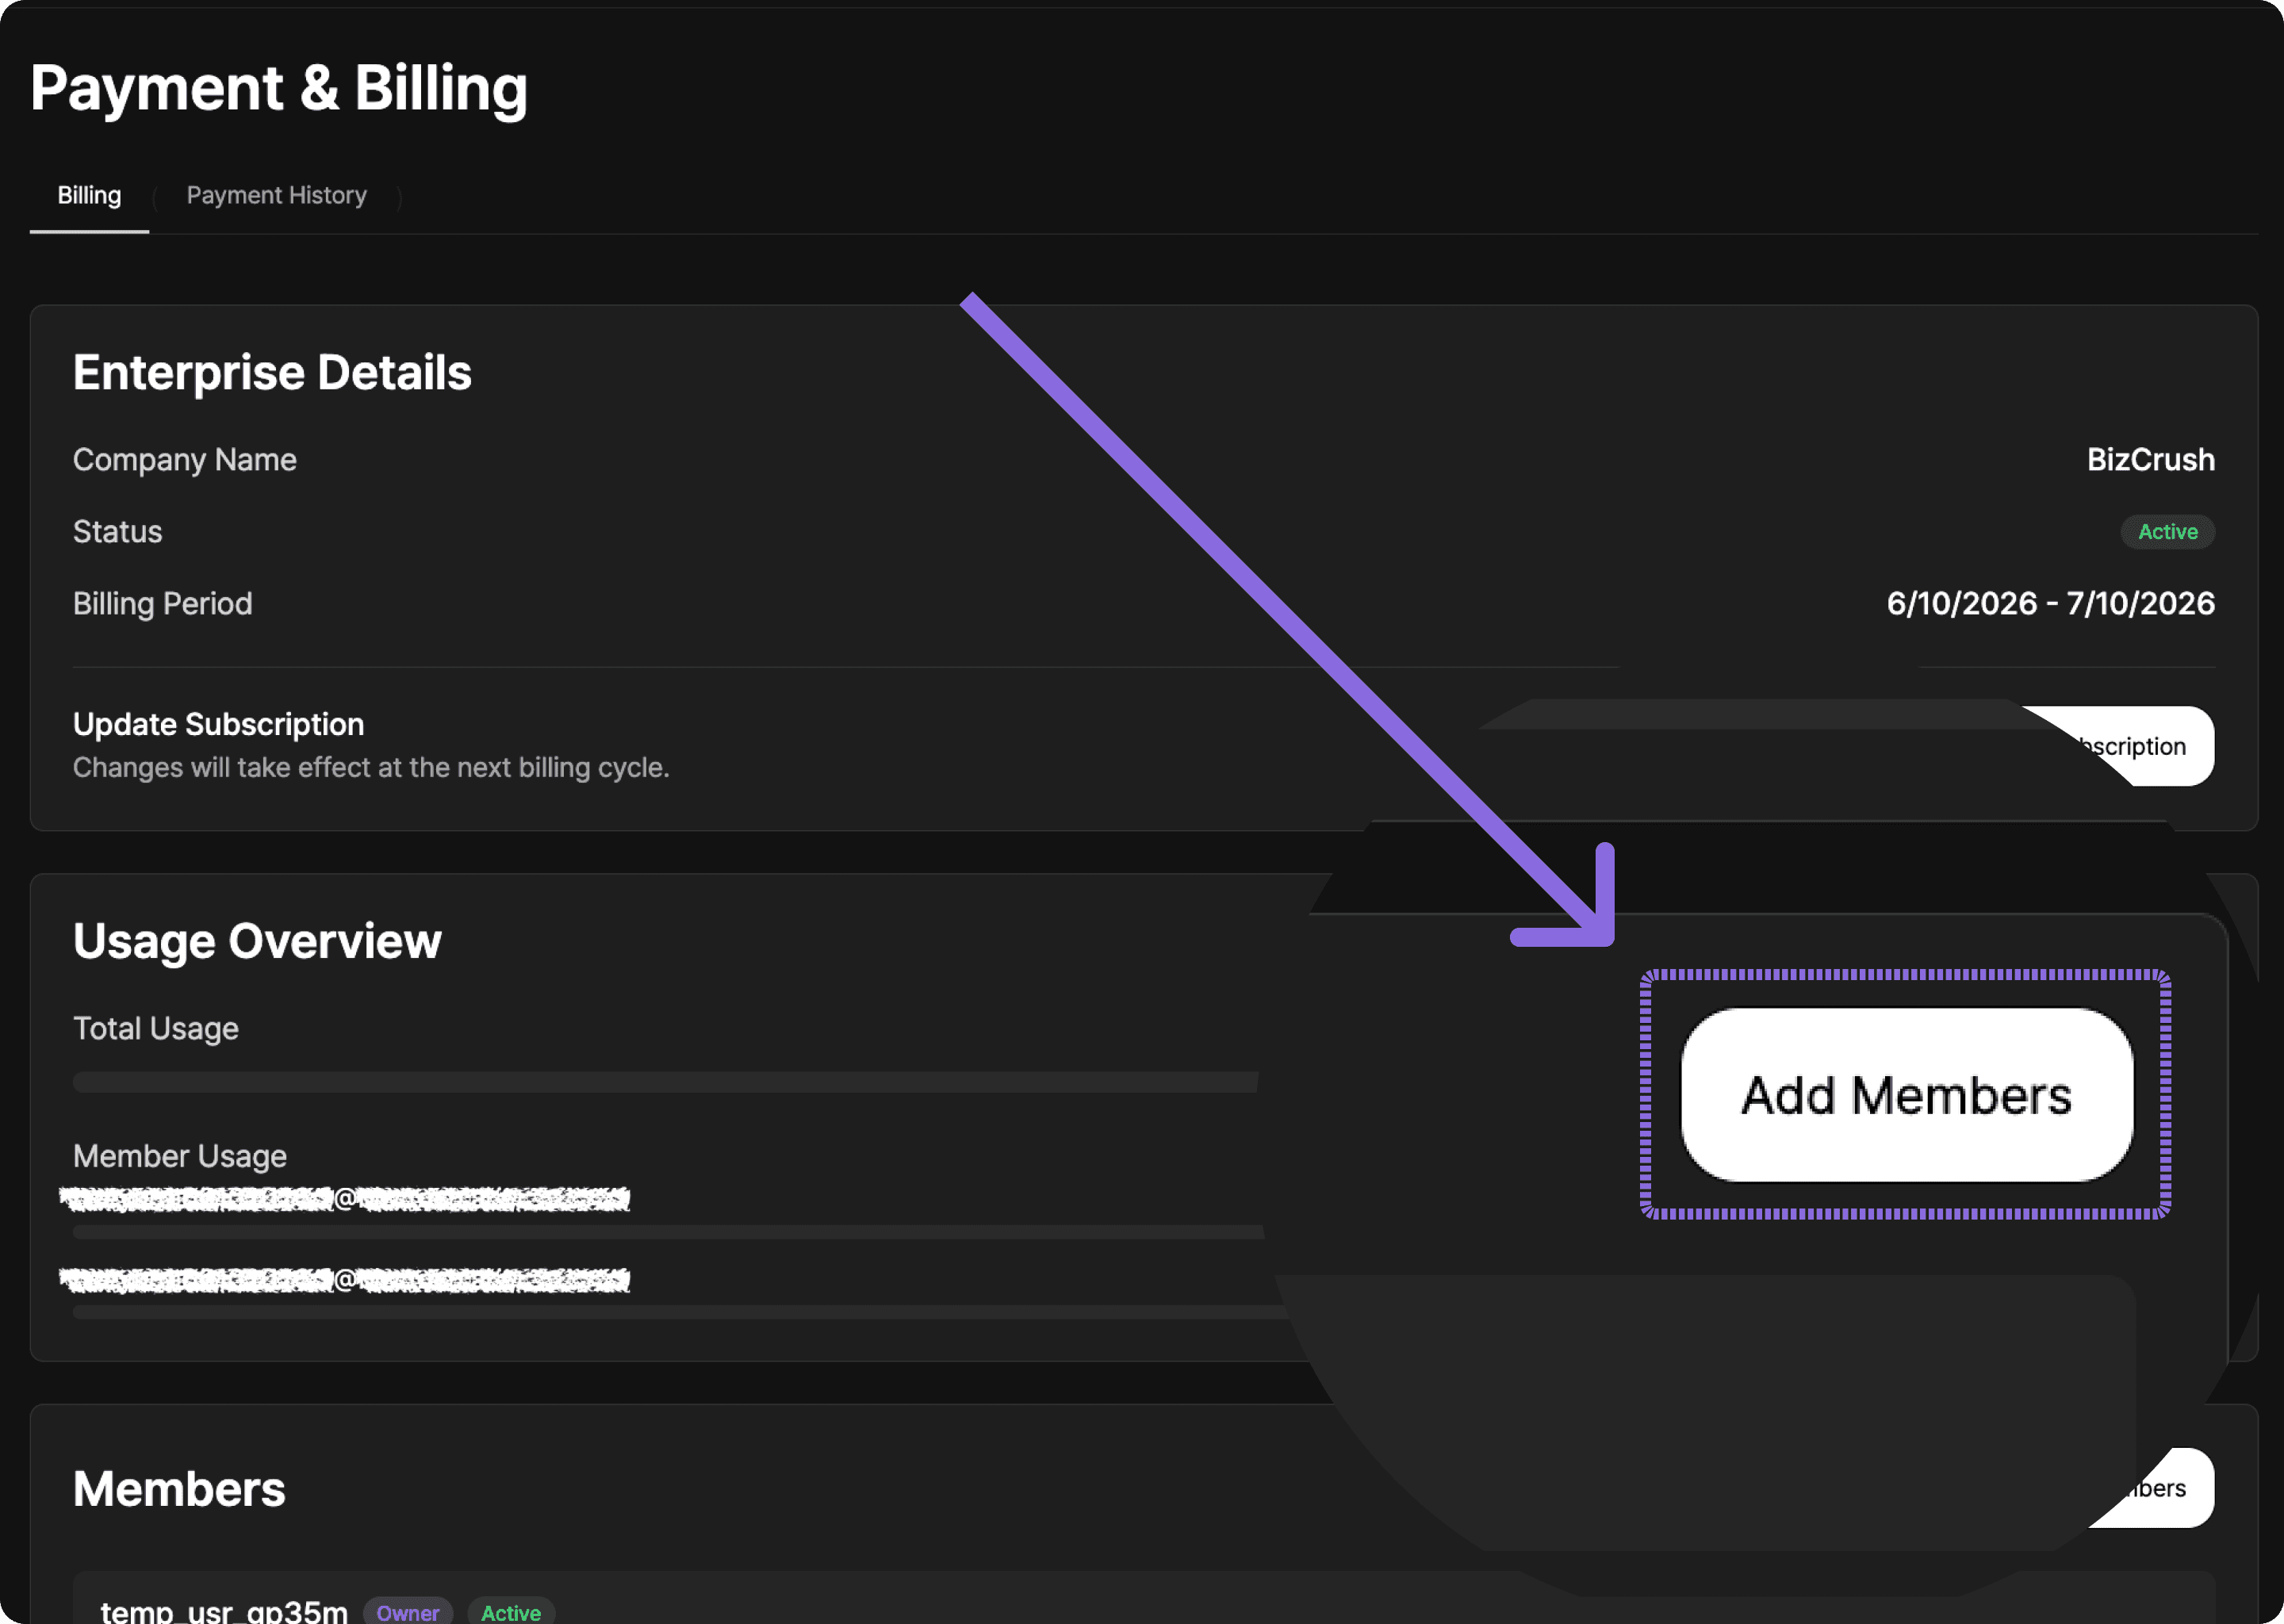
6. Add team members
After your Enterprise plan is active, the admin account can add team members.
Go to the member section on the Payment & Billing page and click Add member.
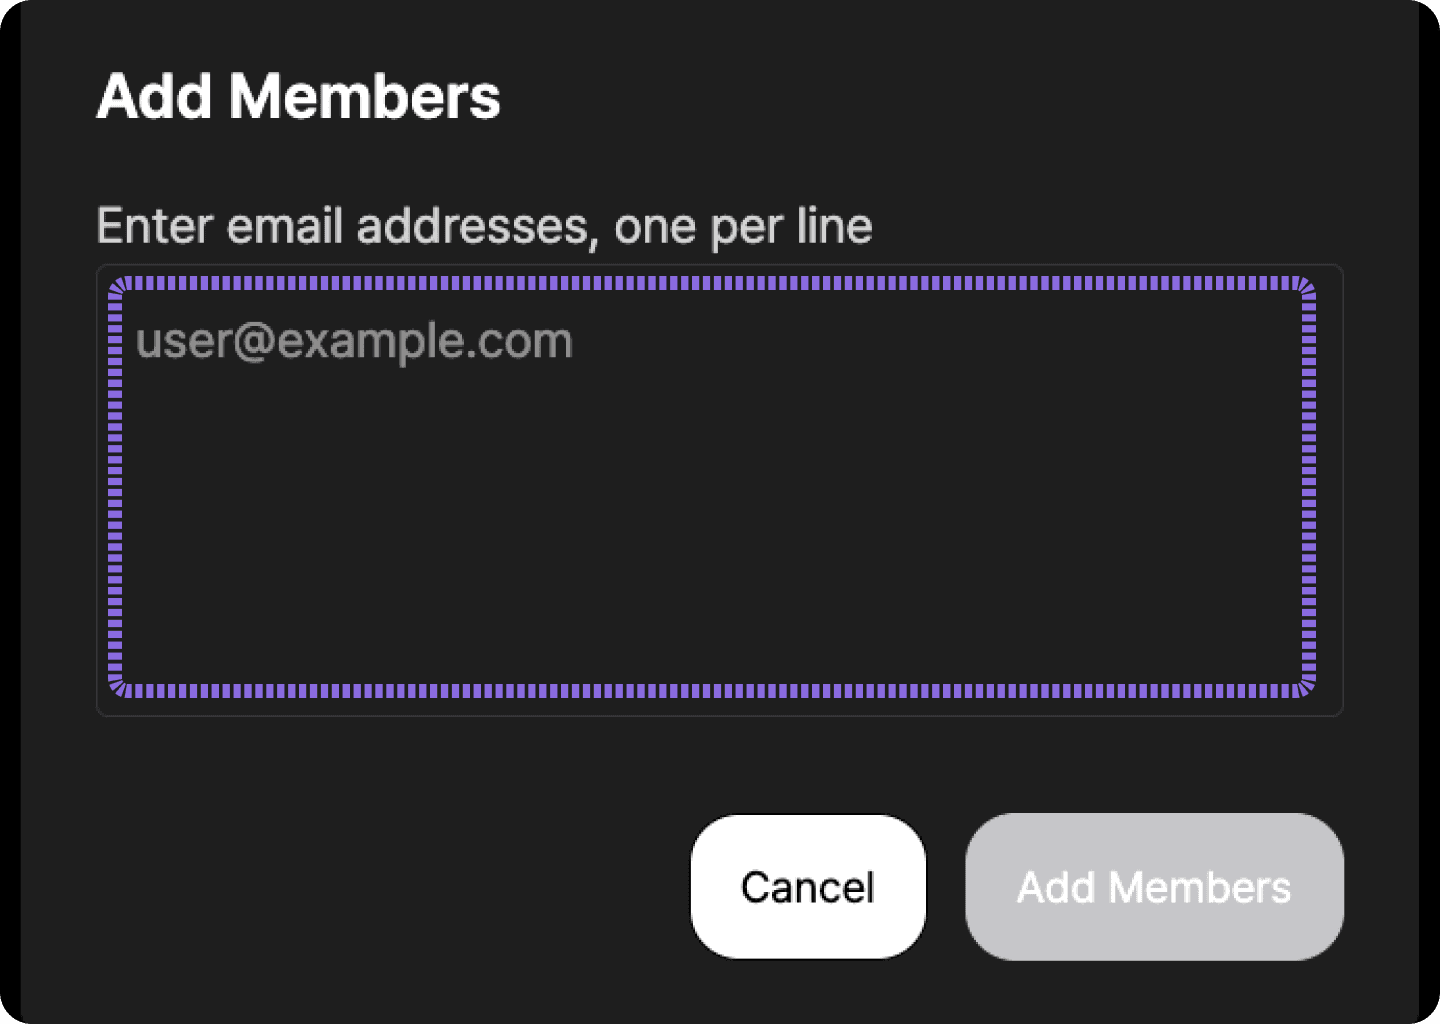
6-1. Click Add member
In the member list, click the Add member button on the right.
6-2. Enter team member email addresses
When the Add member window opens, enter the email addresses of the team members you want to add.
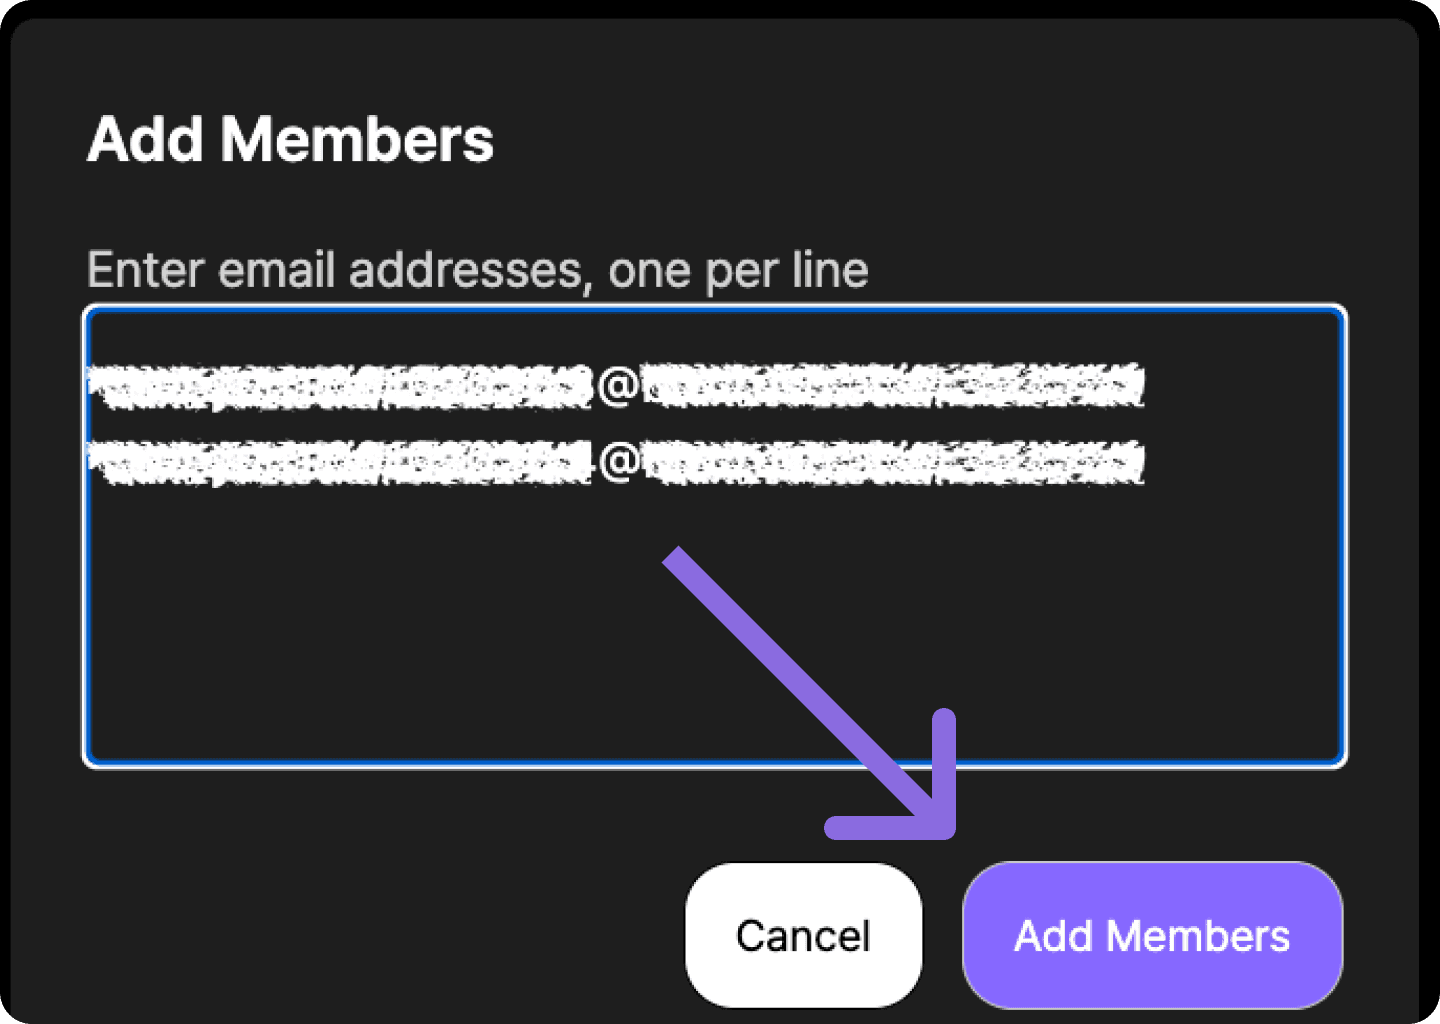
Enter one email address per line. To add multiple members at once, separate each email address with a line break.
Example:
After checking the email addresses, click Add member.
When adding multiple members, separate email addresses using a line break, such as Shift + Enter or Alt + Enter.
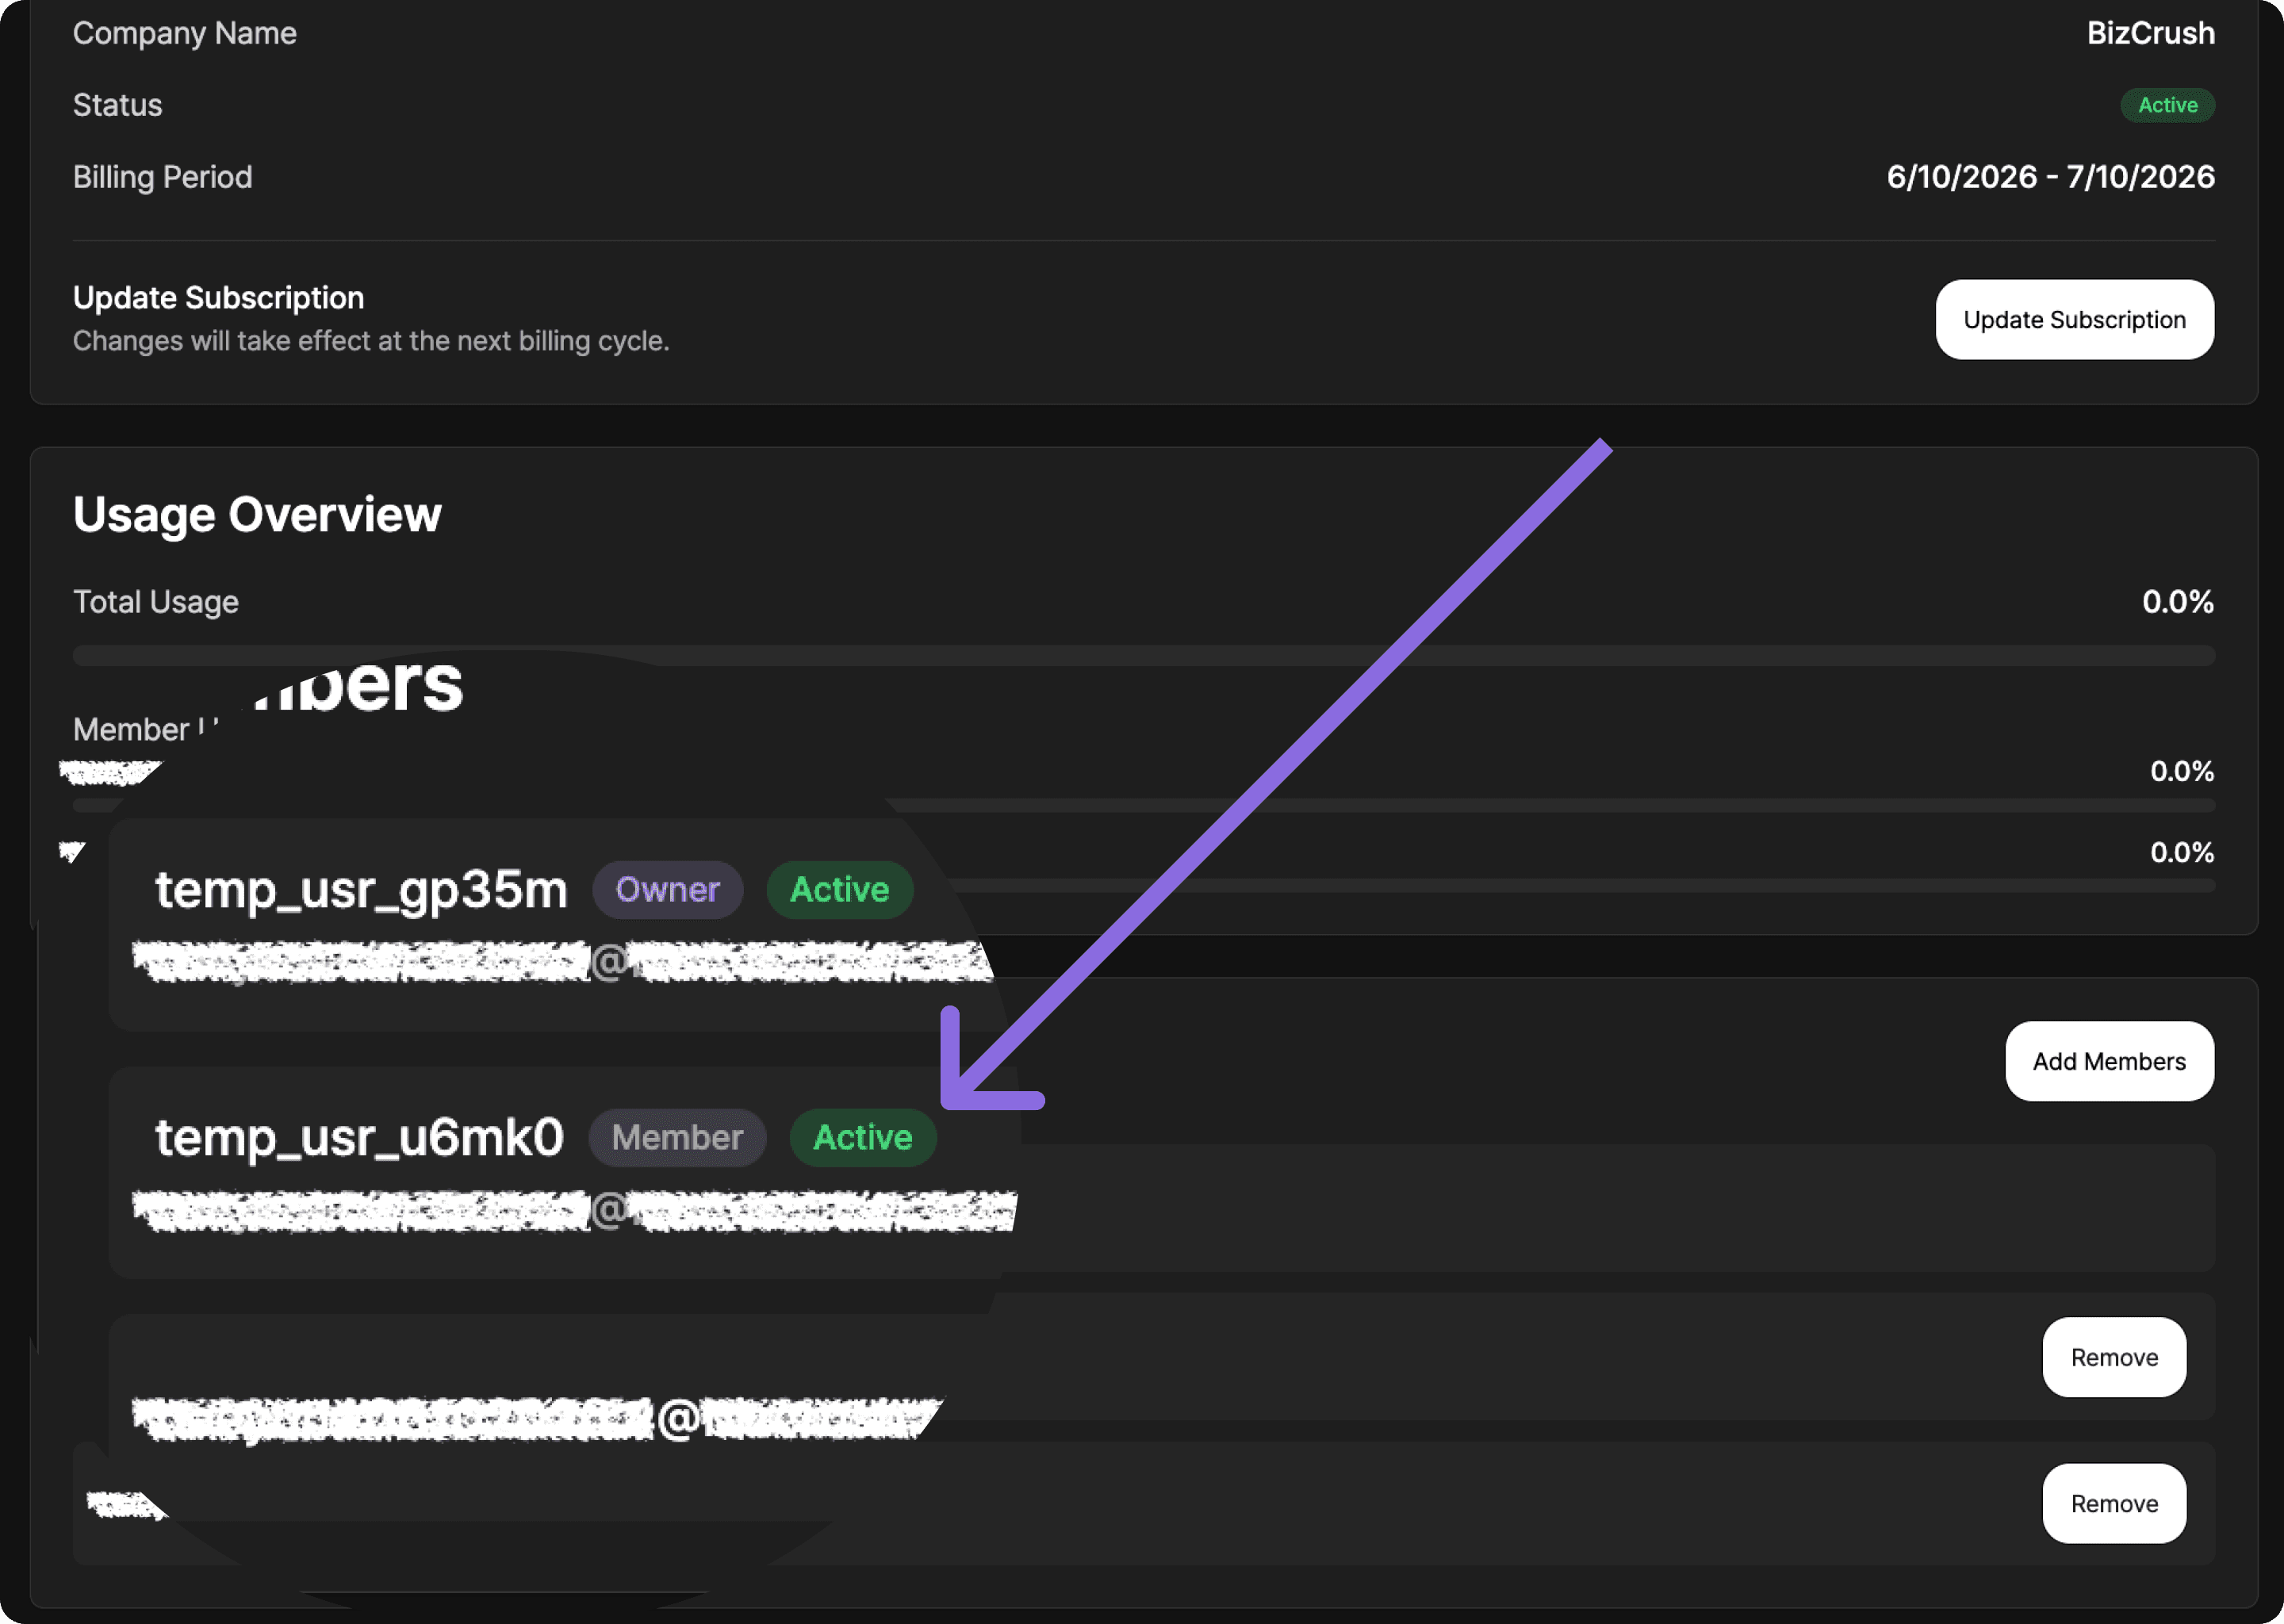
6-3. Confirm that members were added
Once members are added, you will see a confirmation message saying that the members have been added.
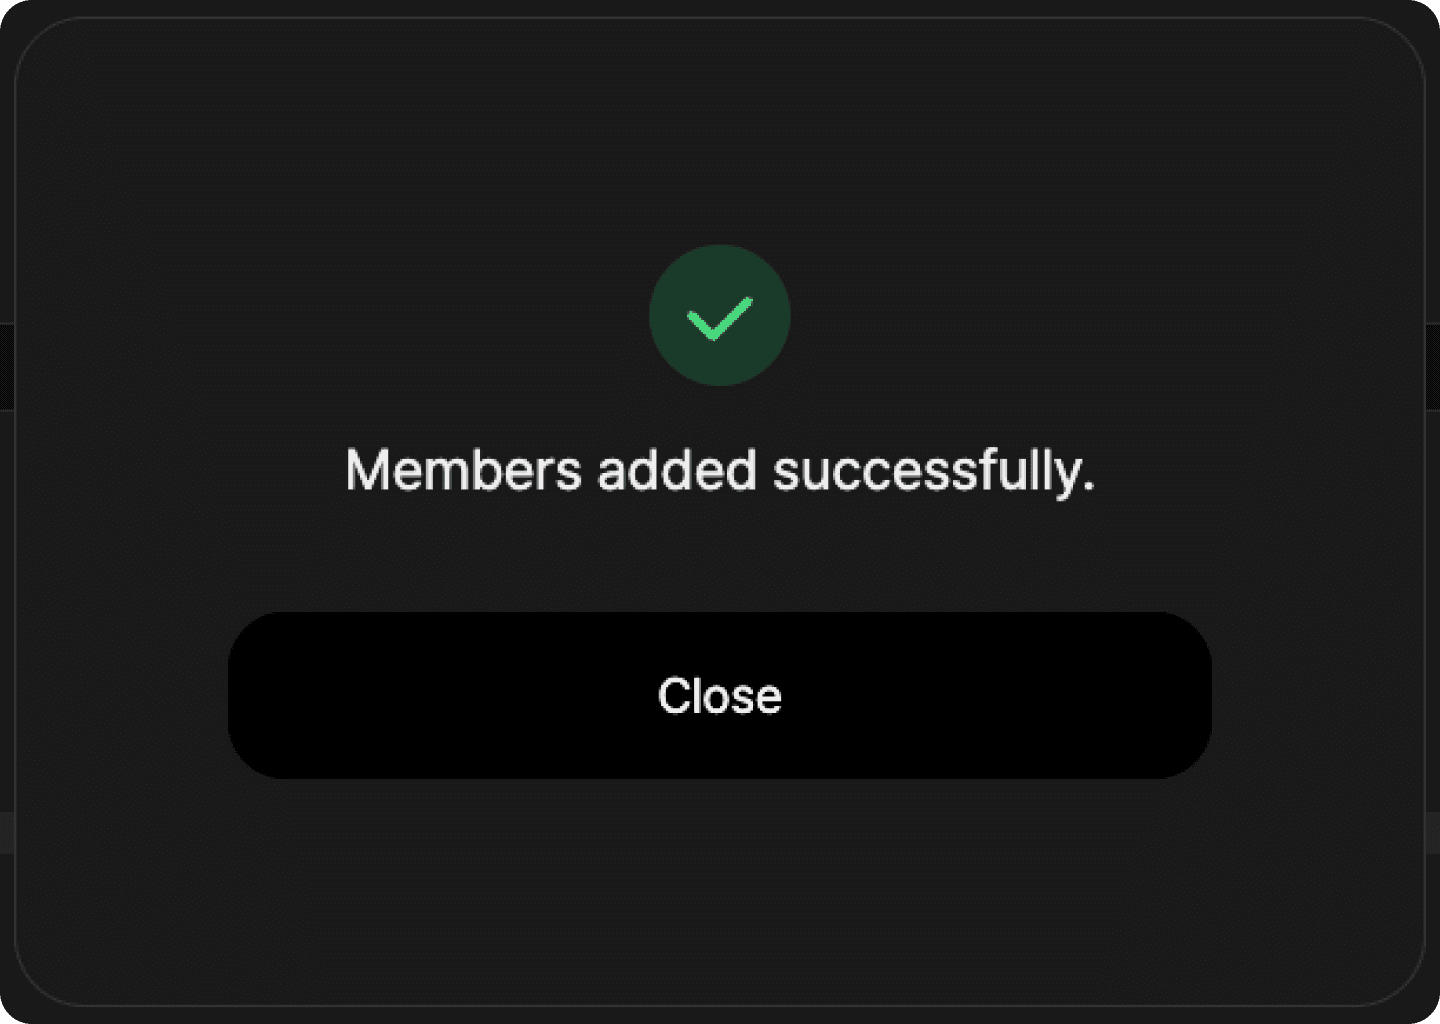
Close the message and check the member list to make sure the newly added team members appear.
Added members may appear with one of the following statuses:
Invited: The team member has not accepted the invitation yet or has not logged in with that email address.
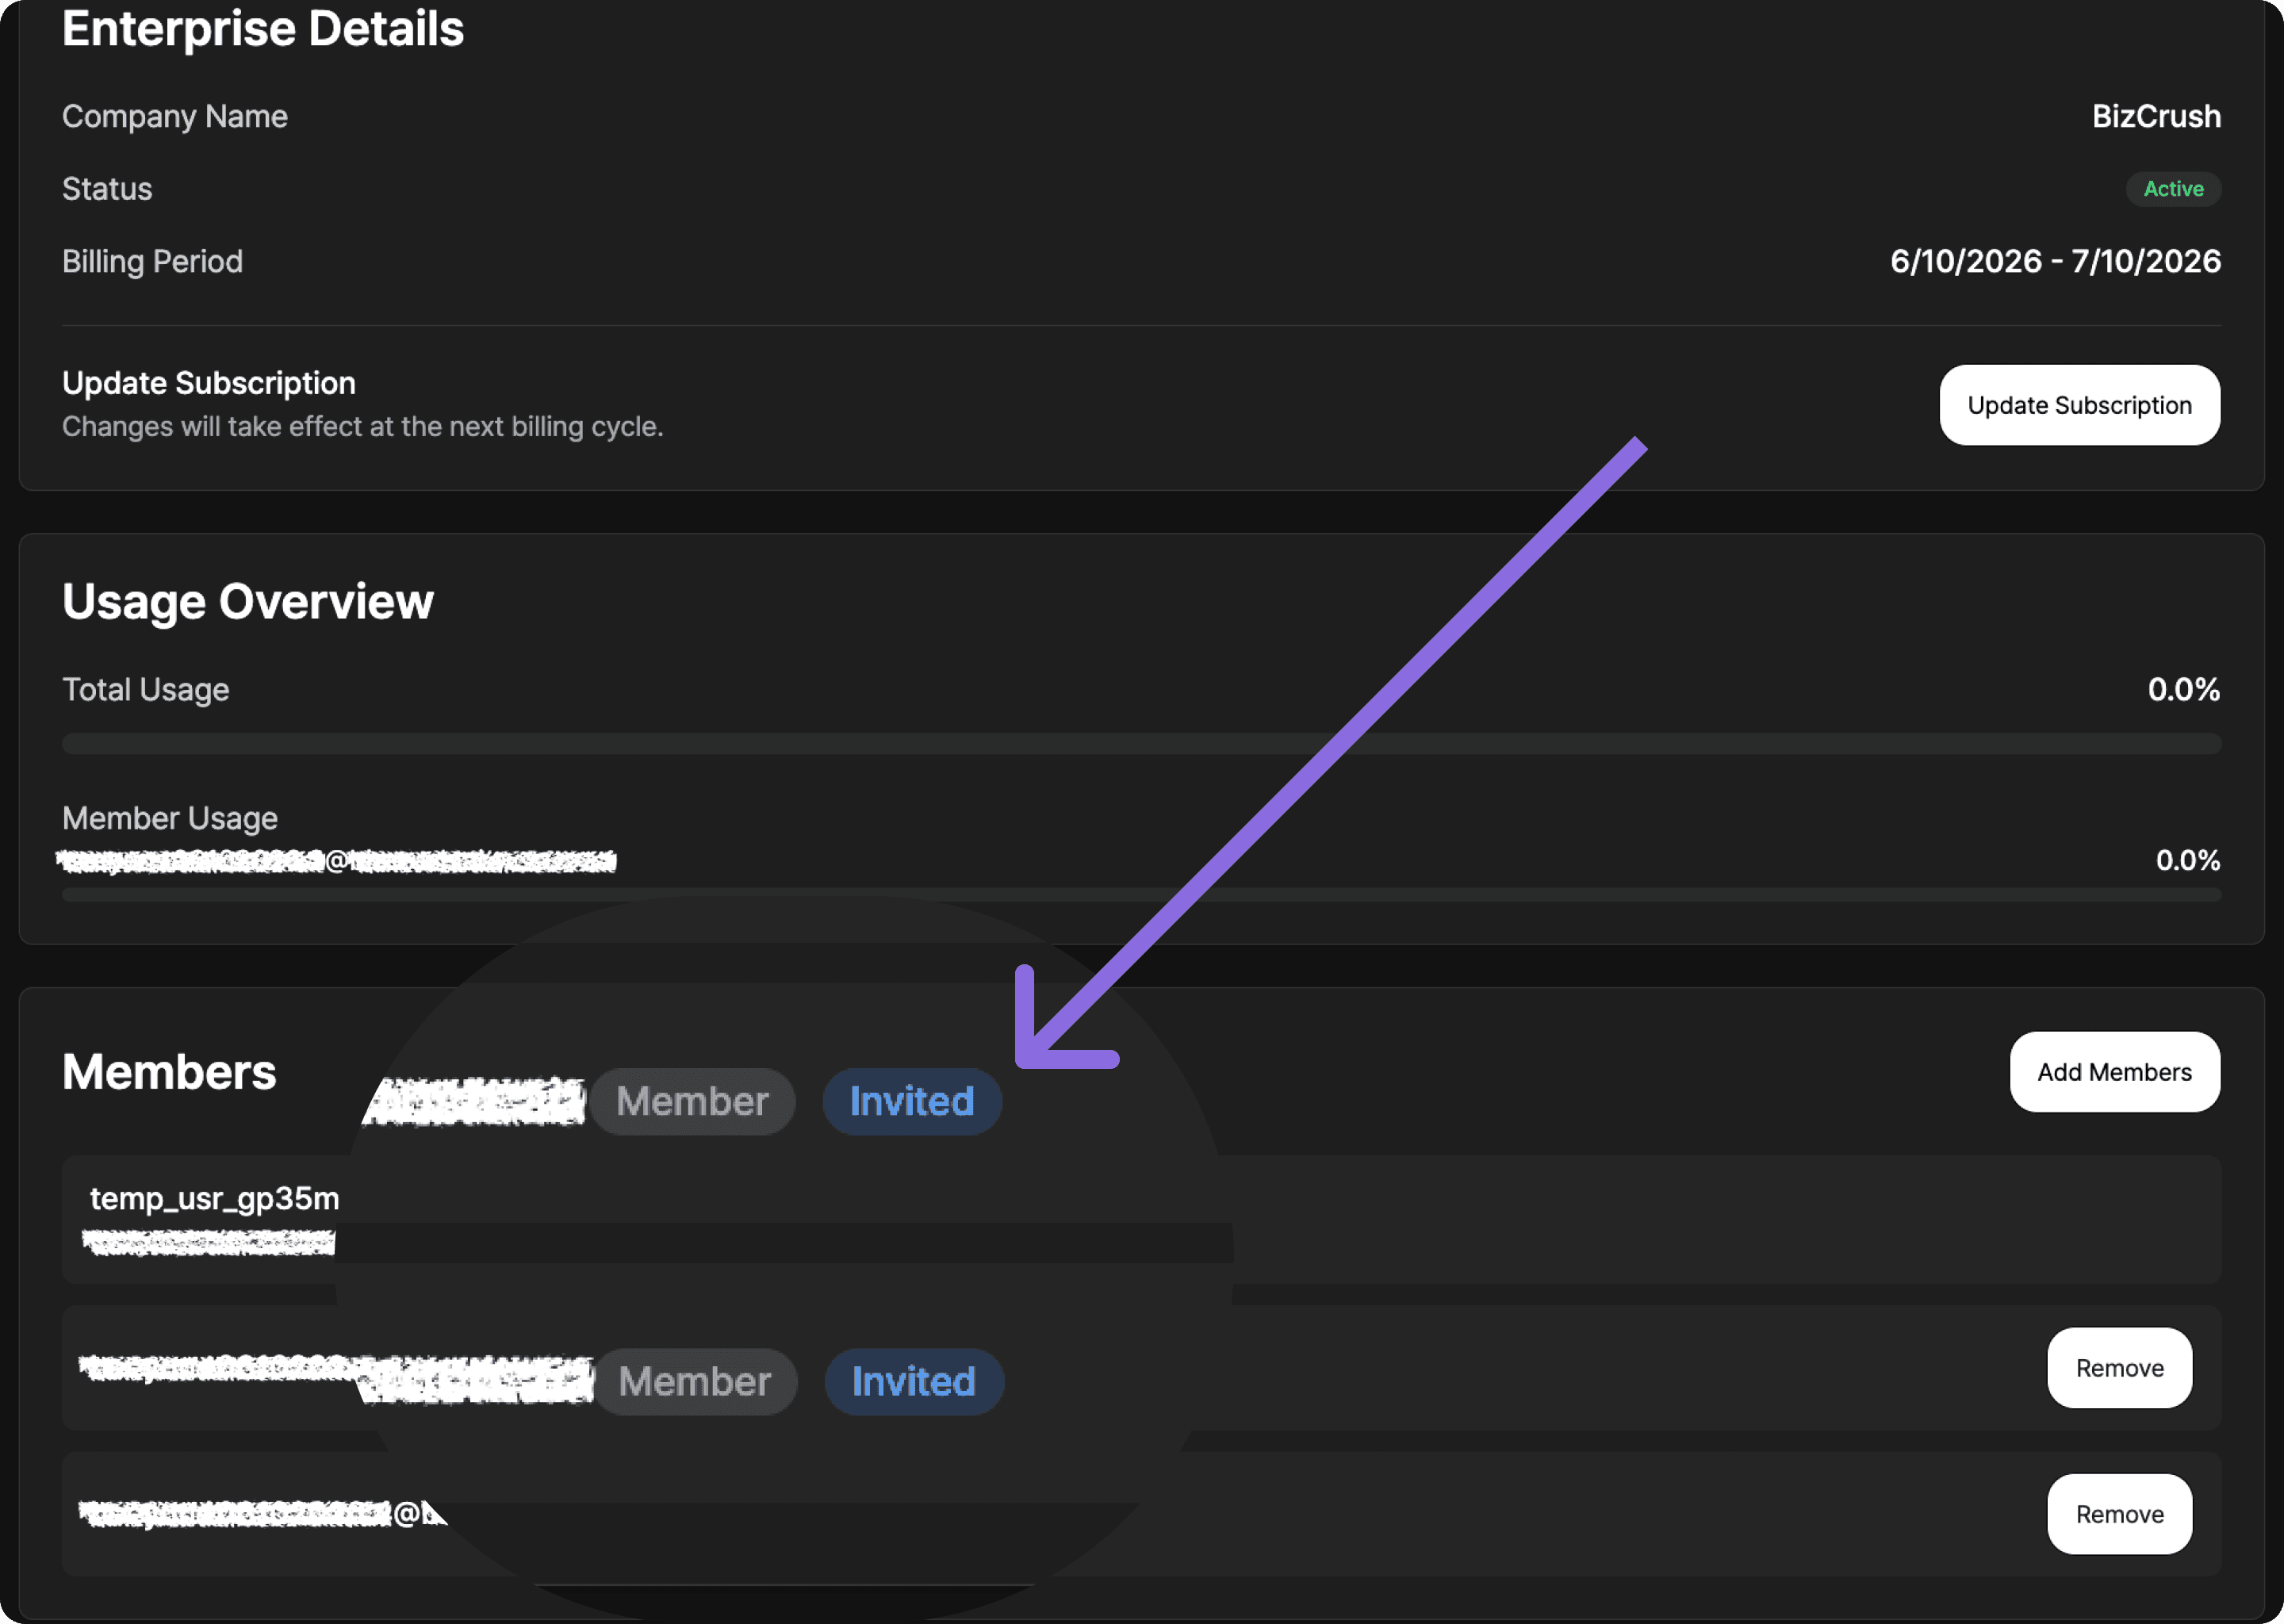
Active: The team member has logged in with that email address and is connected to the Enterprise group.
Important
When adding a team member, enter the email address they will actually use to log in to BizCrush. If the email address entered by the admin is different from the email address the team member uses, the account may not connect to the Enterprise group correctly.
7. Remove team members
If a team member no longer needs access to the Enterprise plan, the admin can remove them from the team.
When a team member is removed, they will no longer be able to use the Enterprise group’s shared usage.
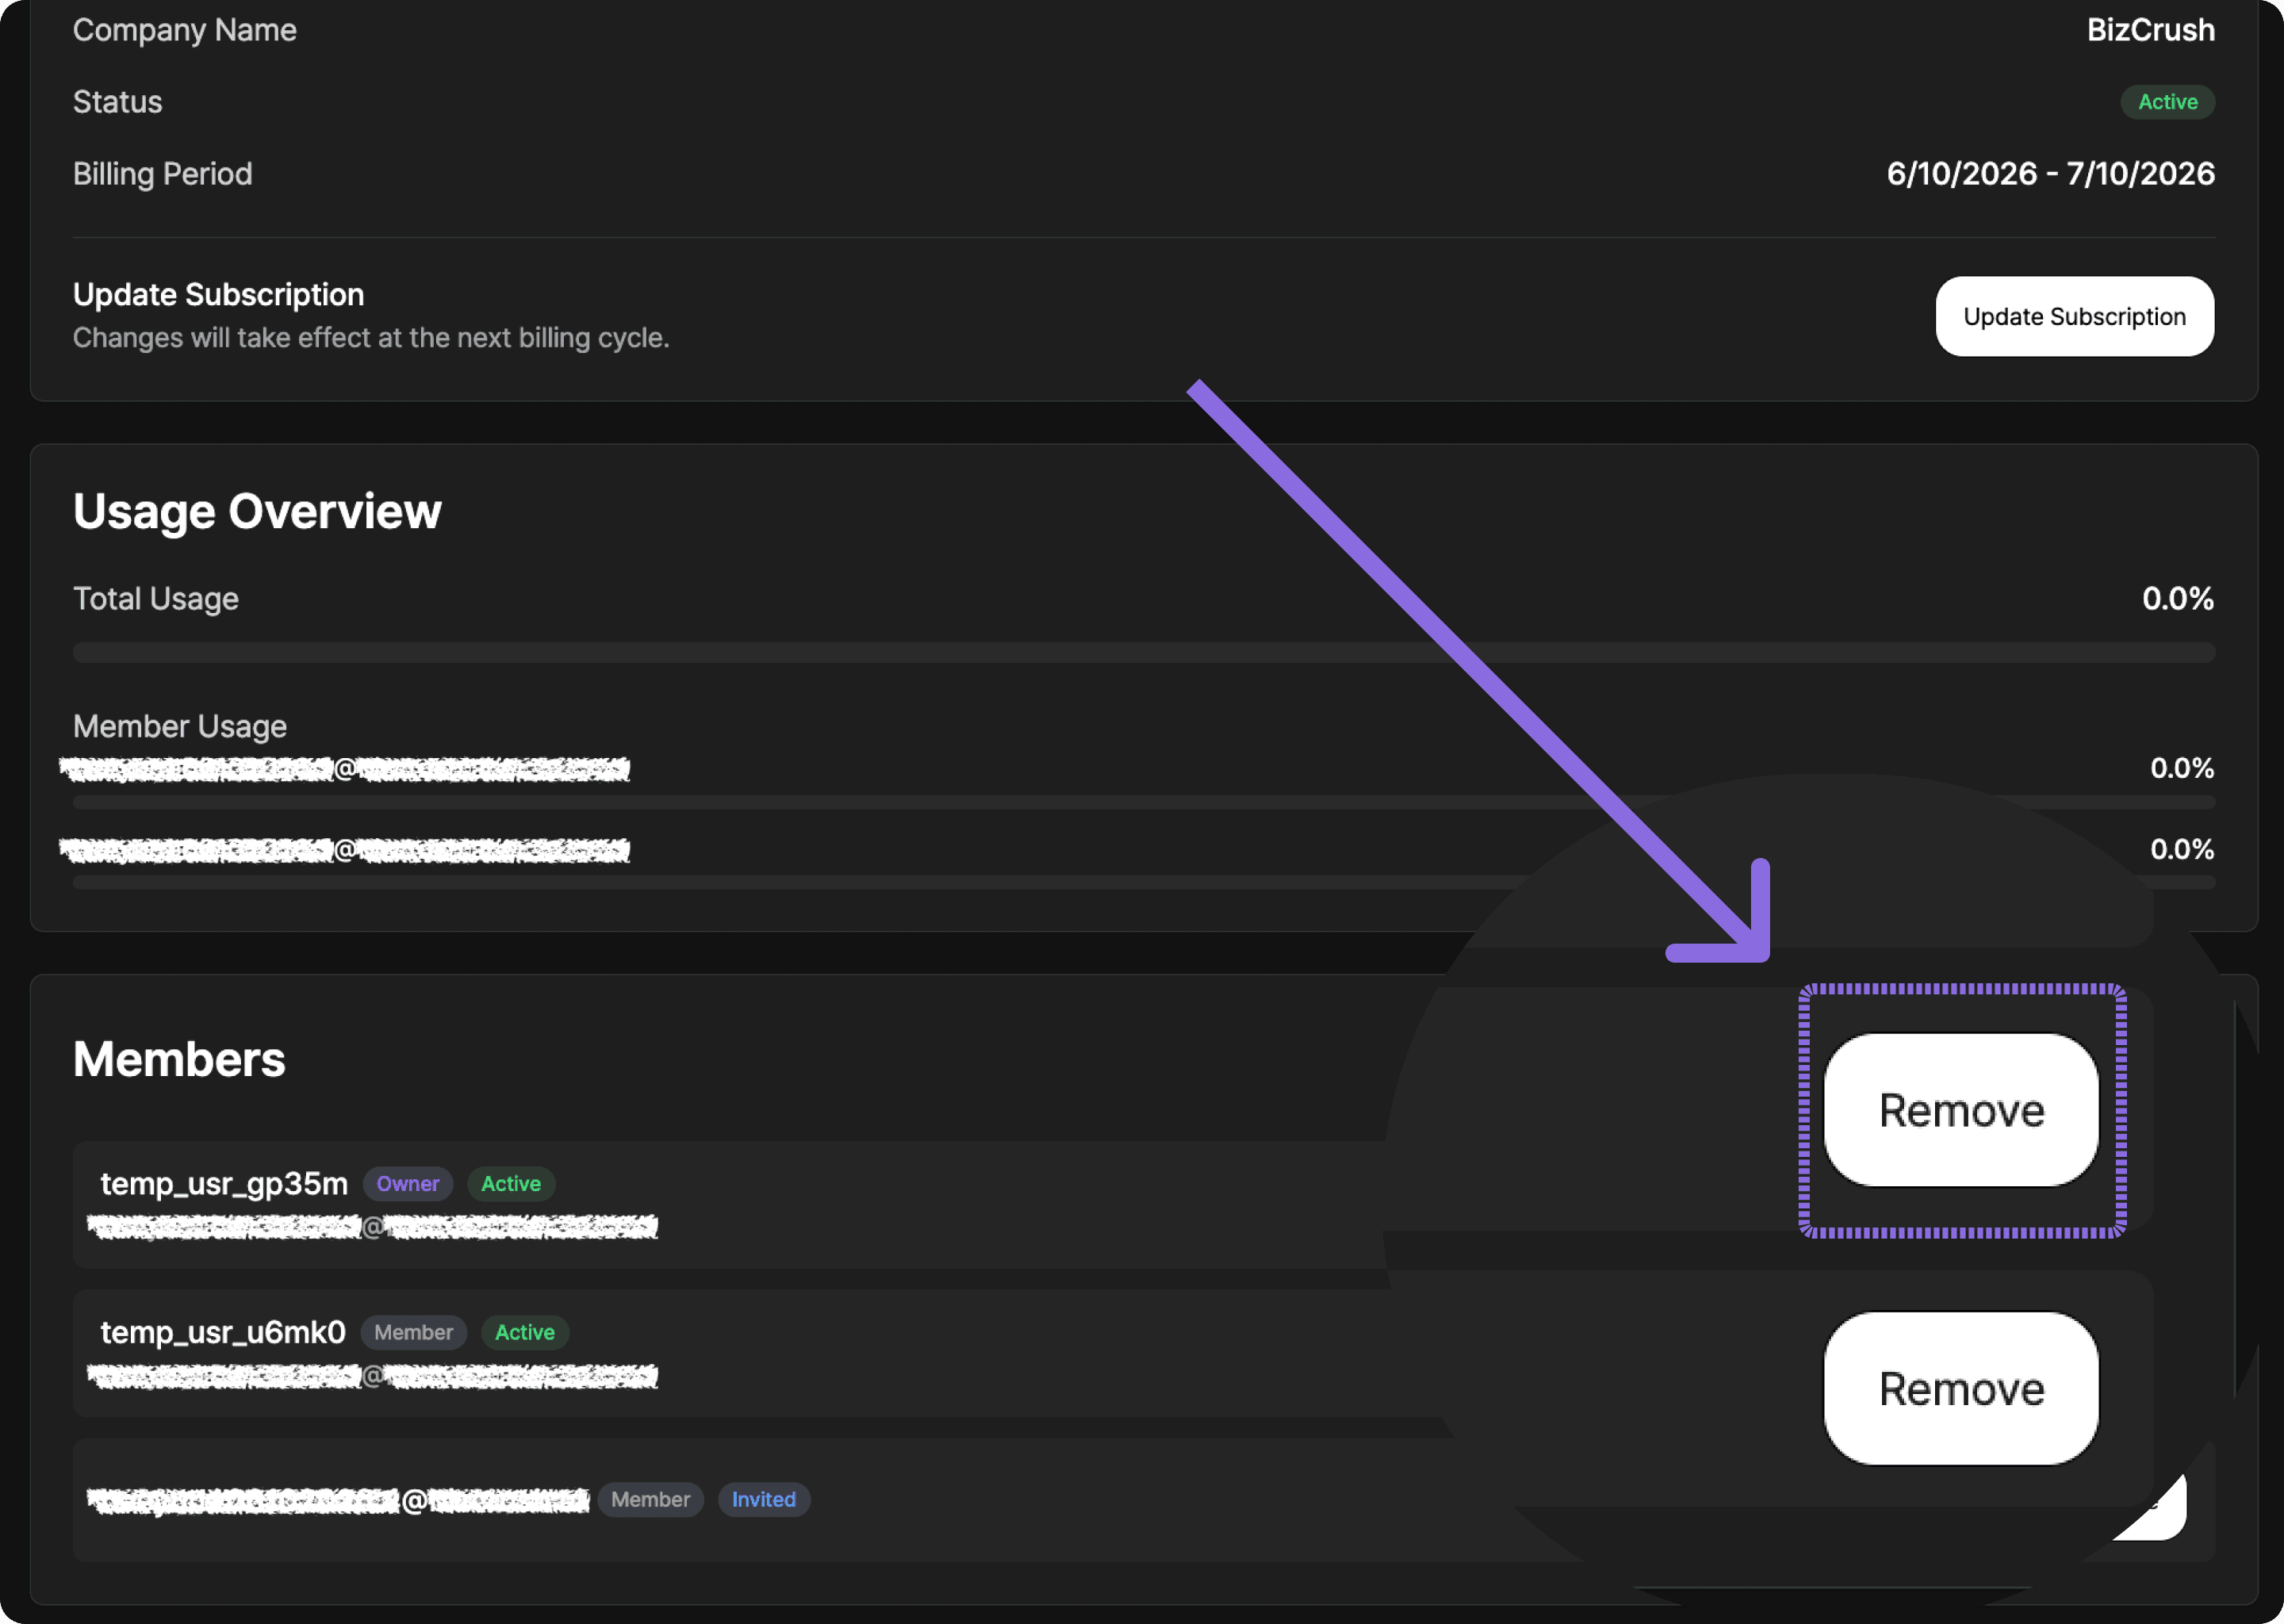
7-1. Find the team member you want to remove
On the Payment & Billing page, go to the member list and find the team member you want to remove.
Before deleting a member, double-check their email address and username.
Click the Remove button on the right side of the member you want to remove.
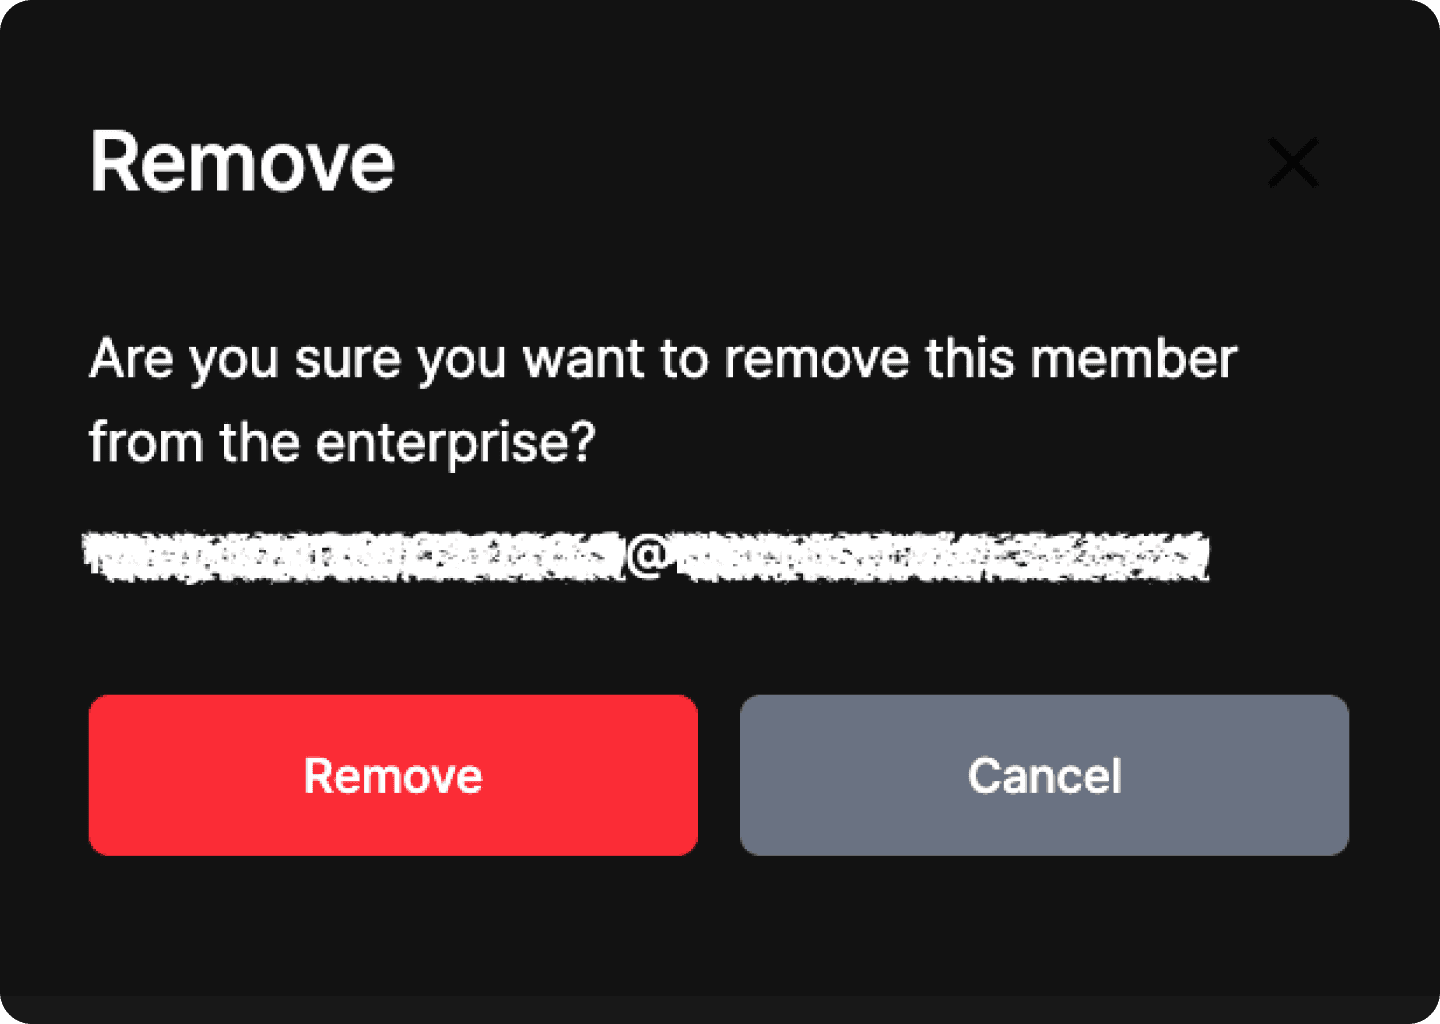
7-2. Confirm deletion
When the confirmation window opens, check that you are removing the correct team member, then click Remove.
Once deletion is complete, the team member will be removed from the Enterprise member list.
Important
Removed members cannot use the Enterprise group’s shared usage. If you remove someone by mistake, you can add them again using the Add member feature.
8. What to do if a team member already has an individual paid plan
If a team member is already using an individual Basic or Pro Plan and needs to move to the Enterprise plan, check their current subscription status first.
Keeping both an individual subscription and Enterprise access active at the same time may result in duplicate billing.
This is especially important if the team member subscribed through the Apple App Store or Google Play Store. In that case, they may need to cancel their existing subscription directly through the relevant store’s subscription management page.
Recommended steps:
Check the team member’s current individual subscription status.
Confirm whether the subscription was purchased on the web, through the App Store, or through Google Play.
Cancel the existing individual subscription if needed.
Confirm that the account switches to the Free Plan after the current billing cycle ends.
Have the admin add that same email address as an Enterprise team member.
If you are not sure whether the existing subscription should be kept or canceled before moving to Enterprise, contact your BizCrush representative.
Important
Individual Basic or Pro Plans do not include team-wide shared usage or member management. To use BizCrush as a team, users must log in with the email address added to the Enterprise plan.
FAQ
Can I purchase an Enterprise plan directly from the pricing page?
No. The Enterprise plan is configured after you discuss your usage terms with the BizCrush sales team.
Once setup is complete, you can review the price and payment button on the Billing page of the configured admin account.
Why can’t I see the payment button?
First, check whether you are logged in with the email address that was set as the admin account.
If you are logged in with a different email address, the payment button may not appear.
If you are using the correct admin account but still cannot see the button, contact your BizCrush representative.
What should I do if the plan details look different from what we discussed?
Do not proceed with payment.
Enterprise plans are configured based on the terms agreed in advance. If the plan details do not look correct, contact your BizCrush representative before completing payment.
Do team members need to pay separately?
No. Team members do not need to purchase separate individual subscriptions.
Once the admin adds their email addresses to the Enterprise plan, team members can log in with those same email addresses and connect to the Enterprise group.
The email address added by the admin must match the email address the team member actually uses to log in.
Can I share usage with my team by purchasing an individual Basic or Pro Plan?
No. Shared usage and member management are only available through the Enterprise plan.
To use BizCrush as a team, discuss your plan with the BizCrush sales team and complete payment using the Enterprise payment button configured in the admin account.
Need help?
If you need help with Enterprise payment or team member management, contact us anytime at:

BizCrush
Growth
June 12, 2026
5
min

Product
Introducing the BizCrush STT Benchmark
BizCrush compares speech-to-text services using real apps, real audio, and transparent results.
Comparing speech-to-text accuracy through actual app workflows
“Which STT service is more accurate?”
It sounds like a simple question, but the answer often depends on the audio, environment, app behavior, and post-processing. Different users experience different conditions, which makes it difficult to compare speech-to-text services based on impressions alone.
BizCrush built this benchmark to make STT results easier to compare under the same conditions.
Instead of testing only recognition engine APIs, the BizCrush Benchmark runs the actual apps users interact with. The same audio is played through the same input path, and the transcripts produced by each app are compared against a reference transcript.
We publish not only the scores, but also the source audio, reference transcript, app-generated transcript, and error analysis so readers can inspect the results directly on the benchmark page.
June 12, 2026. Please visit the benchmark page for the latest results.
Why we built it
Many speech-to-text services highlight high accuracy.
But it is often difficult to compare how accurate they are, where they perform well, and where they struggle under the same conditions. In quiet office environments, most services perform reasonably well. The harder cases are the ones users often face in practice: multiple people speaking, background noise, overlapping speech, or speakers at different distances.
BizCrush created this benchmark to compare how STT services perform in these more realistic conditions.
BizCrush is also included in the benchmark. That is why we publish more than just the final score. We also provide the reference transcript, app output, scoring method, and known limitations. When a benchmark includes the company that built it, the results need to be easy to inspect.
What makes this benchmark different?
Most STT benchmarks test recognition engines by calling their APIs directly. That approach is useful for evaluating engine-level performance.
But many users do not experience the engine directly. They experience the full app built around it. Meeting note apps and transcription services often add their own audio handling, noise reduction, formatting, and post-processing on top of the recognition engine. As a result, API performance and the transcript users actually see in the app can differ.
The BizCrush Benchmark is designed to test that app-level path.
We play the reference audio, run the actual STT app in an Android emulator, send the audio through the microphone input path, and collect the transcript generated by the app. That transcript is then compared against the reference transcript.
This does not reproduce every possible real-world variable. Device type, physical microphone quality, room acoustics, network conditions, and app versions can all affect results. What this benchmark provides is a same-condition comparison: the same audio, the same input method, and the same scoring criteria across services.
How the test works
The test follows these steps:
Launch each target app, including BizCrush, and start recording.
Send the reference audio through the microphone input path.
Collect the real-time transcript generated by the app.
Save the final result after playback ends.
Compare the app transcript with the reference transcript and calculate WER or CER.
Review the result manually to separate formatting differences from actual recognition errors before publishing.
All test results go through human review before publication. This review is not used to arbitrarily adjust scores. It is used to check whether differences such as casing, punctuation, spacing, number formatting, or unit formatting were incorrectly counted as recognition errors during automated scoring.
Real-time and post-processed transcripts are reported separately
Many services revise transcripts after recording ends. They may add punctuation, clean up sentence structure, or correct words that were initially recognized incorrectly.
This post-processing can improve the user experience. However, the transcript users see during a live meeting and the transcript they receive after recording ends should be evaluated separately.
That is why BizCrush measures two types of output.
Real-time transcript
This measures what users actually see on screen during a meeting or live recording.
Post-processed transcript
This measures the final transcript after post-processing has been applied.
When a service provides both results, we publish them separately. This makes it easier to see how much post-processing changes the final output. Post-processed results for meeting note and note-taking services are being added gradually.
How scores are calculated
Scores are calculated using WER, or Word Error Rate, and CER, or Character Error Rate. For both metrics, lower numbers indicate higher accuracy.
WER measures the rate of changed, missing, or added words compared with the reference transcript. CER applies the same idea at the character level.
Errors are classified into four categories:
Substitution: a spoken word is recognized as a different word
Deletion: a spoken word is missed
Insertion: a word that was not spoken is added
Correct: the word is recognized correctly
For example, if the reference transcript is:
We have a meeting tomorrow at three.
and the app transcript is:
We have a meeting tomorrow at four.
then “three” has been recognized as “four,” which counts as one substitution error.
In real transcripts, however, there may be differences that are not directly related to speech recognition accuracy. These include casing, punctuation, spacing, number formatting, currency formatting, and unit formatting. For languages where spacing, segmentation, or writing conventions can vary, CER can also provide an additional view alongside WER.
Because these formatting differences can be counted as errors by automated scoring, BizCrush reviews the results after automatic calculation to distinguish formatting differences from actual recognition errors.
The same criteria are applied across all test results. They are not applied selectively to a specific language or service.
Why noisy environments matter
In quiet environments, most services produce strong results. But when there is background noise or when multiple people speak at the same time, the differences between services become much more visible.
That difference matters in real usage.
Meeting rooms, conference halls, cafés, trade shows, lectures, customer interviews, and networking events are rarely silent. A speaker may be far from the microphone. Several people may react at once. Other conversations and background sounds may be present.
The BizCrush Benchmark reflects these conditions by publishing results across different noise conditions. The most important point is not a single score in isolation, but how each service performs with the same audio, the same input path, and the same scoring criteria.
The latest results are available on the benchmark page.
Separating formatting differences from recognition errors
To evaluate speech recognition performance more accurately, formatting differences are separated from actual recognition errors whenever possible.
For example, the following differences are not counted as errors when the meaning is the same:
Casing differences
Punctuation differences
HTML entities
Currency formatting
Percentage formatting
Number formatting
Spacing differences
Different spellings that preserve the same pronunciation and meaning
These cases are reviewed manually. If the difference is not considered an actual recognition error, it is treated as a match.
This process is not applied to favor any particular service. The same criteria are applied to all service results.
What data is published?
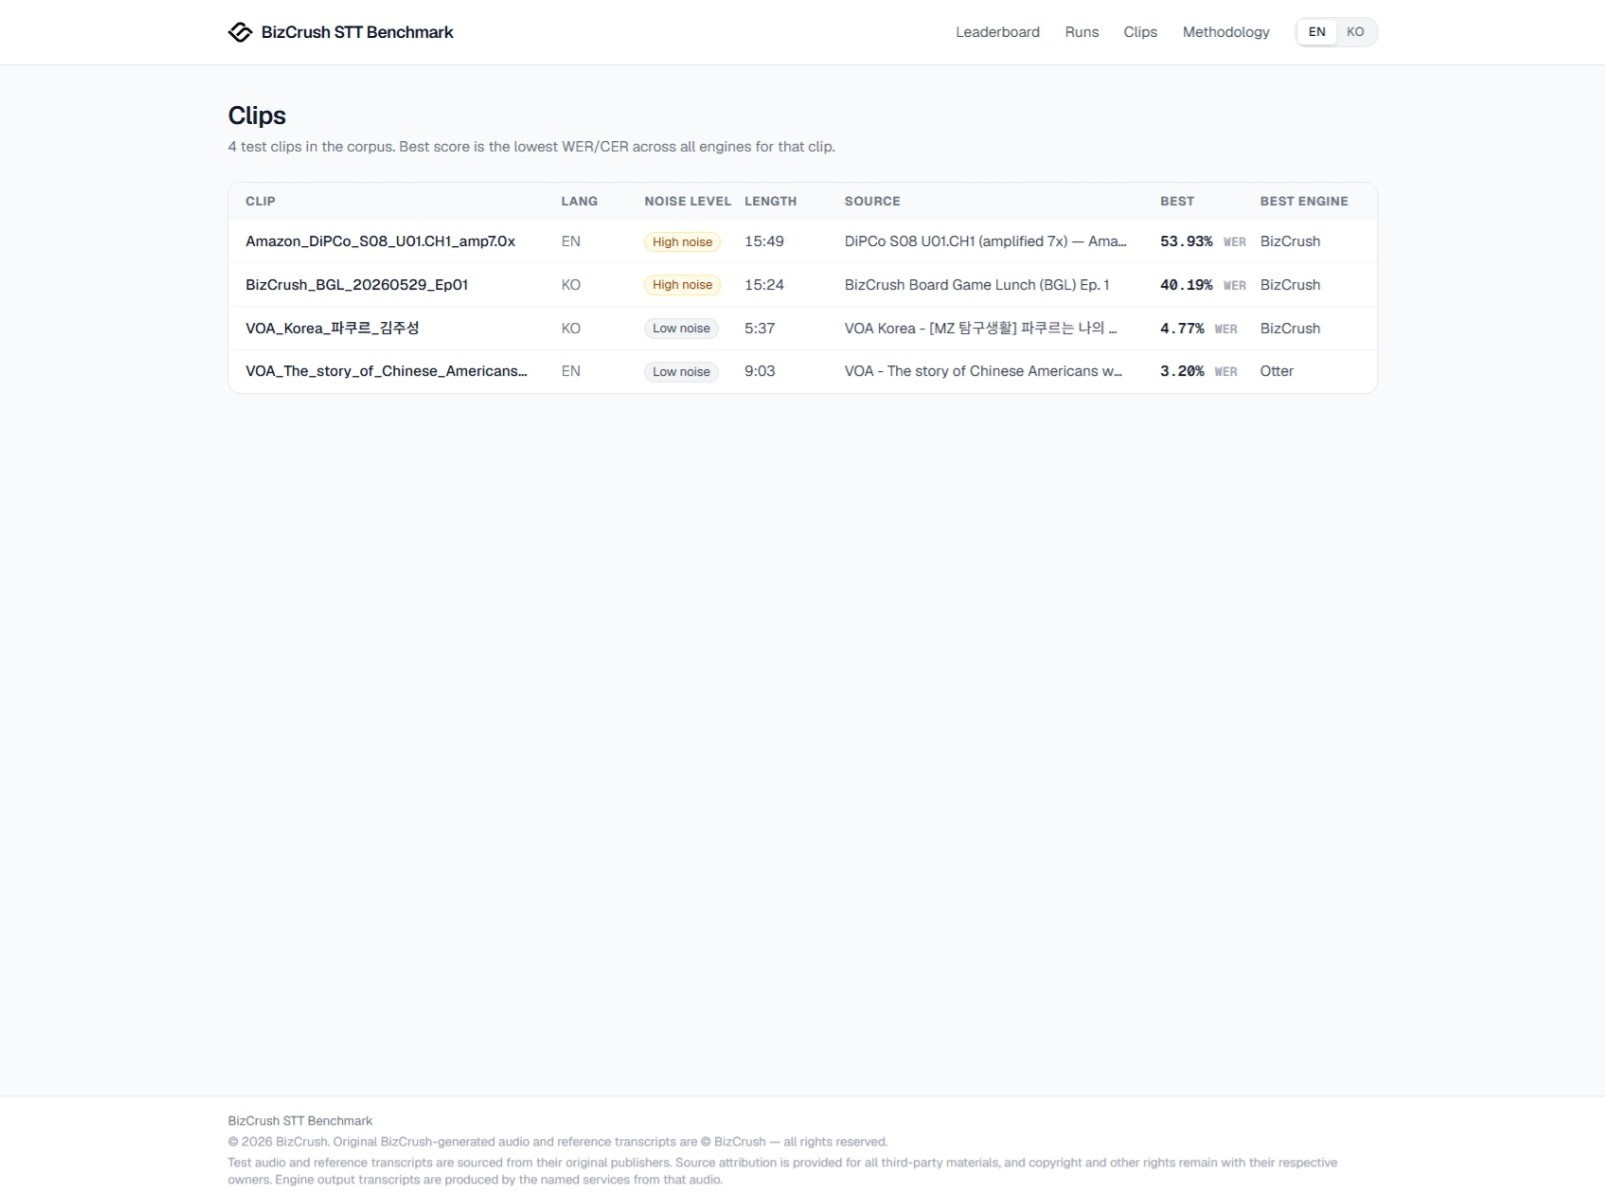
The current test set is built around audio that BizCrush has permission to use or that can be inspected publicly on the benchmark page.
Each test detail page includes:
Source audio
Reference transcript
App-generated transcript
Error analysis
WER/CER calculation results
Scoring and review criteria
Test data is added gradually after quality and licensing conditions are reviewed. The latest test list and results are available on the benchmark page.
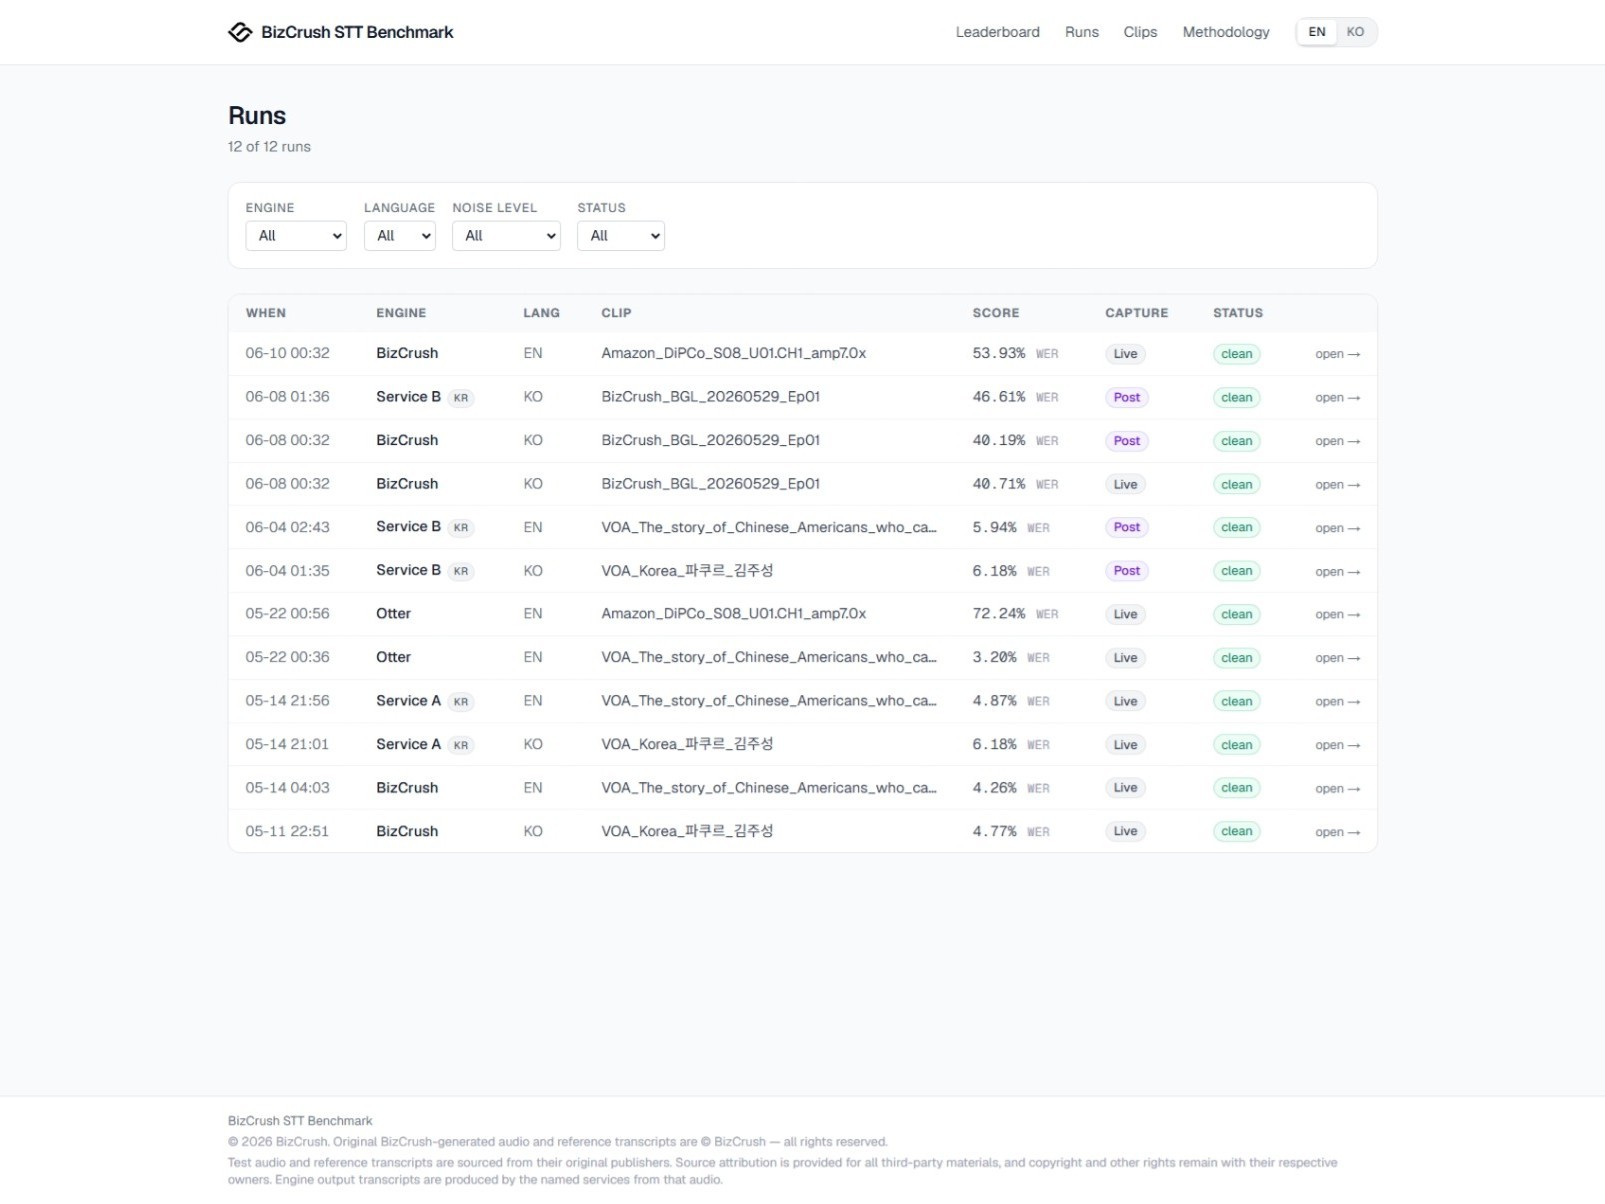
June 12, 2026. The runs page layout may change in future updates.
Transparency and usage limitations
All public tests include the source audio, reference transcript, app-generated transcript, error analysis, and WER/CER calculation results.
This allows readers to inspect the results directly on the page and recalculate them if needed.
Some comparison services may be anonymized when necessary. The purpose is not to identify or criticize specific vendors, but to compare actual outputs under the same conditions. Even when a service is anonymized, the same input, scoring criteria, and disclosure rules apply.
Source audio can be reviewed directly on each benchmark page. However, to prevent unauthorized saving, redistribution, or reuse, audio file downloads are not provided.
June 12, 2026. Please visit the benchmark page for the latest test list and results.
For third-party source audio, we provide links to the original materials where applicable. BizCrush-produced test data is made available for on-page verification only. Unauthorized saving, redistribution, or reuse is not permitted. If a school, research institution, company, or any external organization would like to use the data, please contact BizCrush for separate approval.
How to interpret the results
This benchmark does not represent every possible real-world environment. Actual results may vary depending on the device, microphone quality, network conditions, app version, speaker position, room acoustics, and type of background noise.
The BizCrush Benchmark should therefore be read as a same-condition comparison, not as a universal measure of performance in every environment.
A single score is not the whole story. It is also important to look at where errors occur, what type of errors they are, and how the app output compares with the source audio and reference transcript. That is why BizCrush publishes the score together with the audio, transcript, and error analysis.
What’s next
The current benchmark focuses on app-based testing. Going forward, we plan to add:
More diverse noise conditions
Direct API testing
More language coverage
Direct API testing will be added as a complementary view, not as a replacement for app-based testing. It will help show the difference between engine-level performance and the app experience users actually see.
We also plan to expand language coverage over time. However, each language requires reliable reference transcripts and a review process that can be applied consistently. Rather than adding languages for the sake of volume, we will expand in a way that keeps the data inspectable and reliable.
A useful benchmark starts with trustworthy data built over time. BizCrush will continue developing STT evaluation criteria that stay close to how people actually use transcription apps.
BizCrush
Growth
June 8, 2026
5
min

Usecase
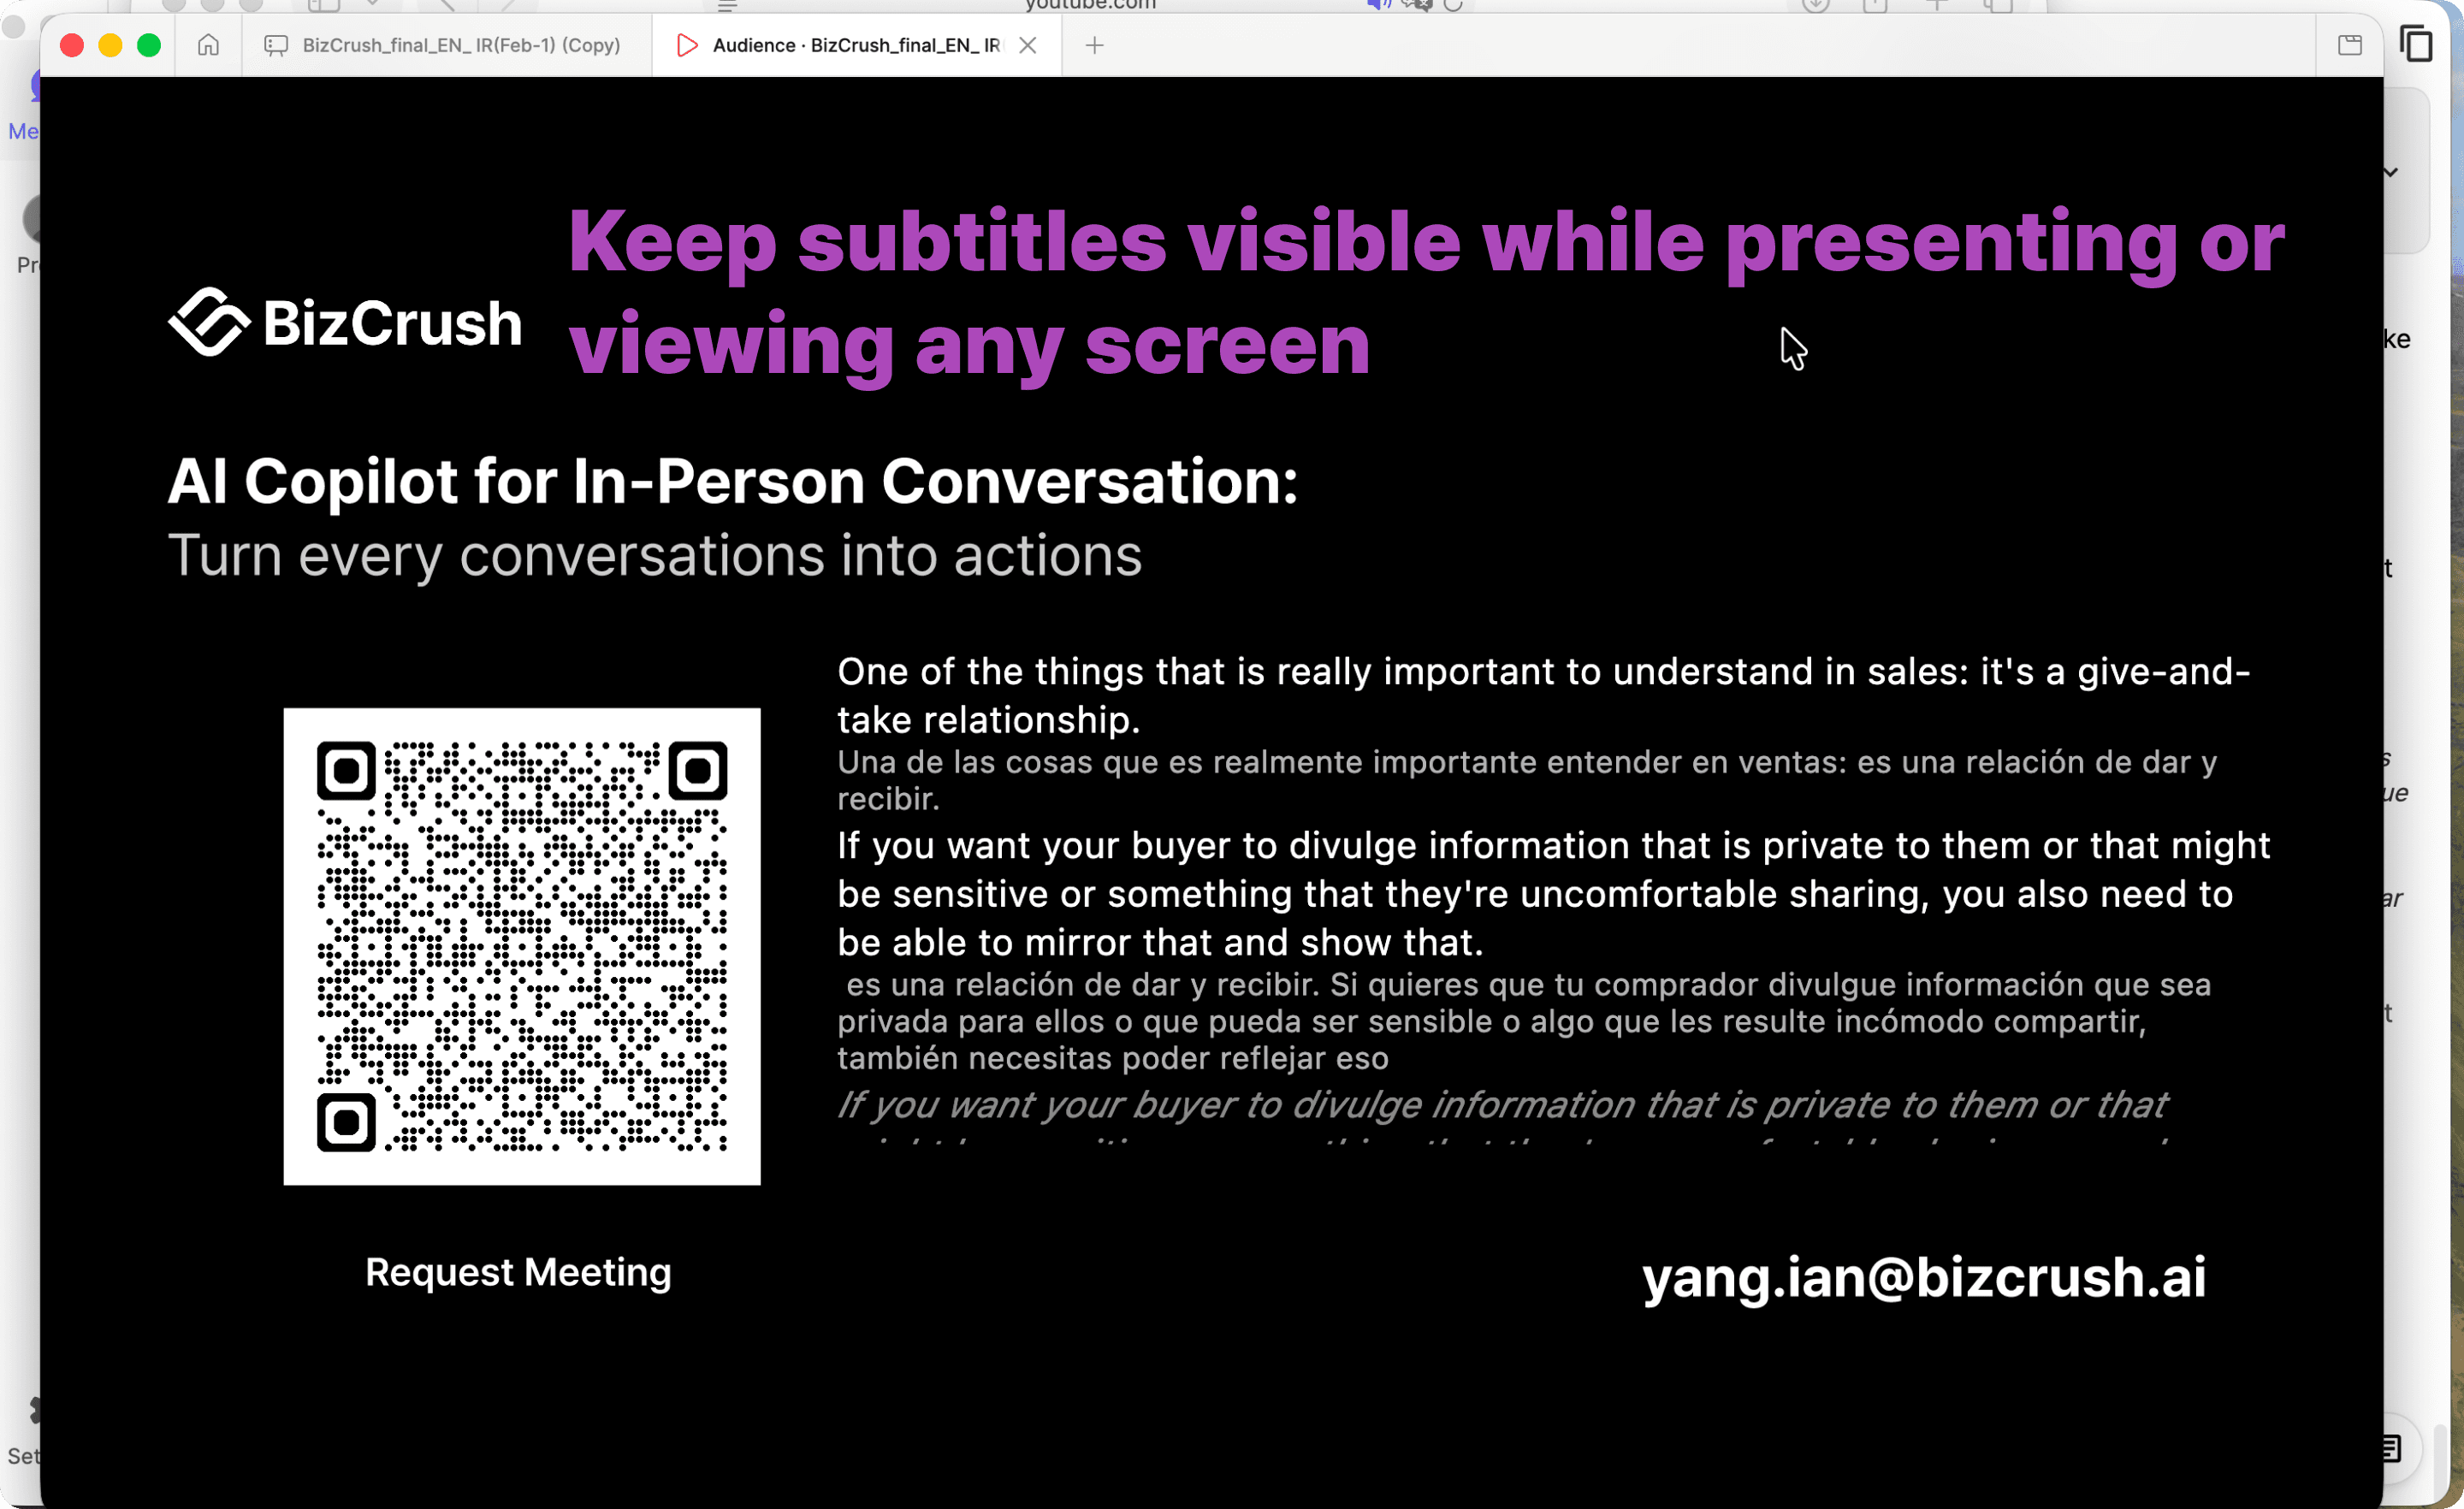
Turning a Korean Developer Conference into a Global Event with Real-Time AI Subtitles
At the Changbal Dev Conference, BizCrush provided real-time overlay subtitles, providing English captions for Korean presentations.
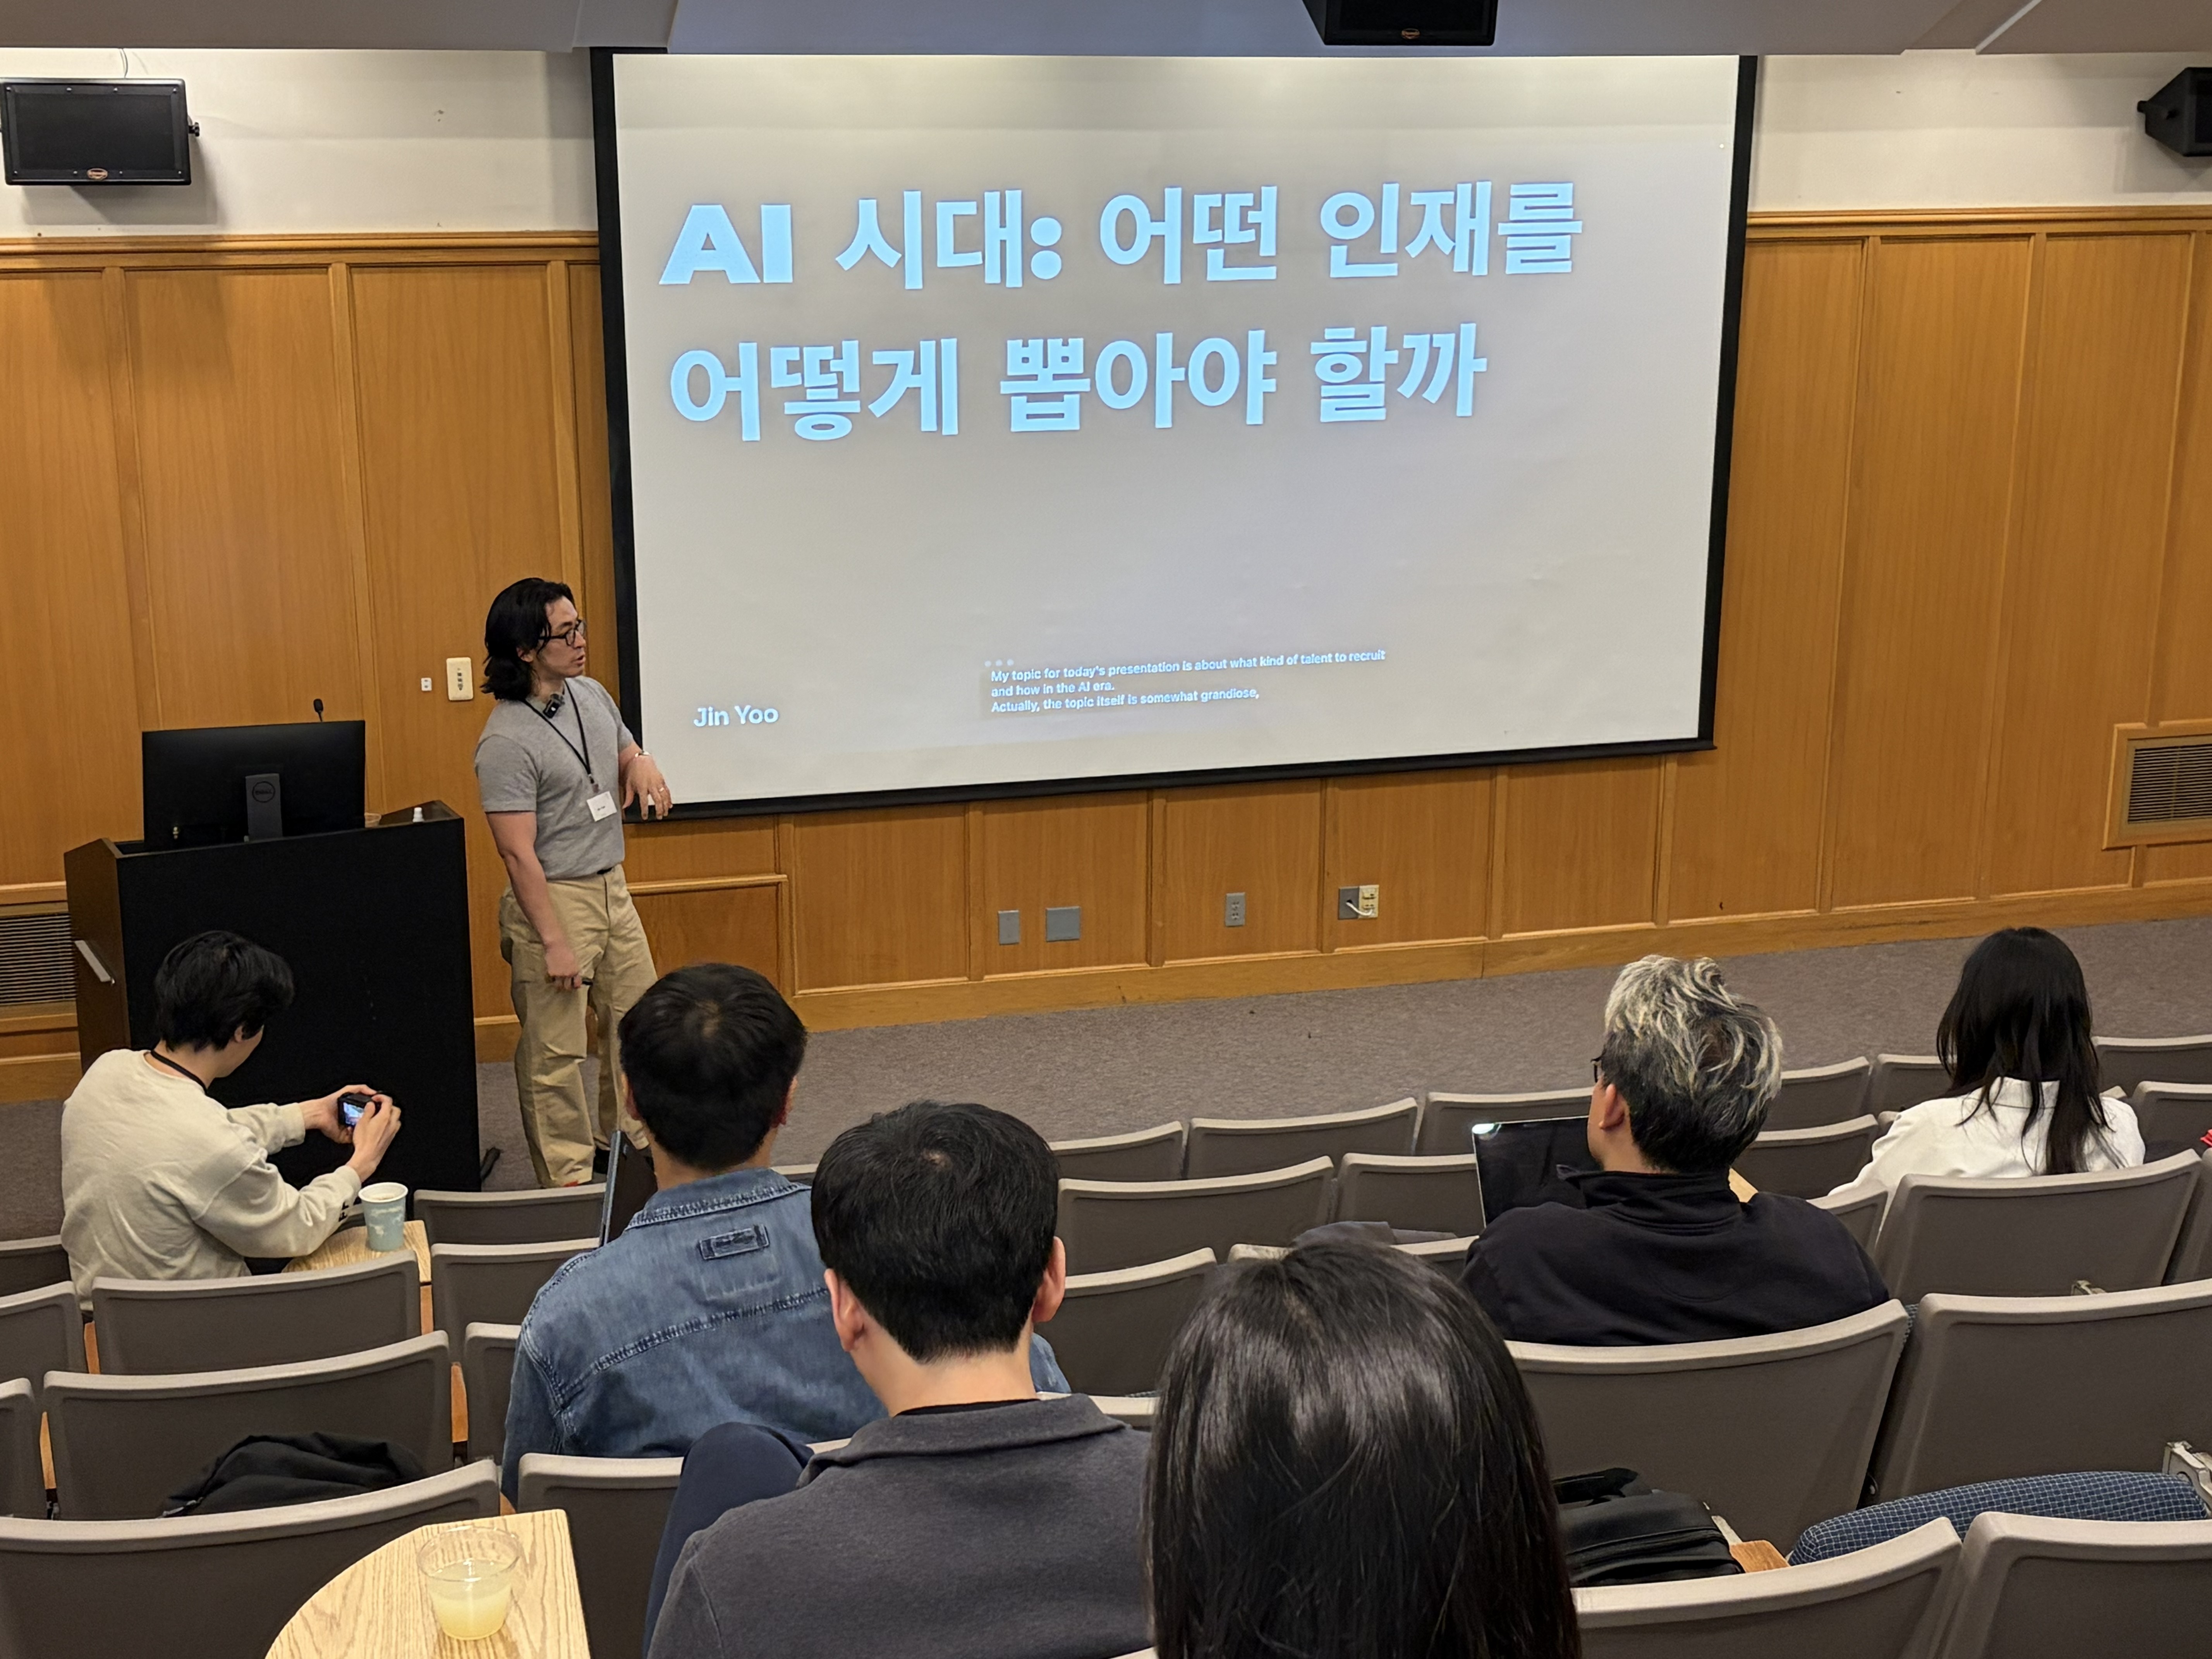
On May 16, the Seattle Changbal Dev Conference brought together developers, founders, researchers, and technology leaders for a full day of technical talks and networking.
The event featured eight presentations delivered primarily in Korean. However, nearly 30% of attendees were English speakers.
For the organizers, this created a familiar challenge:
How do you make technical content accessible to a multilingual audience without adding interpretation booths, expensive equipment, or a dedicated operations team?
At many conferences, solving this problem requires interpreters, specialized hardware, separate displays, and additional staff.
At Changbal Dev Conference, the solution was much simpler.
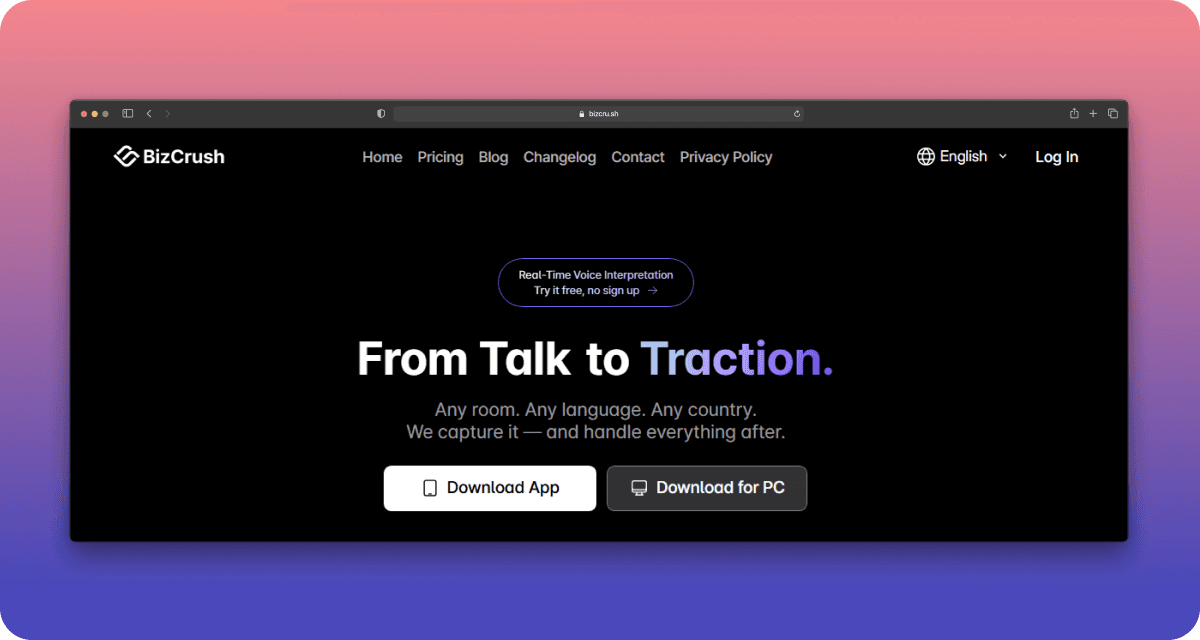
The entire event ran with real-time English subtitles using only the presenter’s MacBook and BizCrush.
Event at a Glance
8 Korean-language presentations
30% English-speaking attendees
1 MacBook running BizCrush
1 event operator
0 interpretation booths and dedicated subtitle staff
The result was a fully bilingual conference experience without changing the event's existing setup.
Why Real-Time Translation Is Difficult at Developer Conferences
Developer conferences create a unique challenge for real-time translation systems.
Unlike traditional business meetings, presentations often include:
Rapid speaker pacing
Technical terminology
Mixed Korean and English expressions
Code snippets and pseudocode
Product names and proper nouns
Live audience questions
Frequent topic switching
Many translation solutions struggle in these environments.
Common issues include:
Subtitle delays that disrupt the flow of the presentation
Incorrect translation of technical terms
Complex audio infrastructure requirements
Additional staffing needs
Attendee-side app installation requirements
The Changbal organizers wanted to create an experience where global attendees could follow every session without increasing operational complexity.
Running the Entire Event from One MacBook
BizCrush approached the problem differently.
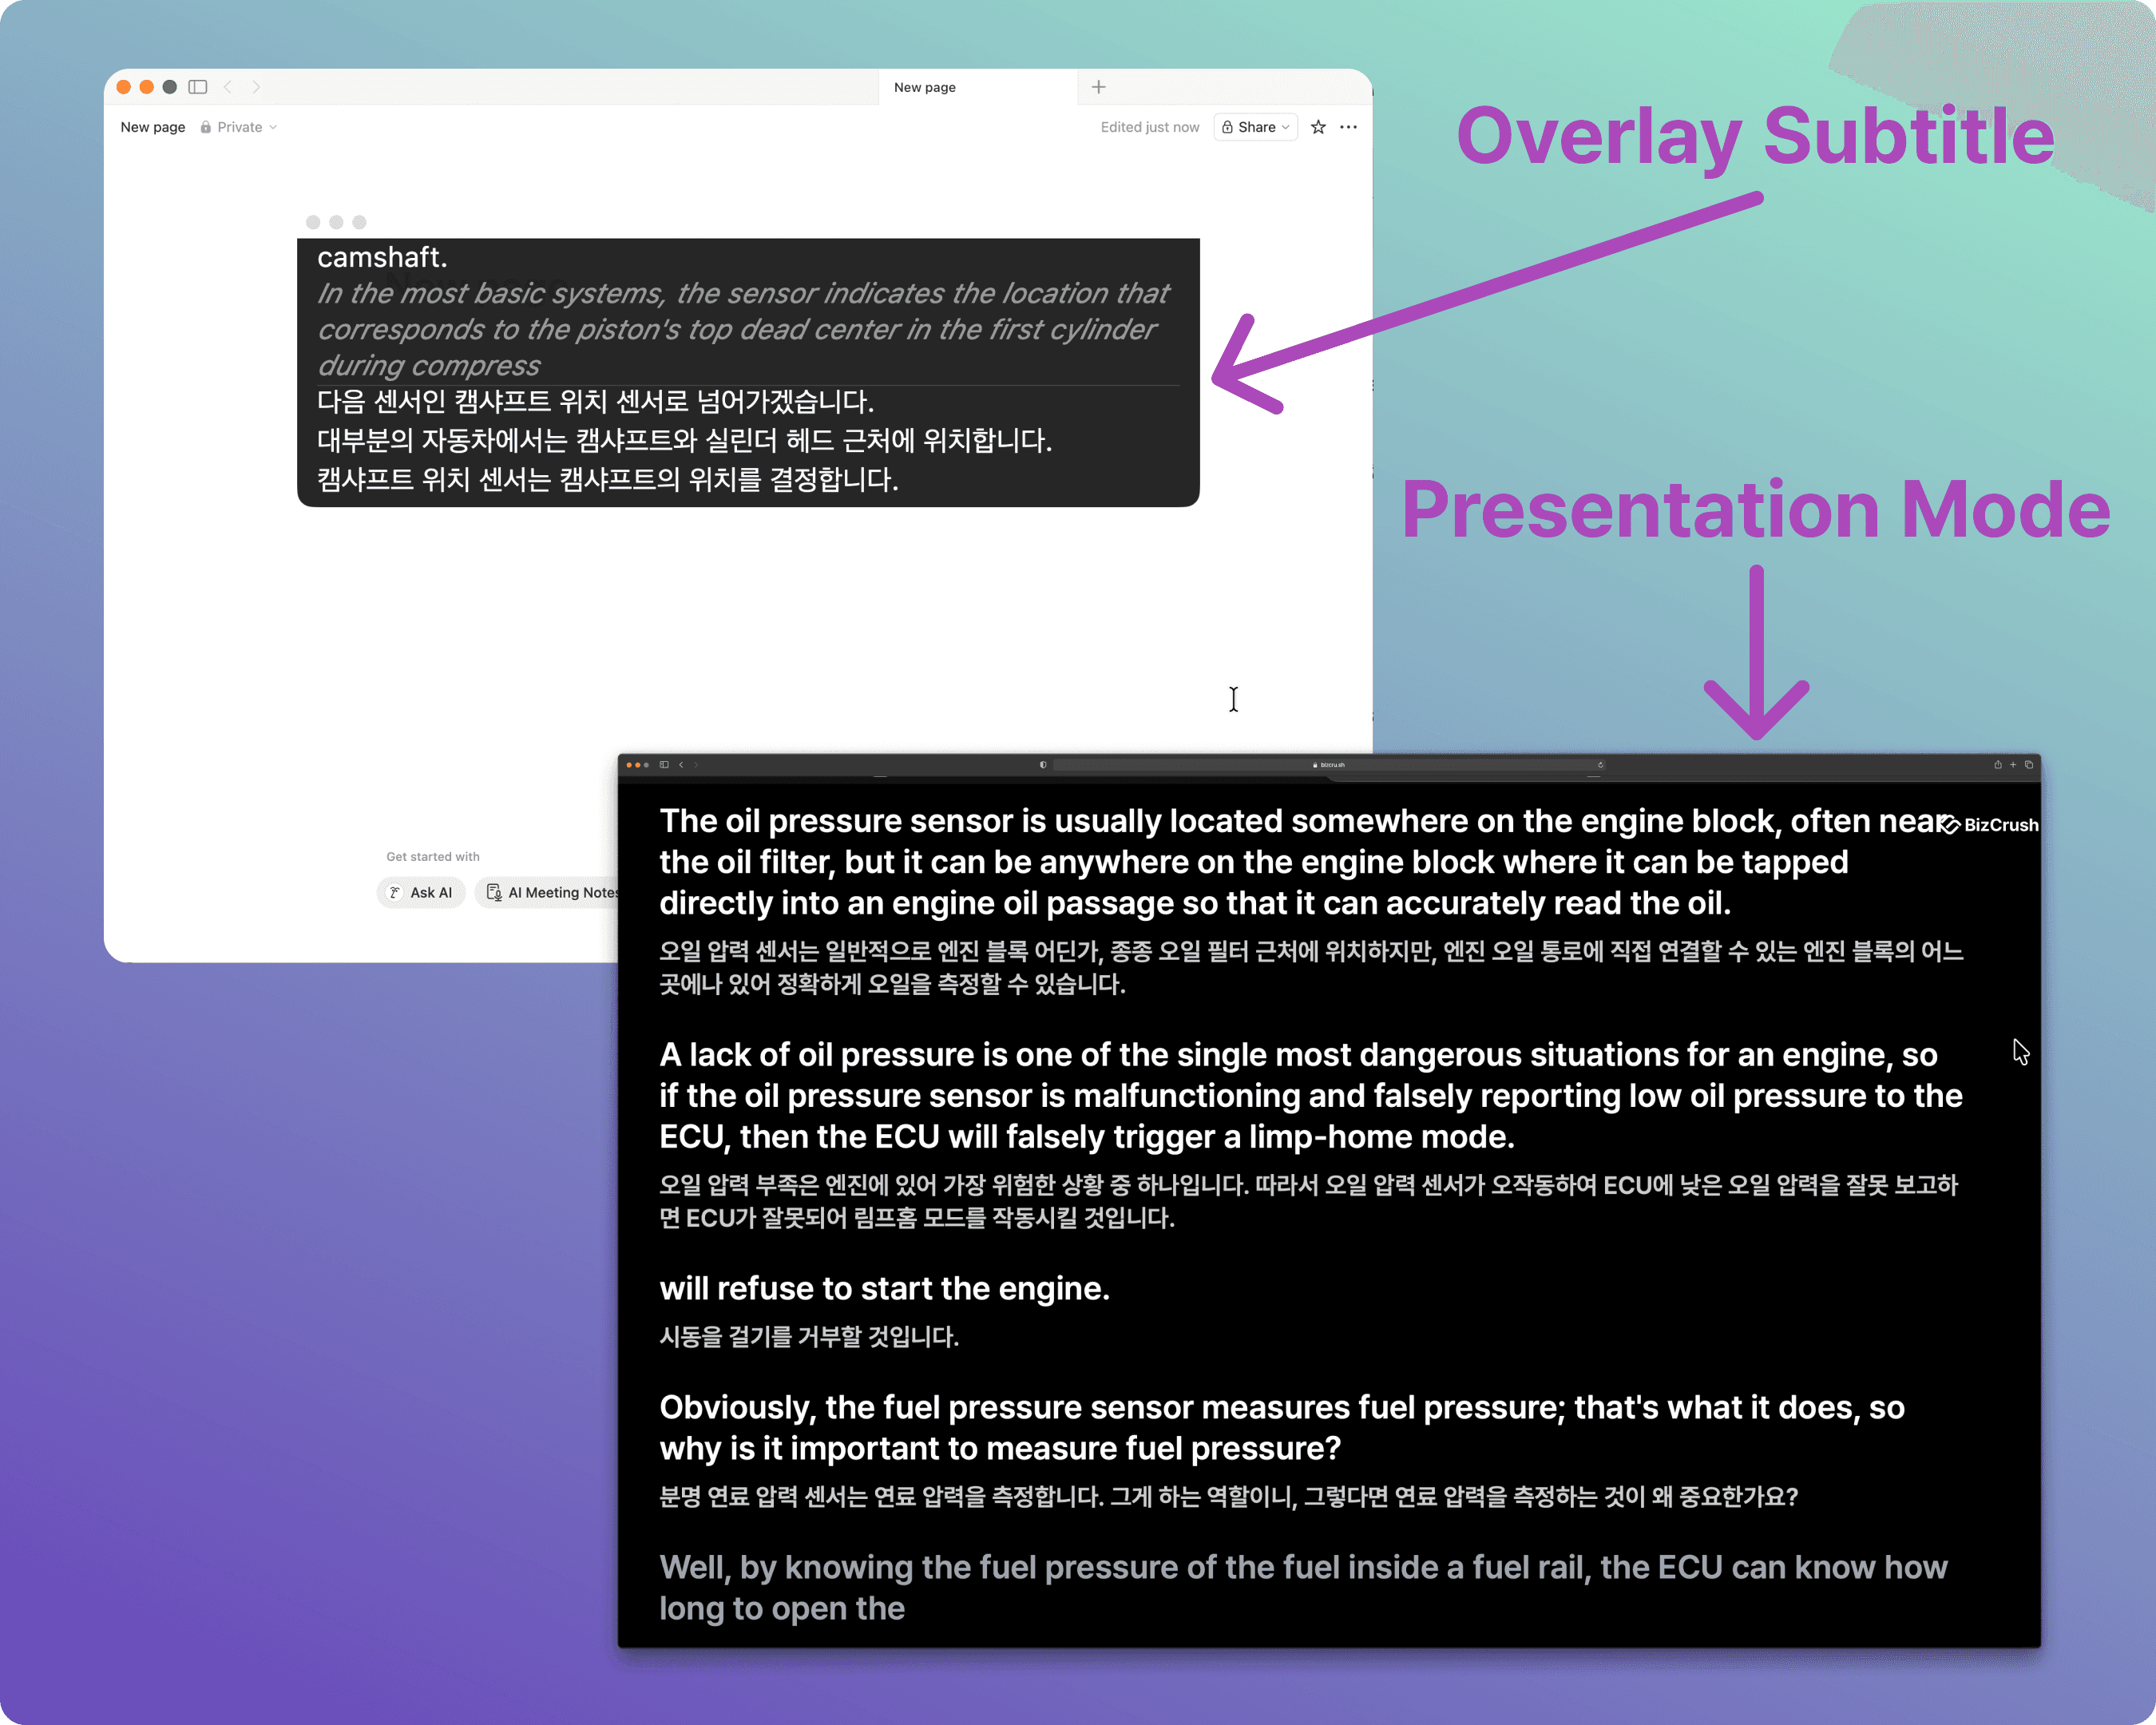
Instead of requiring dedicated interpretation infrastructure, the presenter simply connected their MacBook to the venue display and enabled Presentation Overlay Mode.
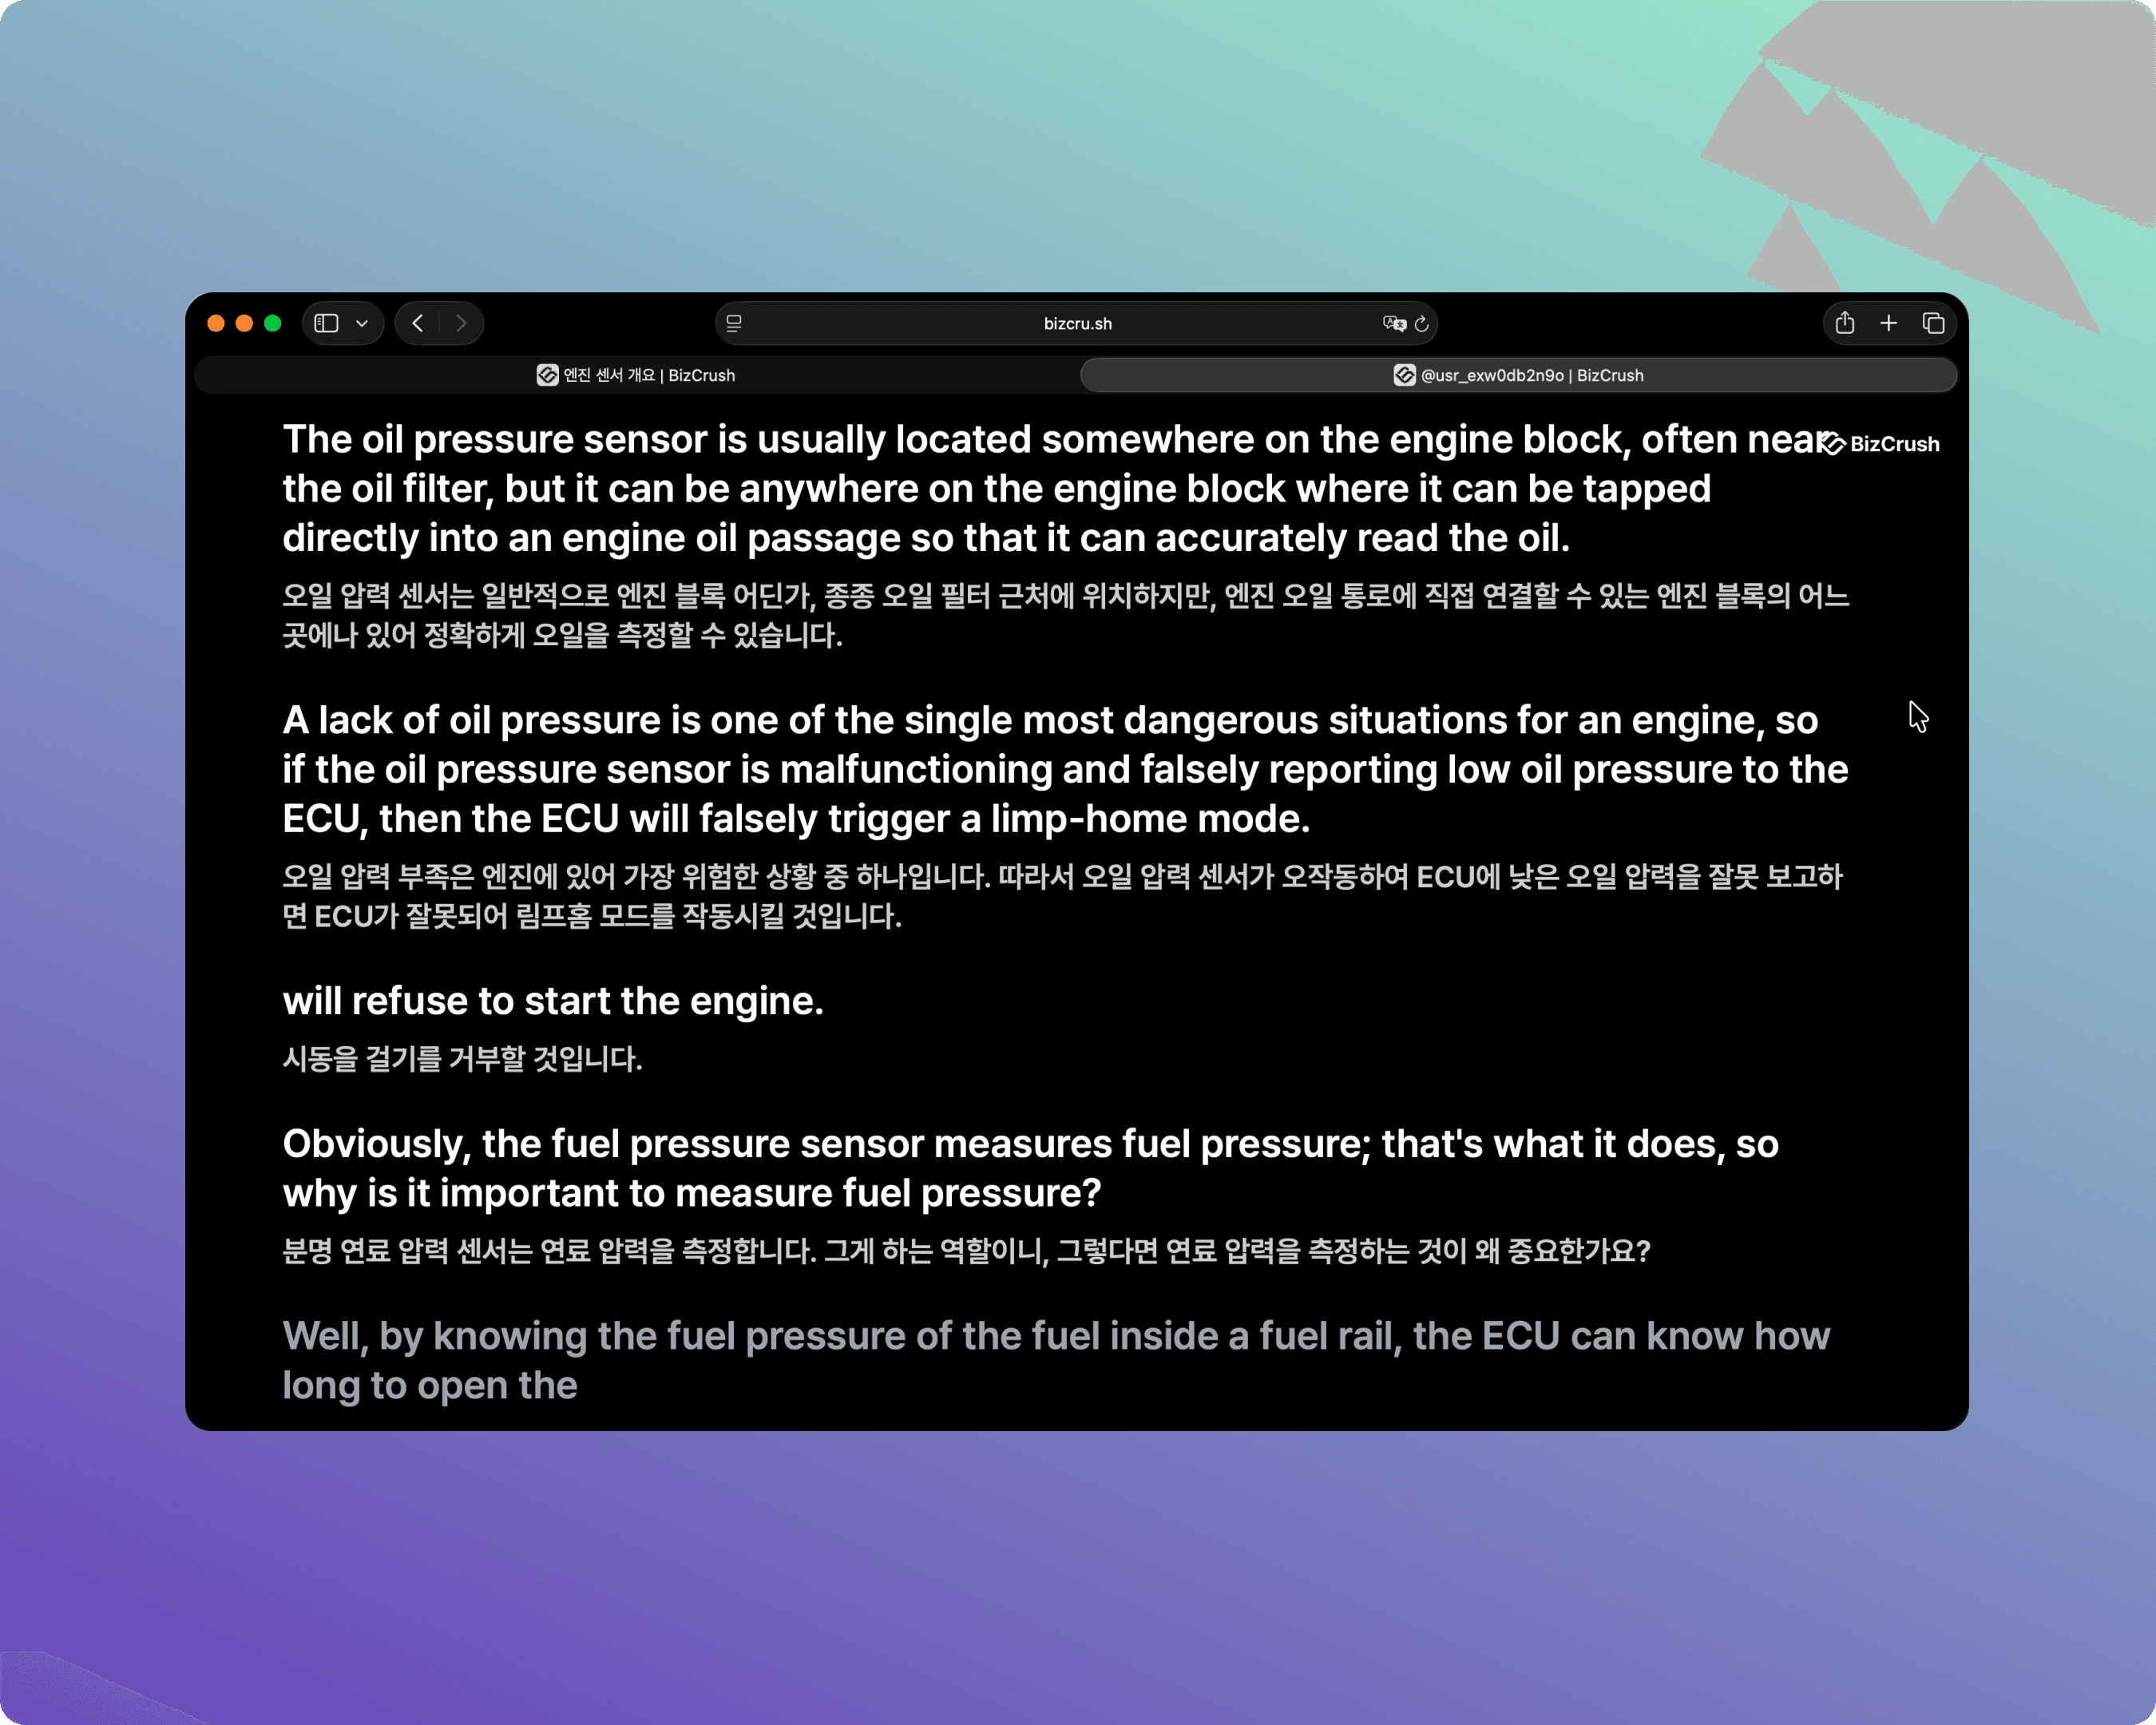
Real-time English subtitles appeared directly over the presentation slides.
No secondary display was needed.
No interpretation booth was needed.
No separate subtitle operator was needed.
The subtitles remained stable throughout slide transitions and animations while preserving the overall presentation design.
One of the most impressive parts of the event was how simple the operation became. The entire subtitle workflow was managed directly by Changbal President Hyesun An.
After a brief walkthrough, she was able to:
Start and stop sessions
Adjust subtitle placement
Manage presenter transitions
Monitor recordings
Keep the conference running smoothly
without requiring technical assistance.
For community-driven events with limited staffing, this simplicity proved just as important as the translation itself.
Translation Quality That Held Up on Stage
The conference covered a wide range of topics, from software engineering and AI to startup building and developer productivity.
During one session, Ju An Kang, Senior Software Engineer at Microsoft, delivered a Korean-language presentation rich in nuanced explanations and references. English-speaking attendees were able to follow the presentation in real time through the subtitles displayed on the main screen.
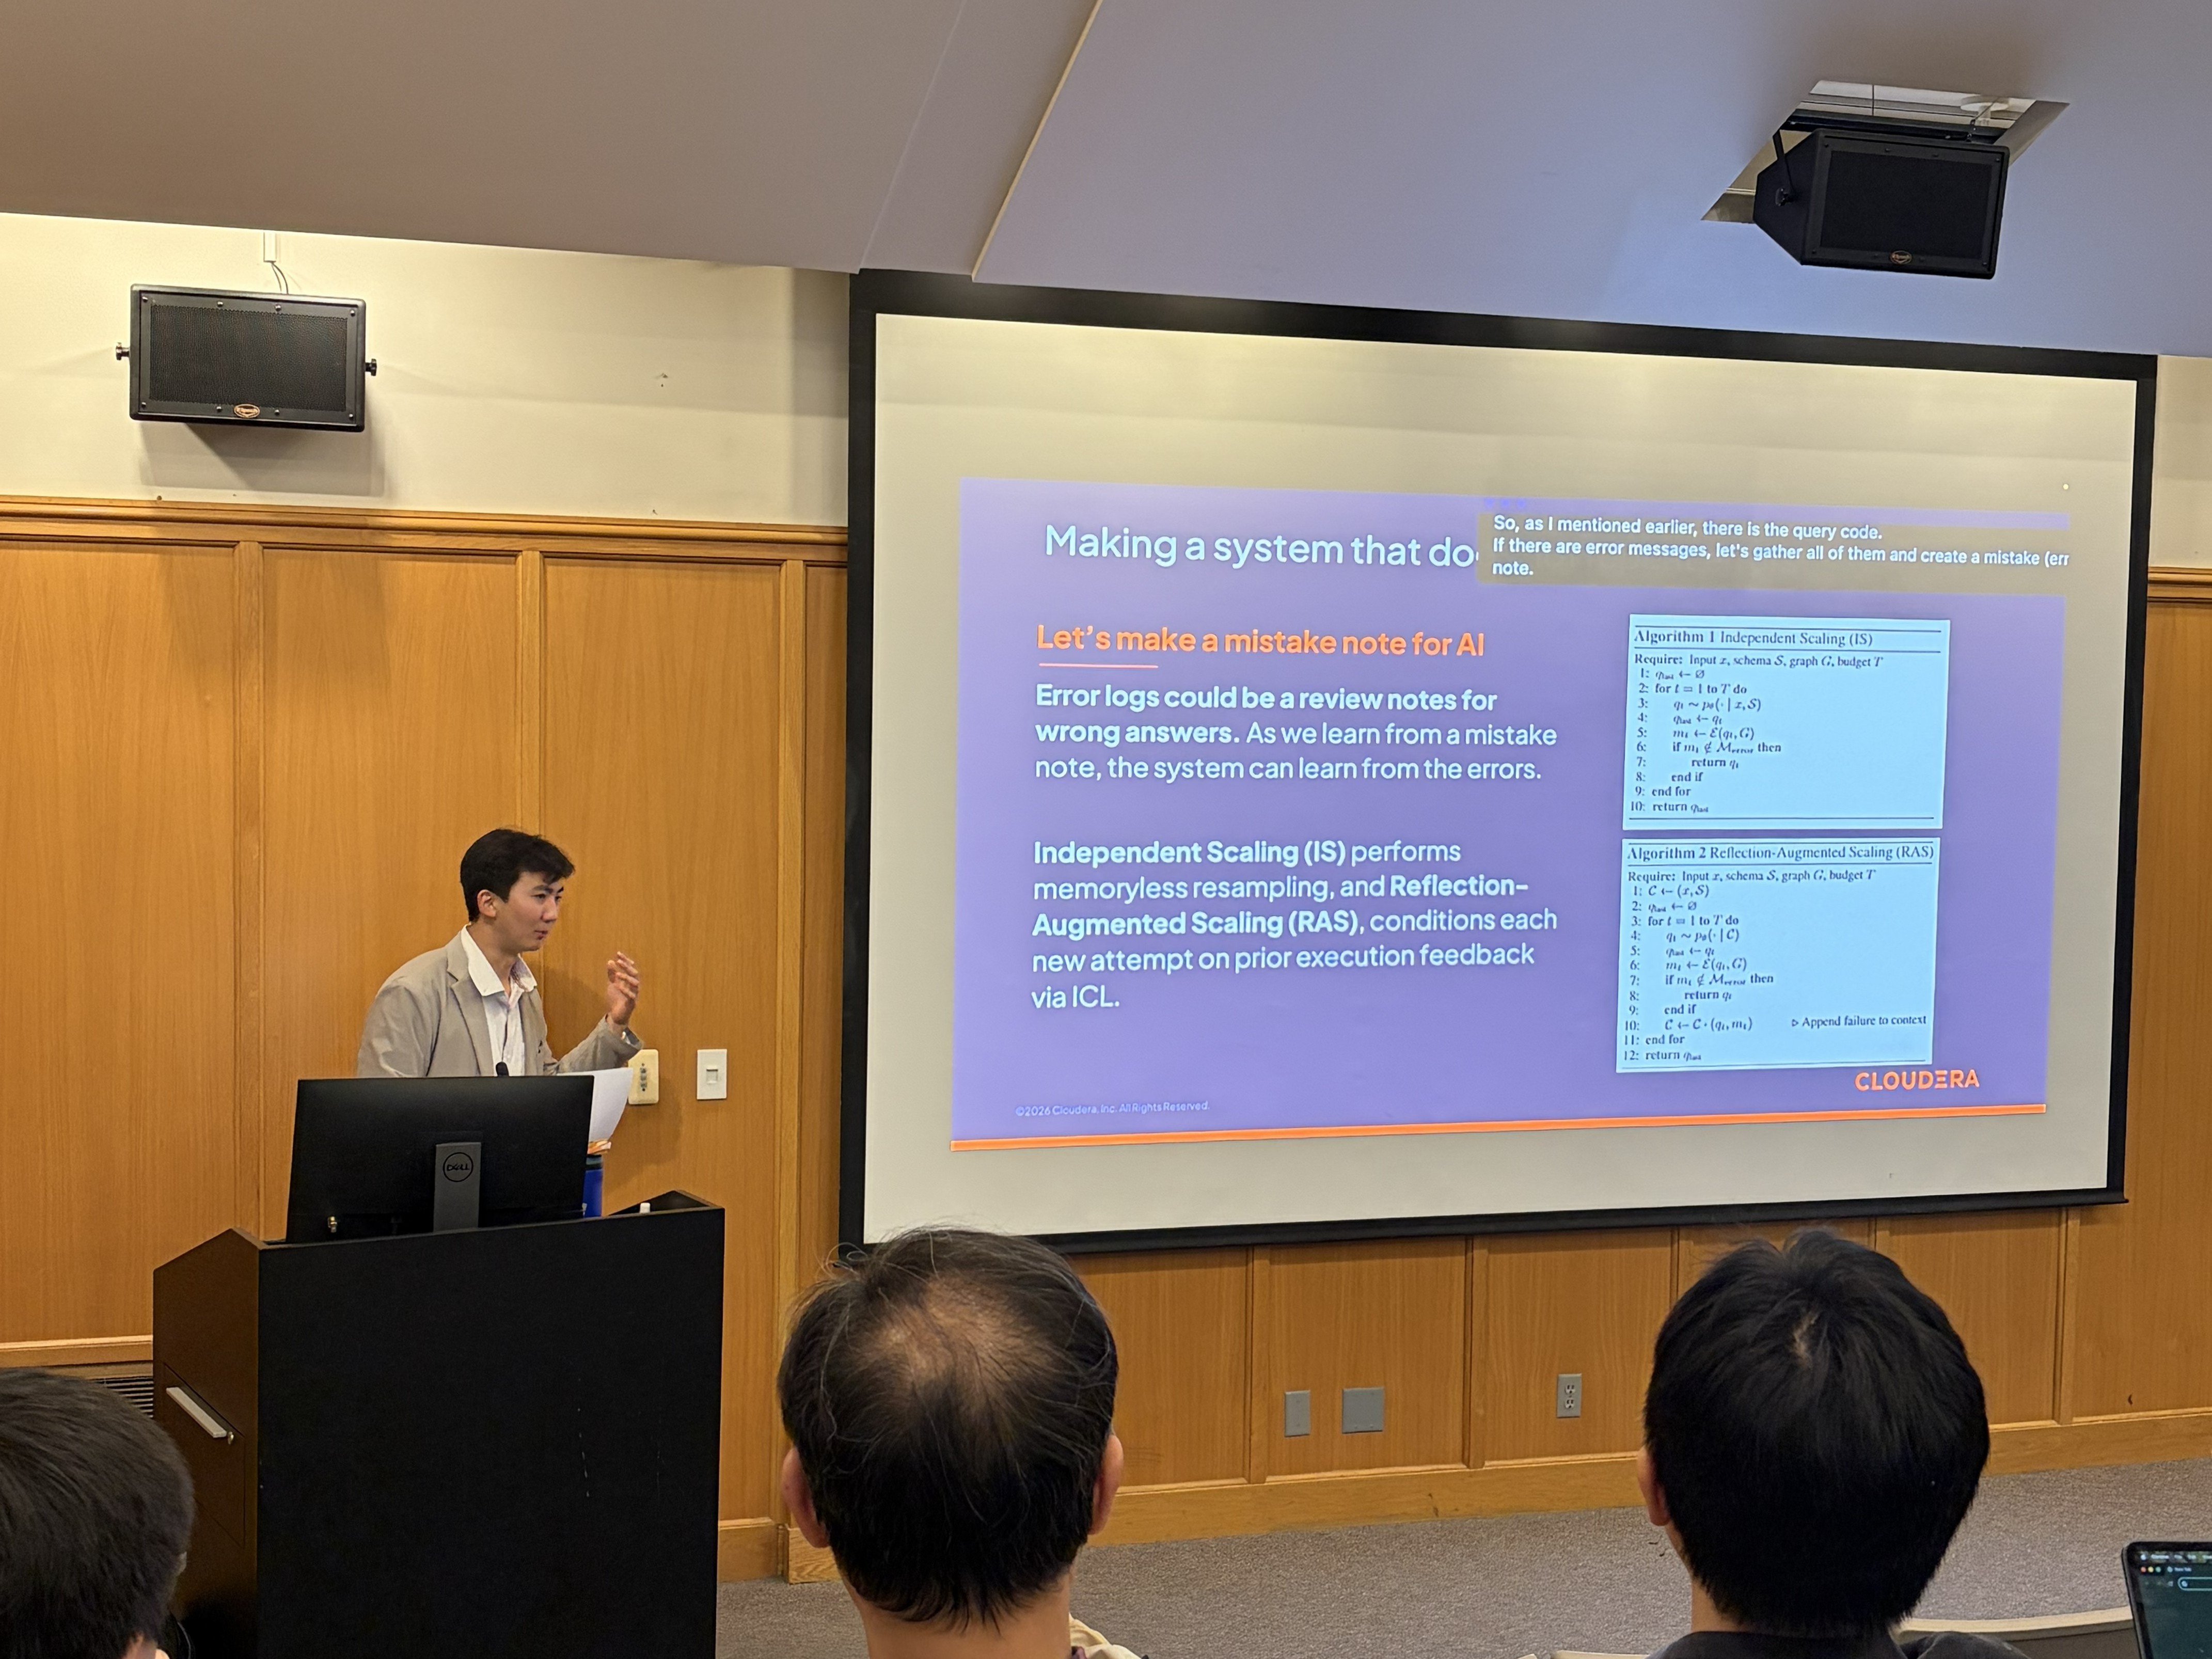
Another session featured Minseok Jeong discussing highly technical topics, including Reflection-Augmented Scaling, algorithm design, and pseudocode structures.
Rather than producing literal word-for-word output, BizCrush generated subtitles that preserved the technical context of the discussion.
Even in situations involving:
Technical jargon
Mixed-language speech
Fast presentation speed
Audience participation
Product-specific terminology
The subtitles remained consistent and readable throughout the sessions.
Capturing Context, Not Just Words
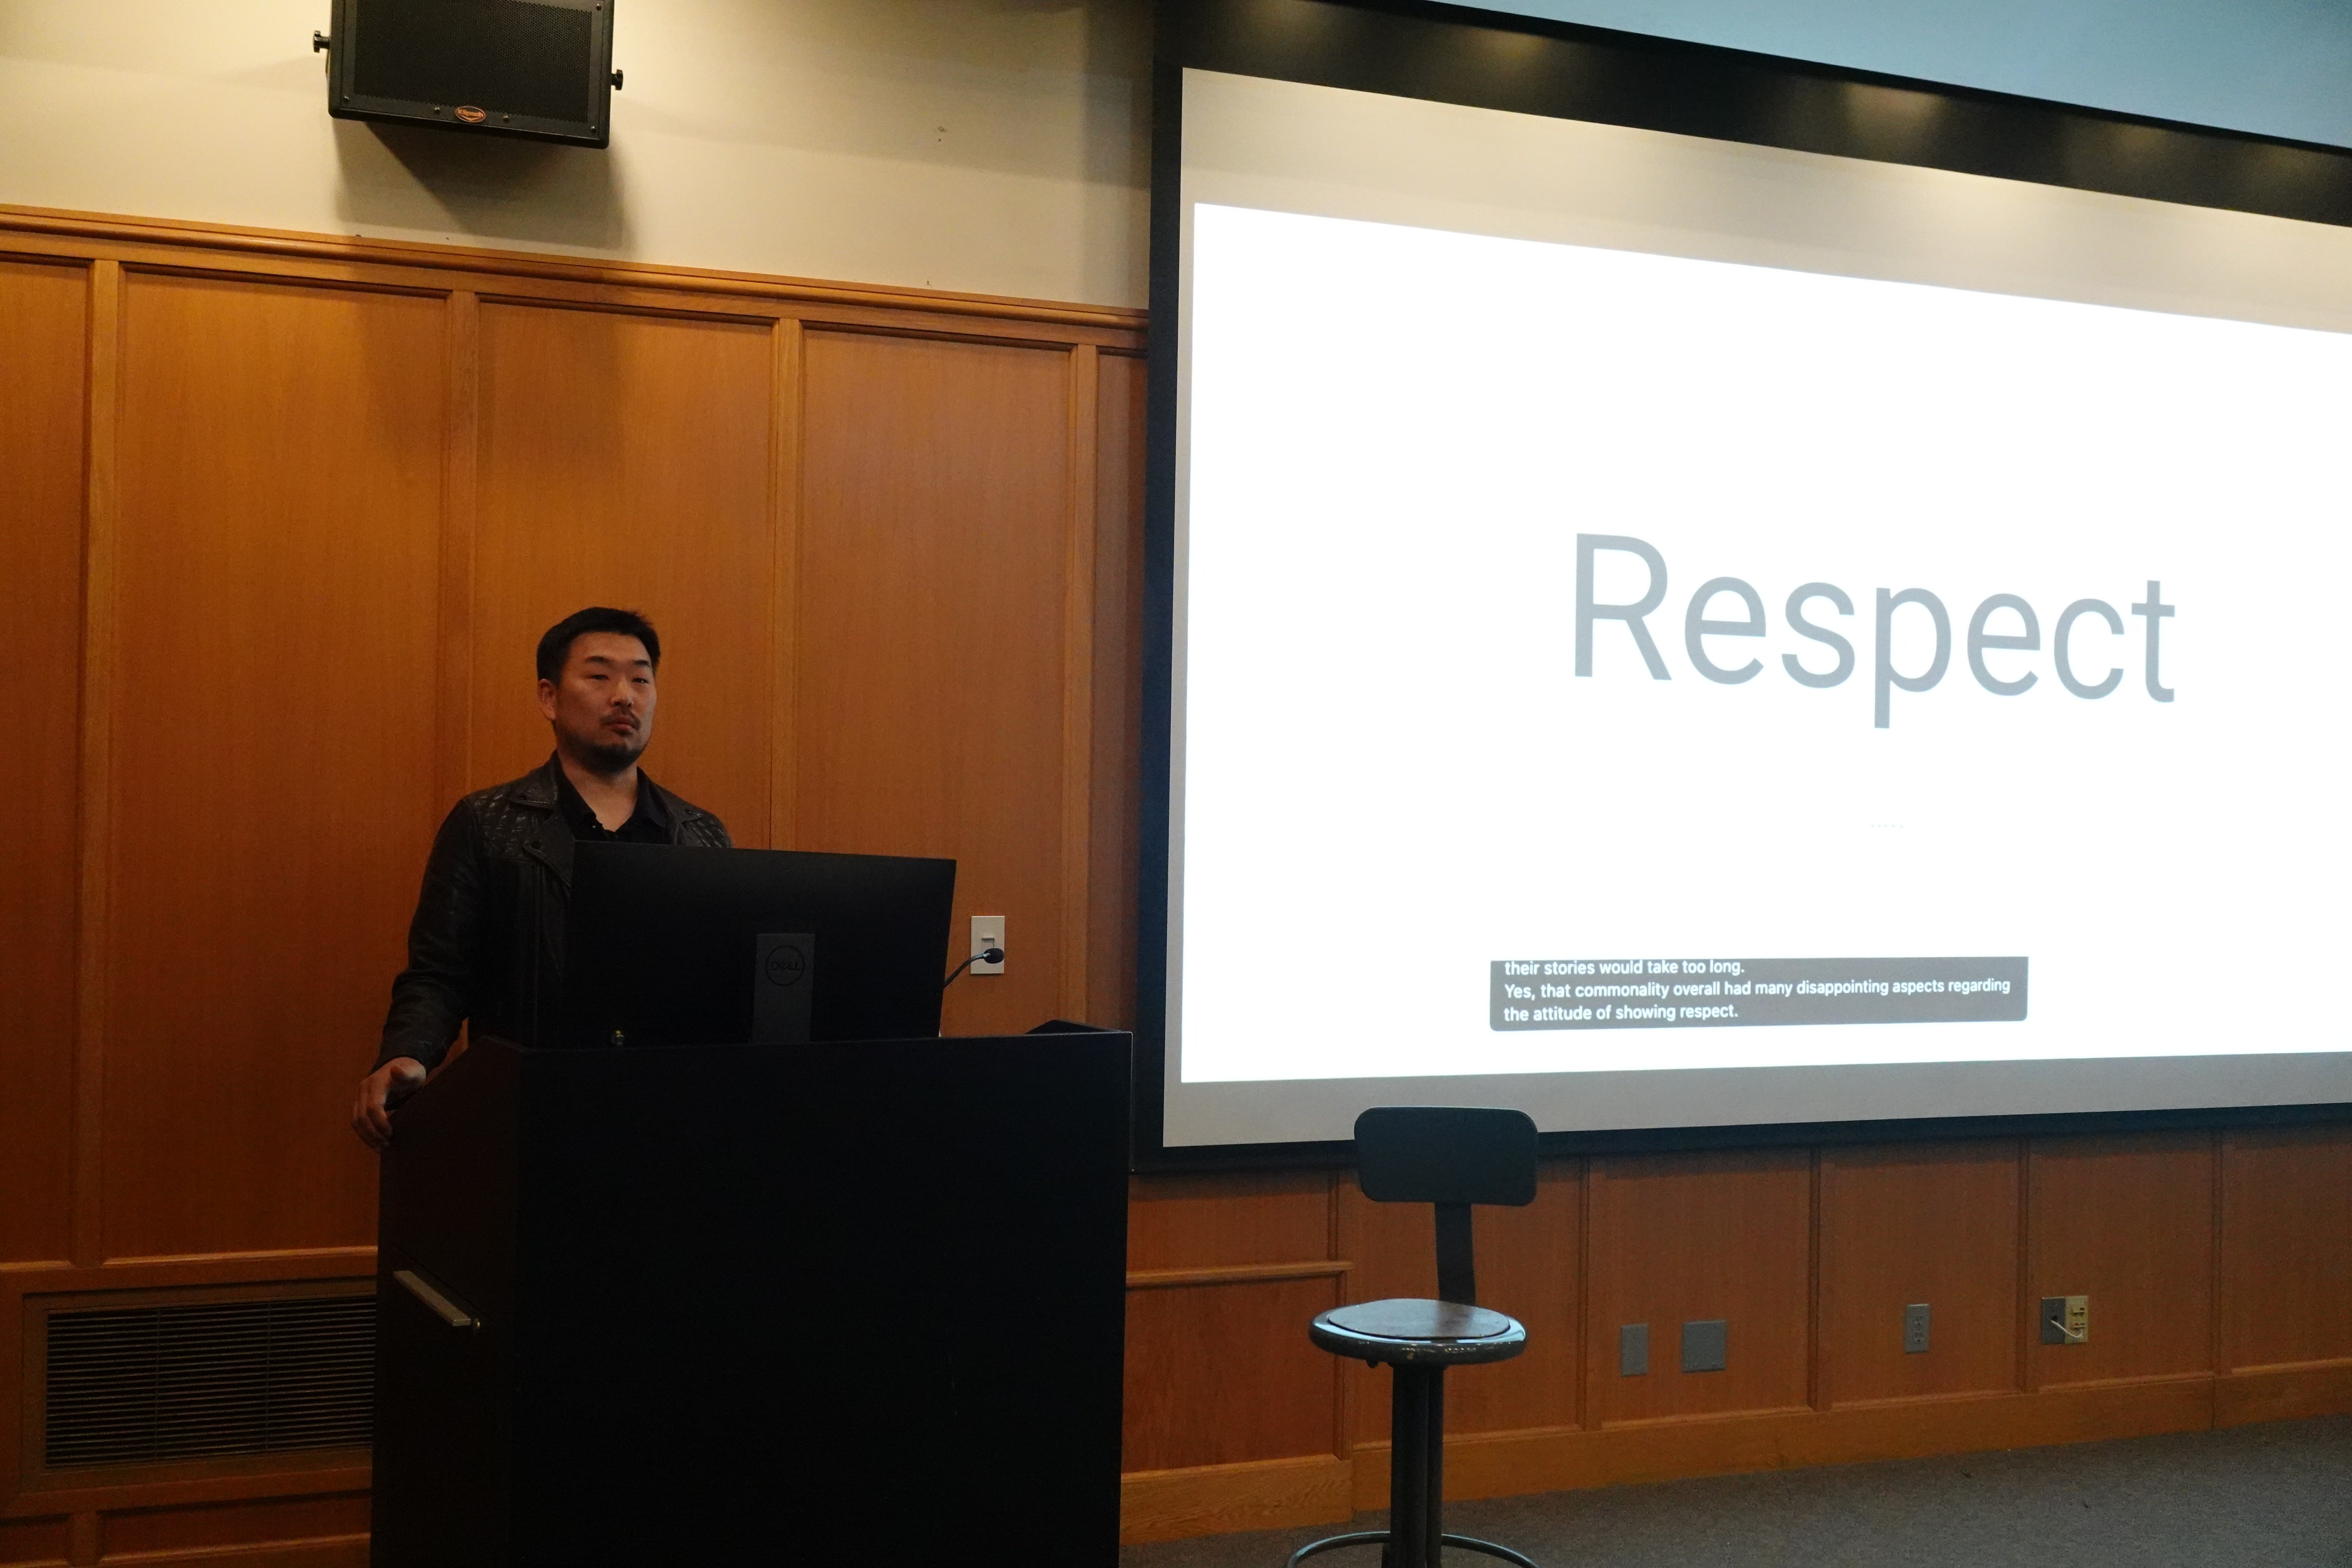
One moment particularly stood out to the event organizers.
During a presentation, a uniquely Korean expression appeared that would have sounded awkward if translated literally.
Instead of forcing a direct translation, BizCrush preserved the original phrase and presented it in a way that maintained its cultural context.
After the event, the operations team commented:
"It preserved the nuance of unique Korean proper nouns without distortion."
For global audiences, this distinction matters. Good subtitles do more than convert speech from one language into another. They help preserve the speaker's intent, context, and meaning.
No Wireless Microphones. No Audio Mixers.
Another standout for attendees was BizCrush's speech recognition.
The event did not rely on wireless microphones for audience participation.
Questions from attendees were often asked directly from their seats.
Even so, BizCrush was able to recognize and subtitle audience questions using only the MacBook's built-in microphone.
This flexibility makes the system particularly useful for community events, hackathons, university programs, startup demo days, and meetups where professional AV infrastructure may not be available.
The Feature Everyone Asked About
Throughout the conference, organizers repeatedly received the same question from attendees:
"What tool is generating those subtitles?”
Many participants noticed the subtitles almost immediately.
Some assumed a dedicated translation team was operating behind the scenes. Others were surprised to learn that the entire system was running from a single laptop.
For the organizers, this reaction validated an important point:
When multilingual support becomes effortless, it stops feeling like an extra feature and starts feeling like a natural part of the event experience.
What's Next: Seattle Changbal Innovation Hackathon
Following the success of the conference, the Changbal team plans to continue using BizCrush at future events.
Attendees will also be able to experience BizCrush again at the upcoming Changbal Hackathon in Seattle on June 20.
To support teams building voice-powered products, all participants will receive BizCrush Voice API credits during the event.
The team that creates the most impactful voice application using BizCrush technology will receive the BizCrush Best Problem Solver Award, along with one year of unlimited BizCrush access for every member of the winning team.
Making Global Events Practical
Global audiences are no longer limited to large enterprise conferences.
Today, multilingual communities exist everywhere:
Developer meetups
Startup demo days
University programs
Hackathons
Technical workshops
Community-led events
The challenge is no longer whether multilingual experiences are needed. The challenge is making them practical.
At the Seattle Changbal Dev Conference, organizers delivered a fully bilingual experience with one laptop and no specialized interpretation infrastructure.
As global participation becomes the norm, we believe that simplicity will become the new standard for event communication.
And that's exactly what BizCrush is building.
BizCrush
Growth
May 27, 2026
5
min

Tutorials
BizCrush Event Host Operations Guide
This guide covers how to run BizCrush at an event, including setup tips, checklists, FAQs, and live multilingual captions with voice translation.
This guide walks you through everything you need to run BizCrush smoothly at an event—from pre-event setup and live caption display to on-site checklists, MC announcement scripts, and frequently asked questions.
With just a laptop or smartphone and Wi-Fi, you can provide real-time multilingual captions and voice translation—no special equipment or professional interpreter required.
1. Getting the Most Out of BizCrush
With BizCrush, you can offer the following features at your event:
Real-time captions: Converts the presenter's voice into text and displays it on screen.
Multilingual translation: Provides captions in multiple languages, including Korean, English, Japanese, and more.
Easy access for attendees: Attendees can scan a QR code and view captions instantly on their own smartphones.
Audio translation: Attendees can listen to translated audio in their preferred language in real time.
How BizCrush Works
Microphone pickup — the device microphone captures the presenter's voice.
AI translation — speech is converted to text and translated into the selected language.
On-screen captions — the recognized speech appears as real-time captions.
You do not need a separate microphone. BizCrush uses the built-in microphone on the smartphone or laptop running the app, so place the device where it can hear the sound clearly.
Good placement options include:
Near the presenter on stage
Close to the venue's loudspeaker
Anywhere the presenter's voice can be heard clearly
2. Pre-Event Setup
Preparing these items beforehand will make event-day operations much easier.
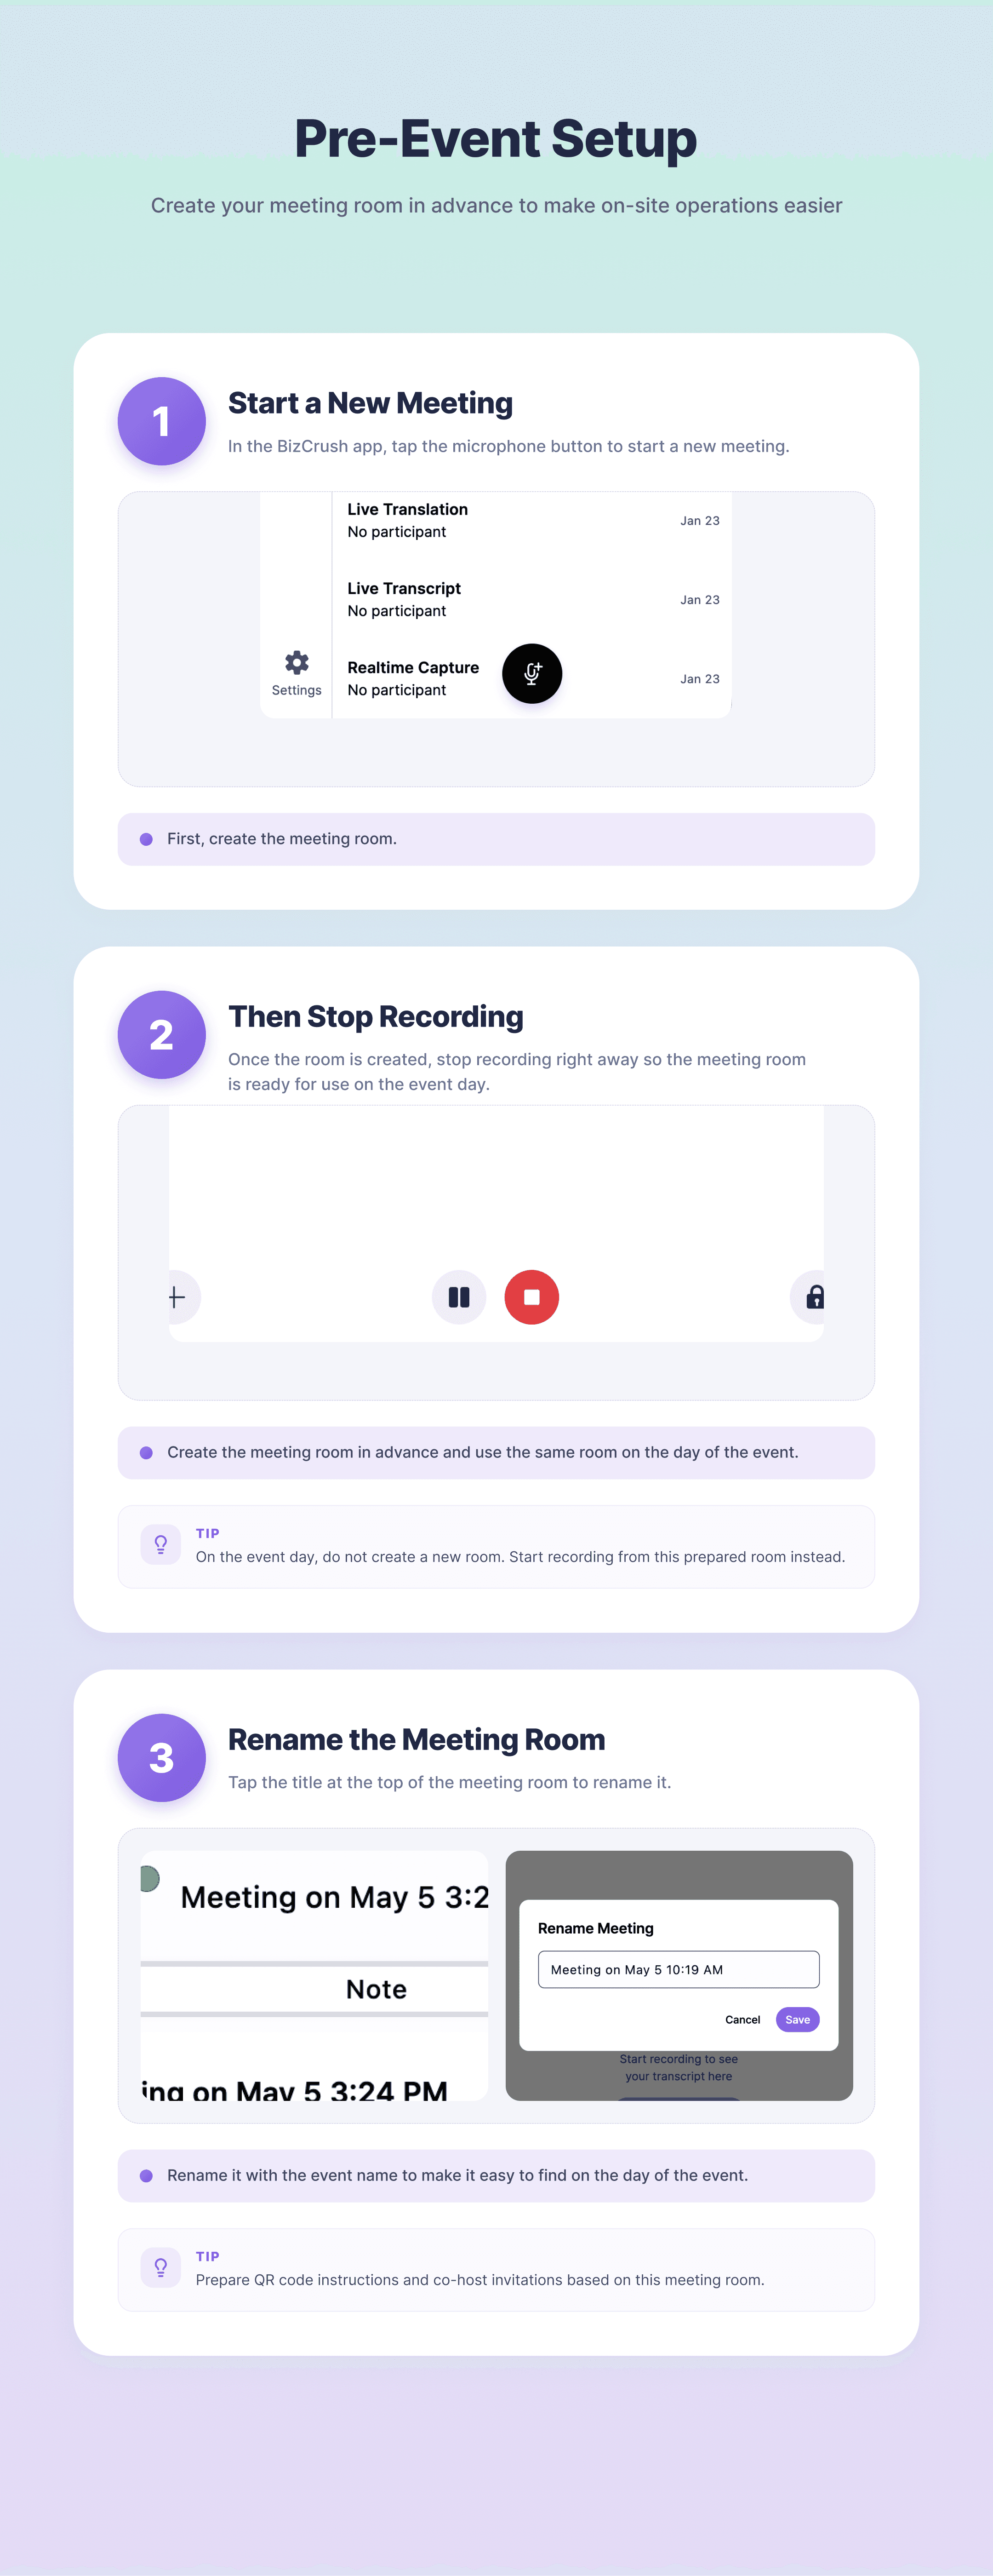
A. Create a Meeting Room in Advance
Creating a meeting room ahead of time allows you to prepare the attendee QR code for signage, printed materials, or a waiting screen before the event begins.
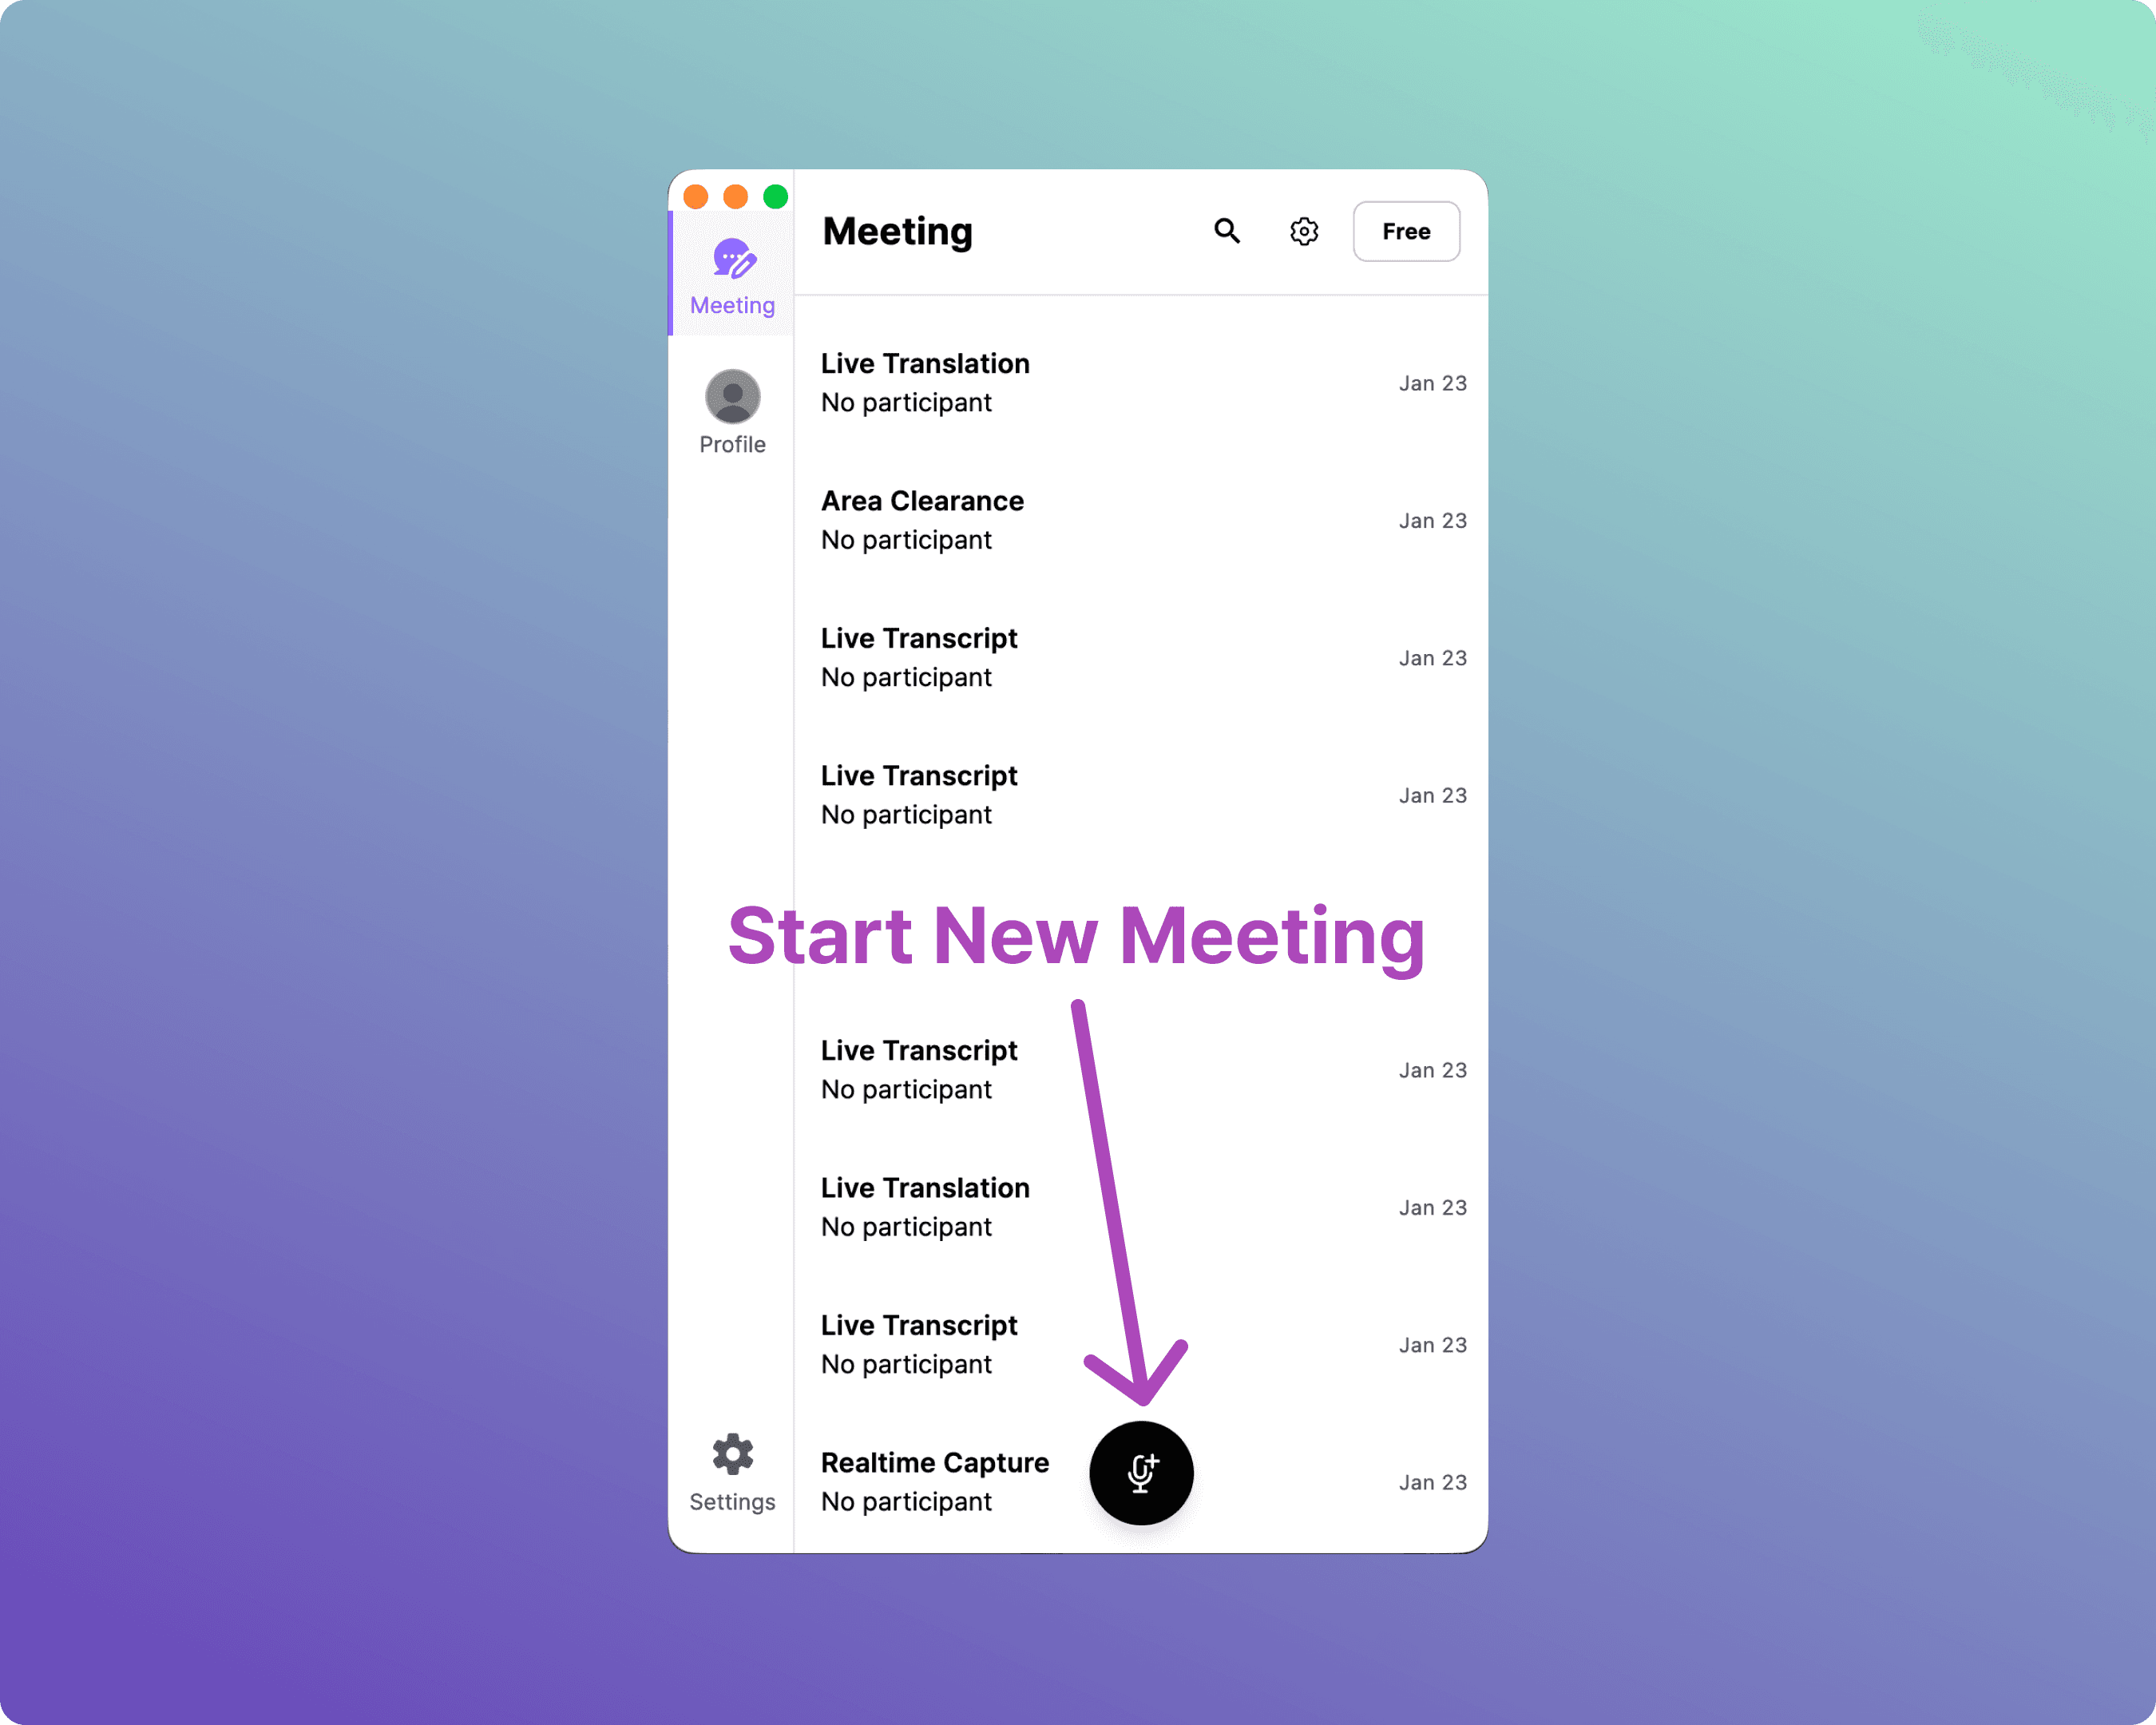
In the BizCrush app, tap the microphone button to start a new meeting.
Once the room is created, immediately tap Stop Recording. This saves the prepared meeting room without leaving the recording active.
Rename the meeting room to match the event name. This will make it easier to find on the day of the event.
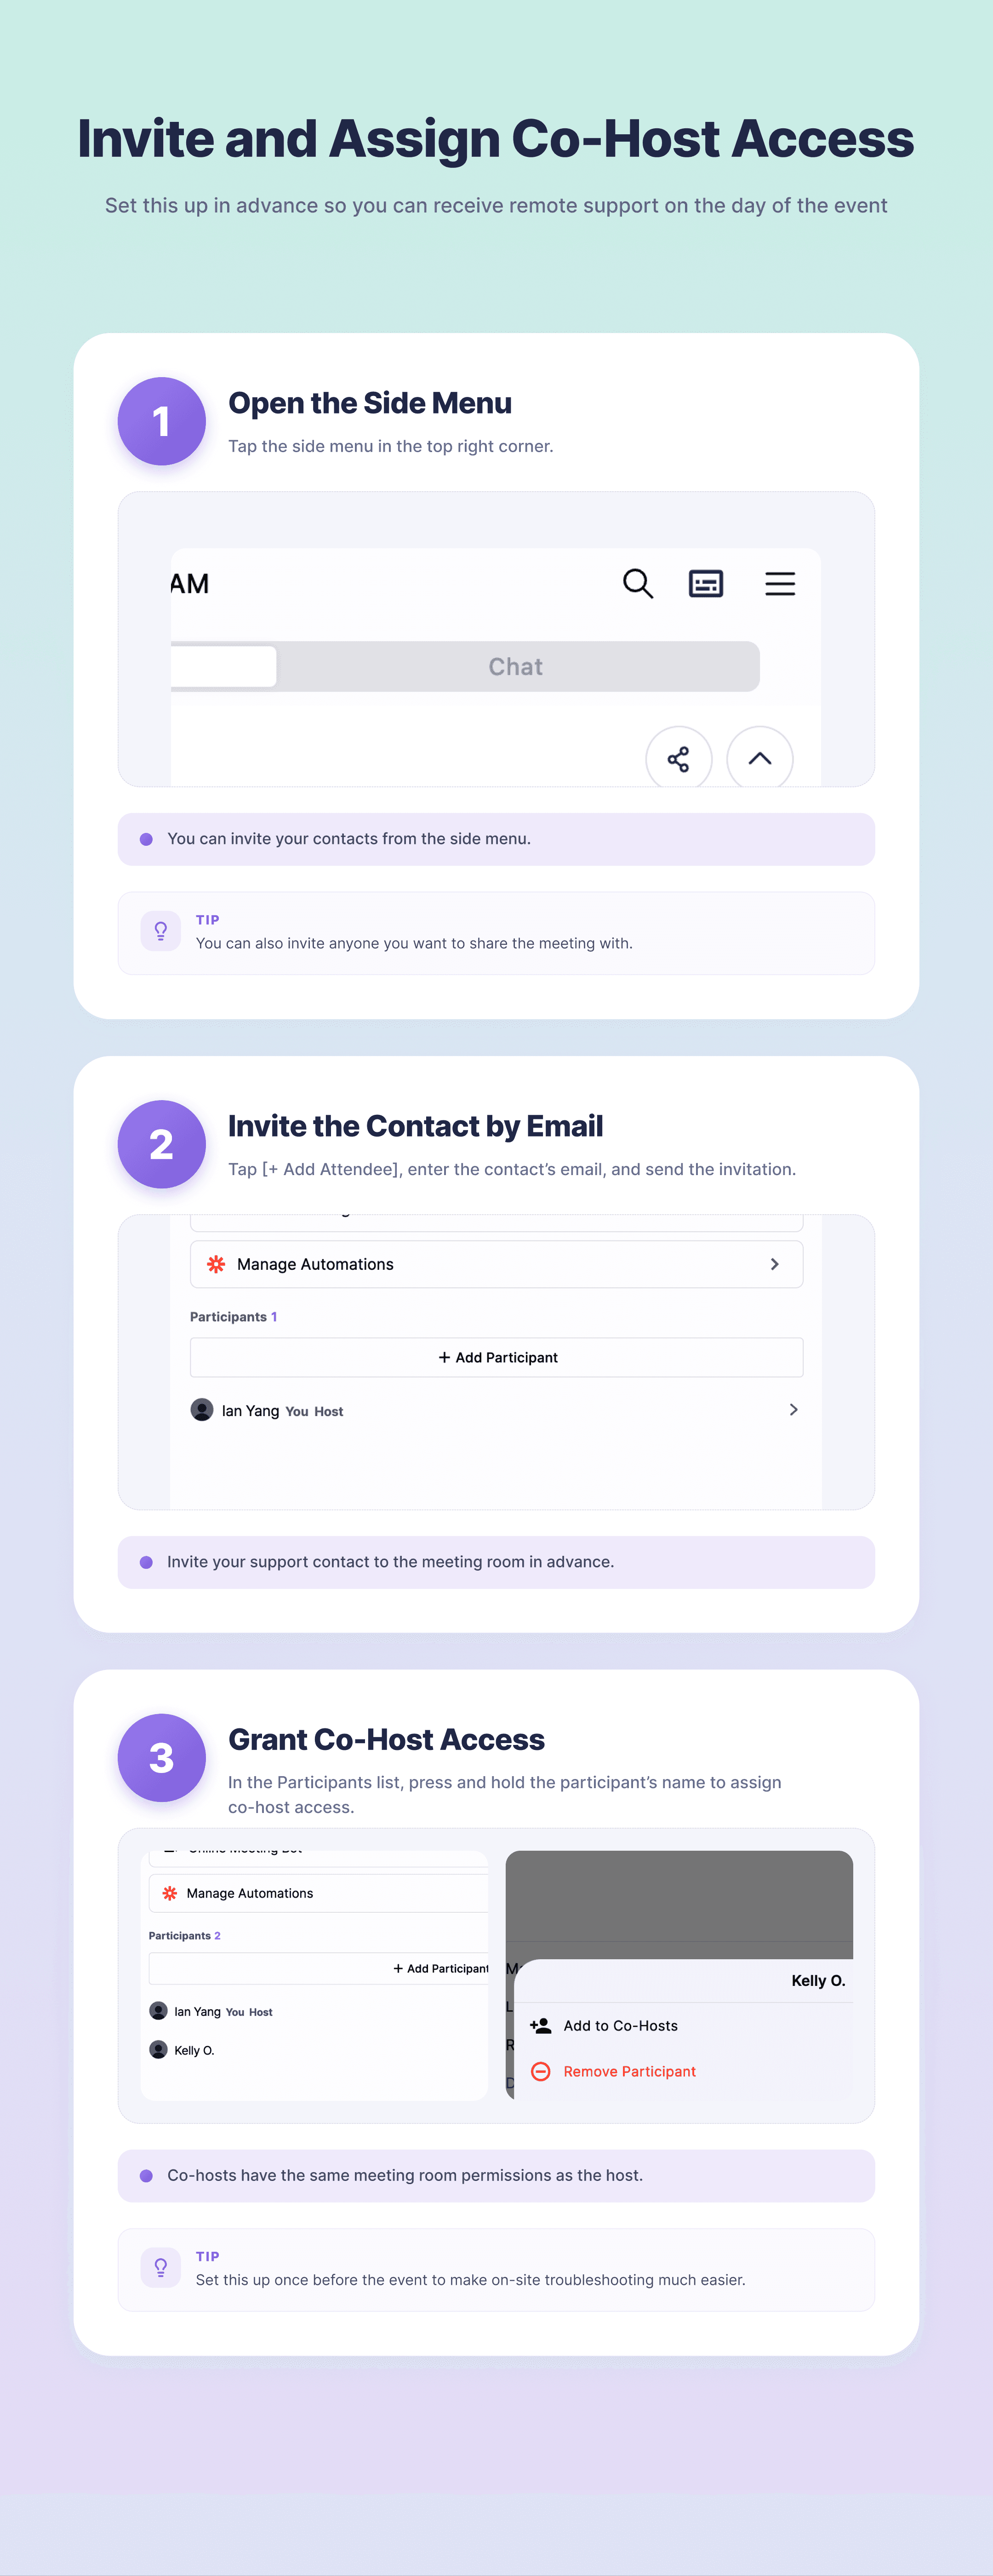
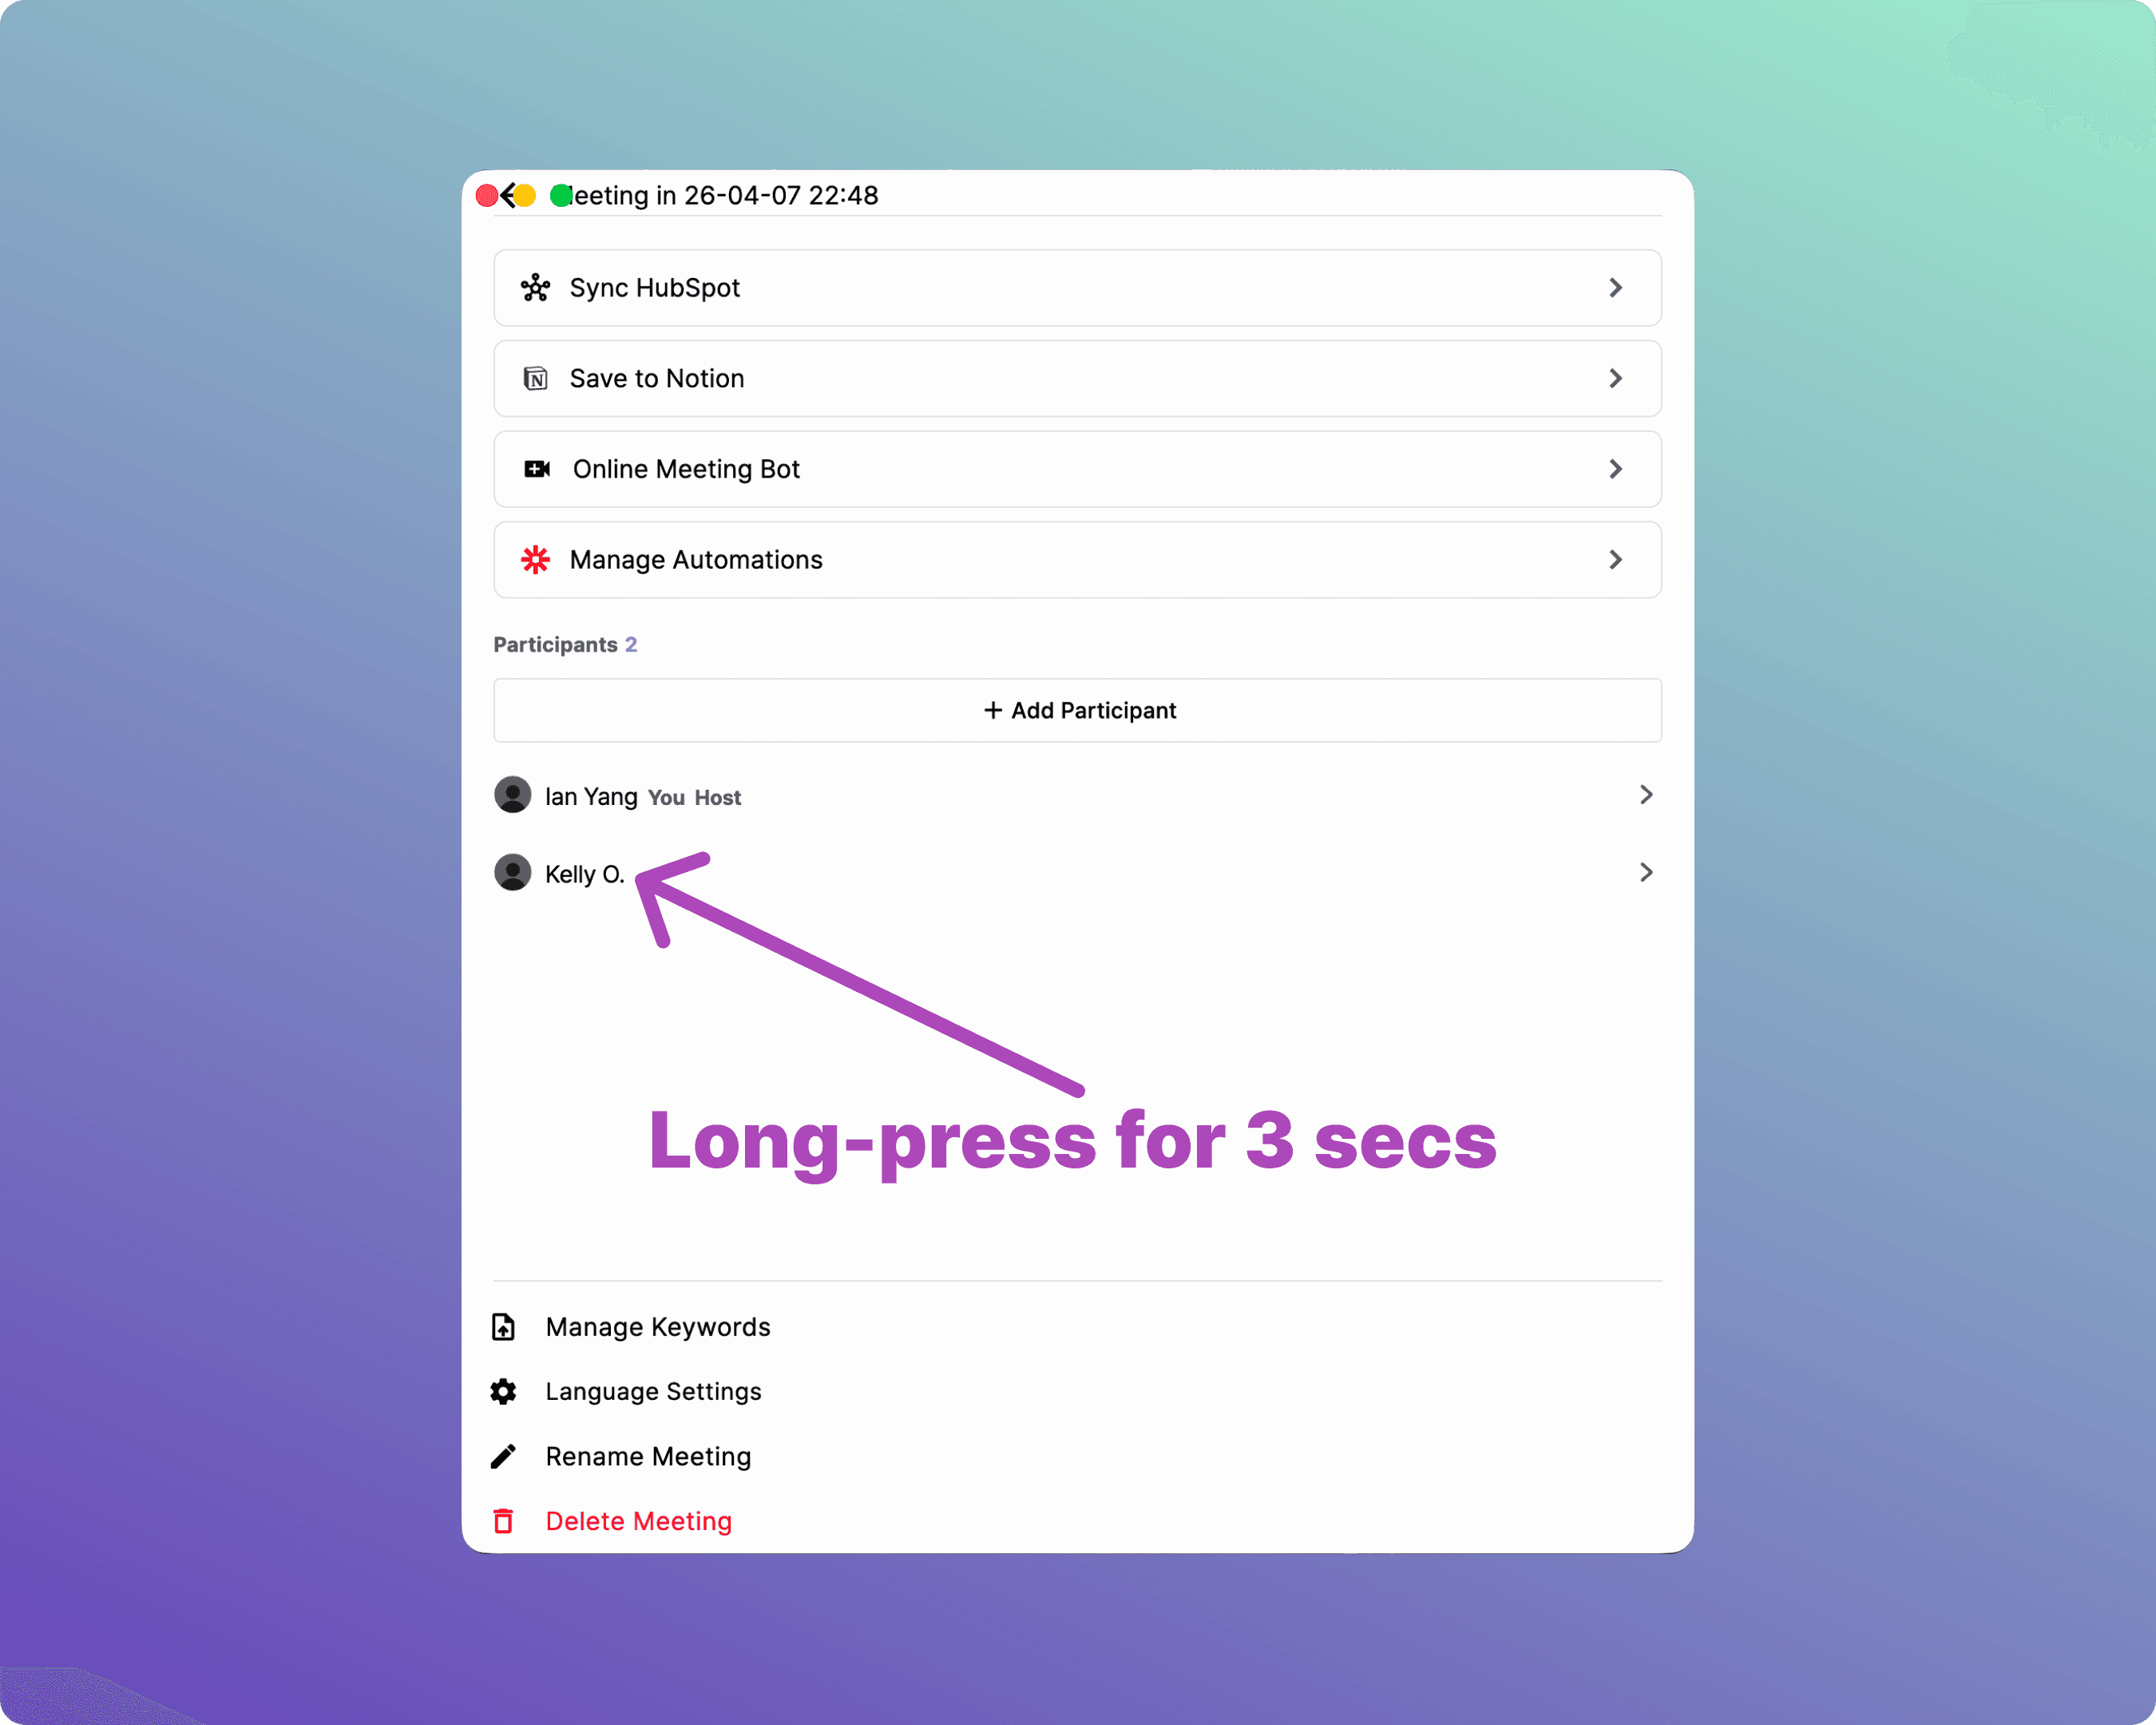
B. Invite and Assign Co-Host Access
If you invite your BizCrush support contact to the meeting room in advance and assign them as a co-host, they can help you remotely on the day of the event.
Open the ☰ Side Menu in the top-right corner.
Tap + Add Participant and enter the support contact's email address.
In the participant list, press and hold the support contact's name for about 3 seconds, then assign Co-Host access.
👉 For the full step-by-step walkthrough with screenshots, see [Setup Guide, Section 4: Assigning Co-hosts].
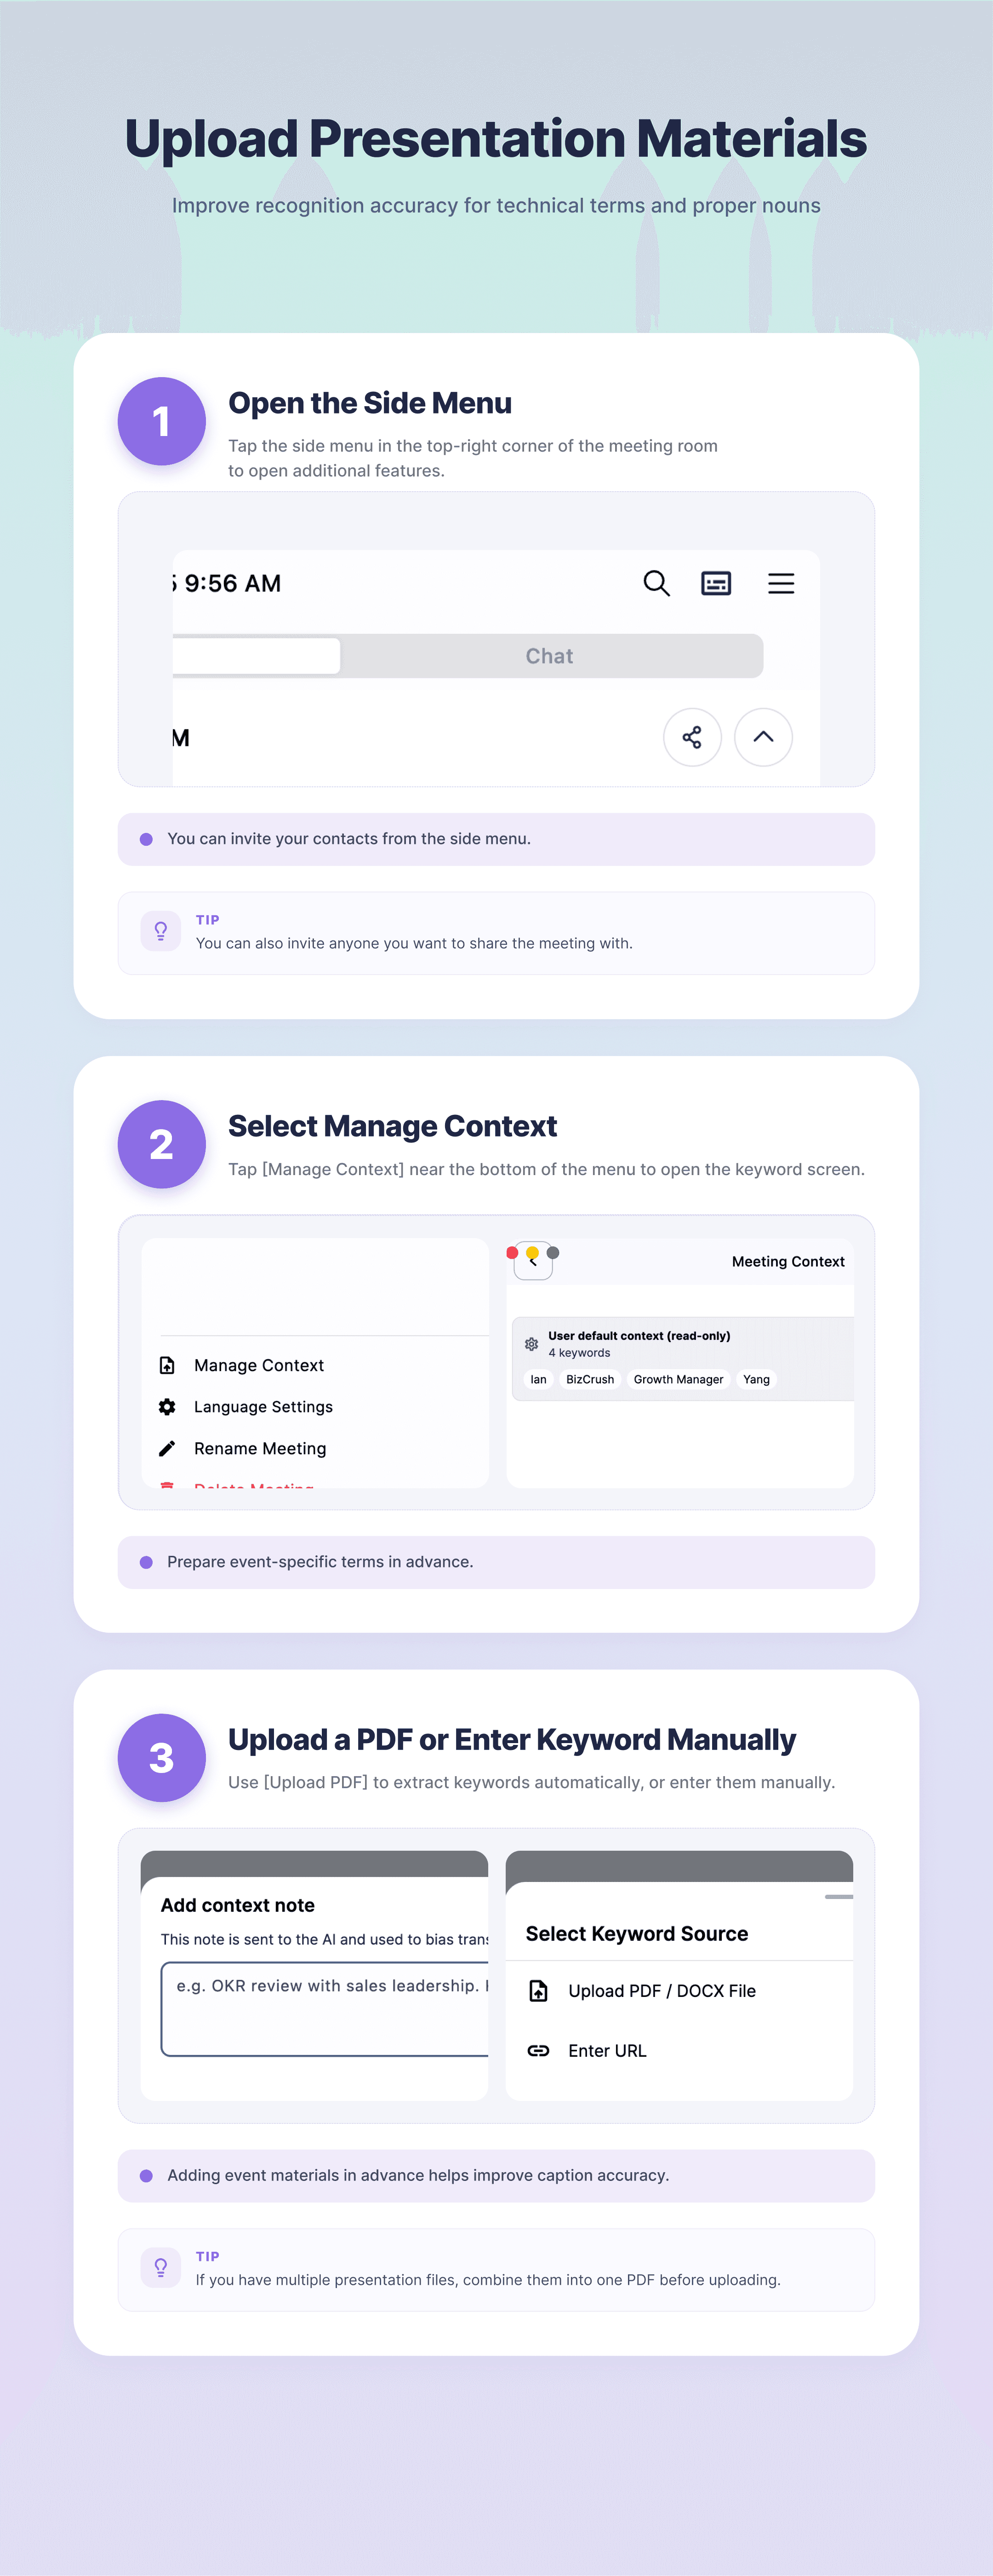
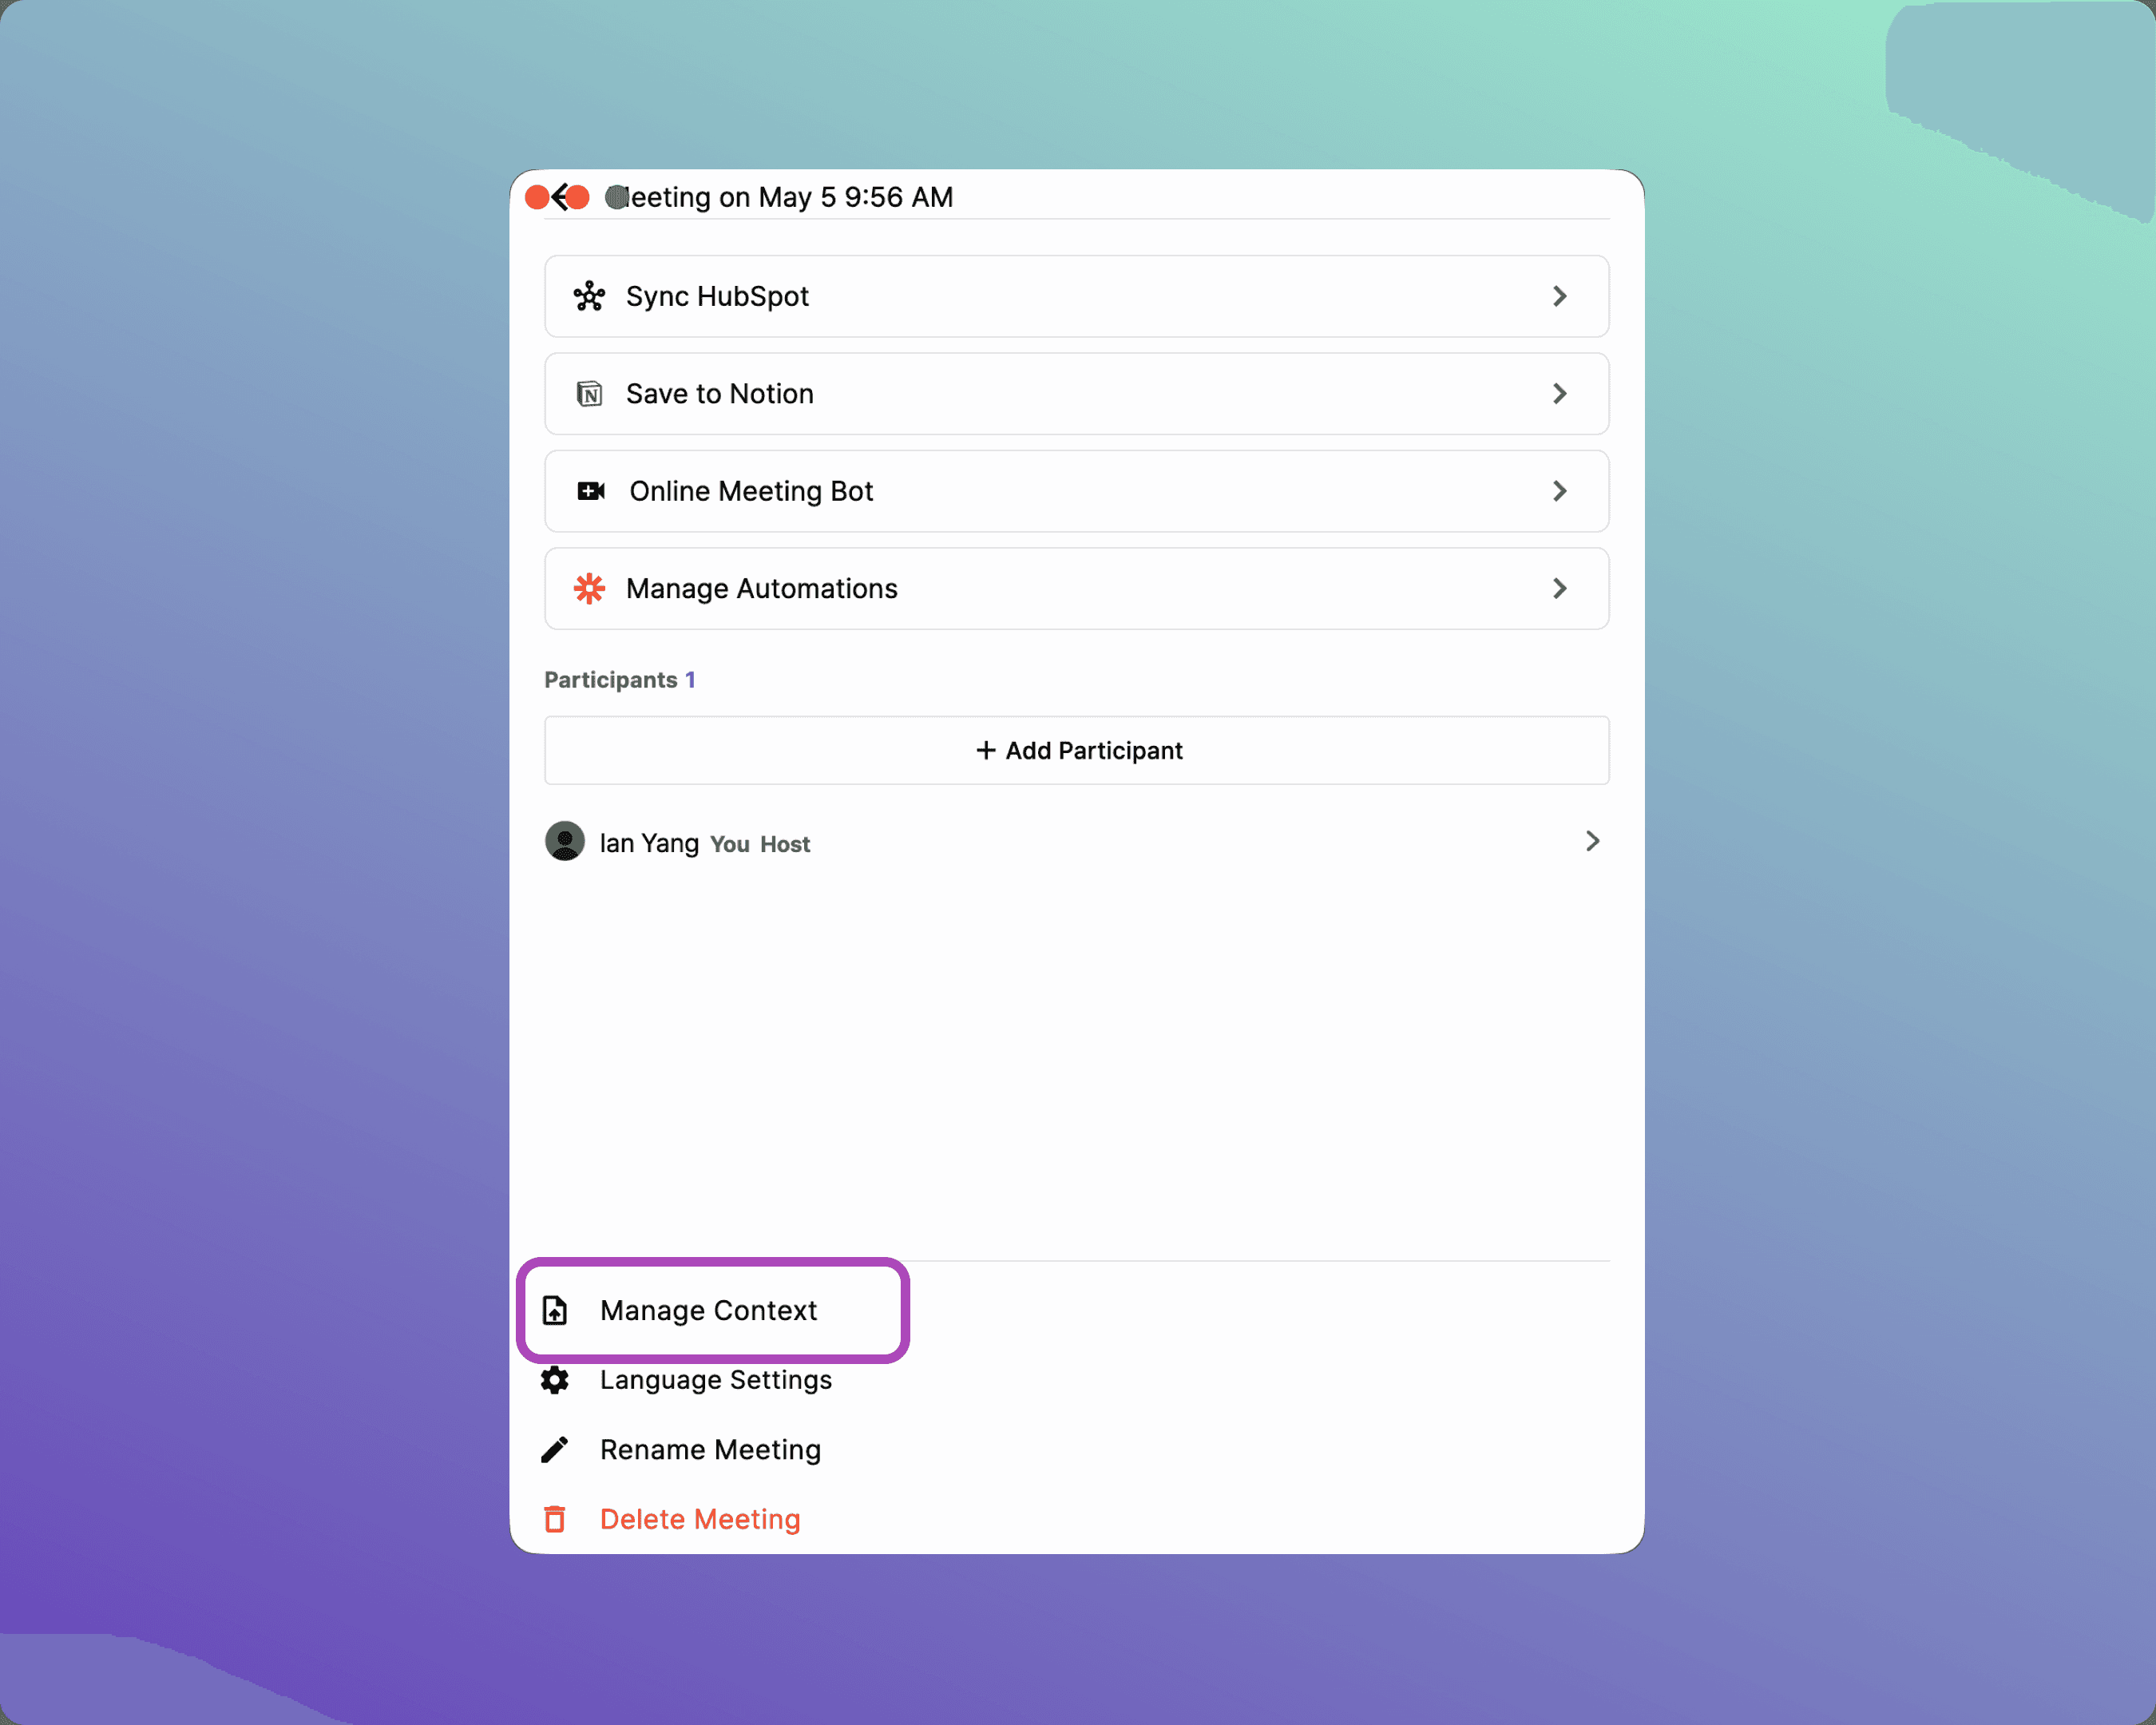
C. Upload Presentation Materials
To help the AI recognize technical terms, proper nouns, and other event-specific vocabulary more accurately, upload your presentation materials and extract Context from them.
Open the ☰ Side Menu in the top-right corner.
Tap Manage Context.
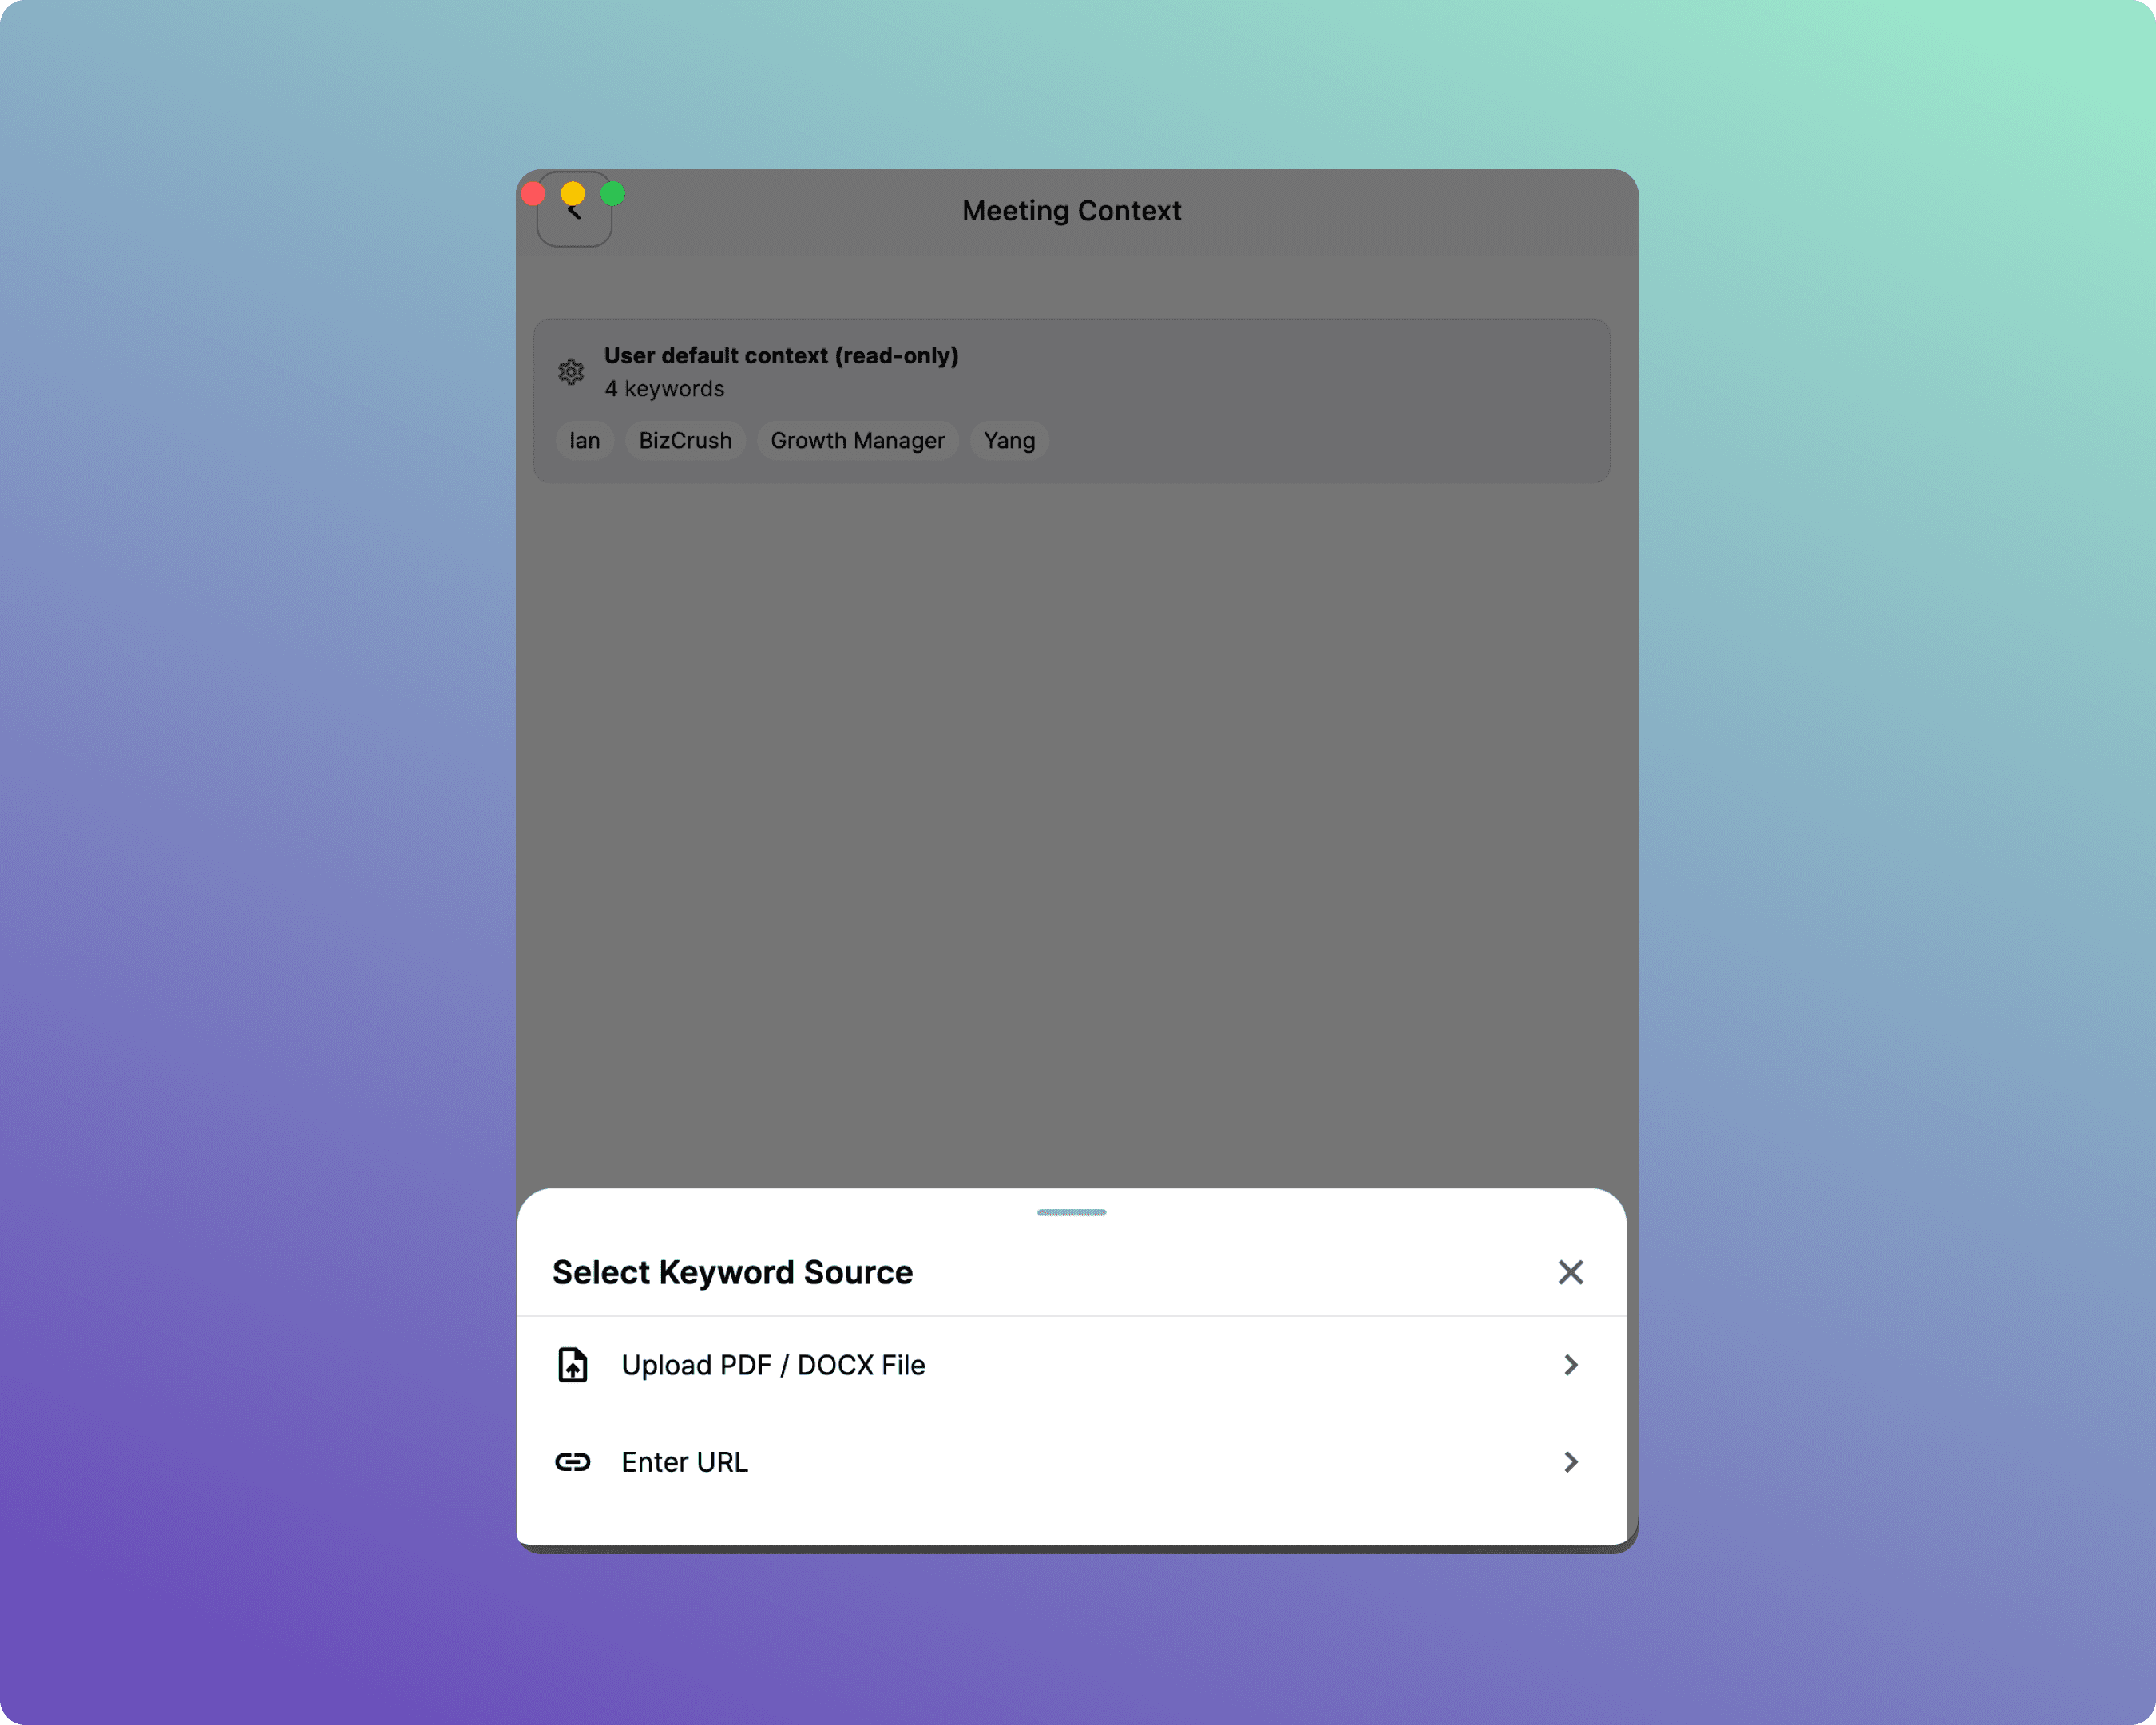
Use the Upload PDF / DOCX File at the top to automatically extract Context, or manually add Context in the input field.
Need to upload multiple files?
Currently, the system supports uploading only one file at a time. If you have multiple presentation files, combine them into a single PDF before uploading.
👉 For the full walkthrough with screenshots, see [Setup Guide, Section 5: Registering Custom Keywords].
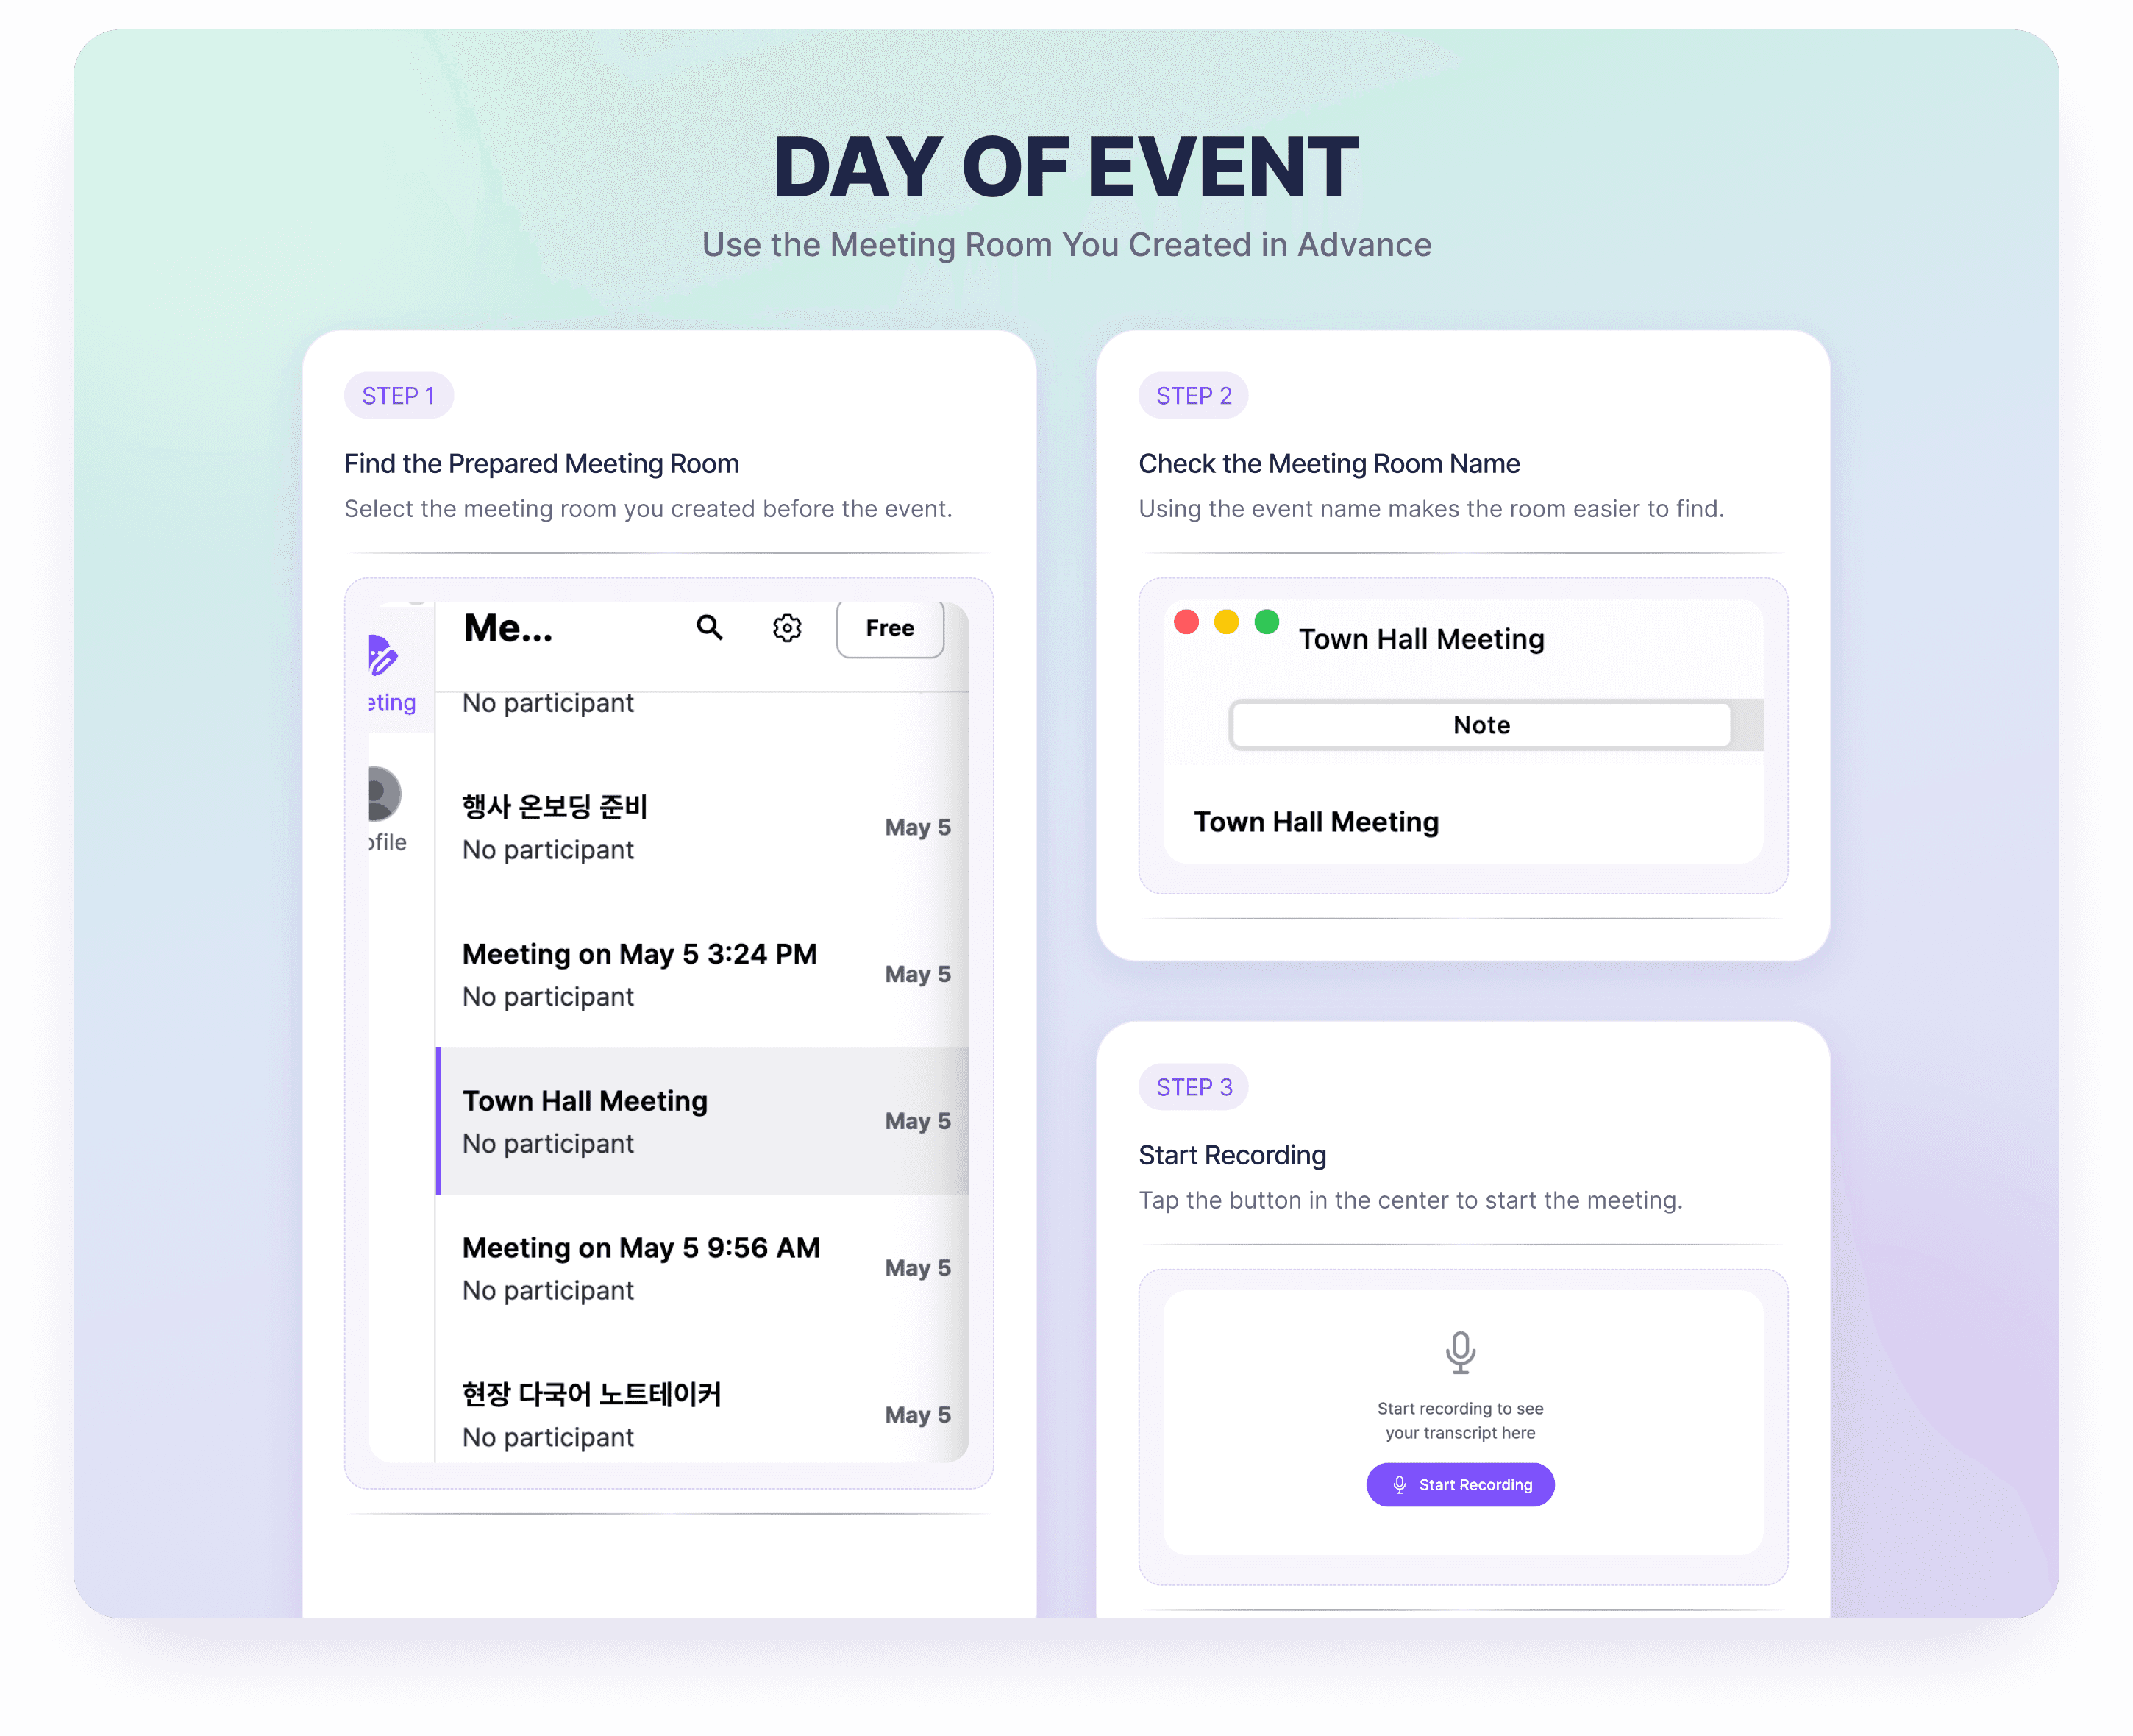
D. Day-of-Reminder
On the day of the event, do not create a new meeting room. Open the meeting room you prepared above and start recording from there.
Find the meeting room you created earlier (using the event name to locate it quickly).
Confirm the meeting room name.
Start recording from that room.
3. Caption Display Options for Different Event Setups
There are two main ways to display captions on the event screen. Choose the option that best fits your venue setup and equipment.
Which Option Should You Use?
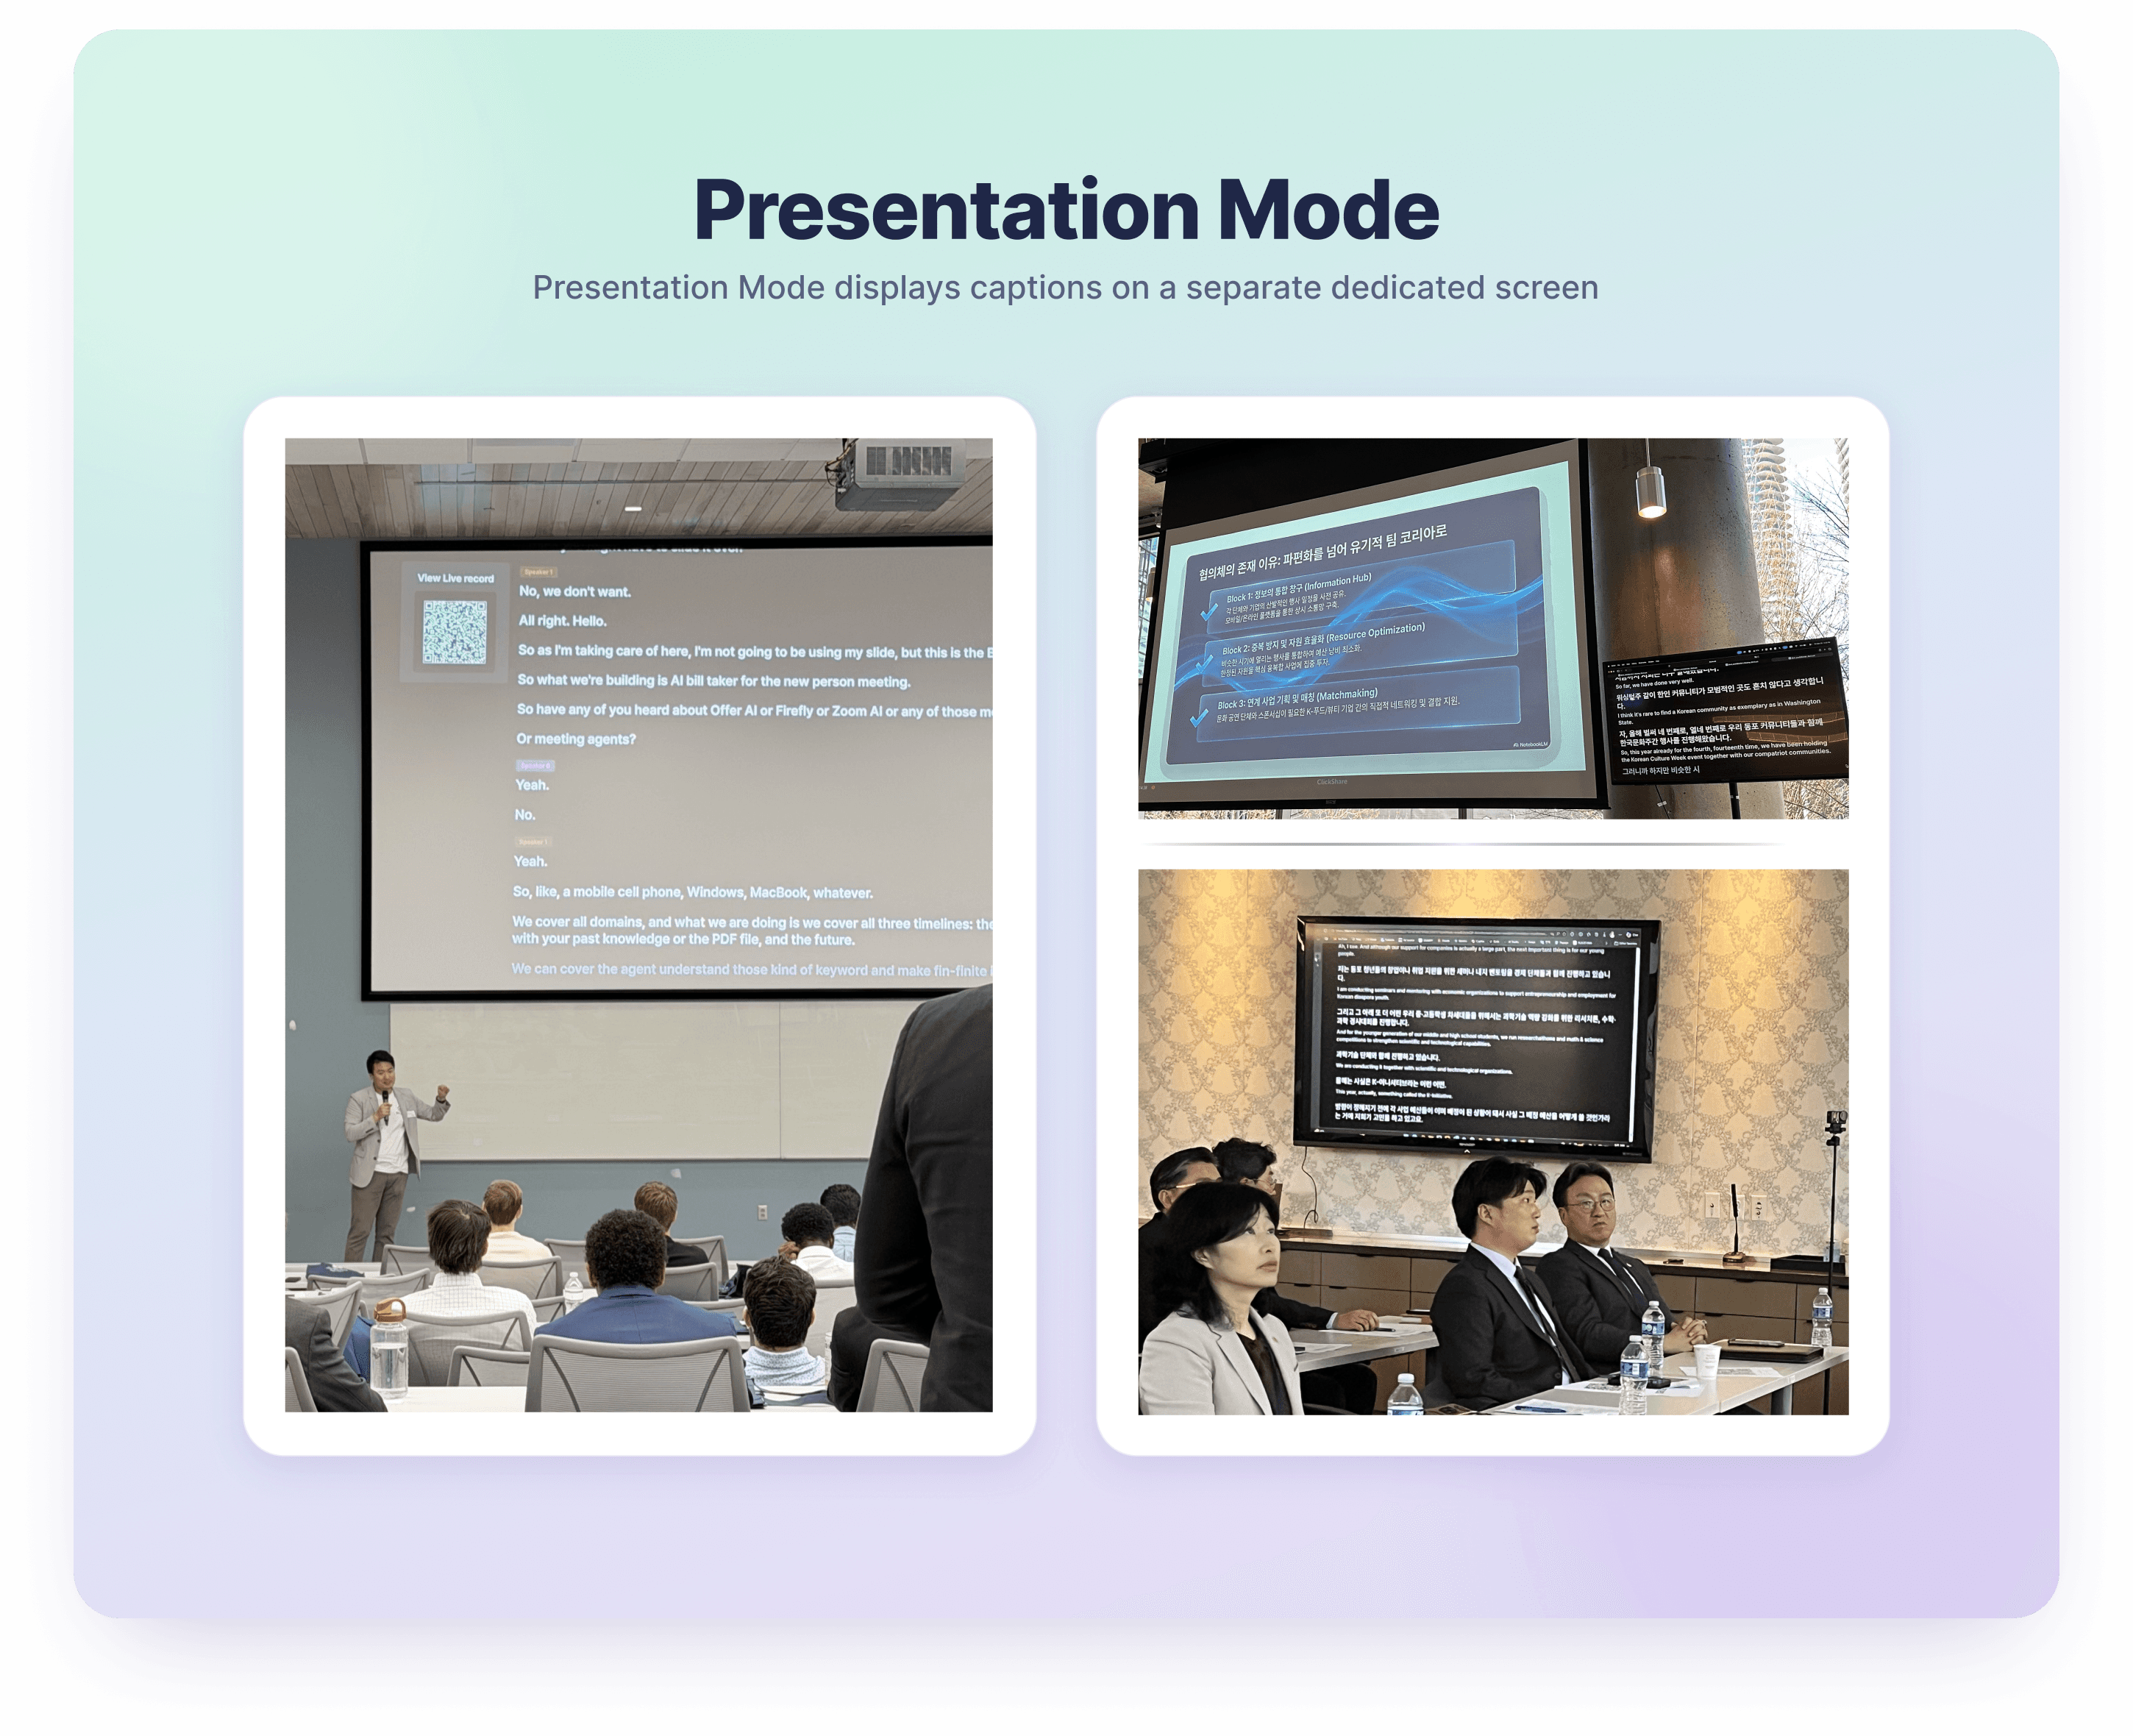
A. Presentation Mode
Setup: Uses two devices
How it works: Displays captions on a separate full-screen caption view
Best for: Mid-sized to large events with a dedicated caption screen
Requirement: Open the shared link in a browser
Advantage: More stable operation because the caption screen is separate. The presentation laptop does not need the BizCrush app installed.
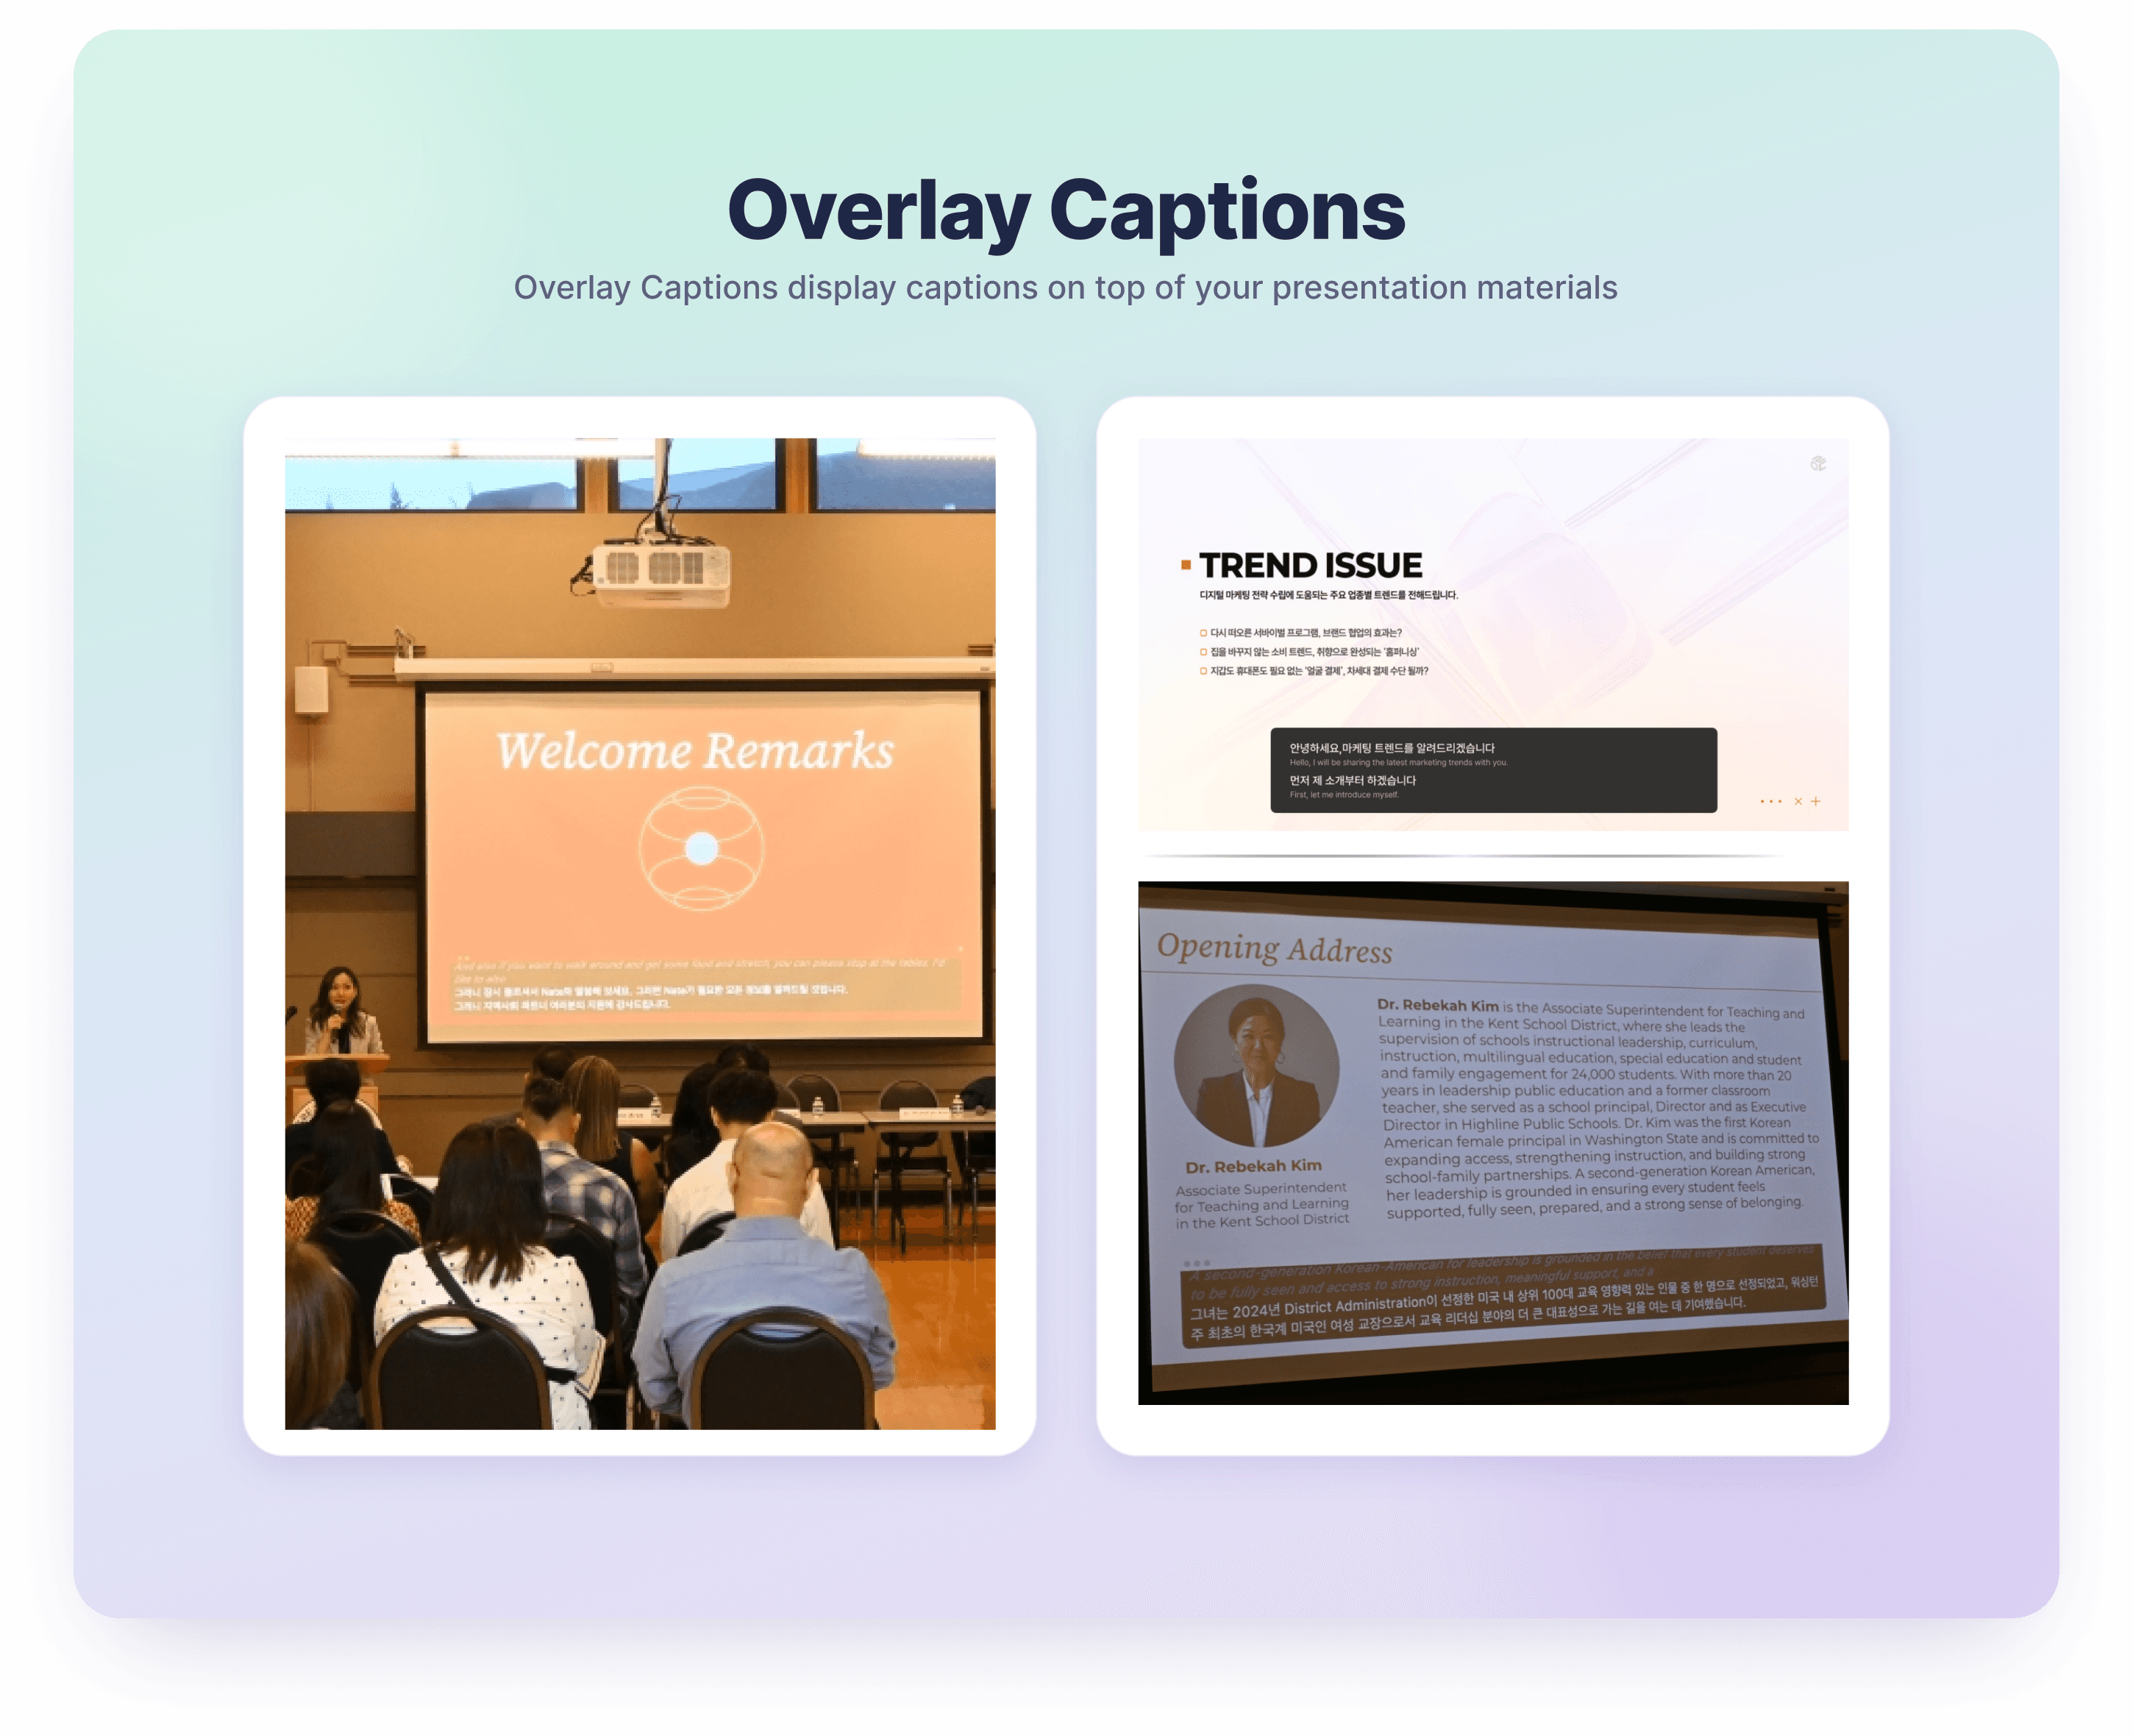
B. Overlay Captions
Setup: Uses one device
How it works: Displays a semi-transparent caption window over the presentation slides
Best for: Small events with a single display
Requirement: Run the desktop app on the presentation laptop
Advantage: Captions can appear directly on top of the slides, so you do not need a separate caption screen.
Feature | A. Two Devices: Presentation Mode | B. One Device: Overlay Captions |
|---|---|---|
What it is | A dedicated, full-screen caption view. | A semi-transparent caption window floating over your slides. |
Best for | Medium-to-large events with a separate, dedicated screen for captions. | Small events with only one main screen or projector. |
Requirements | Any web browser (via a Share Link). | BizCrush Desktop App must be running. |
Pros | No app installation needed on the display device; just open the link. | Stays on top of everything; freely adjustable size and position. |
Watch out for | Needs a second device dedicated to running the app. | Anything that disrupts the presentation laptop affects both slides and captions at once. |
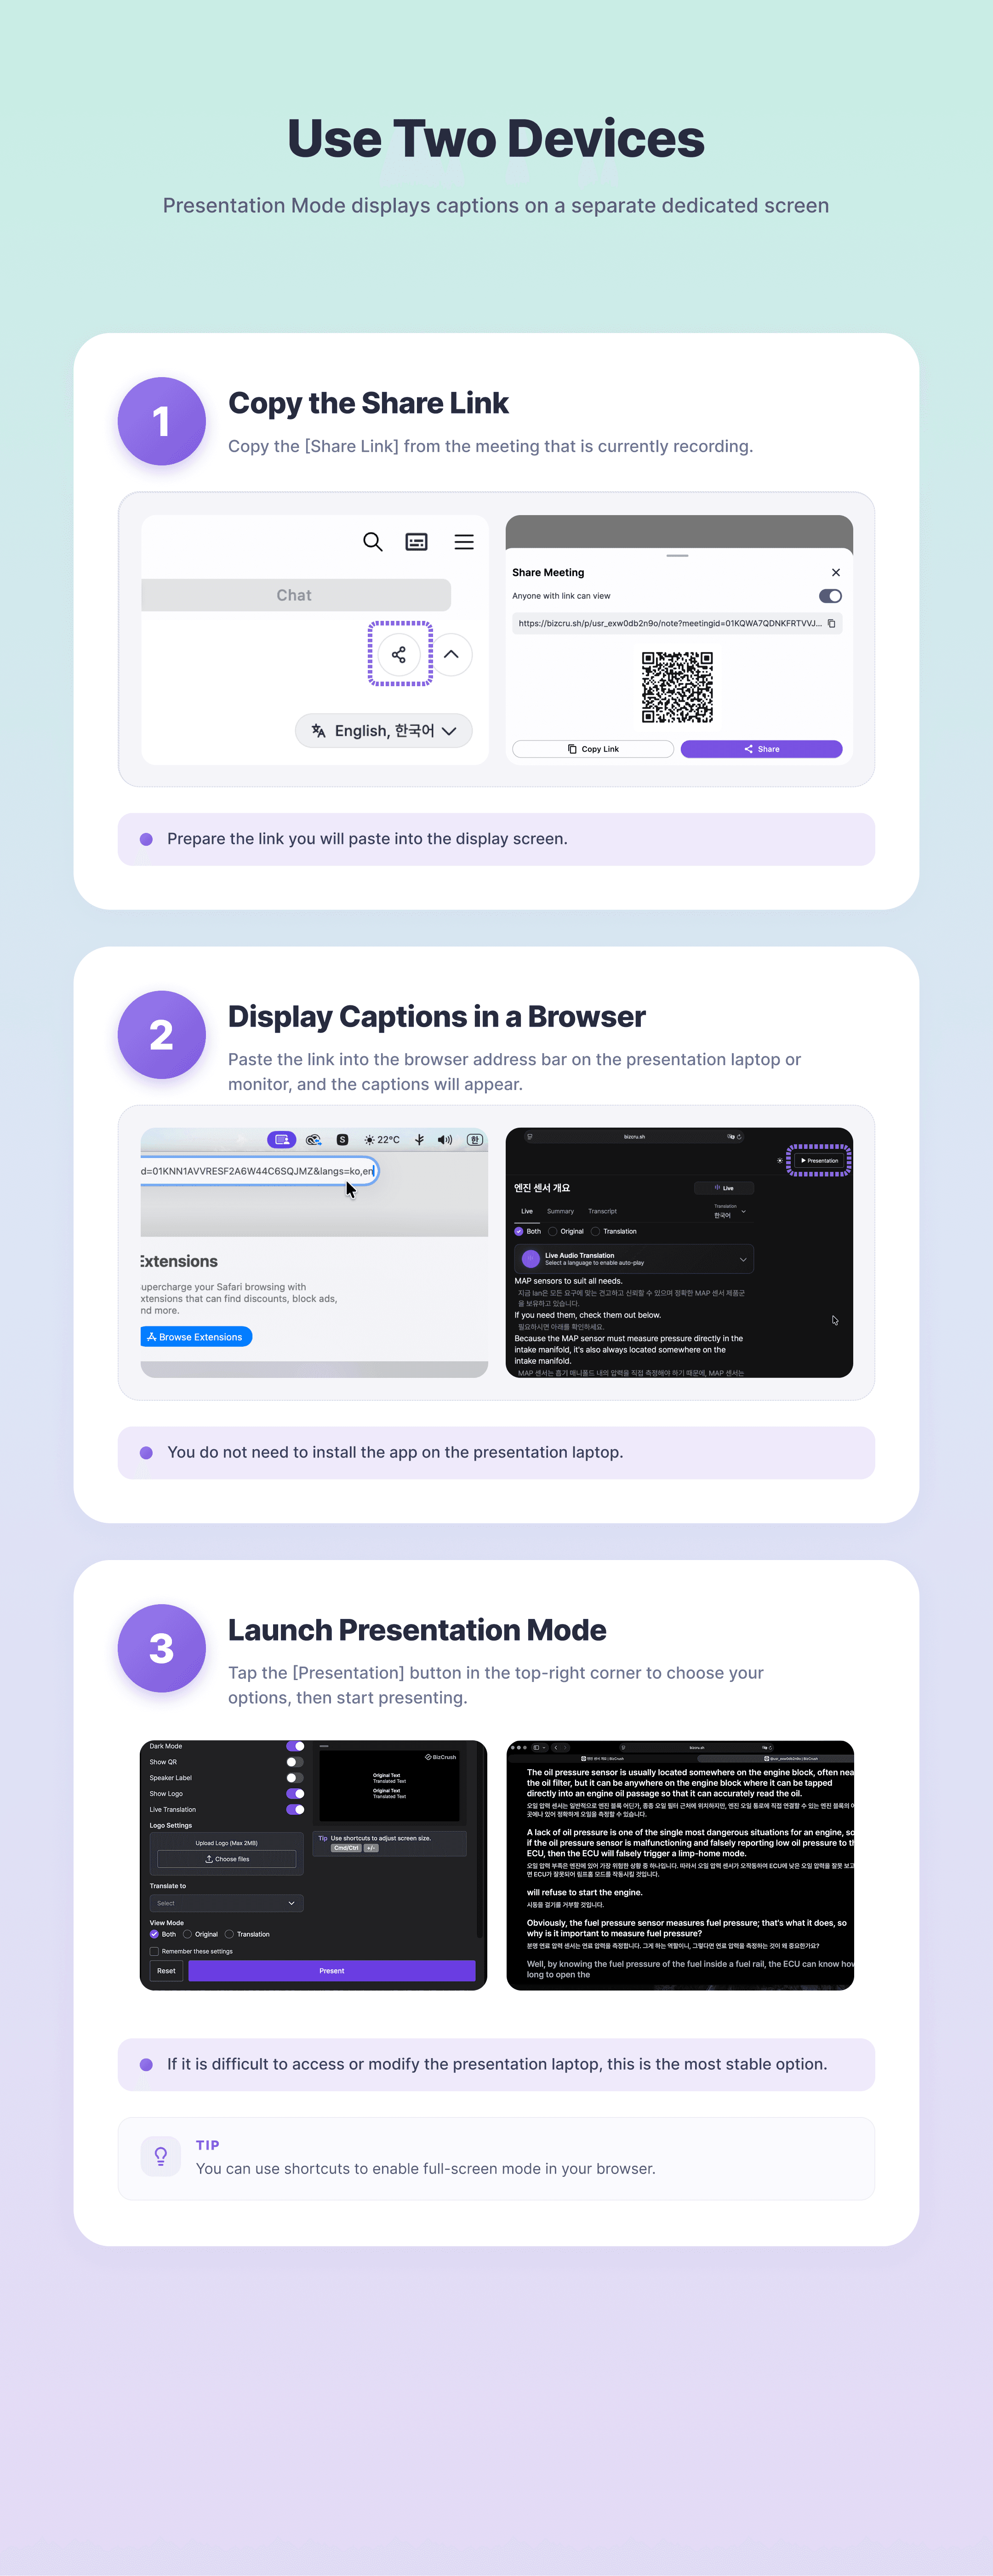
A. Use Two Devices: Presentation Mode
Presentation Mode is the recommended option when you prefer not to touch or modify the presentation laptop.
1. Sound Recognition: Place the Device Running BizCrush
Open the BizCrush app on a staff member's smartphone or an extra laptop, then start the meeting.
Place this device near the presenter on stage or right in front of the venue's loudspeaker.
Once the event starts, avoid moving or touching the device unless necessary.
2. Display: Set Up the Output Screen
The presentation laptop or monitor connected to the display does not need the BizCrush app installed.
Open an internet browser, such as Chrome, and paste the share link for the BizCrush meeting that is currently recording.
The captions will appear on screen.
👉 For instructions on copying links and displaying screens, see [Setup Guide, Section 3.B: Presentation Mode Setup].
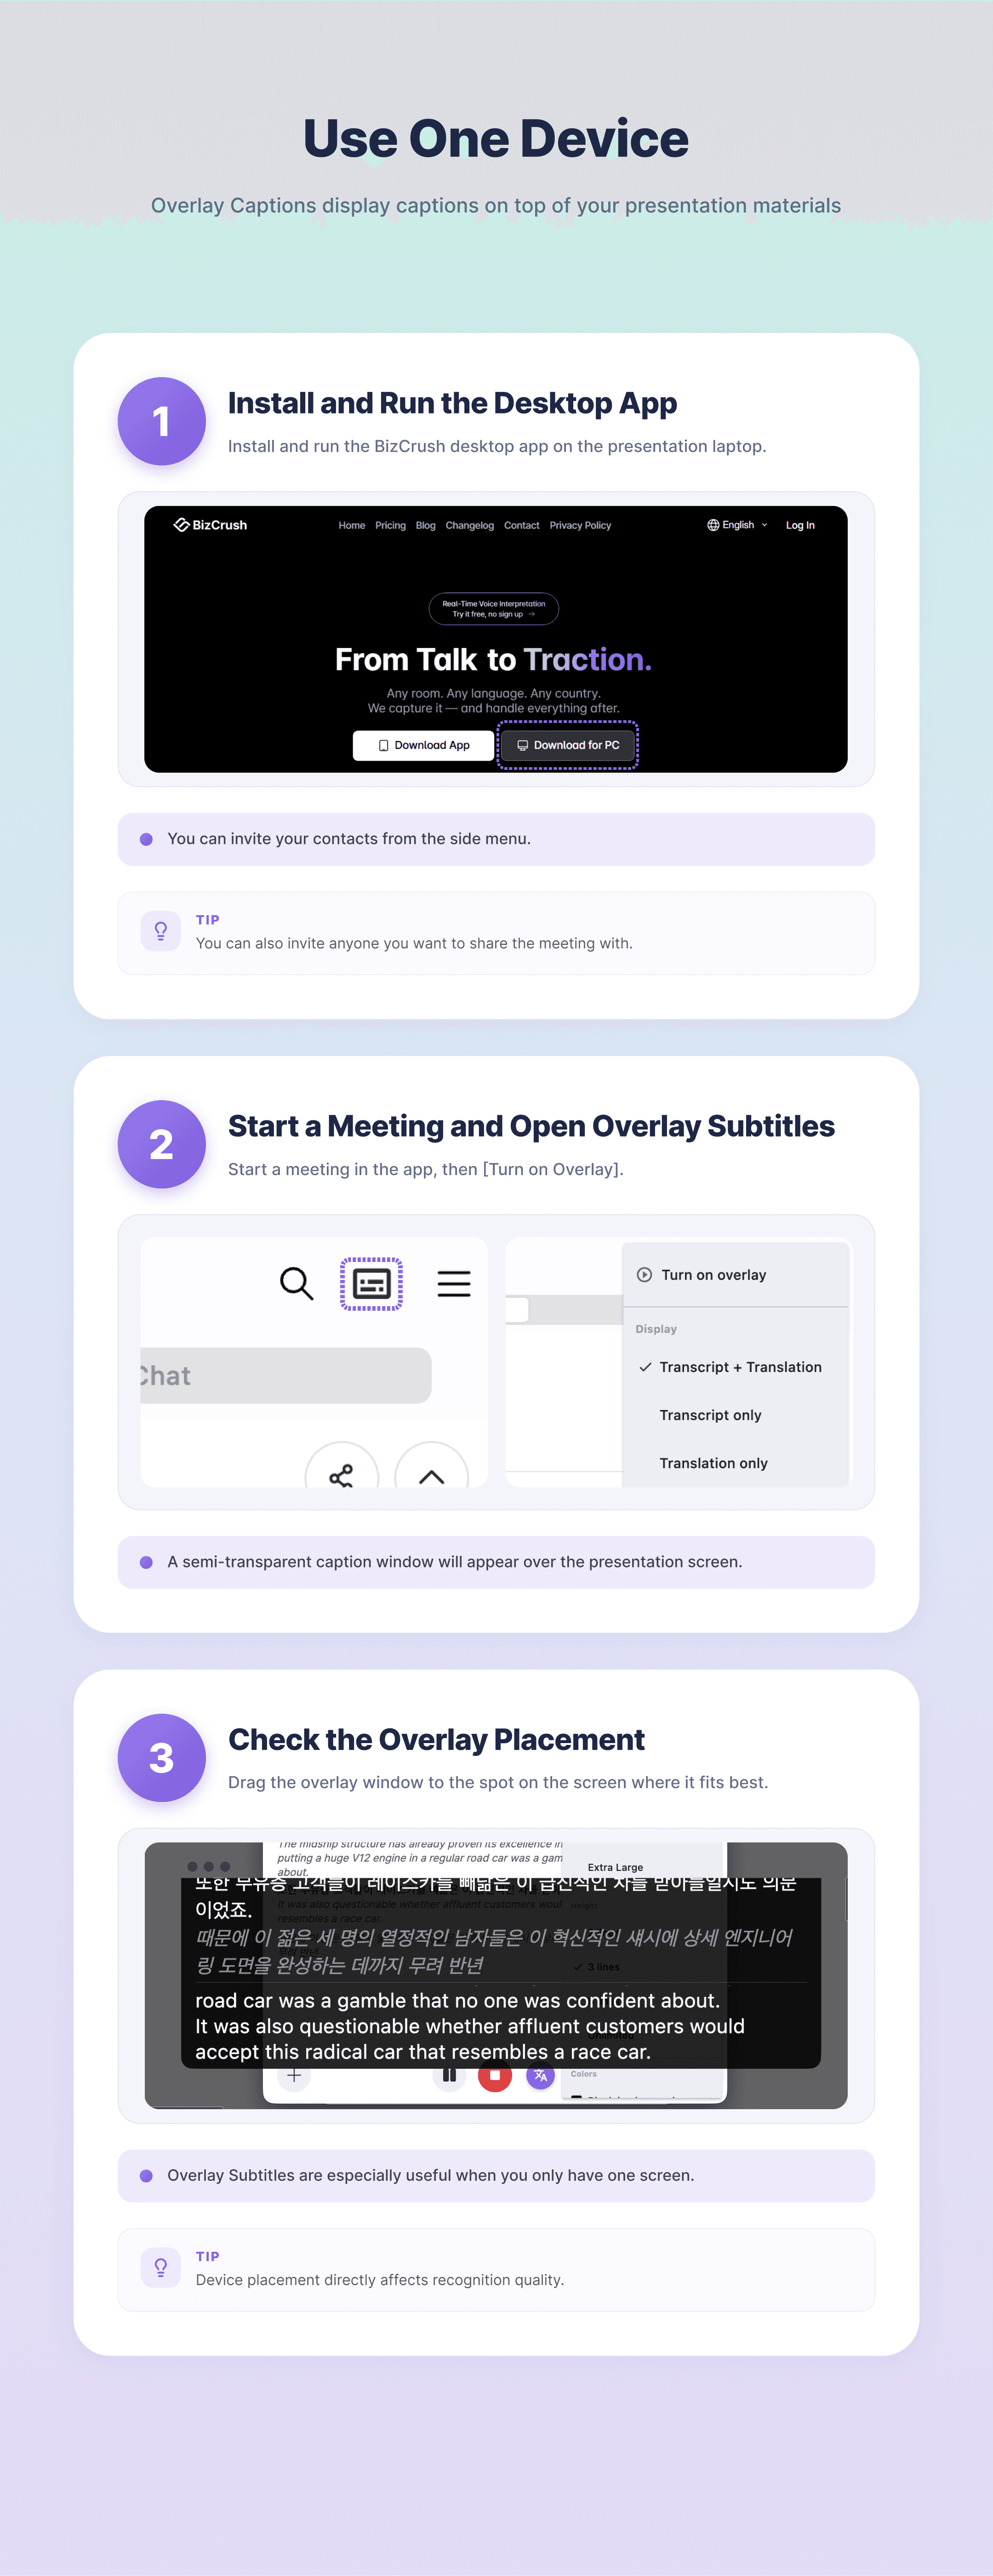
B. Use One Device: Overlay Captions
Use Overlay Captions when you need to show both the presentation slides and captions on the same screen.
Install and run the BizCrush desktop app on the presentation laptop connected to the screen.
Start a meeting in the app, then tap Open Overlay Captions to turn it on.
Make sure the presentation laptop can clearly hear the presenter's voice. Ideally, place it near the front of the stage or close to a loudspeaker.
Note: The desktop app can be downloaded from the BizCrush main homepage.
👉 For instructions on enabling overlays, see [Setup Guide, Section 3.A: Overlay Subtitle Setup].
4. Pre-Event Checklist
To keep the event running smoothly, check the following items before the event starts.
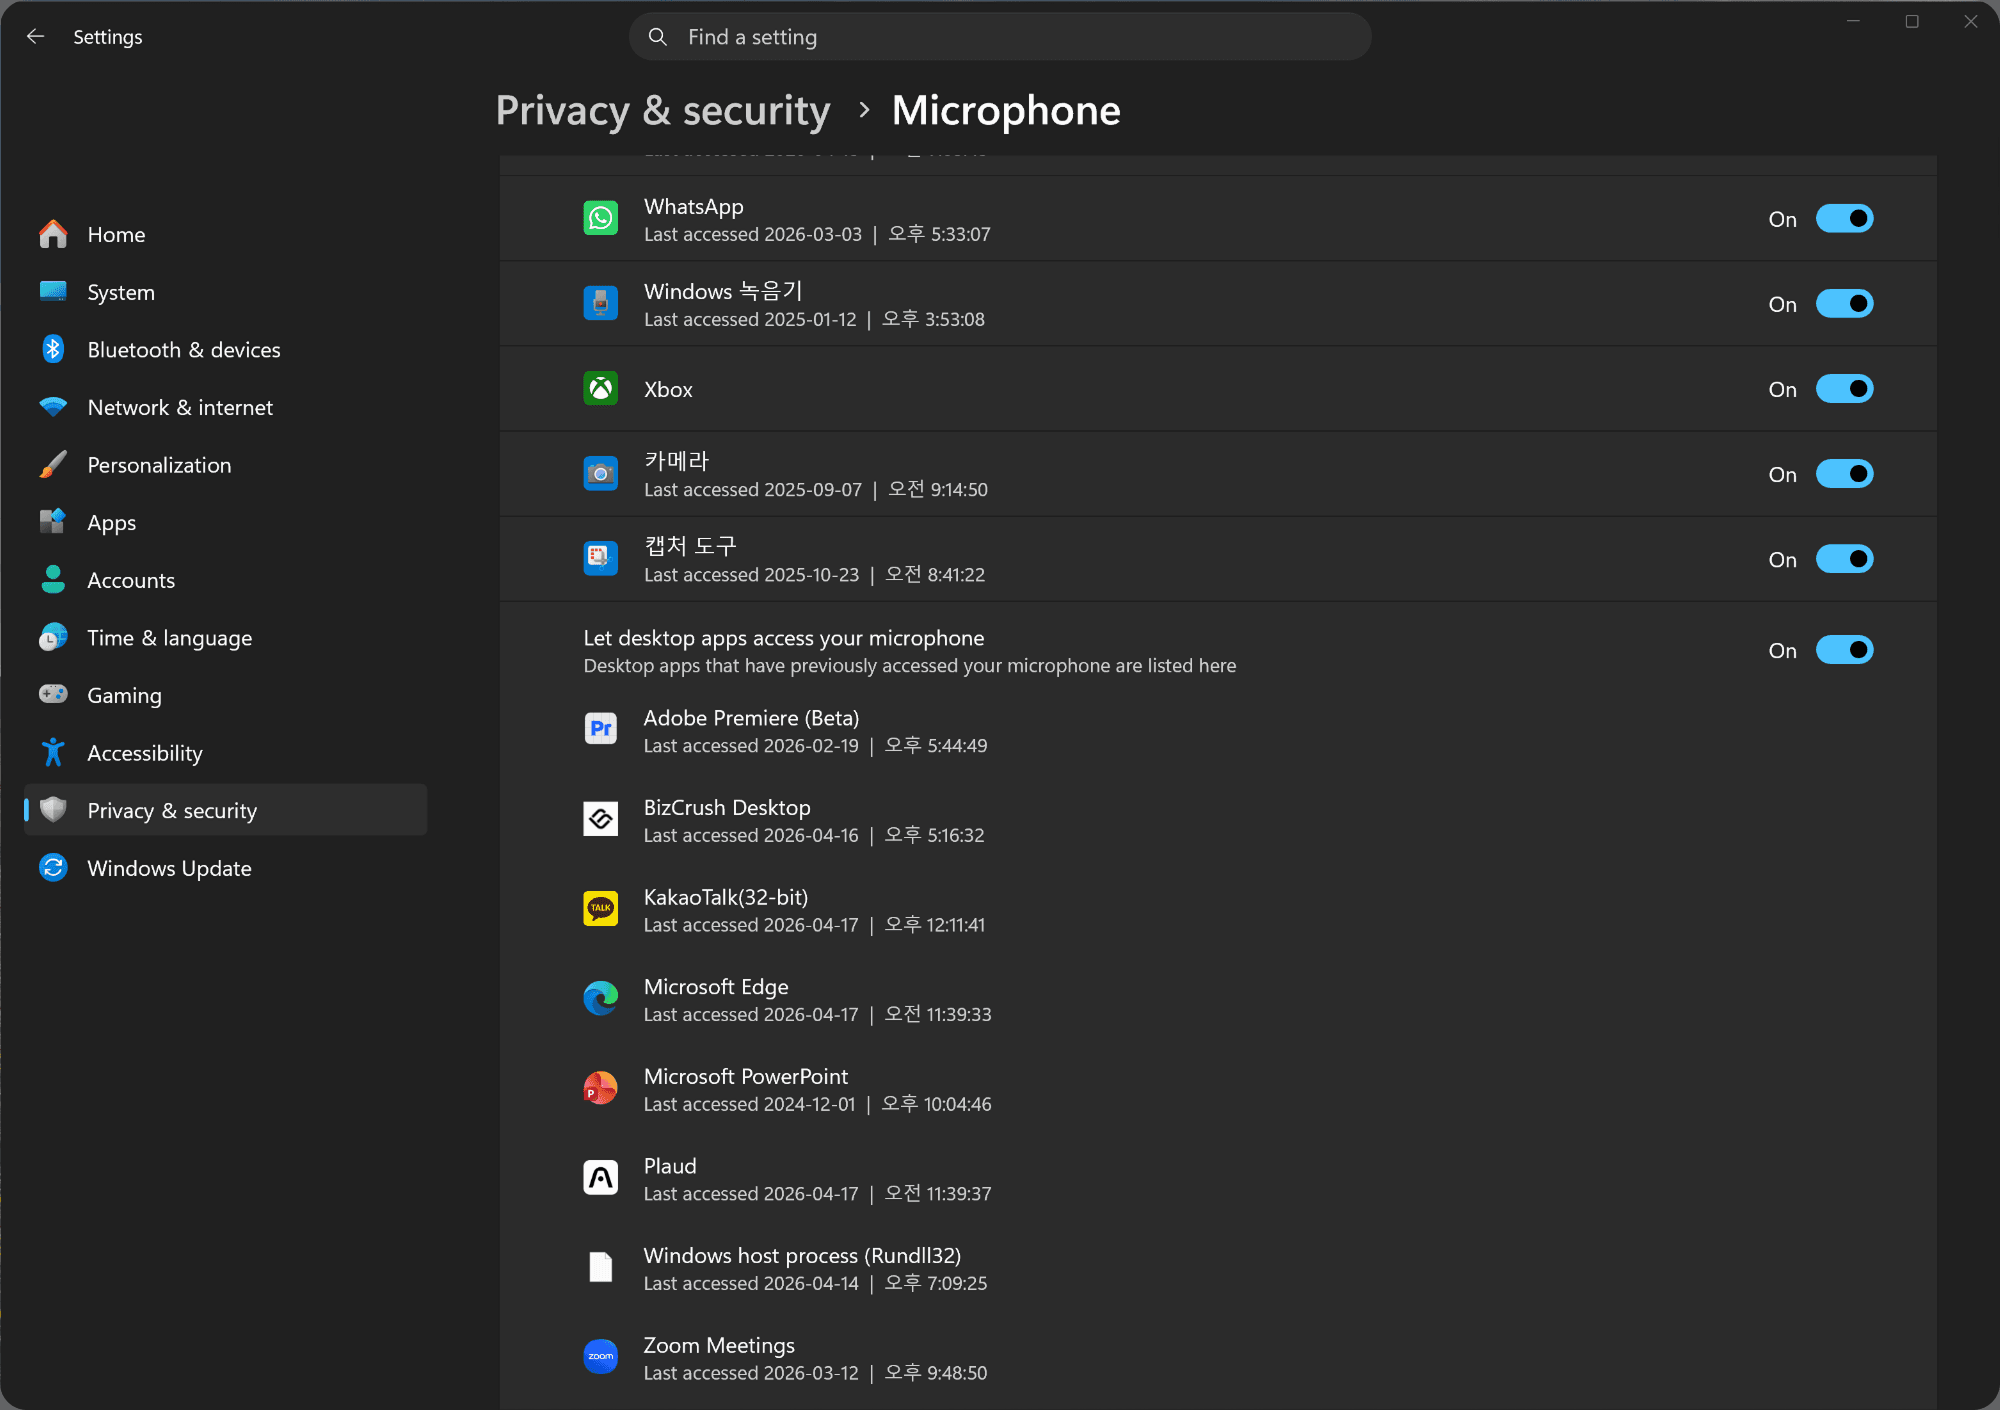
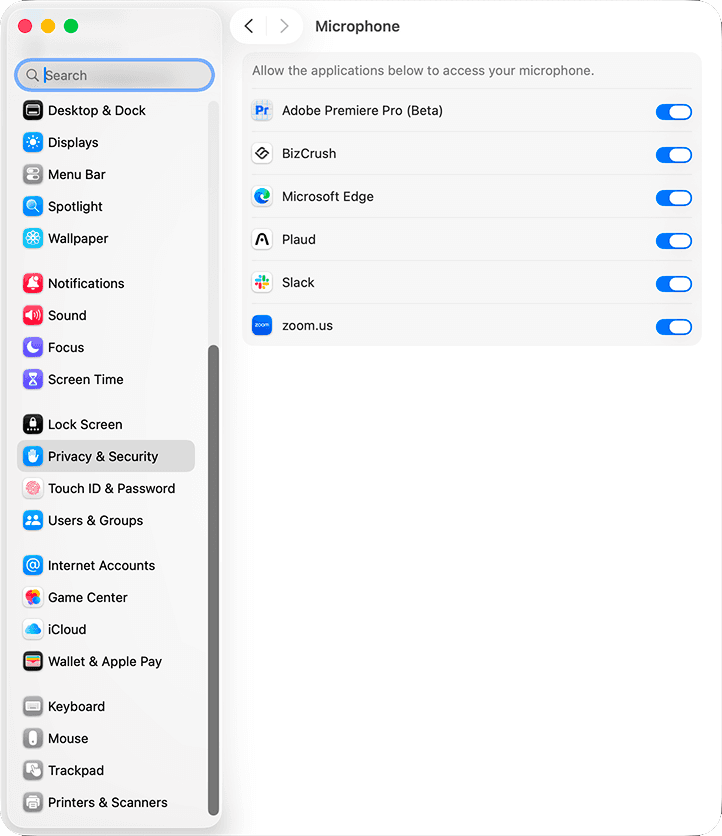
Basic Installation and Permissions
Install the app on the devices you will use for the event.
Allow the installed app to access the microphone.
If you allowed permissions during the first launch and a test recording works properly, your setup is complete.
If recording does not work, check the Microphone section in your device settings and confirm that BizCrush has permission.
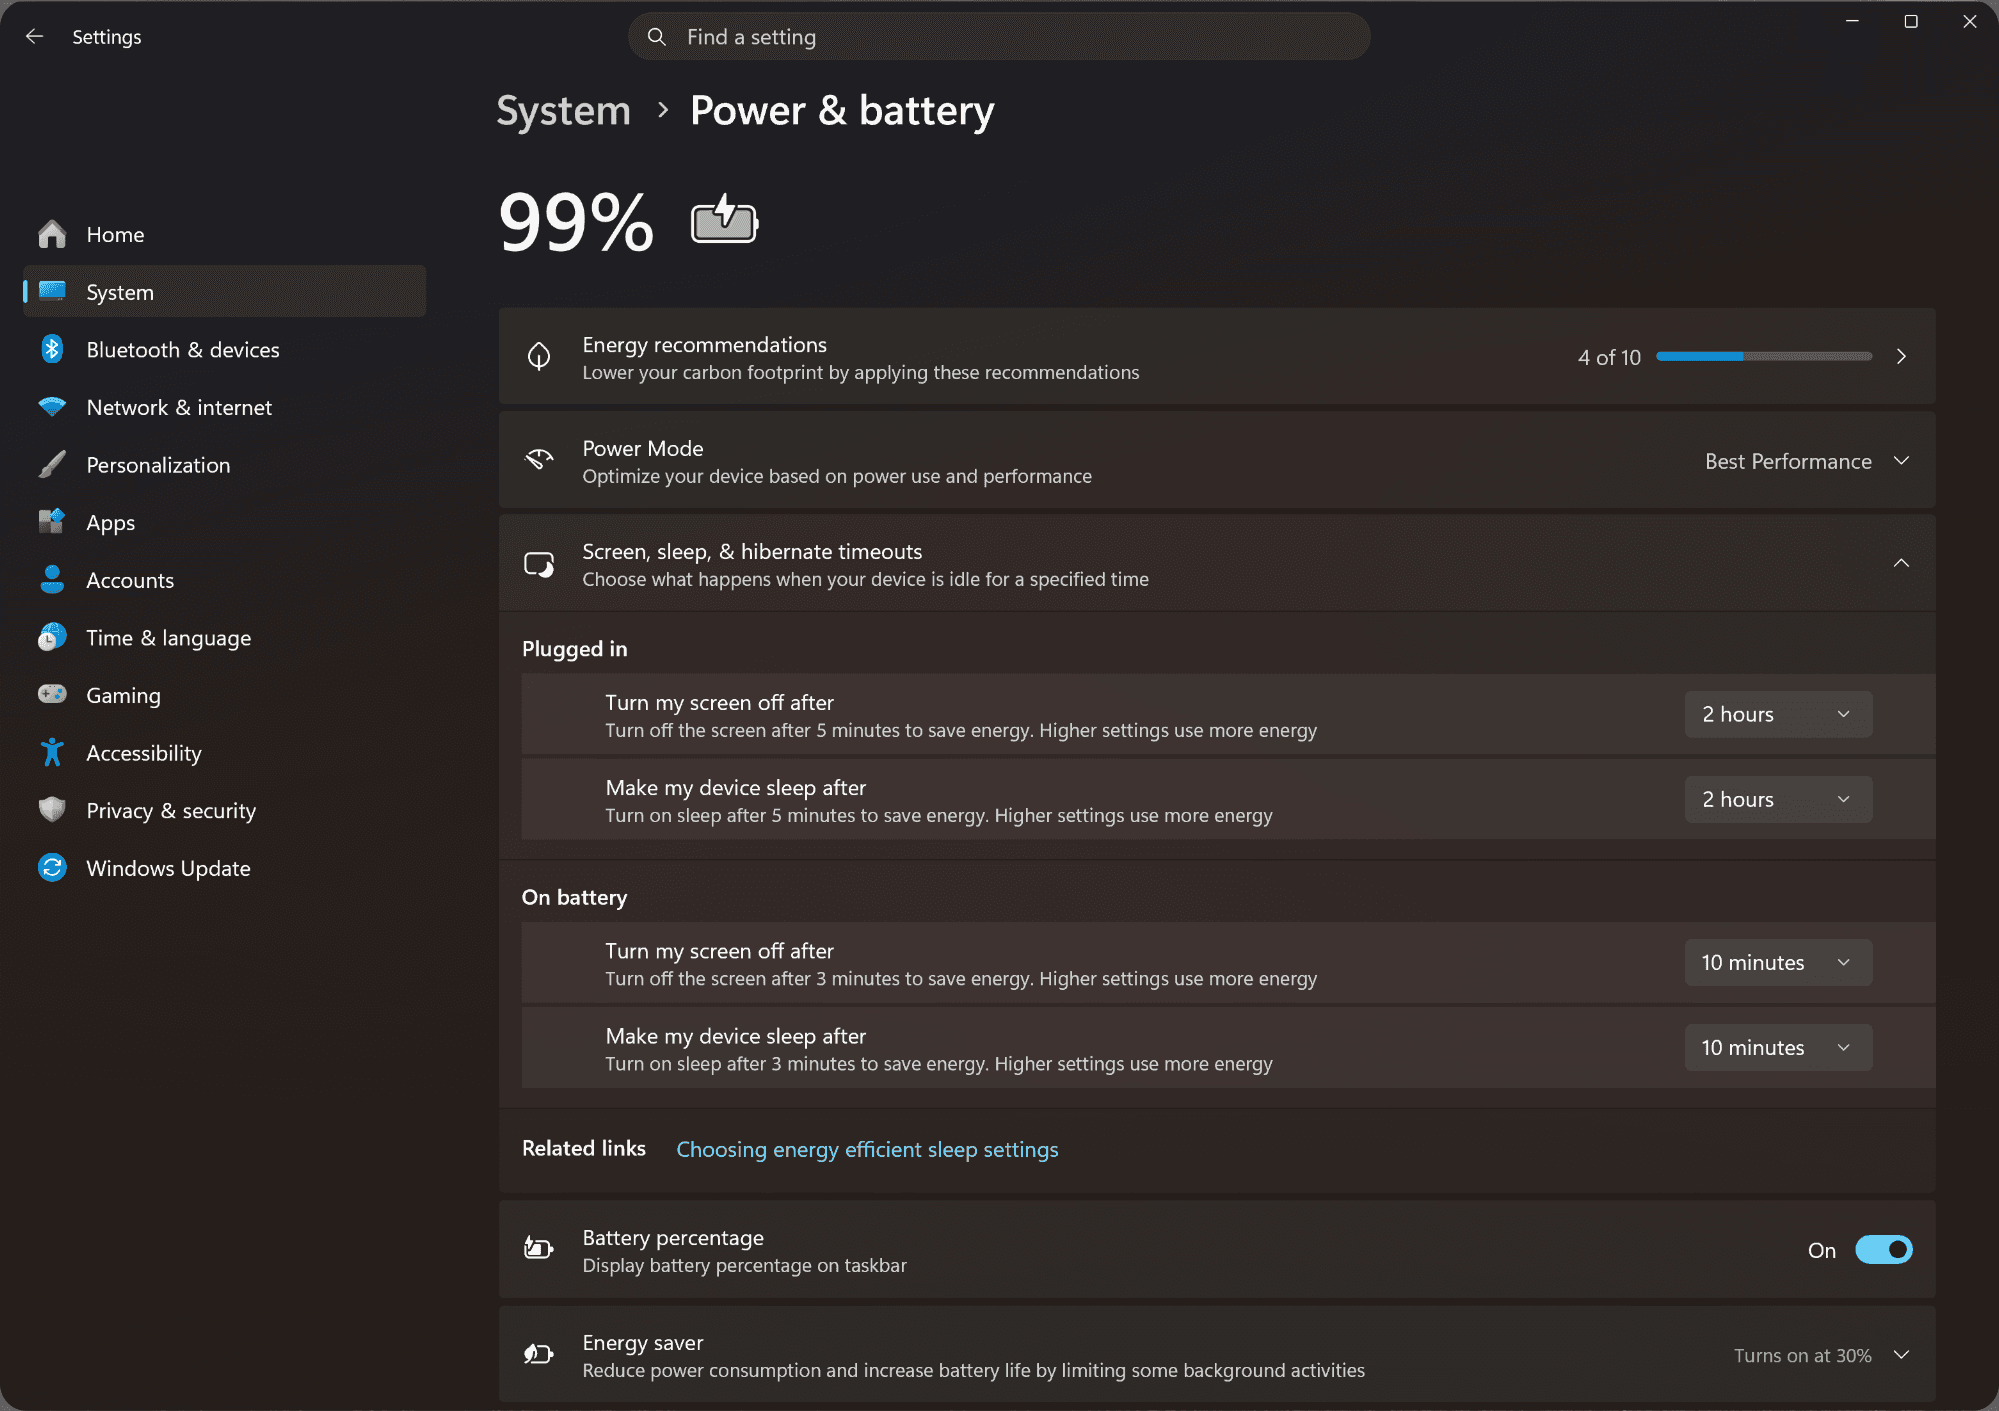
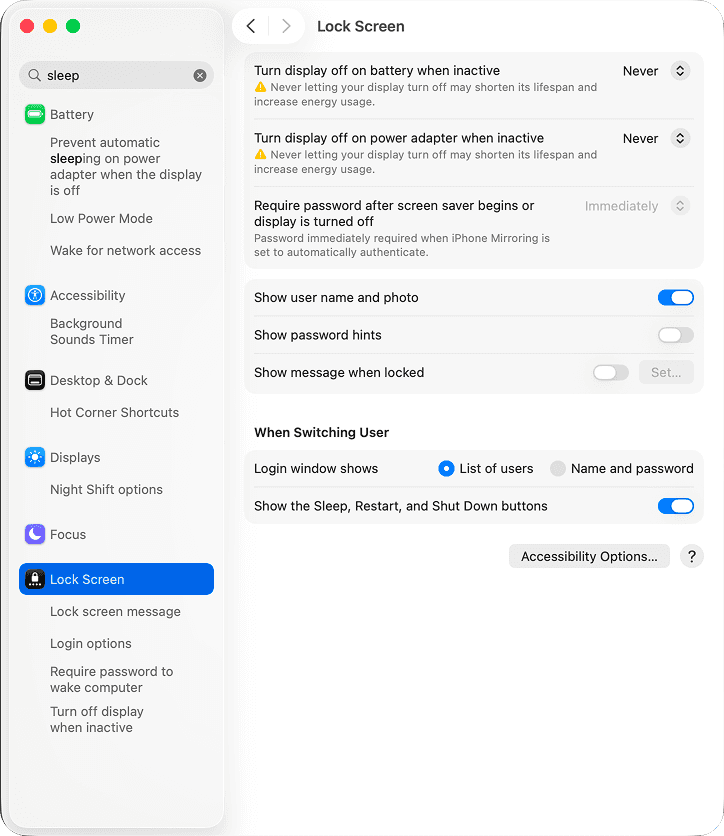
Prevent the Screen from Turning Off
If the recording device screen turns off during the event, especially on a laptop, recording may stop.
Make sure to disable auto screen lock, display sleep, or power-saving mode in the device settings.
Language Settings
Select the presenter's language and the language you want captions to be translated into.
If your event requires multiple languages, check the necessary language combinations in advance.
👉 For instructions on setting the language, see [Setup Guide, Section 3 → Common Setup Steps, Steps 2–3].
Keyword Registration
Add frequently used proper nouns, organization names, presenter names, and technical terms before the event.
You can upload a presentation PDF or DOCX, or add Context manually.
👉 For instructions on registering keywords, see [Setup Guide, Section 5: Registering Custom Keywords].
Microphone Test
Place the device in its actual event location, then test it using the stage microphone.
Confirm that text appears on screen and that the caption response speed feels appropriate.
QR Code Placement
Display the QR code at the venue entrance or on the waiting screen so attendees can view captions on their own smartphones.
👉 For instructions on finding the QR code, see [Setup Guide, Section 6: Sharing Subtitles with Attendees].
Final Rehearsal
Under conditions similar to the actual event, test the full flow once: start recording → display captions → share the QR code.
5. MC / Host Announcement Script
If you would like to introduce BizCrush at the beginning of the event, you can use the script below.
Today's event offers real-time multilingual captions and voice translation for our global attendees.
Please scan the QR code shown on screen using your smartphone camera.
You can choose your preferred language and view captions instantly without installing an app.
If you use personal earphones, you can also listen to translated audio in real time.
Q&A
Q. How do I stop the recording? Can I stop it from any device that is logged in?
A. A session recording can only be stopped from the device that started the recording.
For example, if you started the meeting on a smartphone, you cannot stop the recording from a laptop. Plan accordingly during the event.
Q. The presenter is talking, but captions are not appearing on screen.
A. The device may not be hearing the sound clearly.
Try moving the recording device, whether it is a smartphone or laptop, closer to the venue loudspeaker or to a location where the sound is clearer.
Also, check that recording is actually in progress and that microphone access has been allowed.
Q. Captions are showing, but the translation language is wrong.
A. Check whether the correct translation language is selected in the real-time transcript panel.
Change it back to the language you need.
Q. I am using the real-time caption overlay feature, but the caption text is too small.
A. For Overlay Captions, change the caption size to Large or Extra Large in the caption settings.
For Presentation Mode, you can adjust the display size using your browser shortcuts: Cmd/Ctrl + +/-.
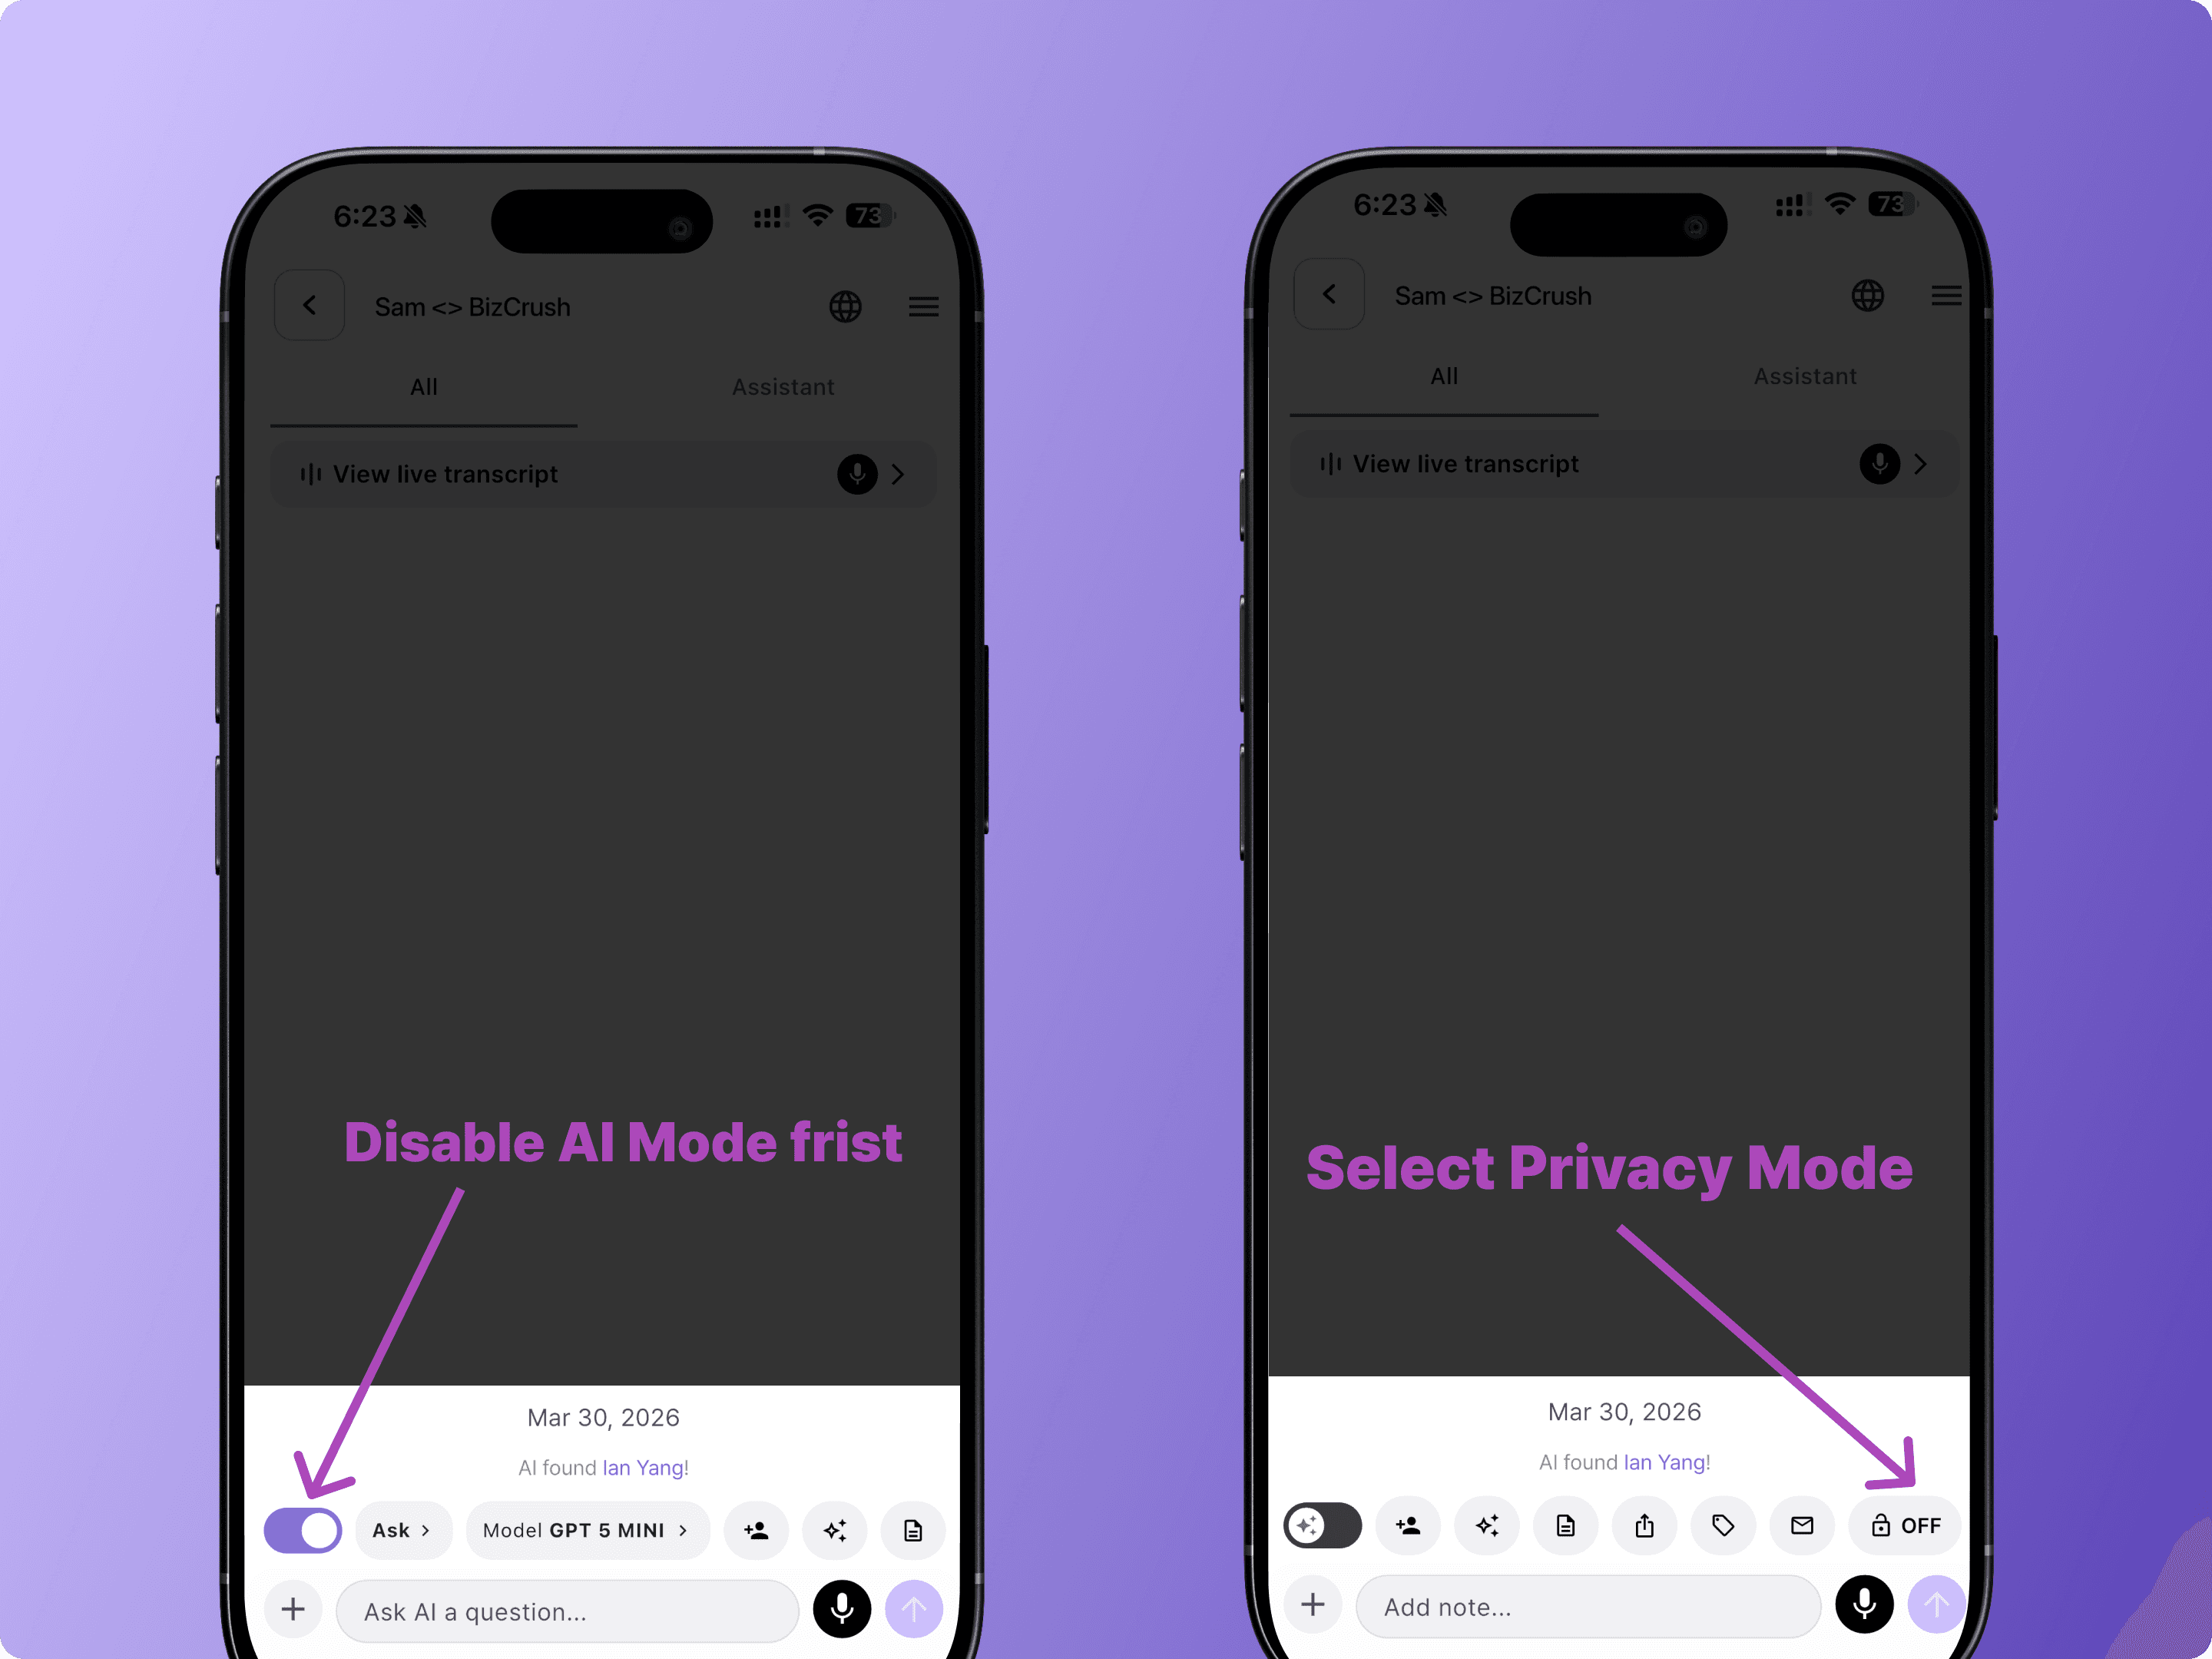
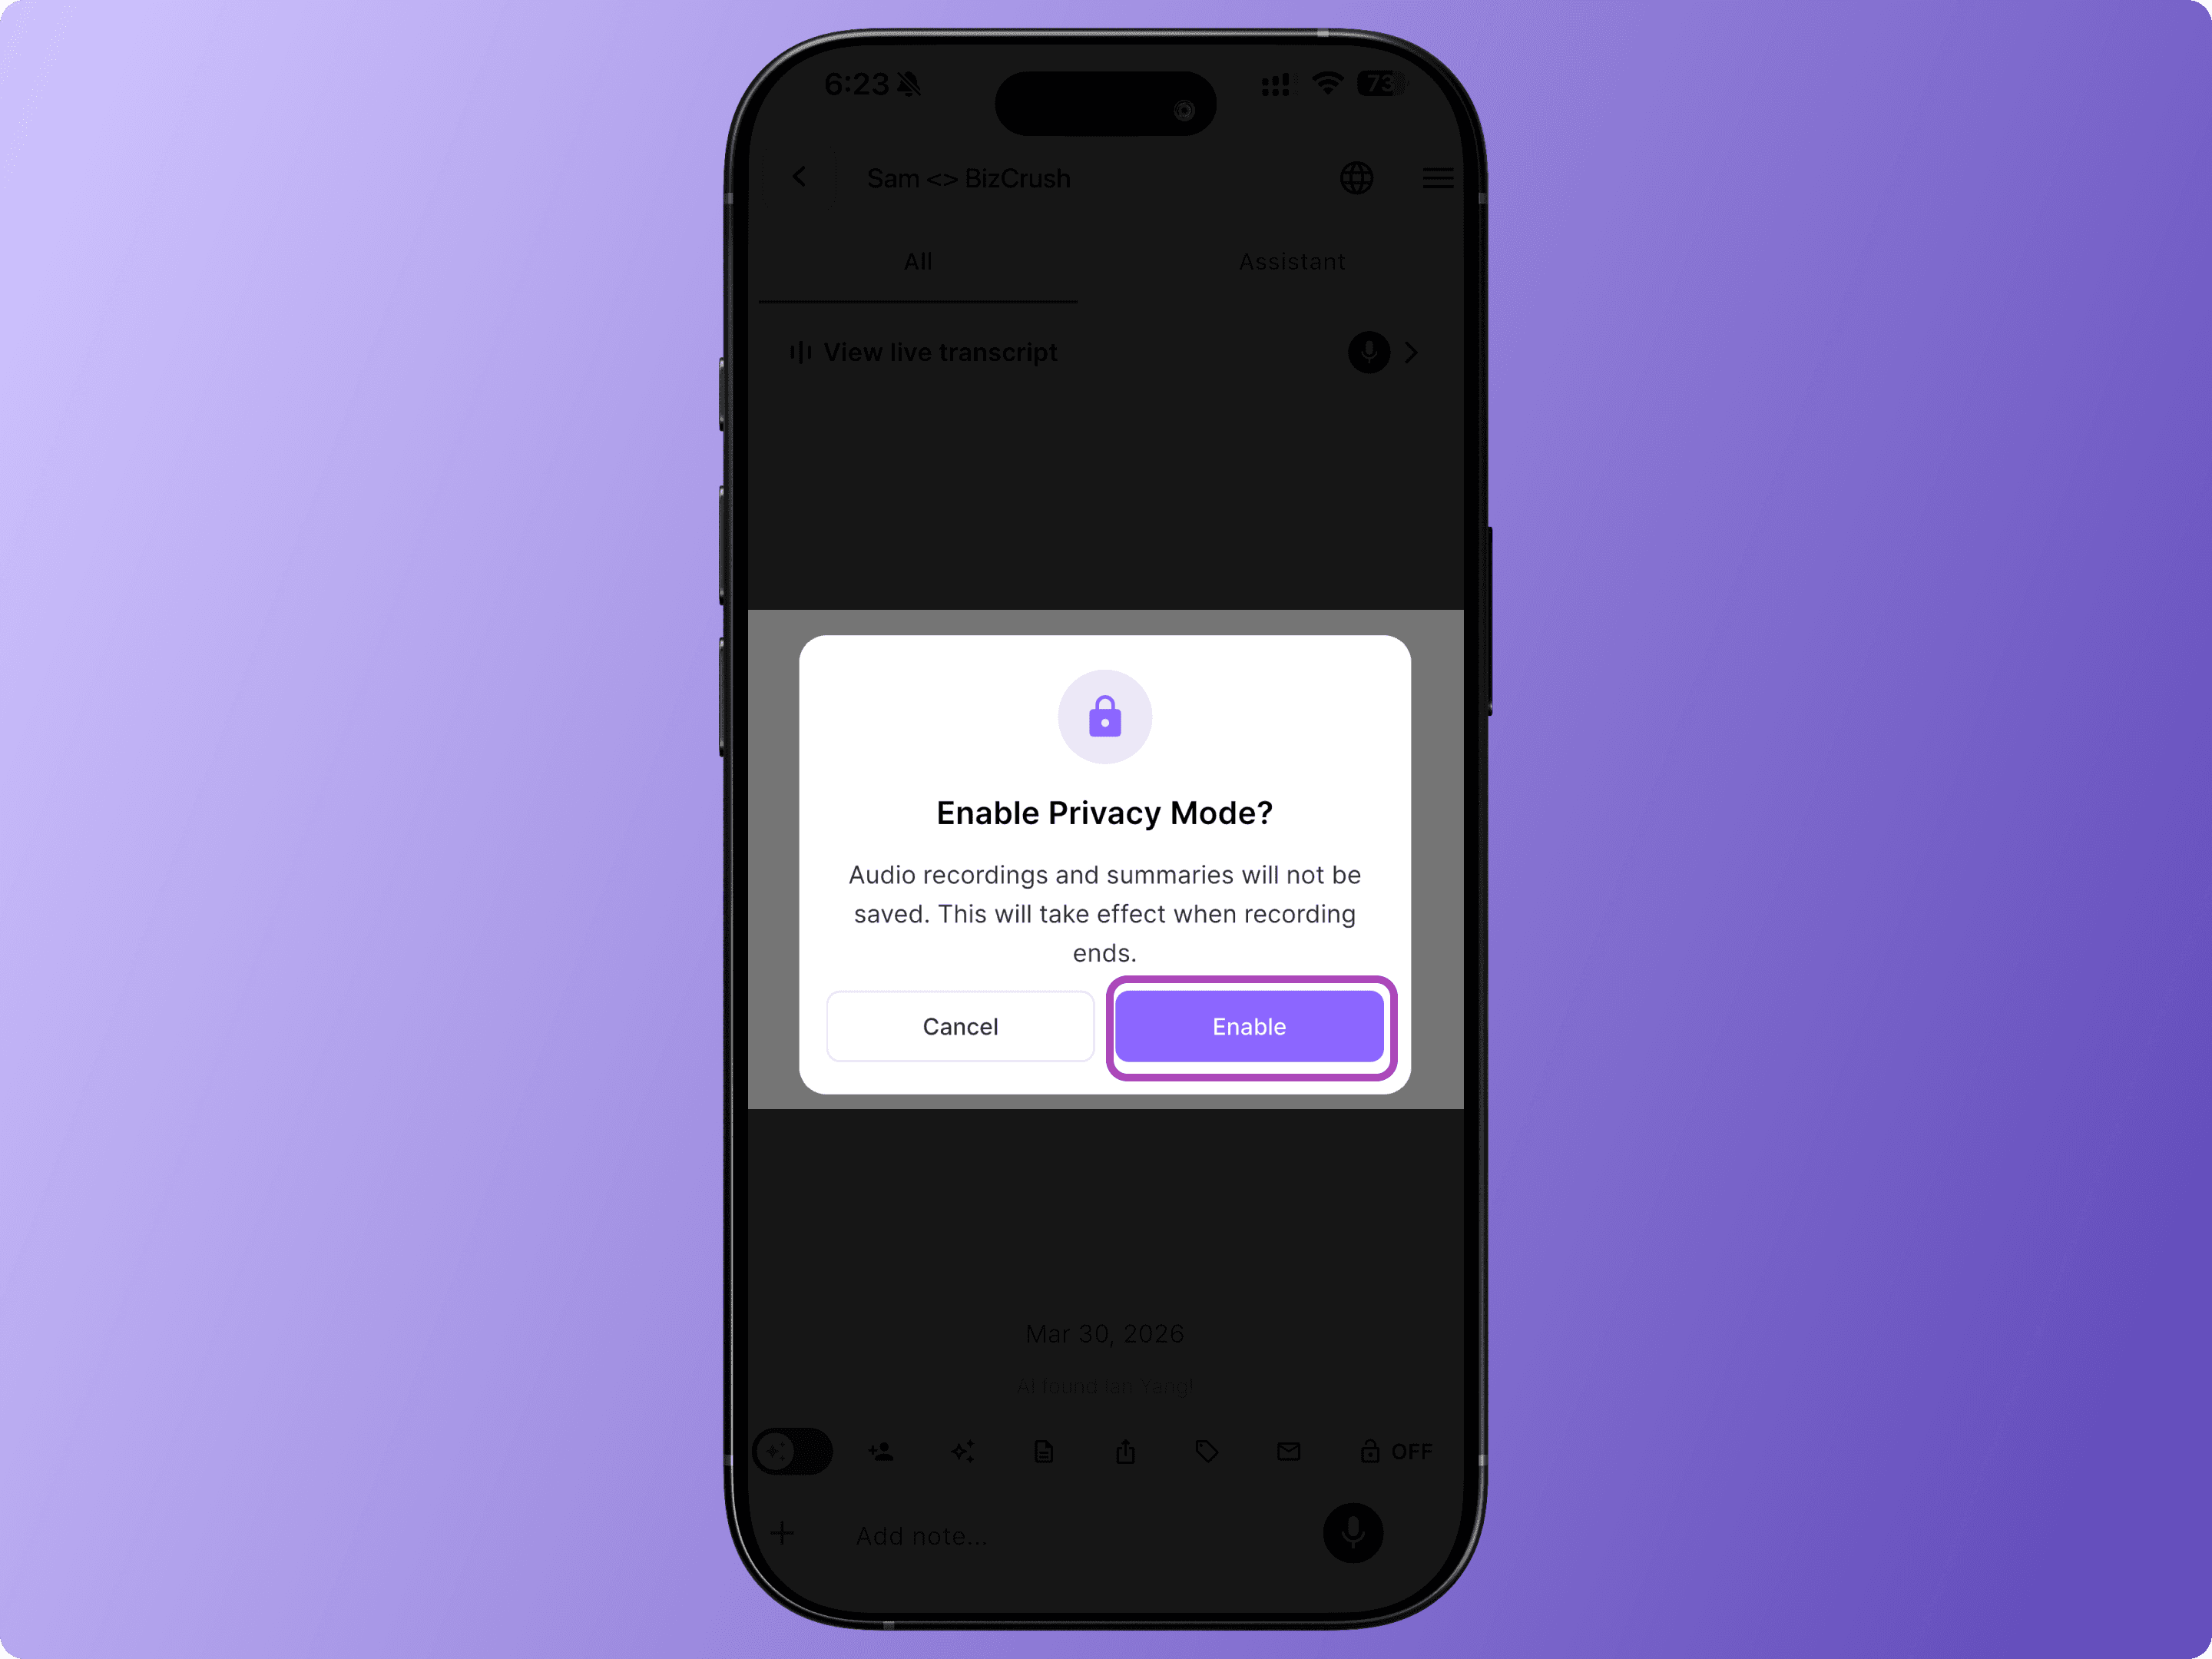
Q. Can I run the event without recording for privacy reasons?
A. Yes — click the Padlock icon in the bottom toolbar to enable Privacy Mode. Real-time translation continues to work, but no voice data or transcripts are saved to your device or BizCrush servers.
If the issue is not resolved, please contact us anytime at business@bizcrush.ai.
👉 For more troubleshooting scenarios, see [Setup Guide, Section 7: Event Day Checklist & Troubleshooting].
BizCrush
Growth
May 7, 2026
5
min

Tutorials
BizCrush Event Host Setup Guide
Host multilingual events effortlessly with BizCrush—live interpretation, captions, AI summaries, and instant sharing in one app. This guide helps you run events smoothly from start to finish.
Host global conferences and seminars seamlessly — with no expensive equipment or live interpreters required.
With just the BizCrush app, you can handle real-time translation, live subtitles, AI summaries, and instant sharing all at once.
This guide walks event hosts through the entire process — from pre-event setup to live execution — so your session runs flawlessly.
1. What BizCrush Offers at Your Event
BizCrush captures spoken audio in real time, converts it to text, translates it into your preferred language, and displays it as subtitles on screen.
For the Host (Presenter's Screen)
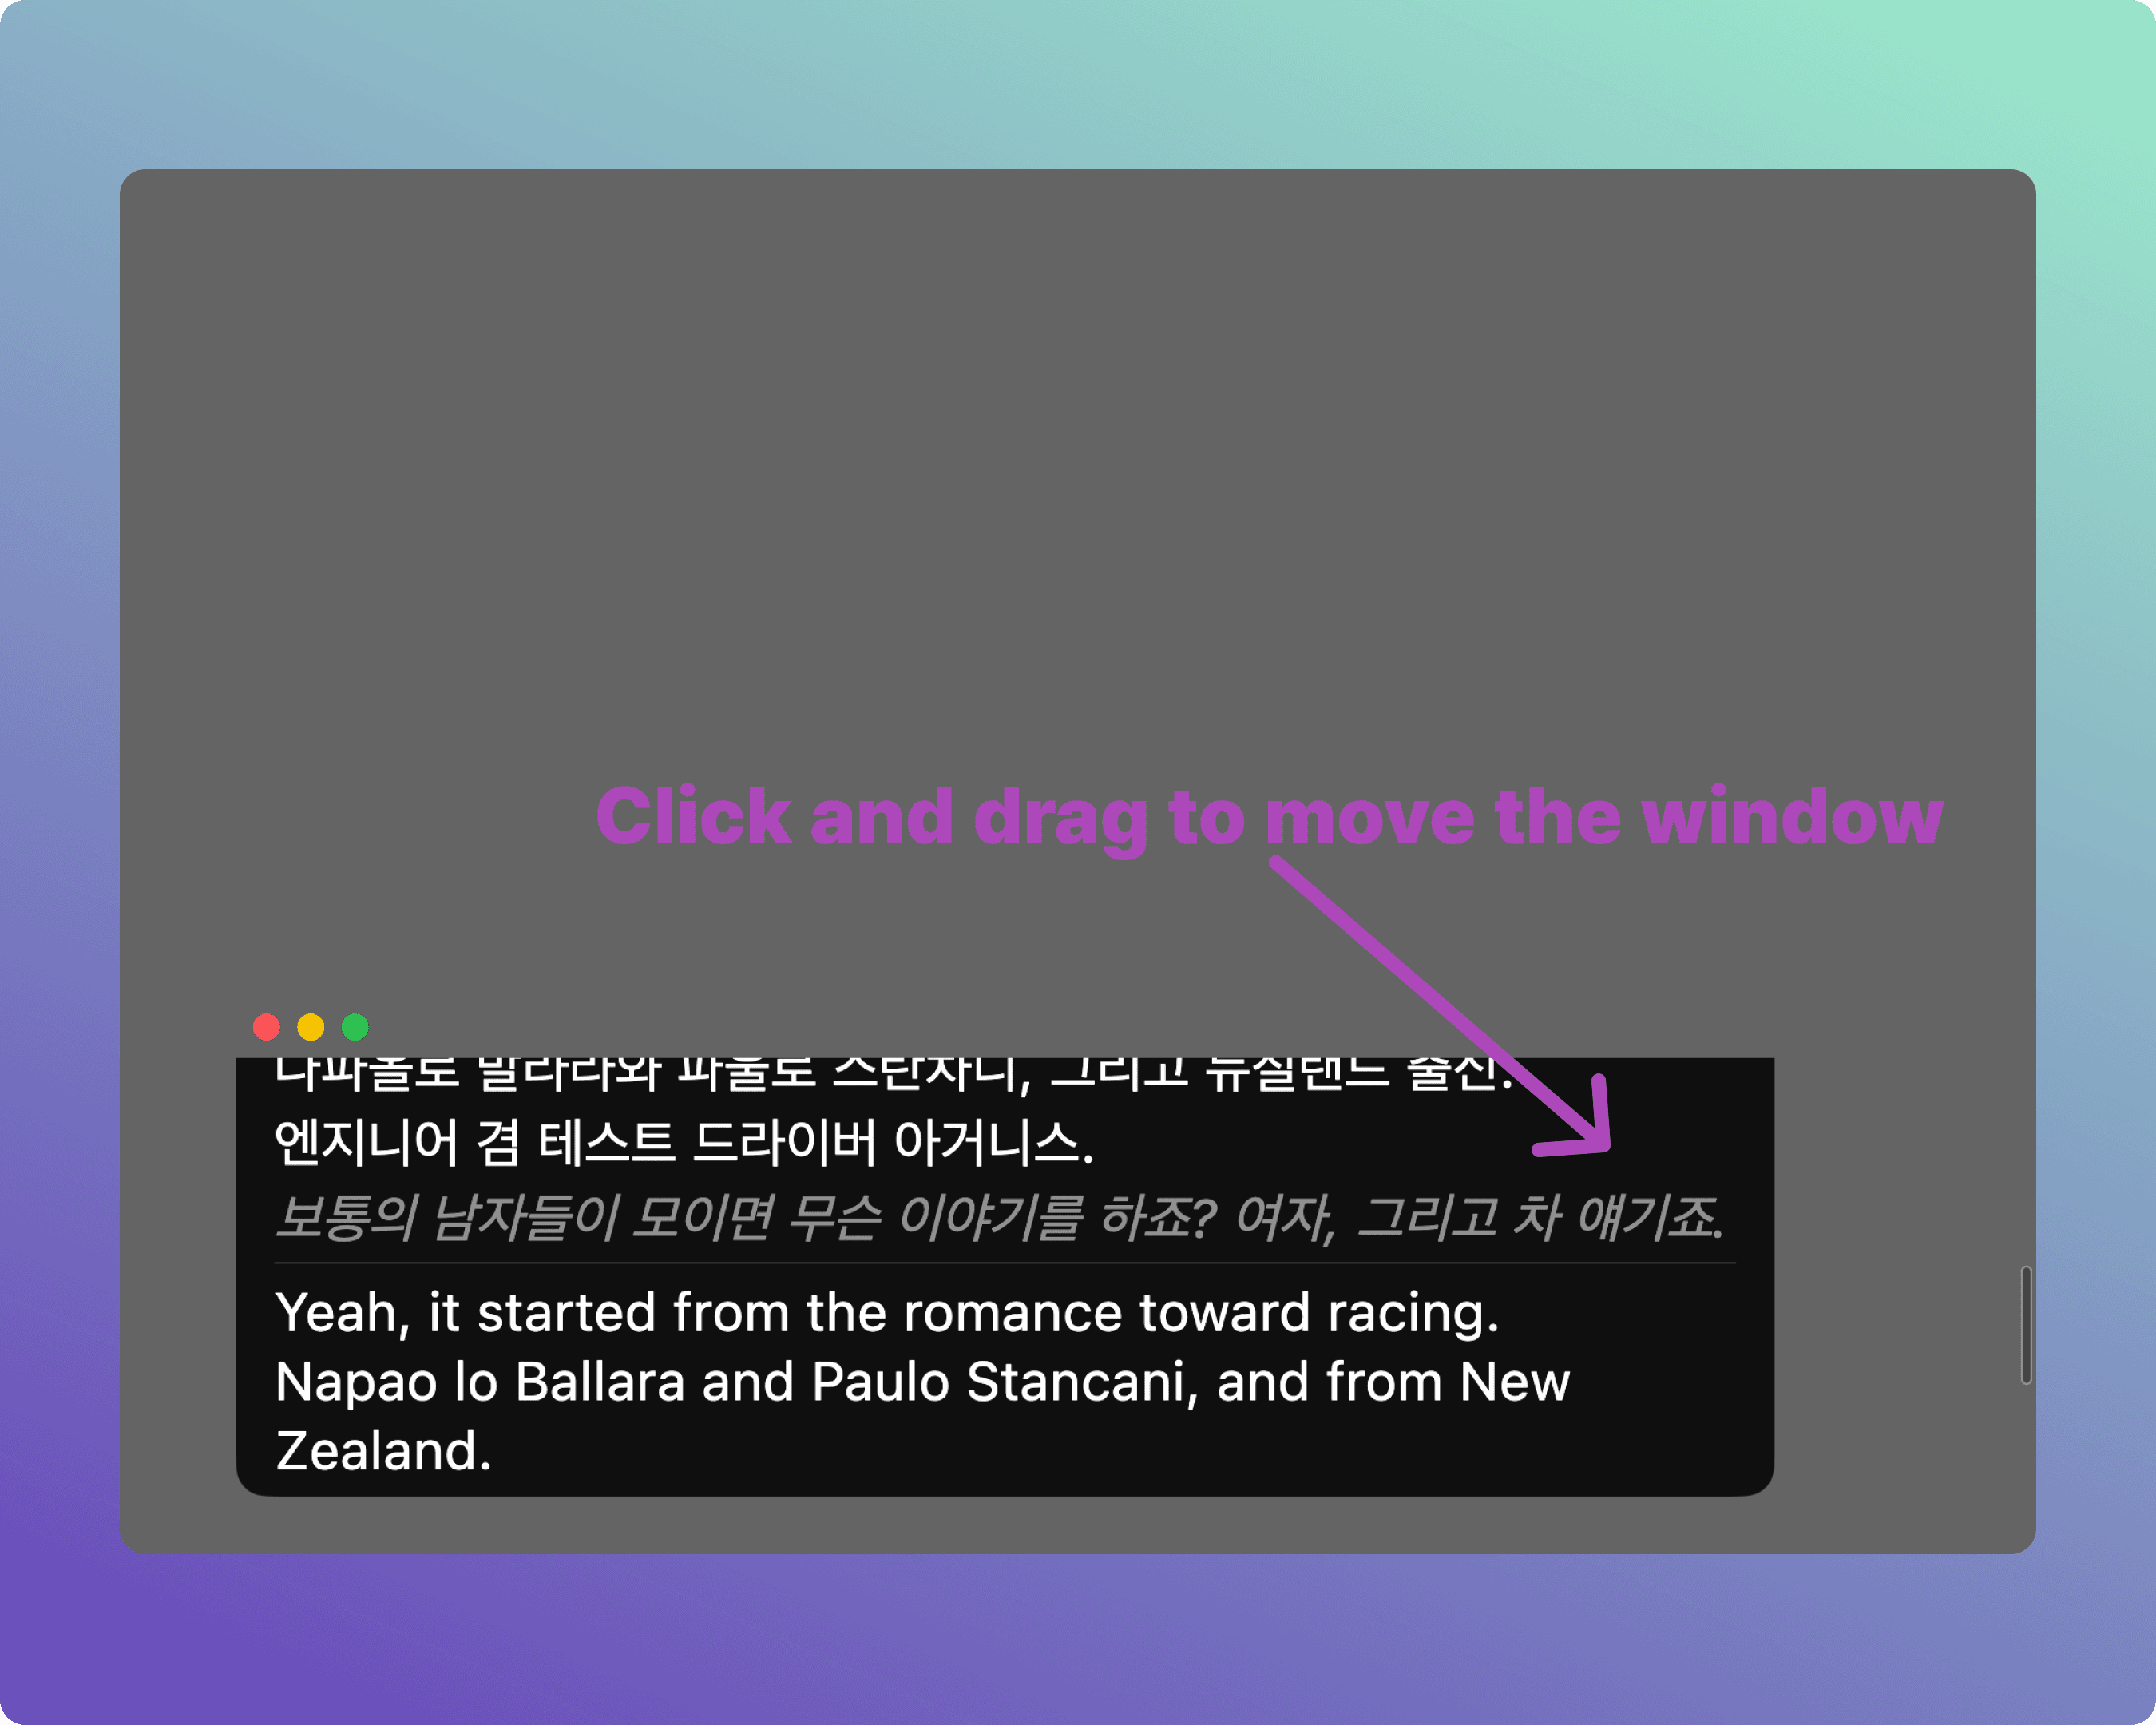
Display live subtitles directly over your presentation screen (Overlay Subtitle Mode).
Subtitles remain on top even when you switch between slides, browsers, or other apps.
Fully customizable subtitle display (Transcript + Translation, Transcript only, Translation only, font size, and number of lines).
For Attendees (Audience Devices)
Attendees simply scan a QR code or click a link to view live transcripts and translations on their own devices.
No app installation or sign-up required for attendees.
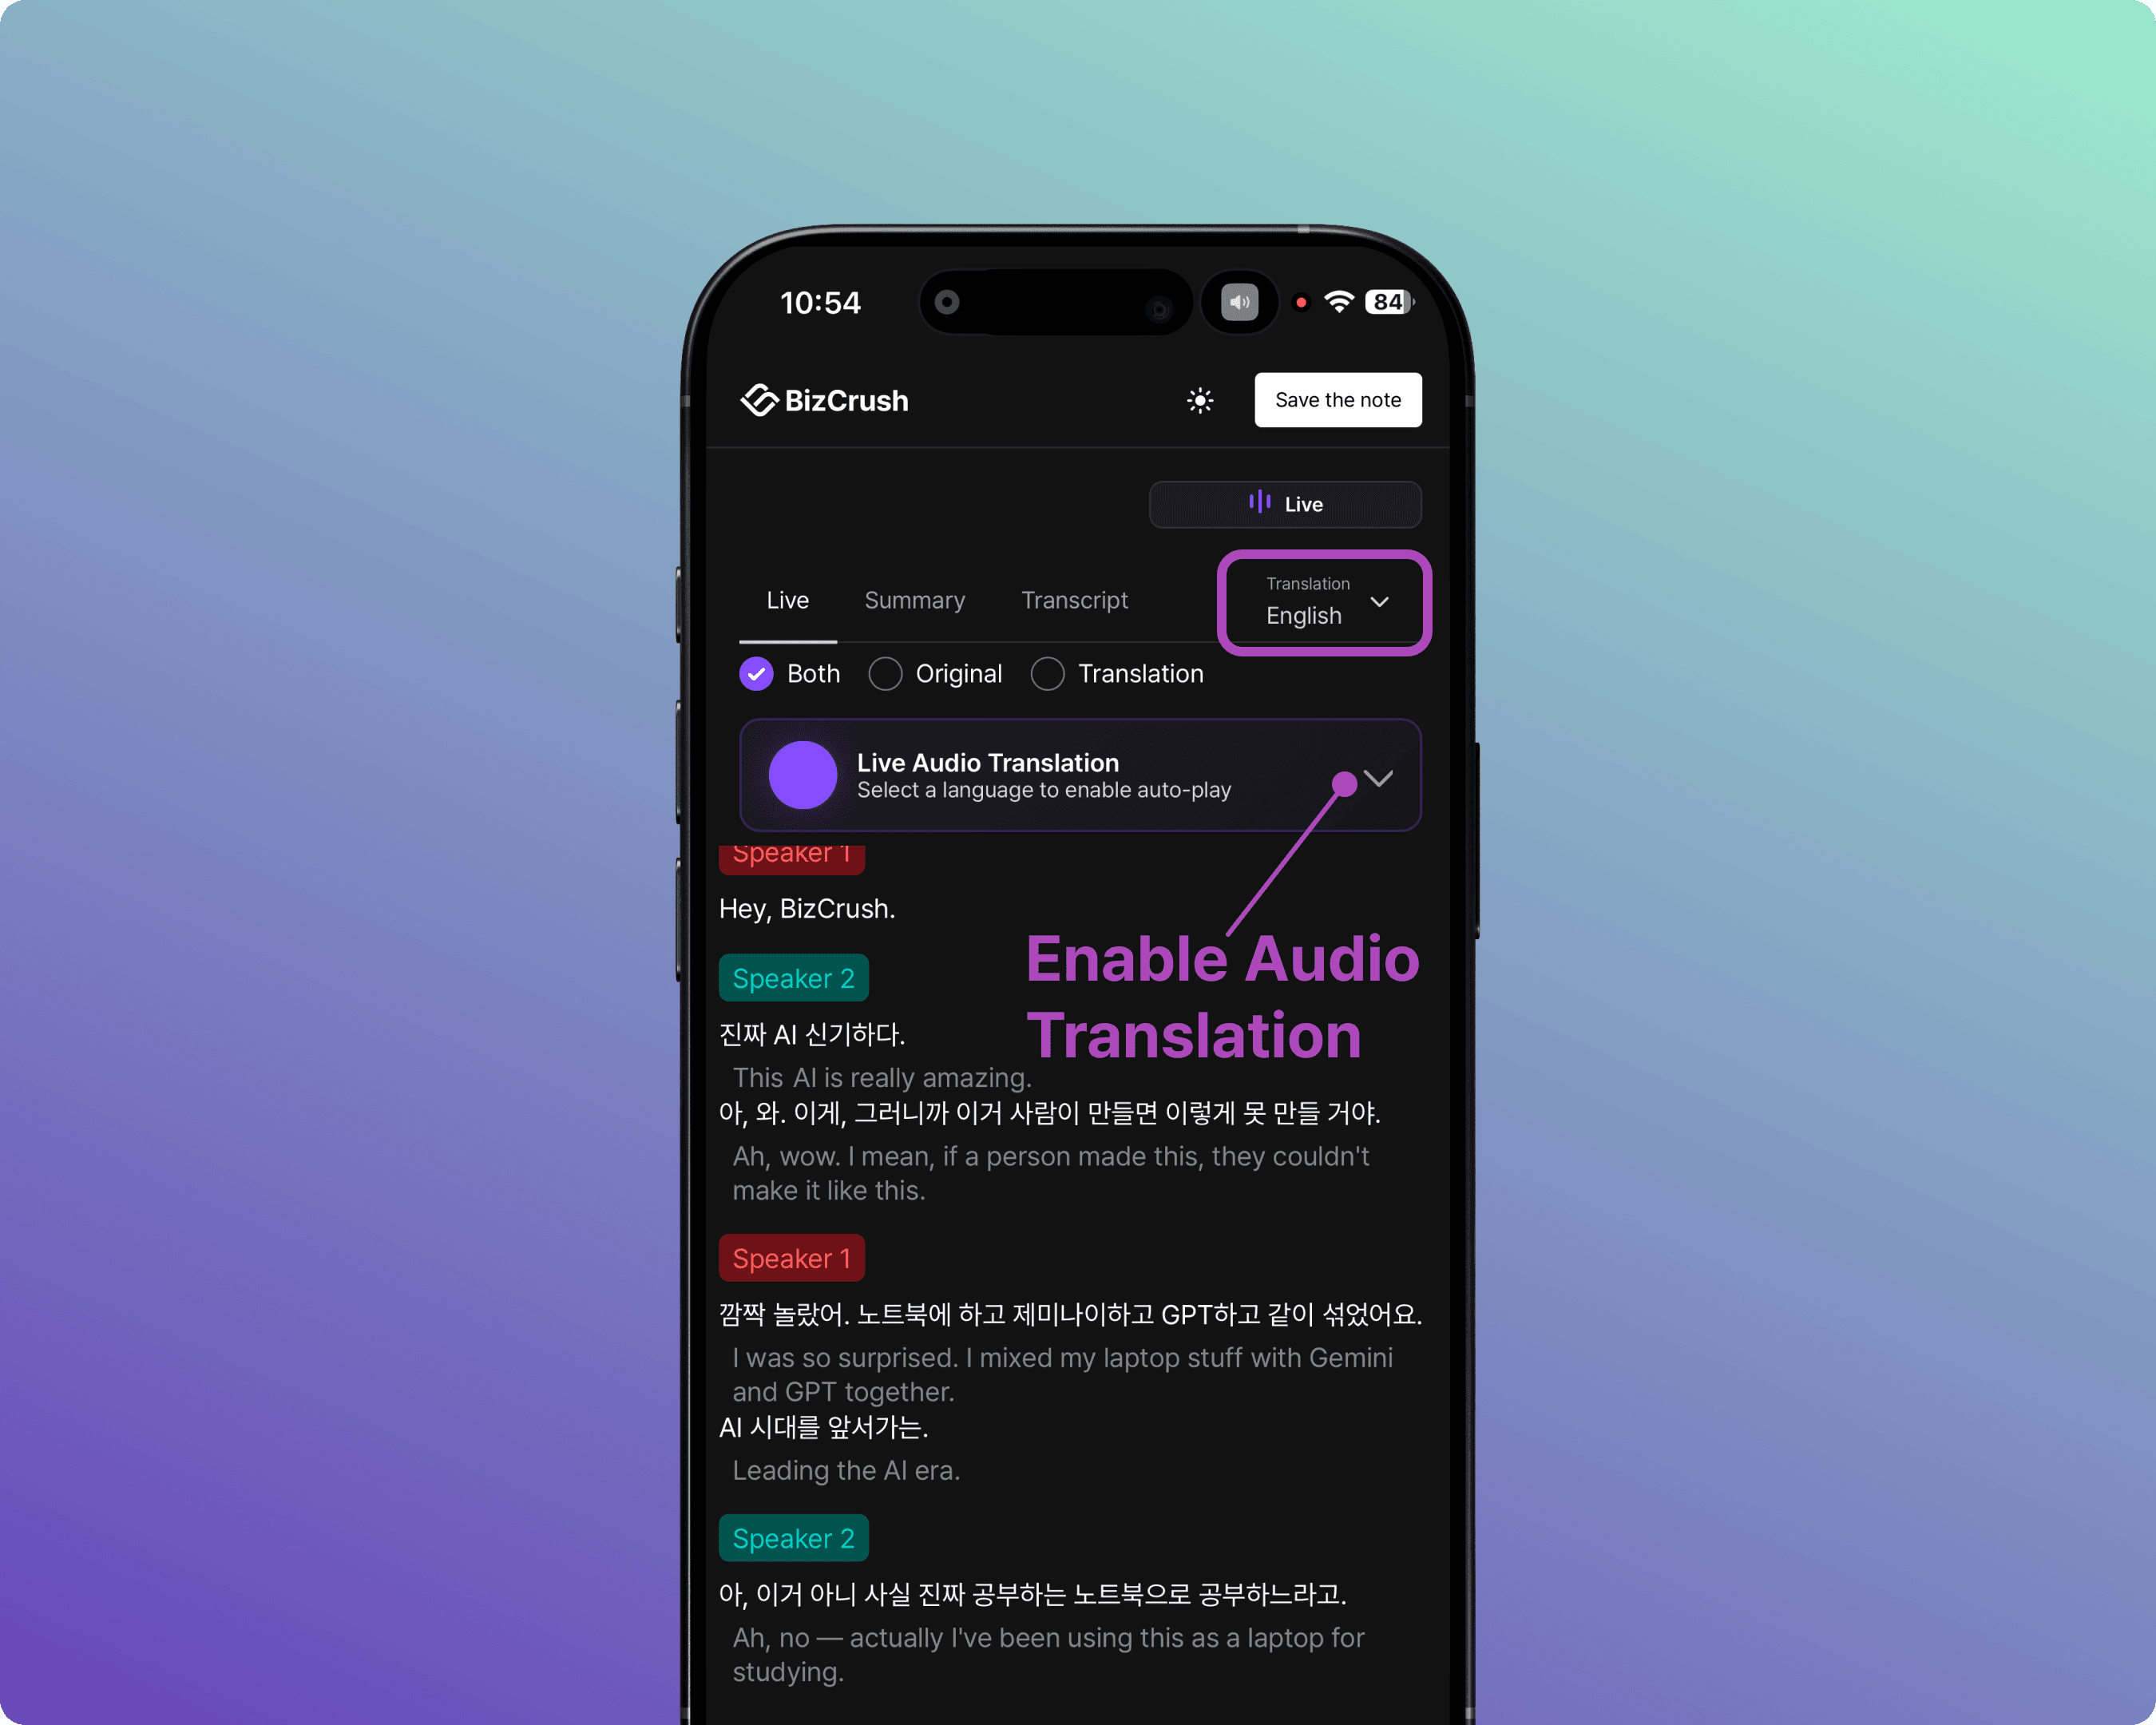
Live Audio Translation: Attendees can listen to the translated audio in real time (personal earphones strongly recommended).
Language Support
Supports 45 languages in total.
Speech Recognition: Recognizes up to 3 spoken languages simultaneously.
Real-time Translation: Outputs up to 2 translated languages simultaneously.
2. Pre-Event Preparation Checklist
To ensure a smooth event, please complete the following steps before event day.
Host's Preparation Checklist
Create a BizCrush account (both Host and Co-hosts)
Install the Desktop App (Windows or macOS)
Decide on your languages (Spoken Language + Translation Language)
Register Custom Keywords (add event-specific jargon and presentation materials → see Section 5)
Assign Co-hosts (if you have staff assisting you → see Section 4)
Do a Dry Run (test subtitle mode in advance)
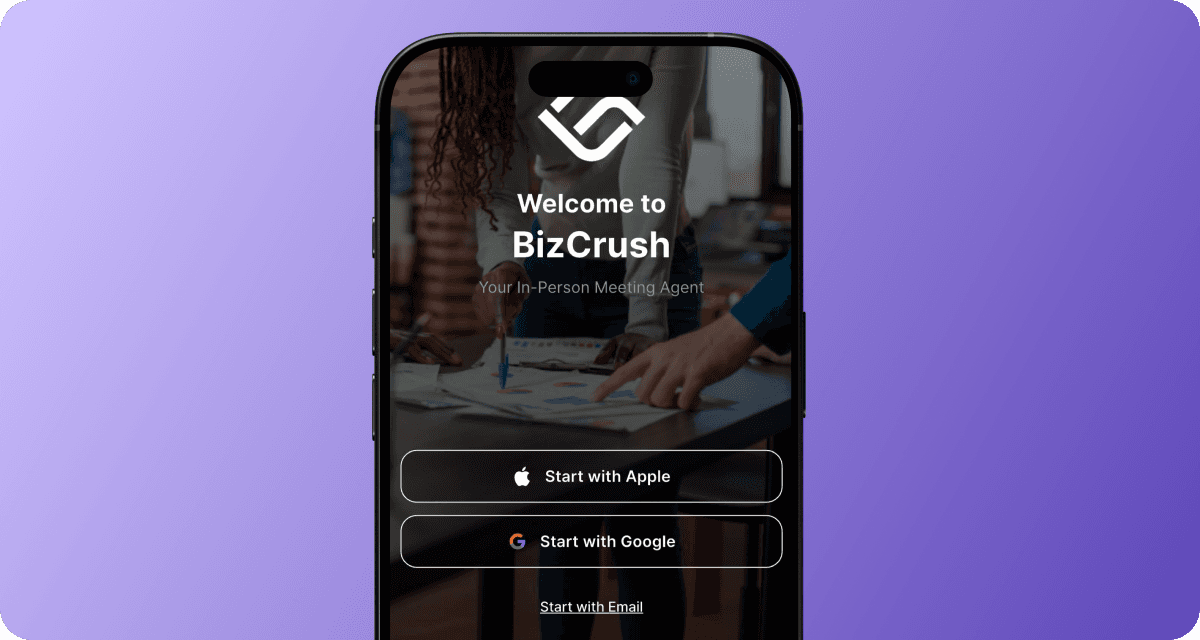
Create an Account
Search for "BizCrush" on the App Store or Google Play and download the app. You can sign up using Google, Apple, or email.

Install the Desktop App
Go to bizcrush.ai and click [Download PC Version] (available for both Windows and macOS) to install the desktop app.
Note: Real-time Overlay Subtitles are only available on the Desktop App.
3. Setting Up Real-Time Subtitle Modes
First, choose the subtitle display method that best fits your venue's screen setup.
Feature | A. Overlay Subtitles | B. Presentation Mode |
|---|---|---|
What it is | A semi-transparent subtitle window floating over your slides. | A dedicated, full-screen subtitle view. |
Best for | Small events with only one main screen or projector. | Medium-to-large events with a separate, dedicated screen for subtitles. |
Requirements | BizCrush Desktop App must be running. | Any web browser (via a Share Link). |
Pros | Stays on top of everything; freely adjustable size and position. | No app installation needed on the display device — just open the link. |
Common Setup Steps
Complete these steps on the presenter's desktop computer on event day.
Step 1. Create a Meeting & Start Recording
From the home screen, click the Microphone icon to create a new meeting room and start recording.
Step 2. Open Language Settings
As soon as the meeting starts, the Live Transcript panel opens. Click the language icon at the top of the panel to open language settings.
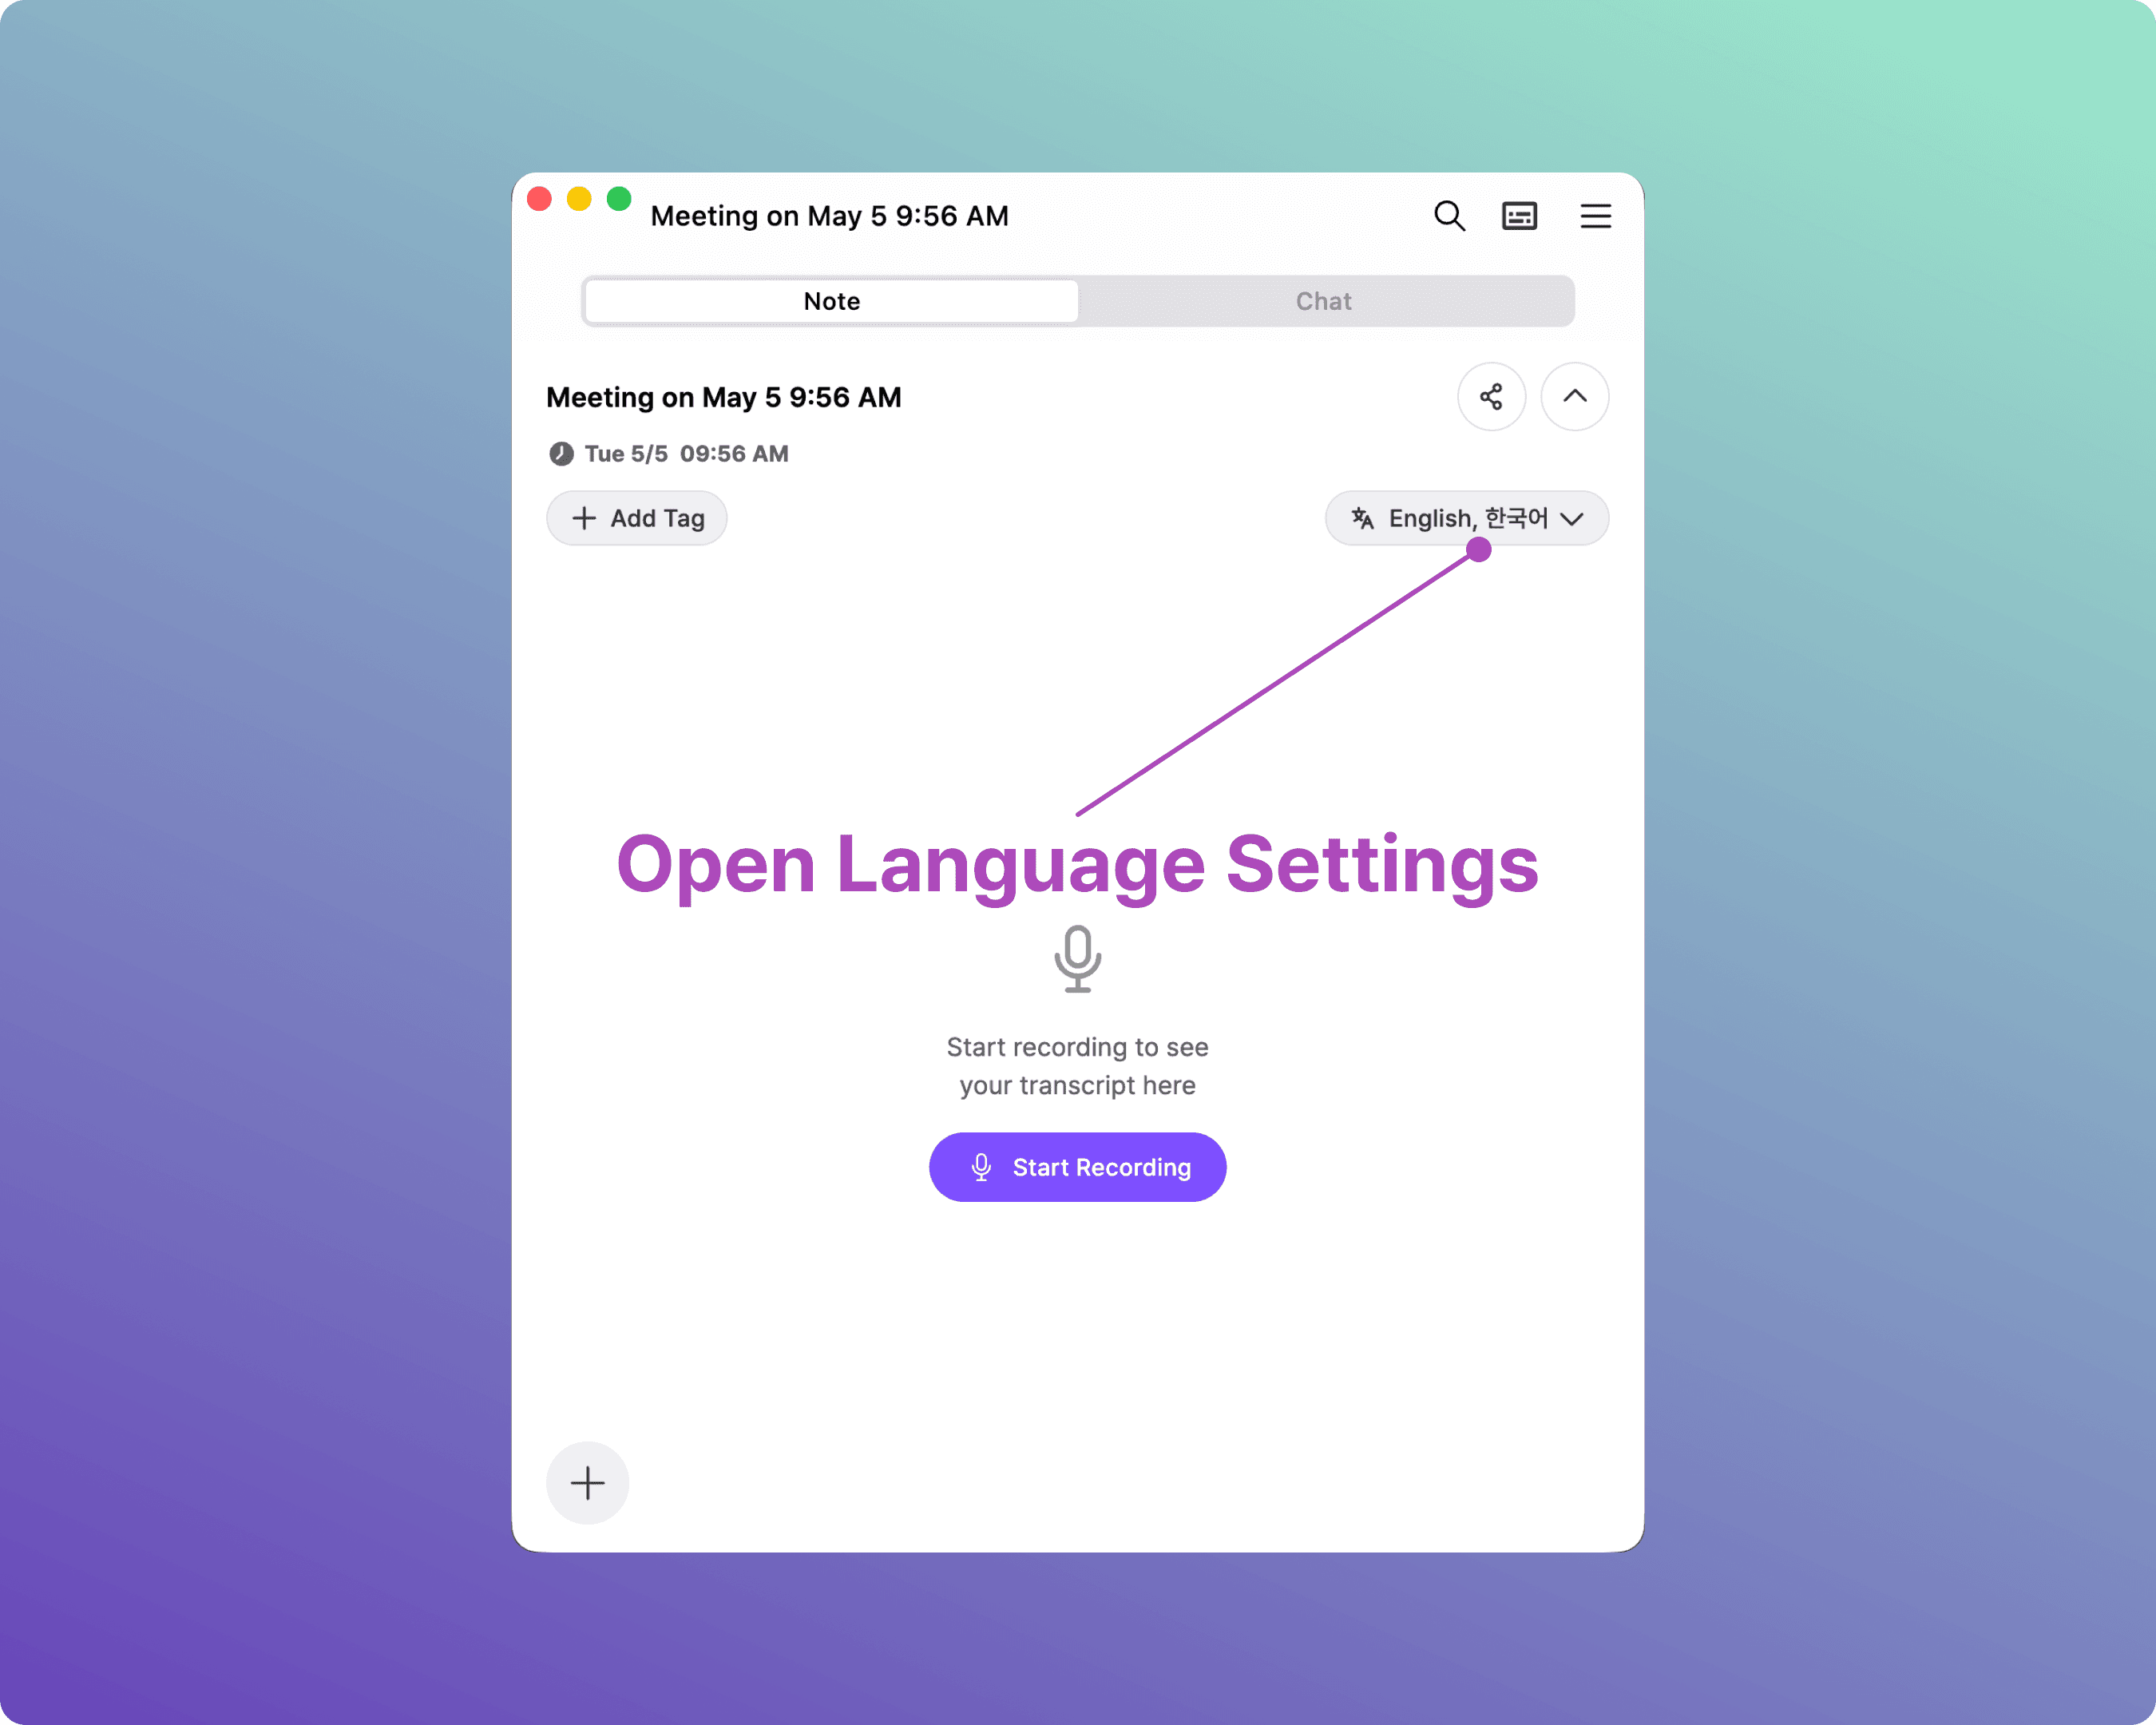
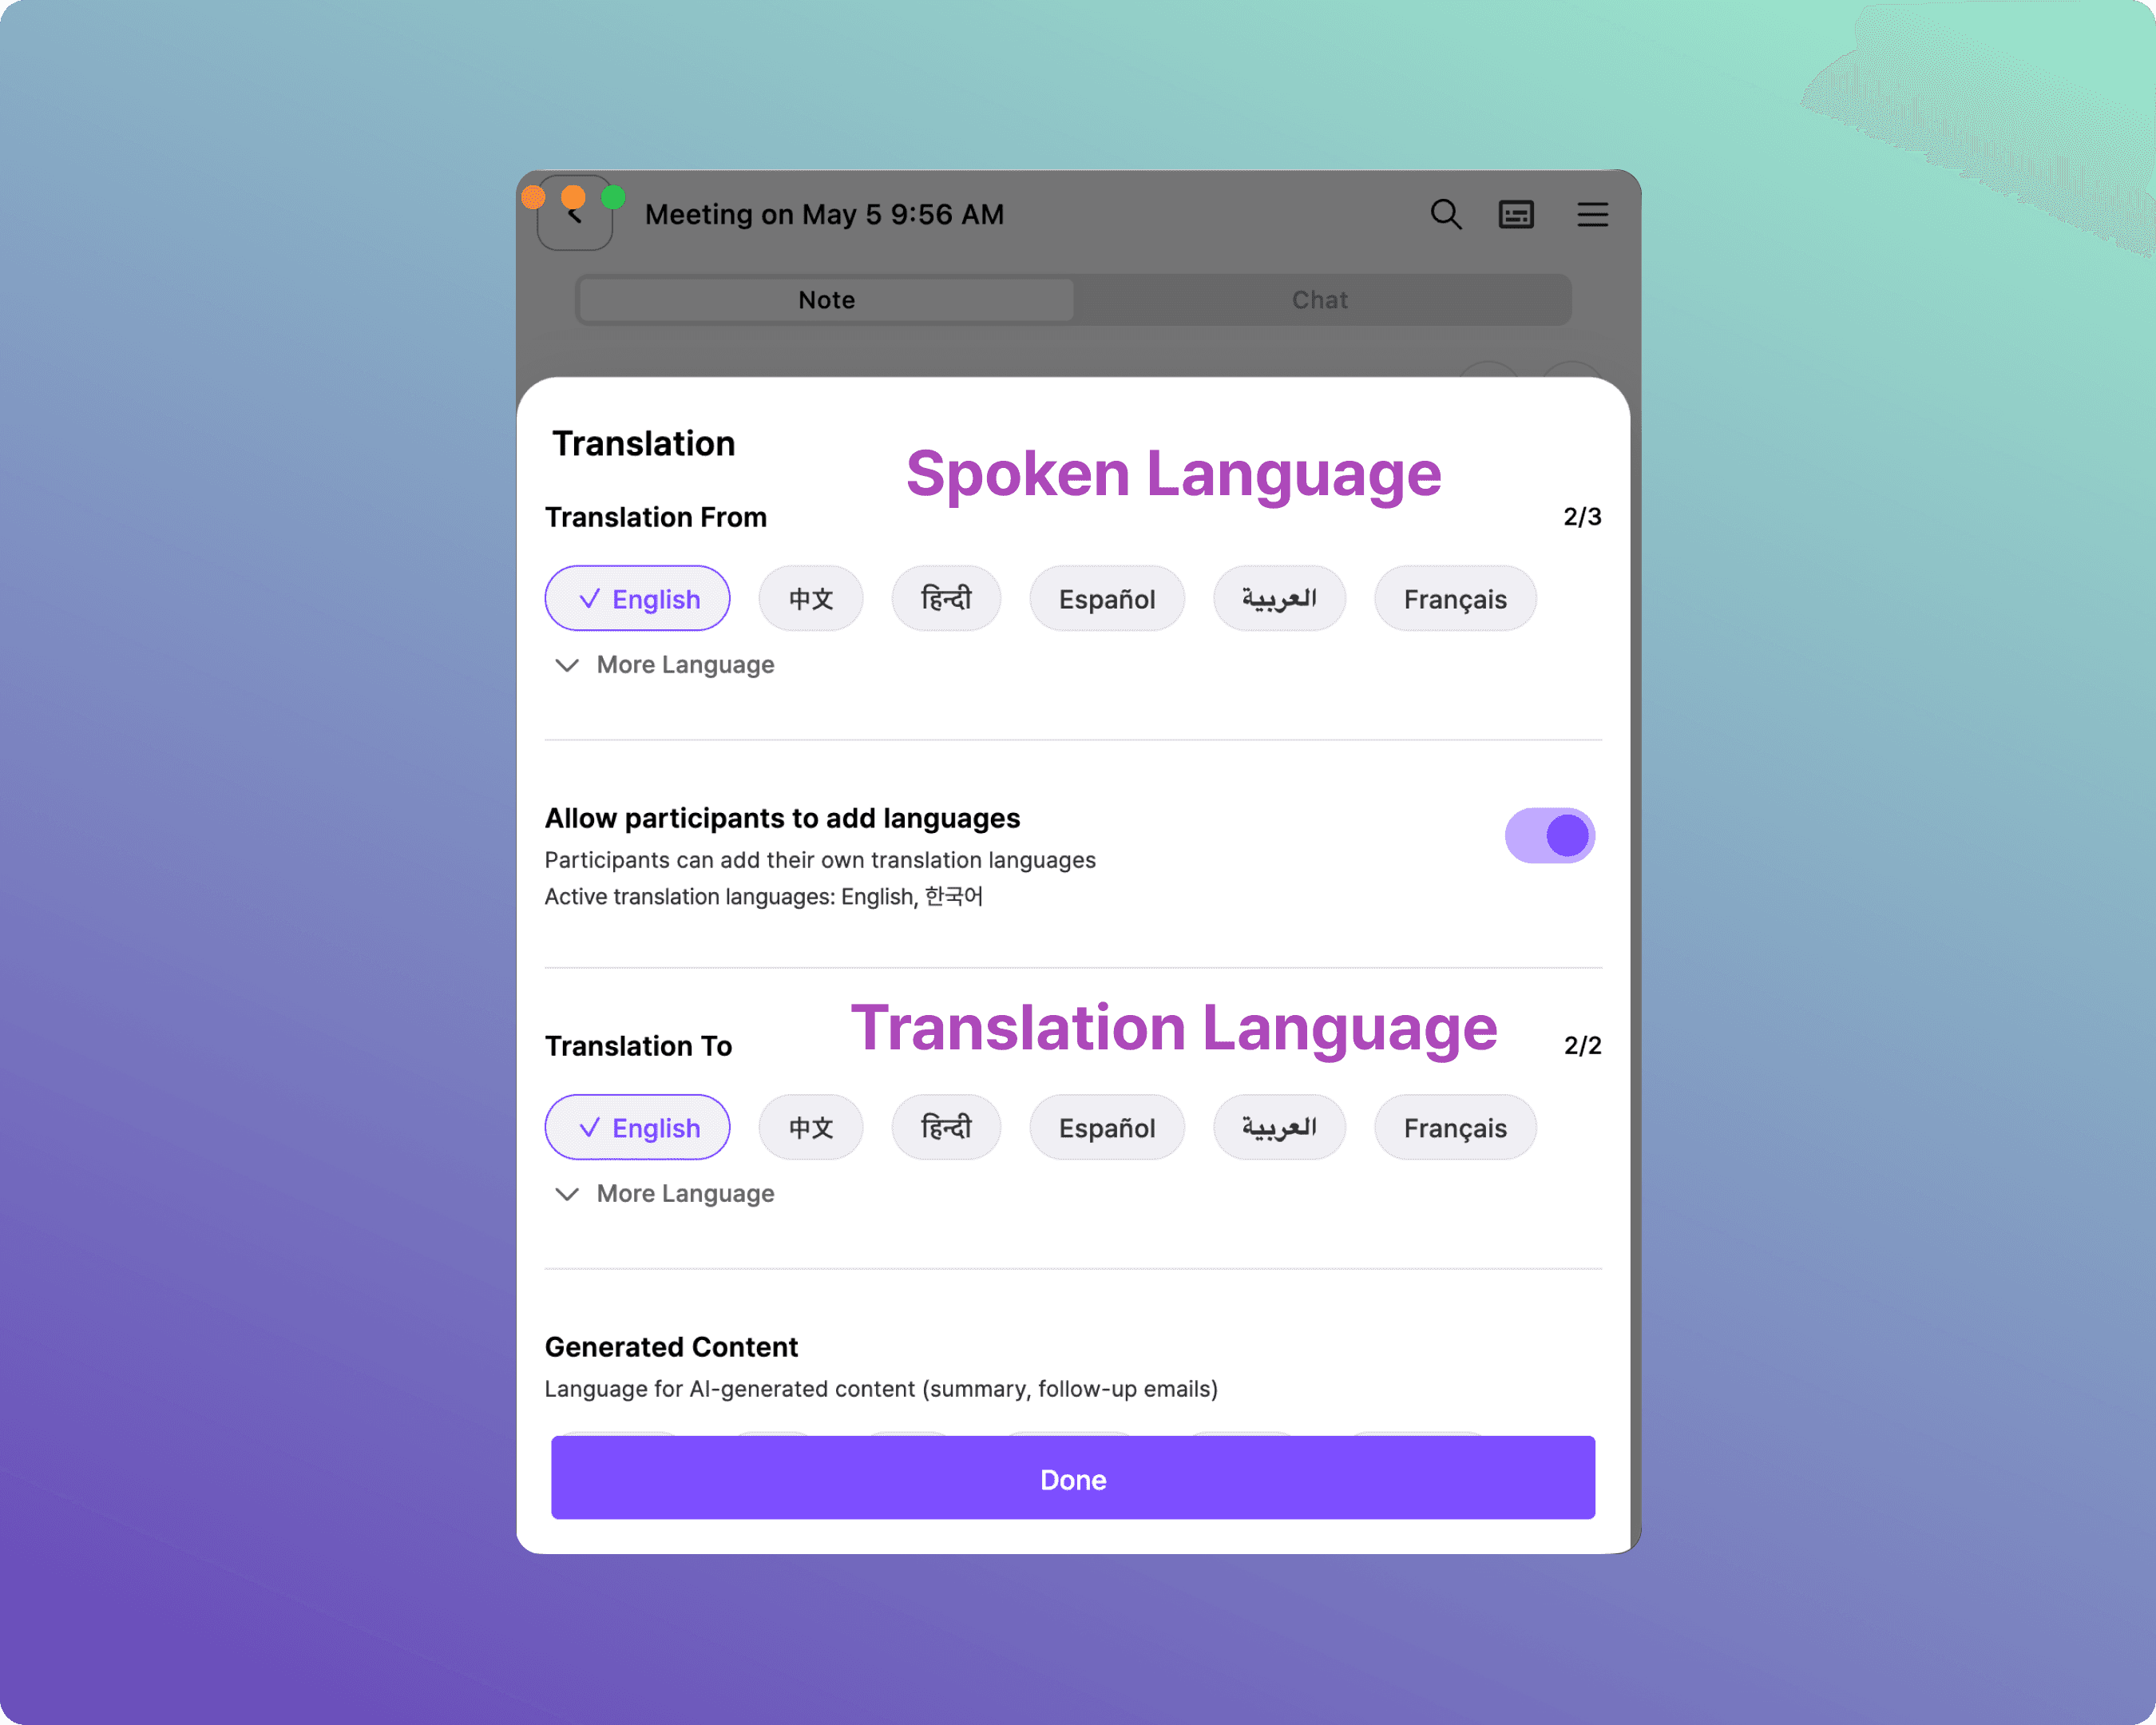
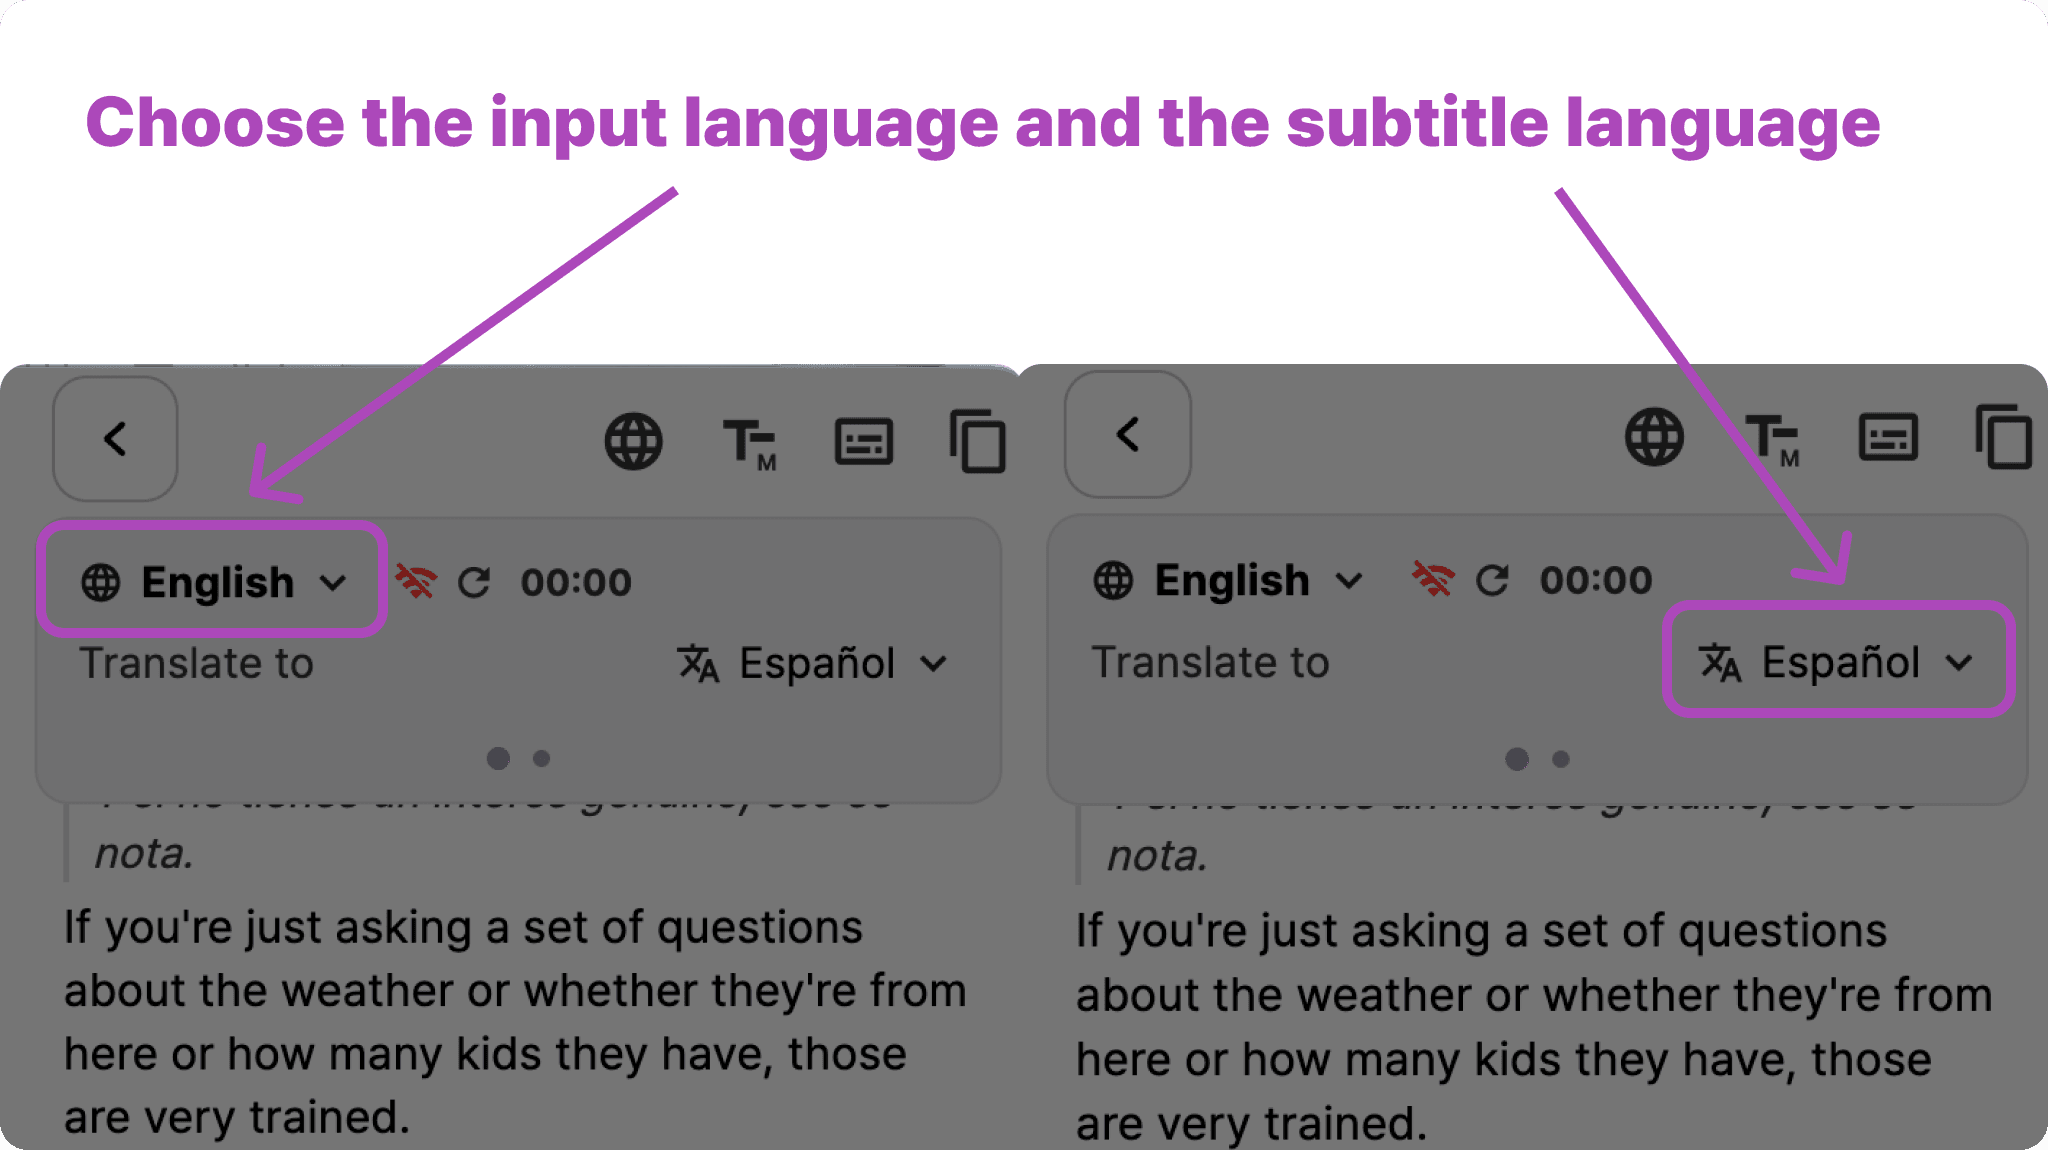
Step 3. Select Spoken & Translation Languages
Manage both transcription and translation settings here. Select the language the speaker will use, and the language you want to display on screen.
A. Overlay Subtitle Setup
Follow these steps if you want subtitles to float over your presentation slides.
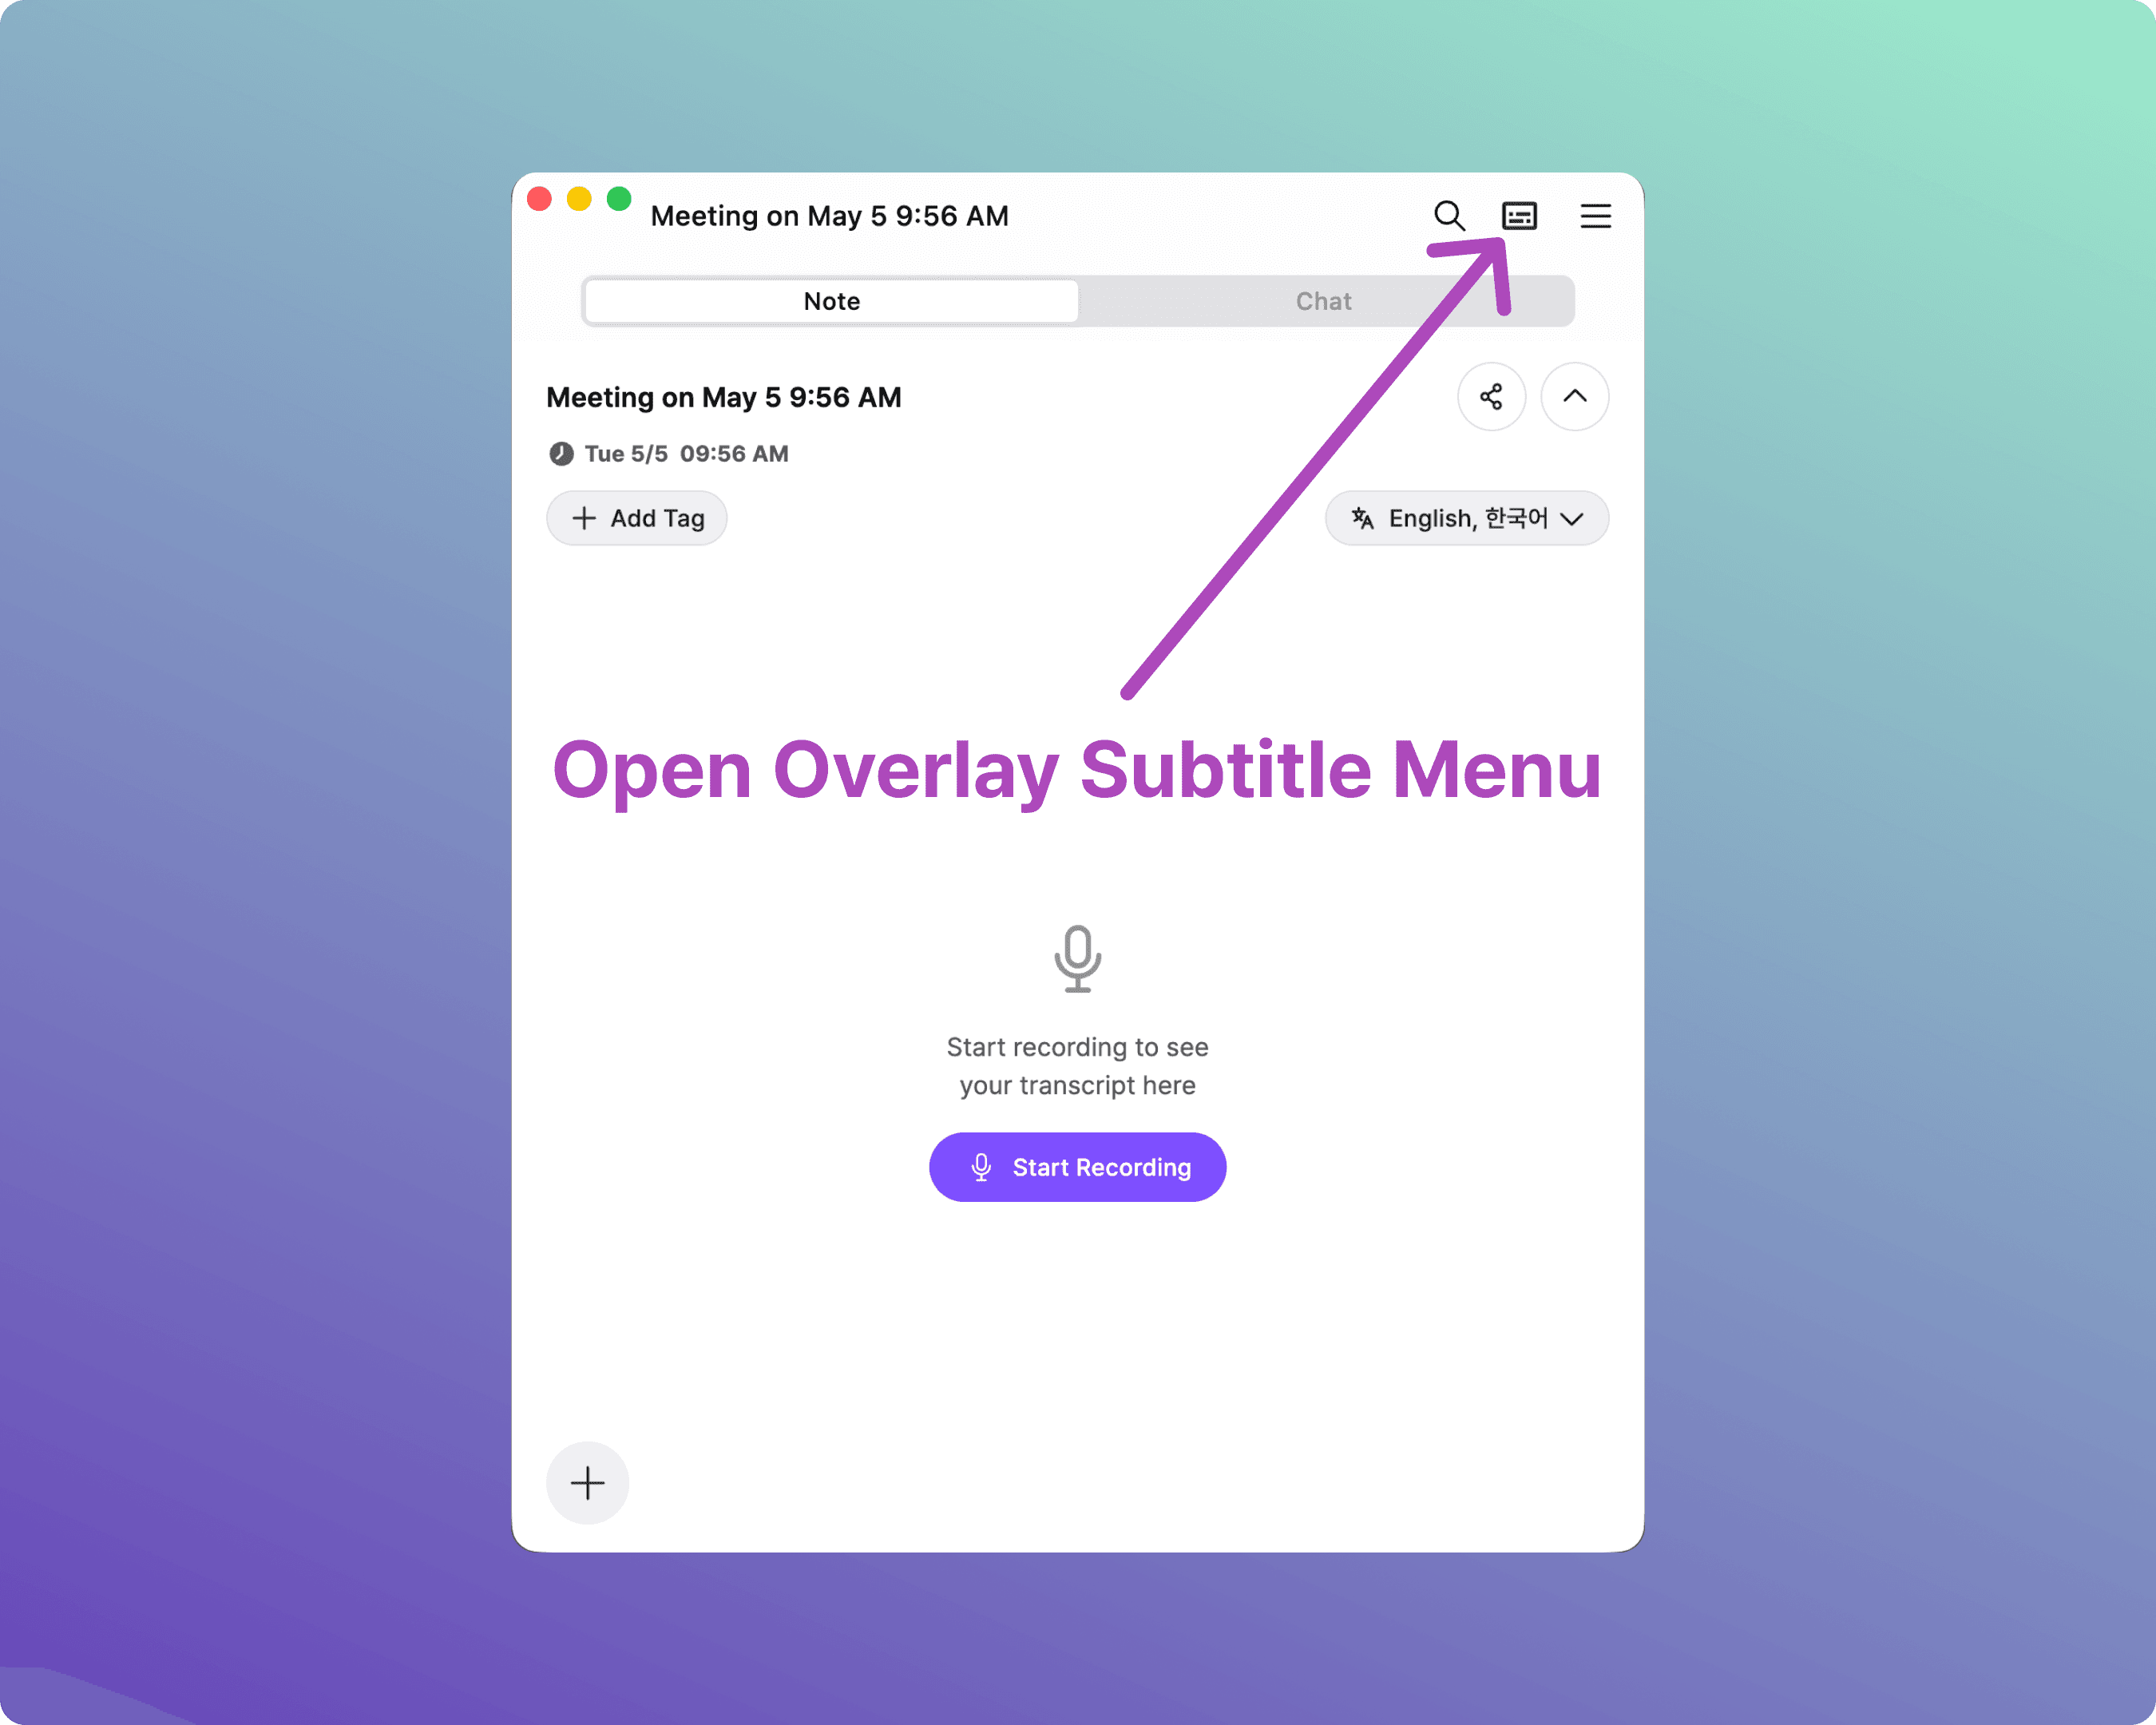
A-1. Open the Overlay Subtitle Menu
Click the Subtitle icon at the top right of the Live Transcript panel to open the Overlay options.
A-2. Customize Overlay Settings
Adjust the options below to fit your screen size and event environment:
Display: Transcript + Translation / Transcript only / Translation only
Size: Small / Medium / Large / Extra Large
Height: 2 lines / 3 lines / 5 lines / Unlimited
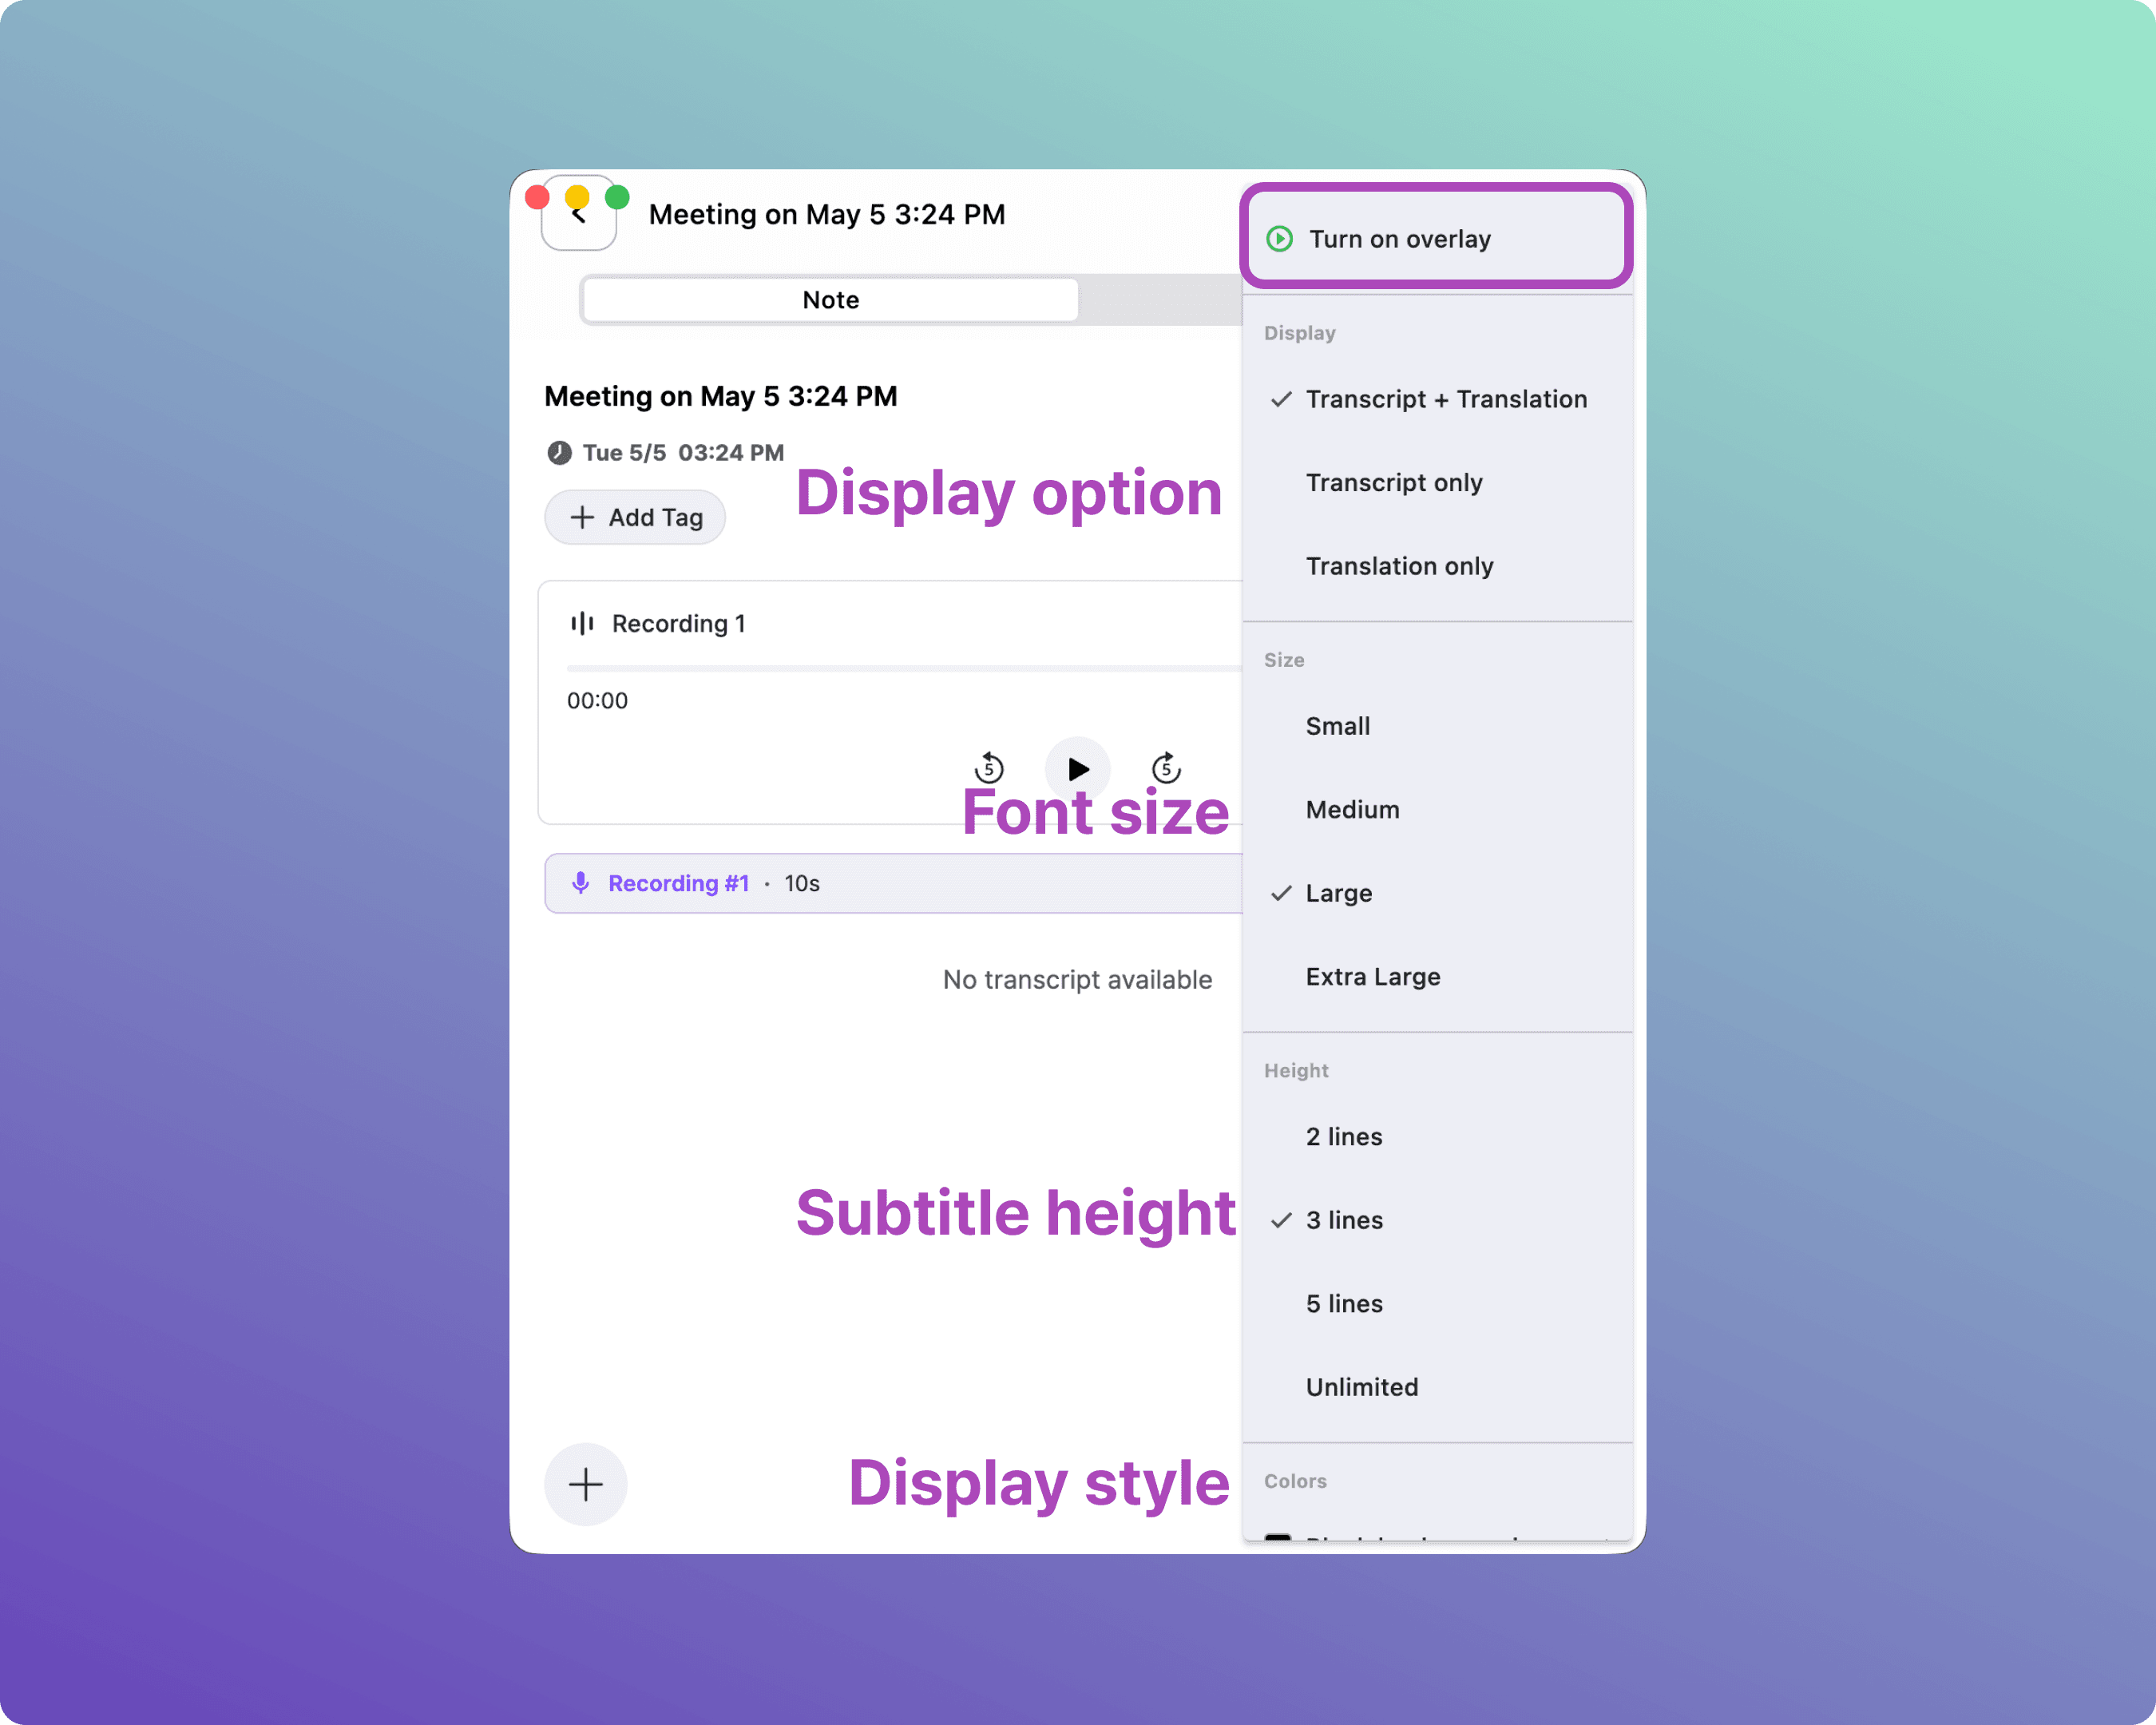
A-3. Adjust Overlay Position
Once configured, turn on the Overlay toggle. The subtitle window will appear on your screen — drag and drop it to any location.
Tip: For large projectors, we recommend Large text and 3 lines. For smaller monitors, Medium and 2 lines work best.
A-4. Close Subtitles
When you no longer need the subtitles, hover over the subtitle window and click the [X] button to close.

B. Presentation Mode Setup
Follow these steps if you have a separate, dedicated monitor or browser window just for subtitles.
B-1. Create a Meeting & Start Recording
As with Overlay mode, click the Microphone icon on the home screen to start a meeting.
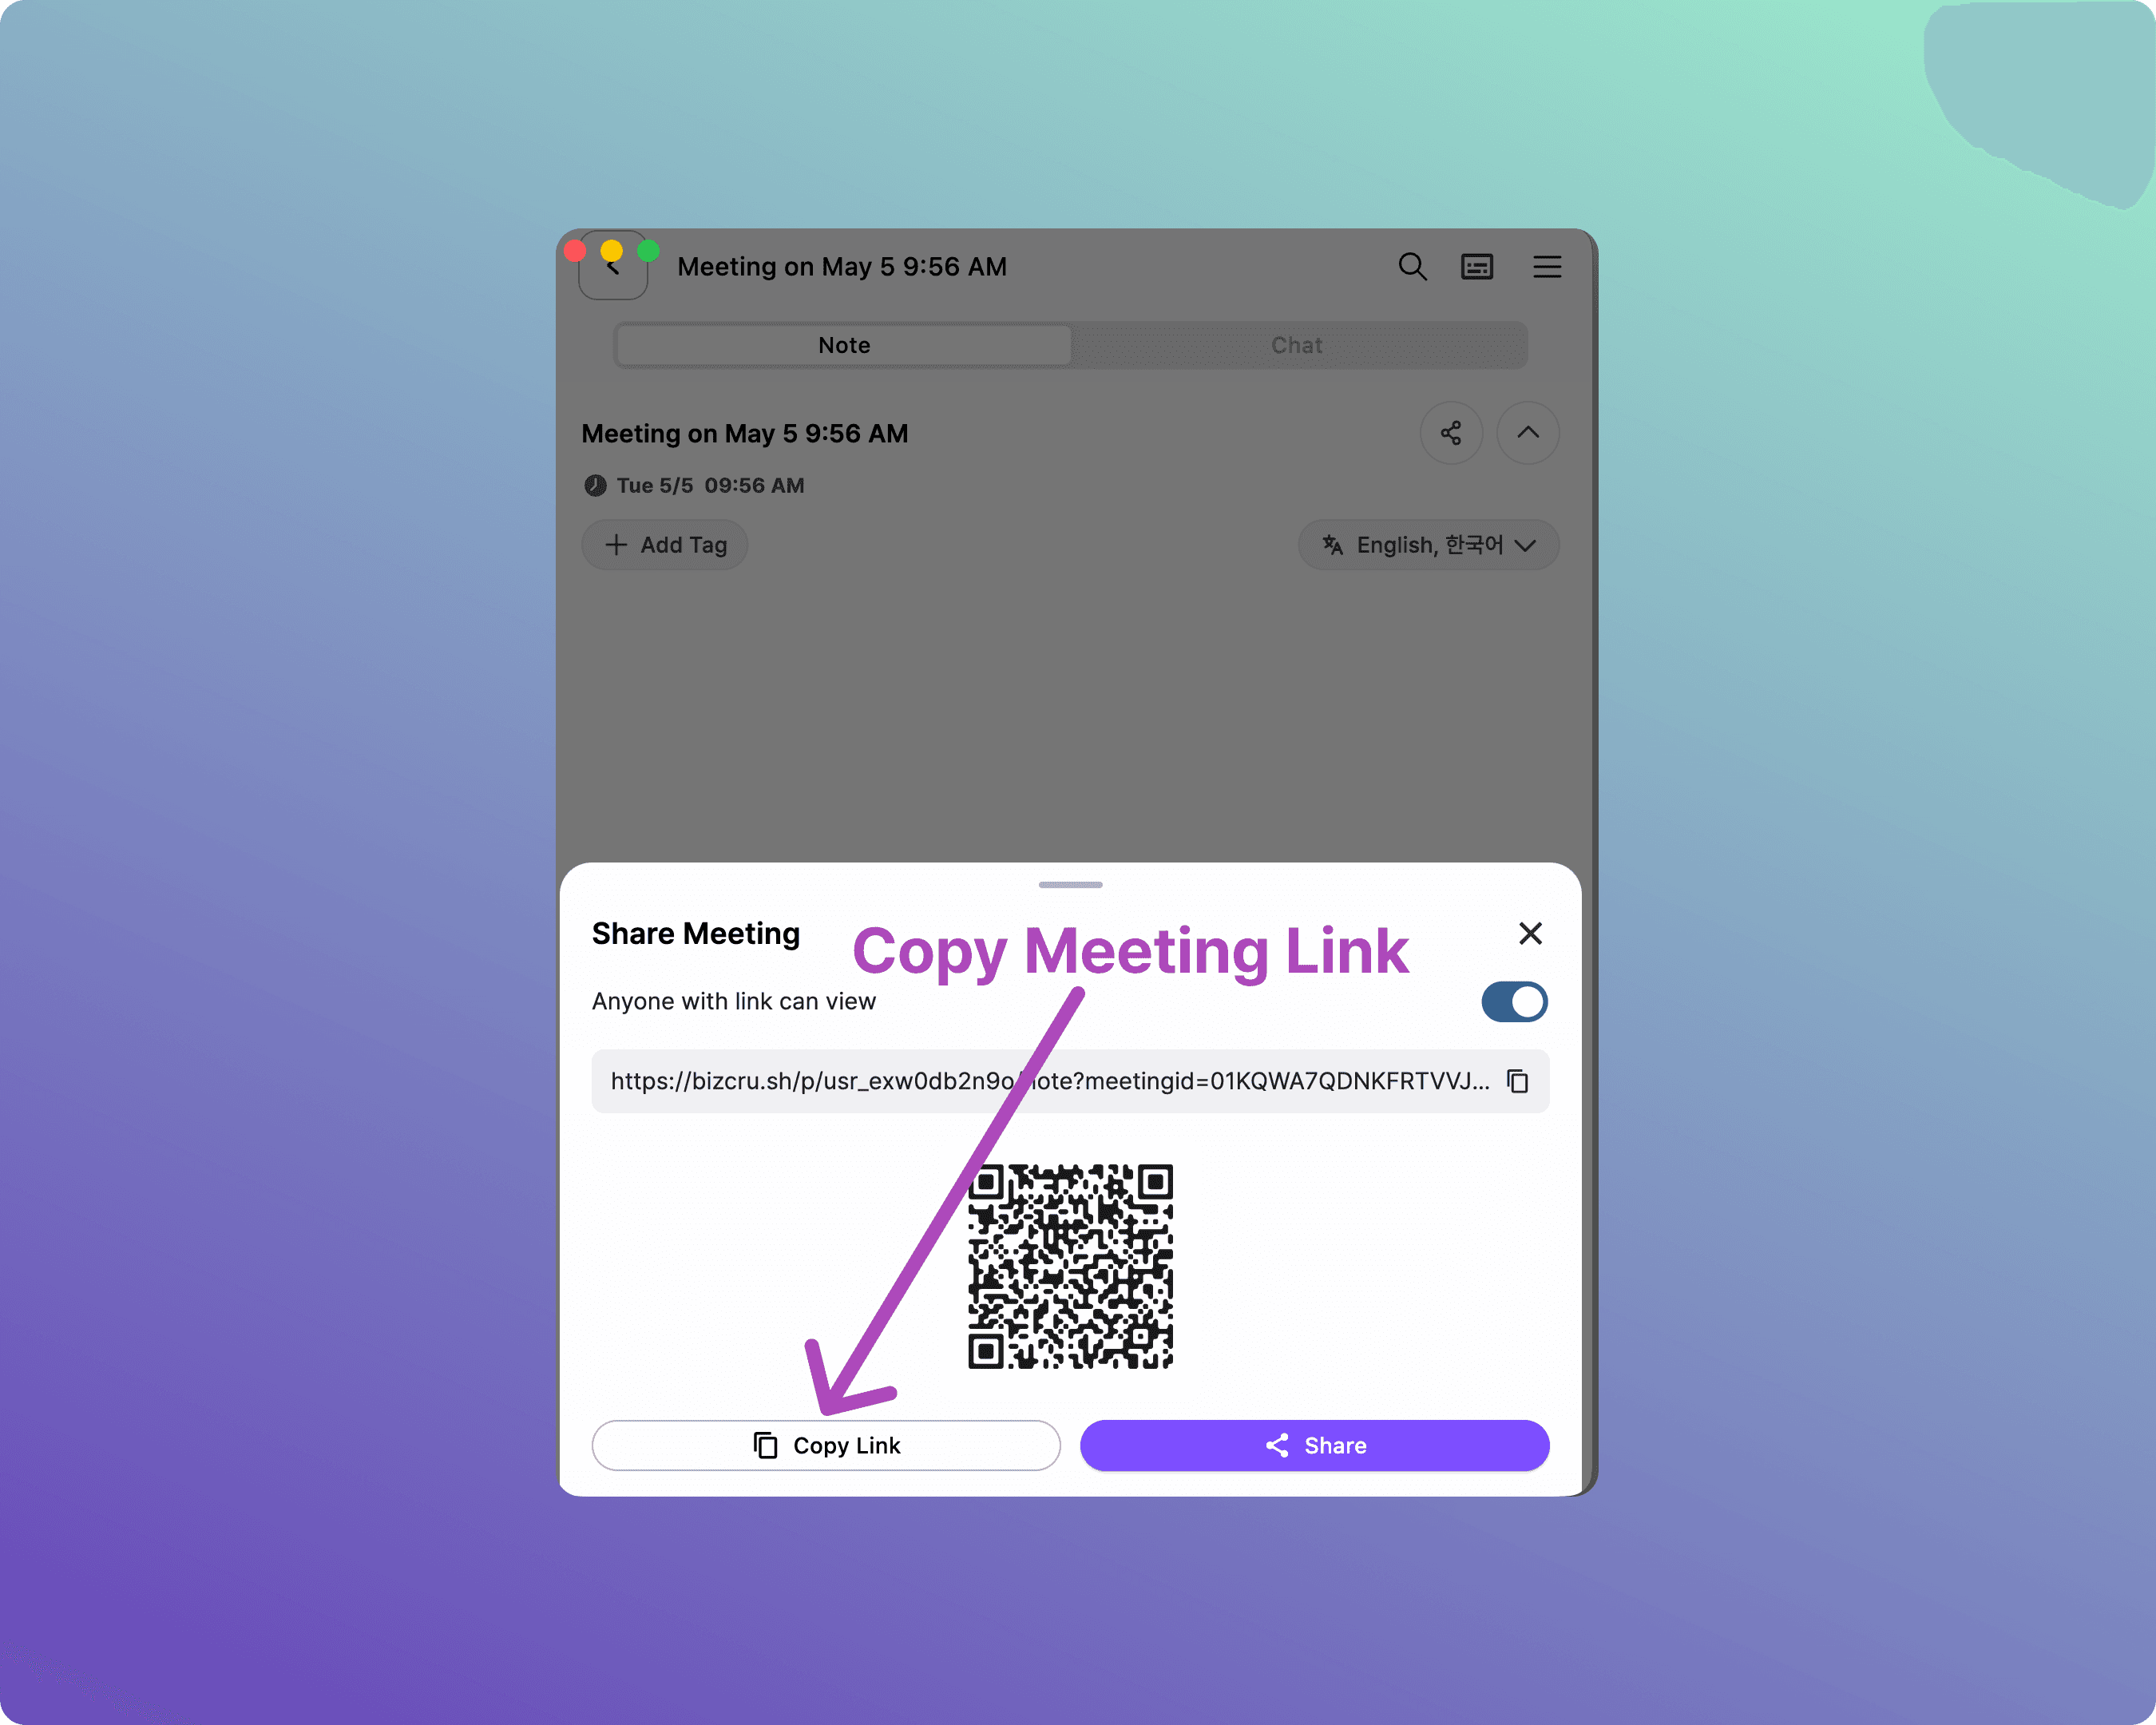
B-2. Copy the Share Link
Click [Share Meeting].

Then click [Copy Link].
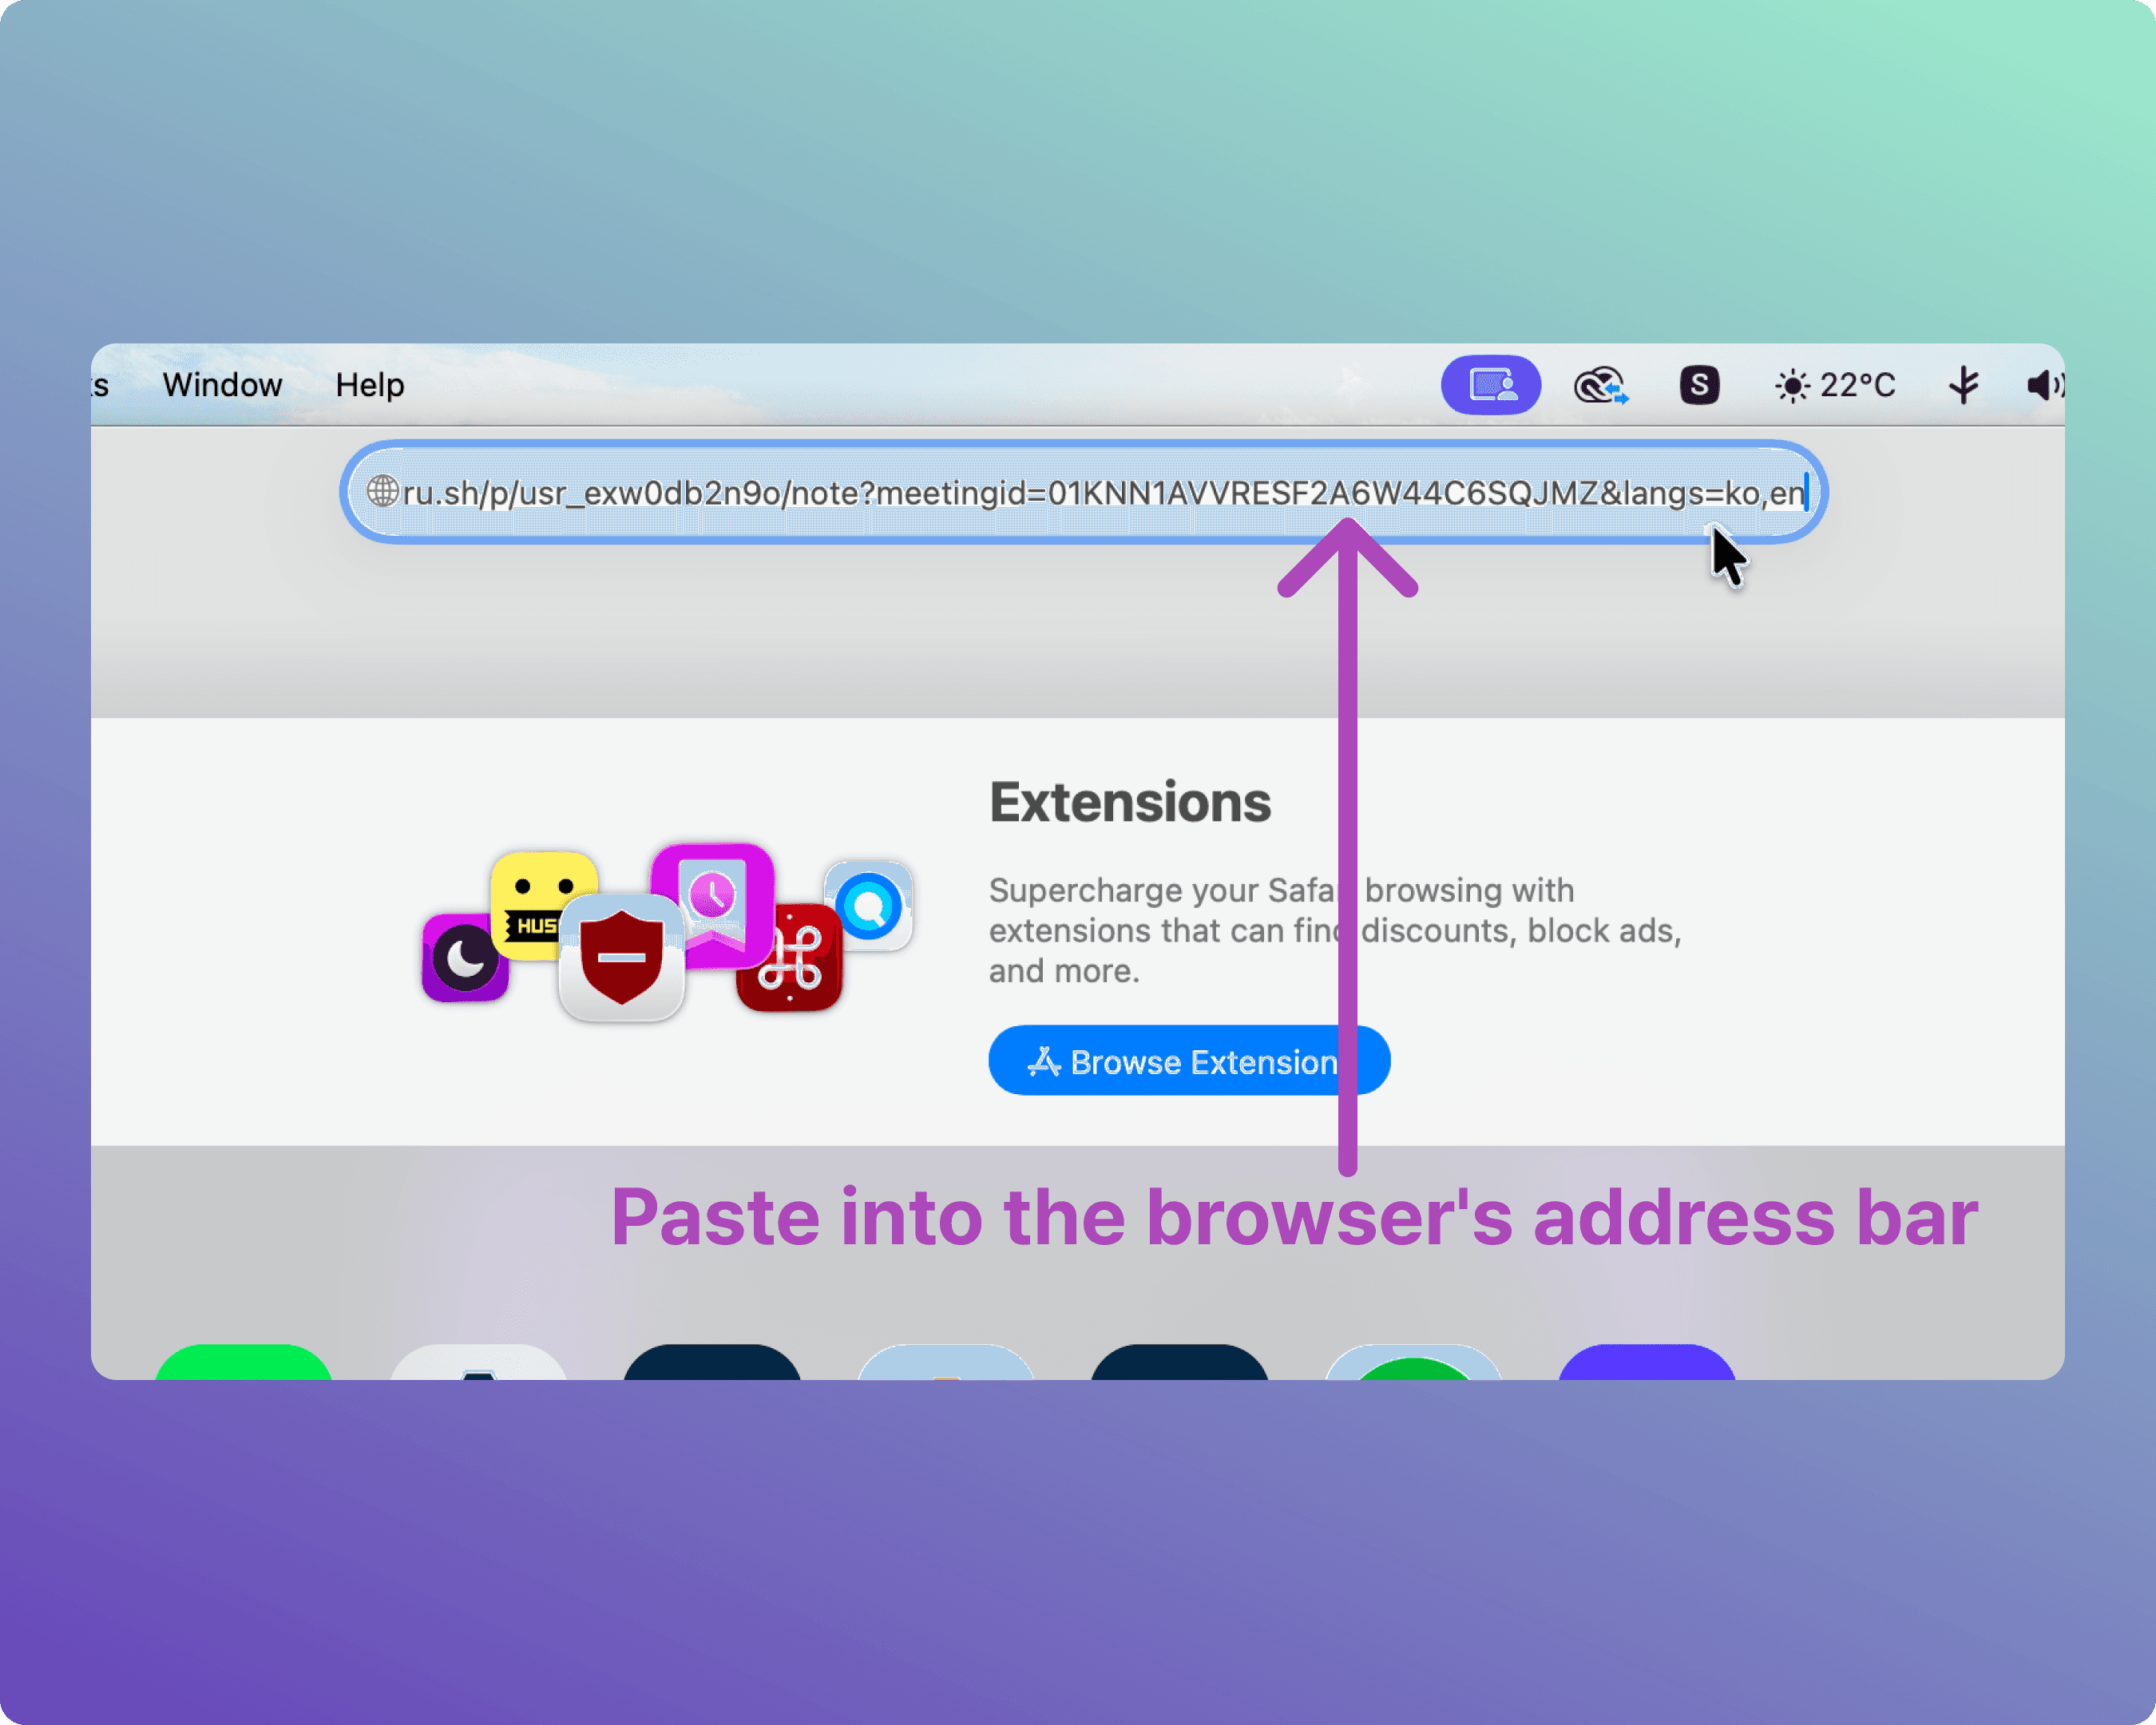
B-3. Open the Share Link in a Browser
Open a web browser on the device connected to your dedicated subtitle screen, and paste the copied link into the address bar.
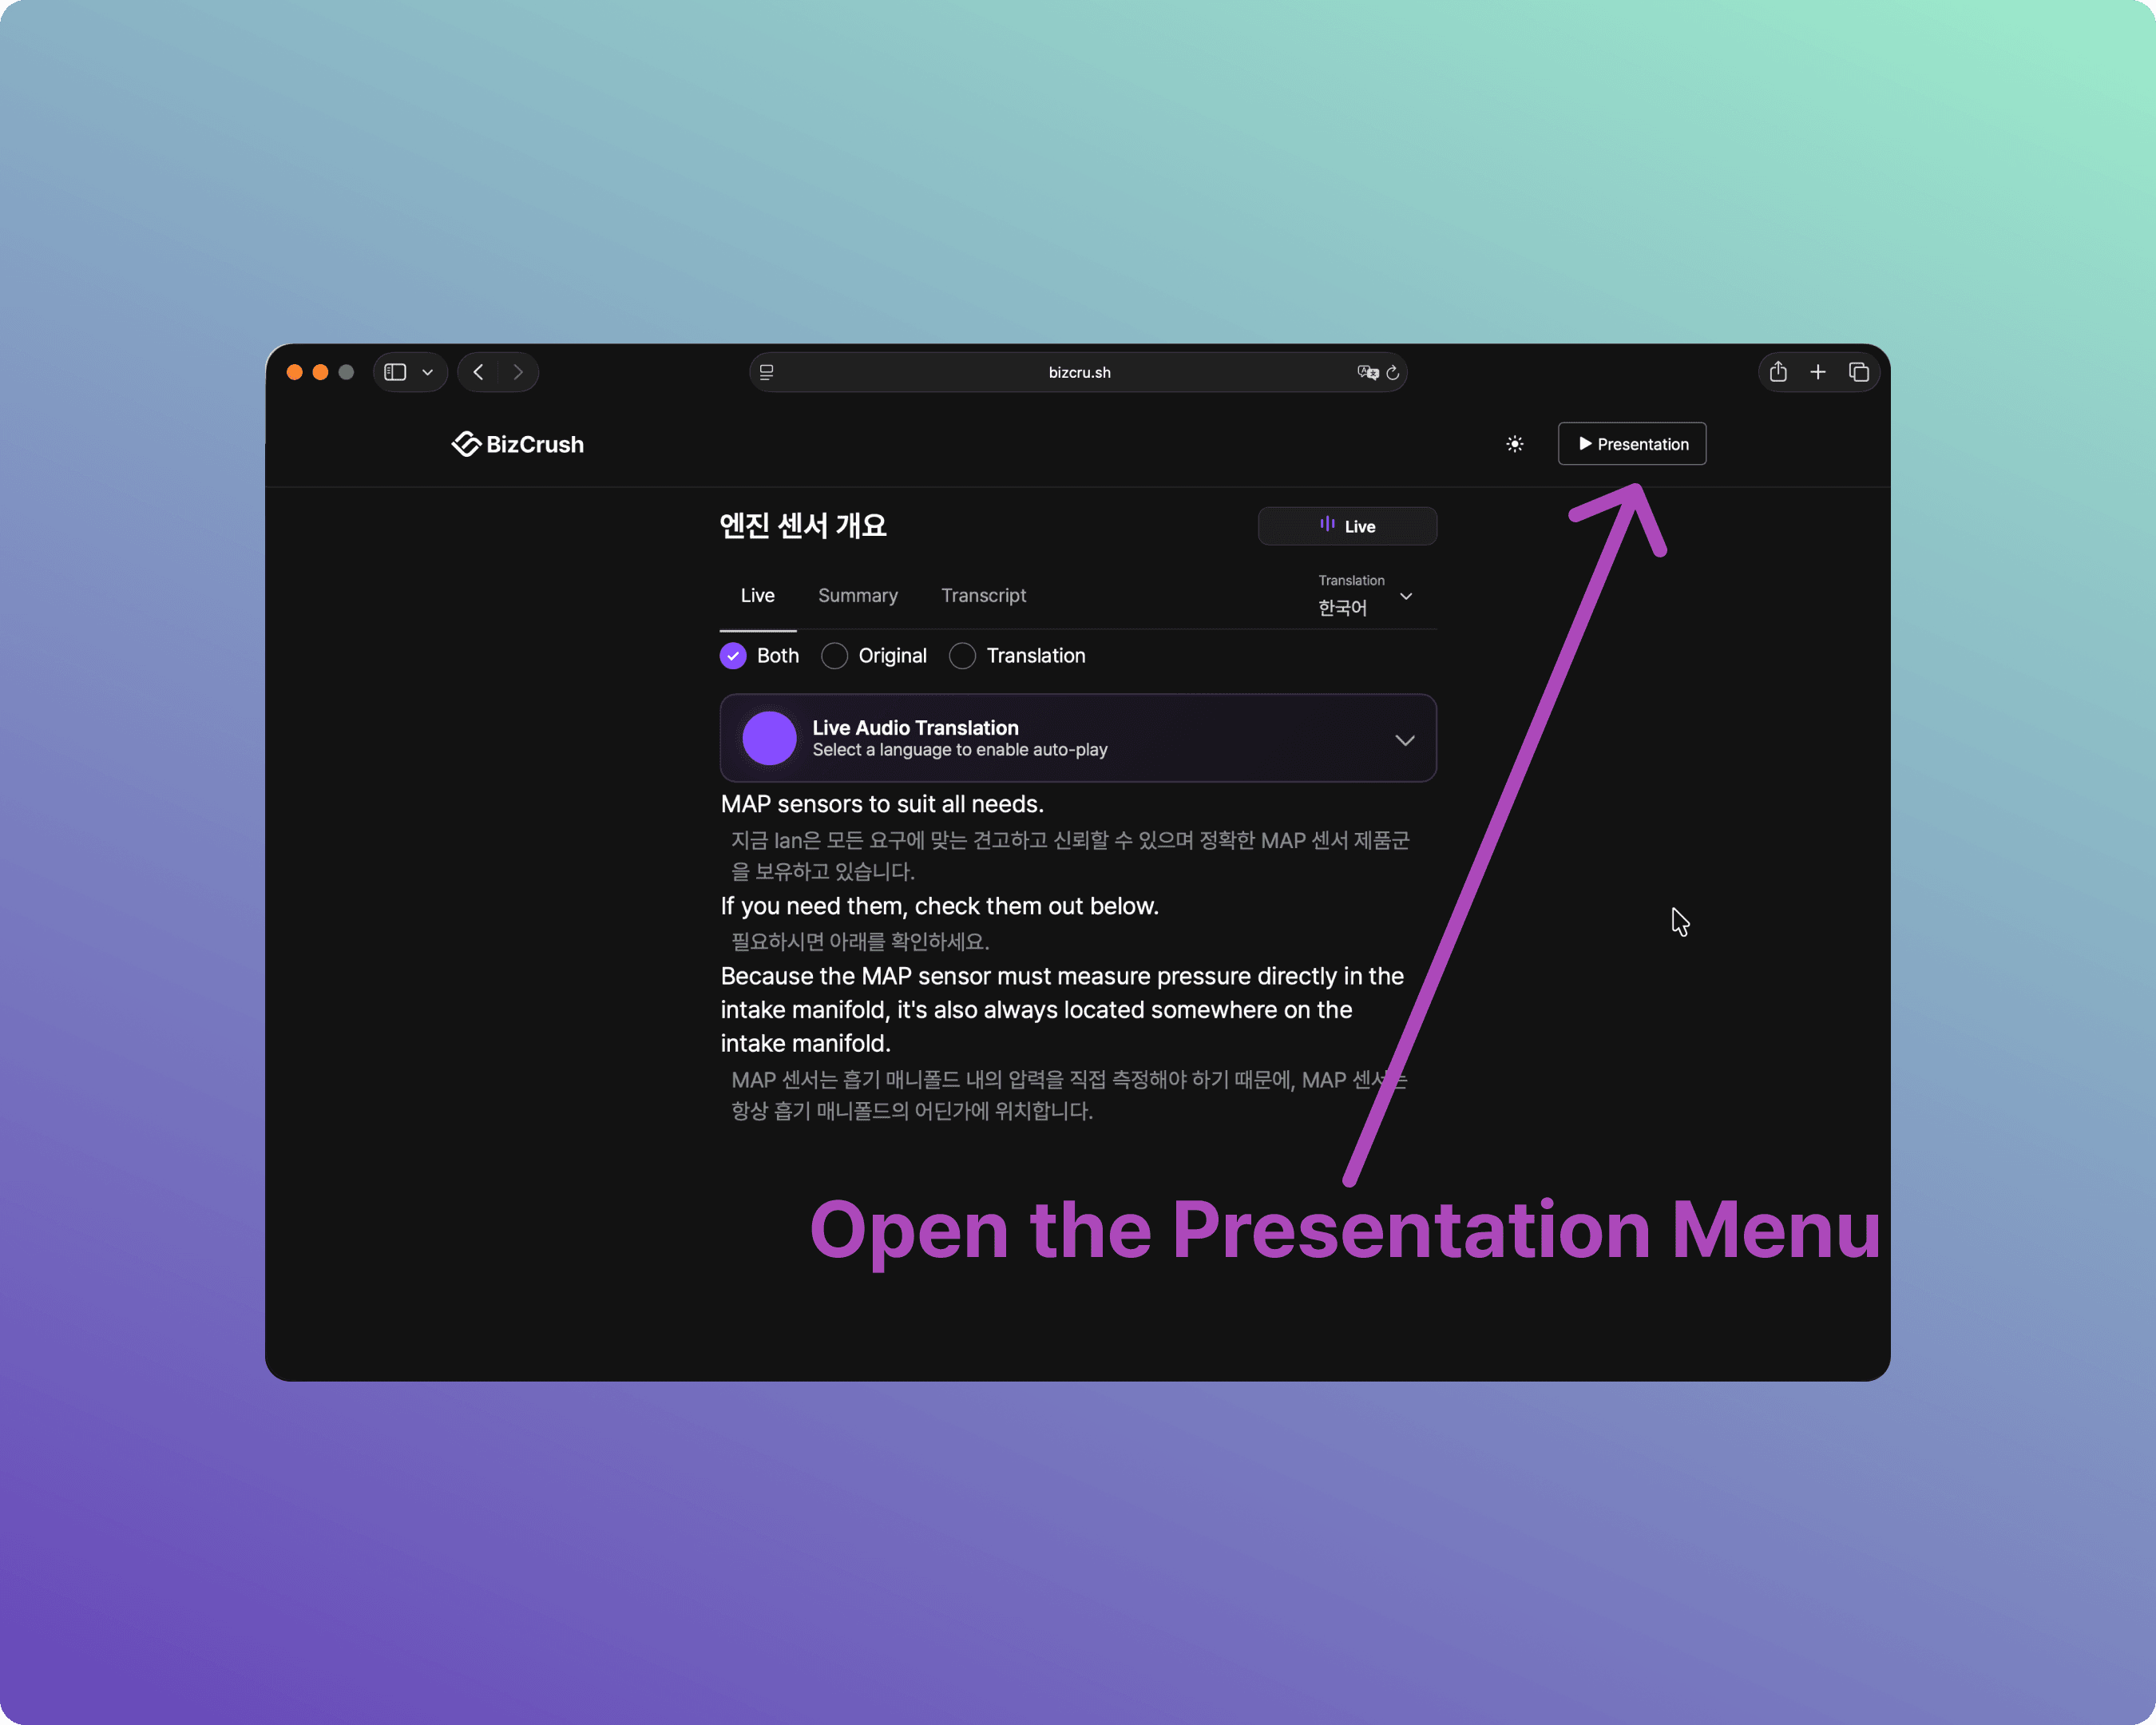
B-4. Open the Presentation Menu
Once the live transcript page loads, click the [▶ Presentation] button in the top right corner to open the settings panel.
B-5. Configure Subtitle Settings
Adjust display, size, and other options in the panel to fit your venue.
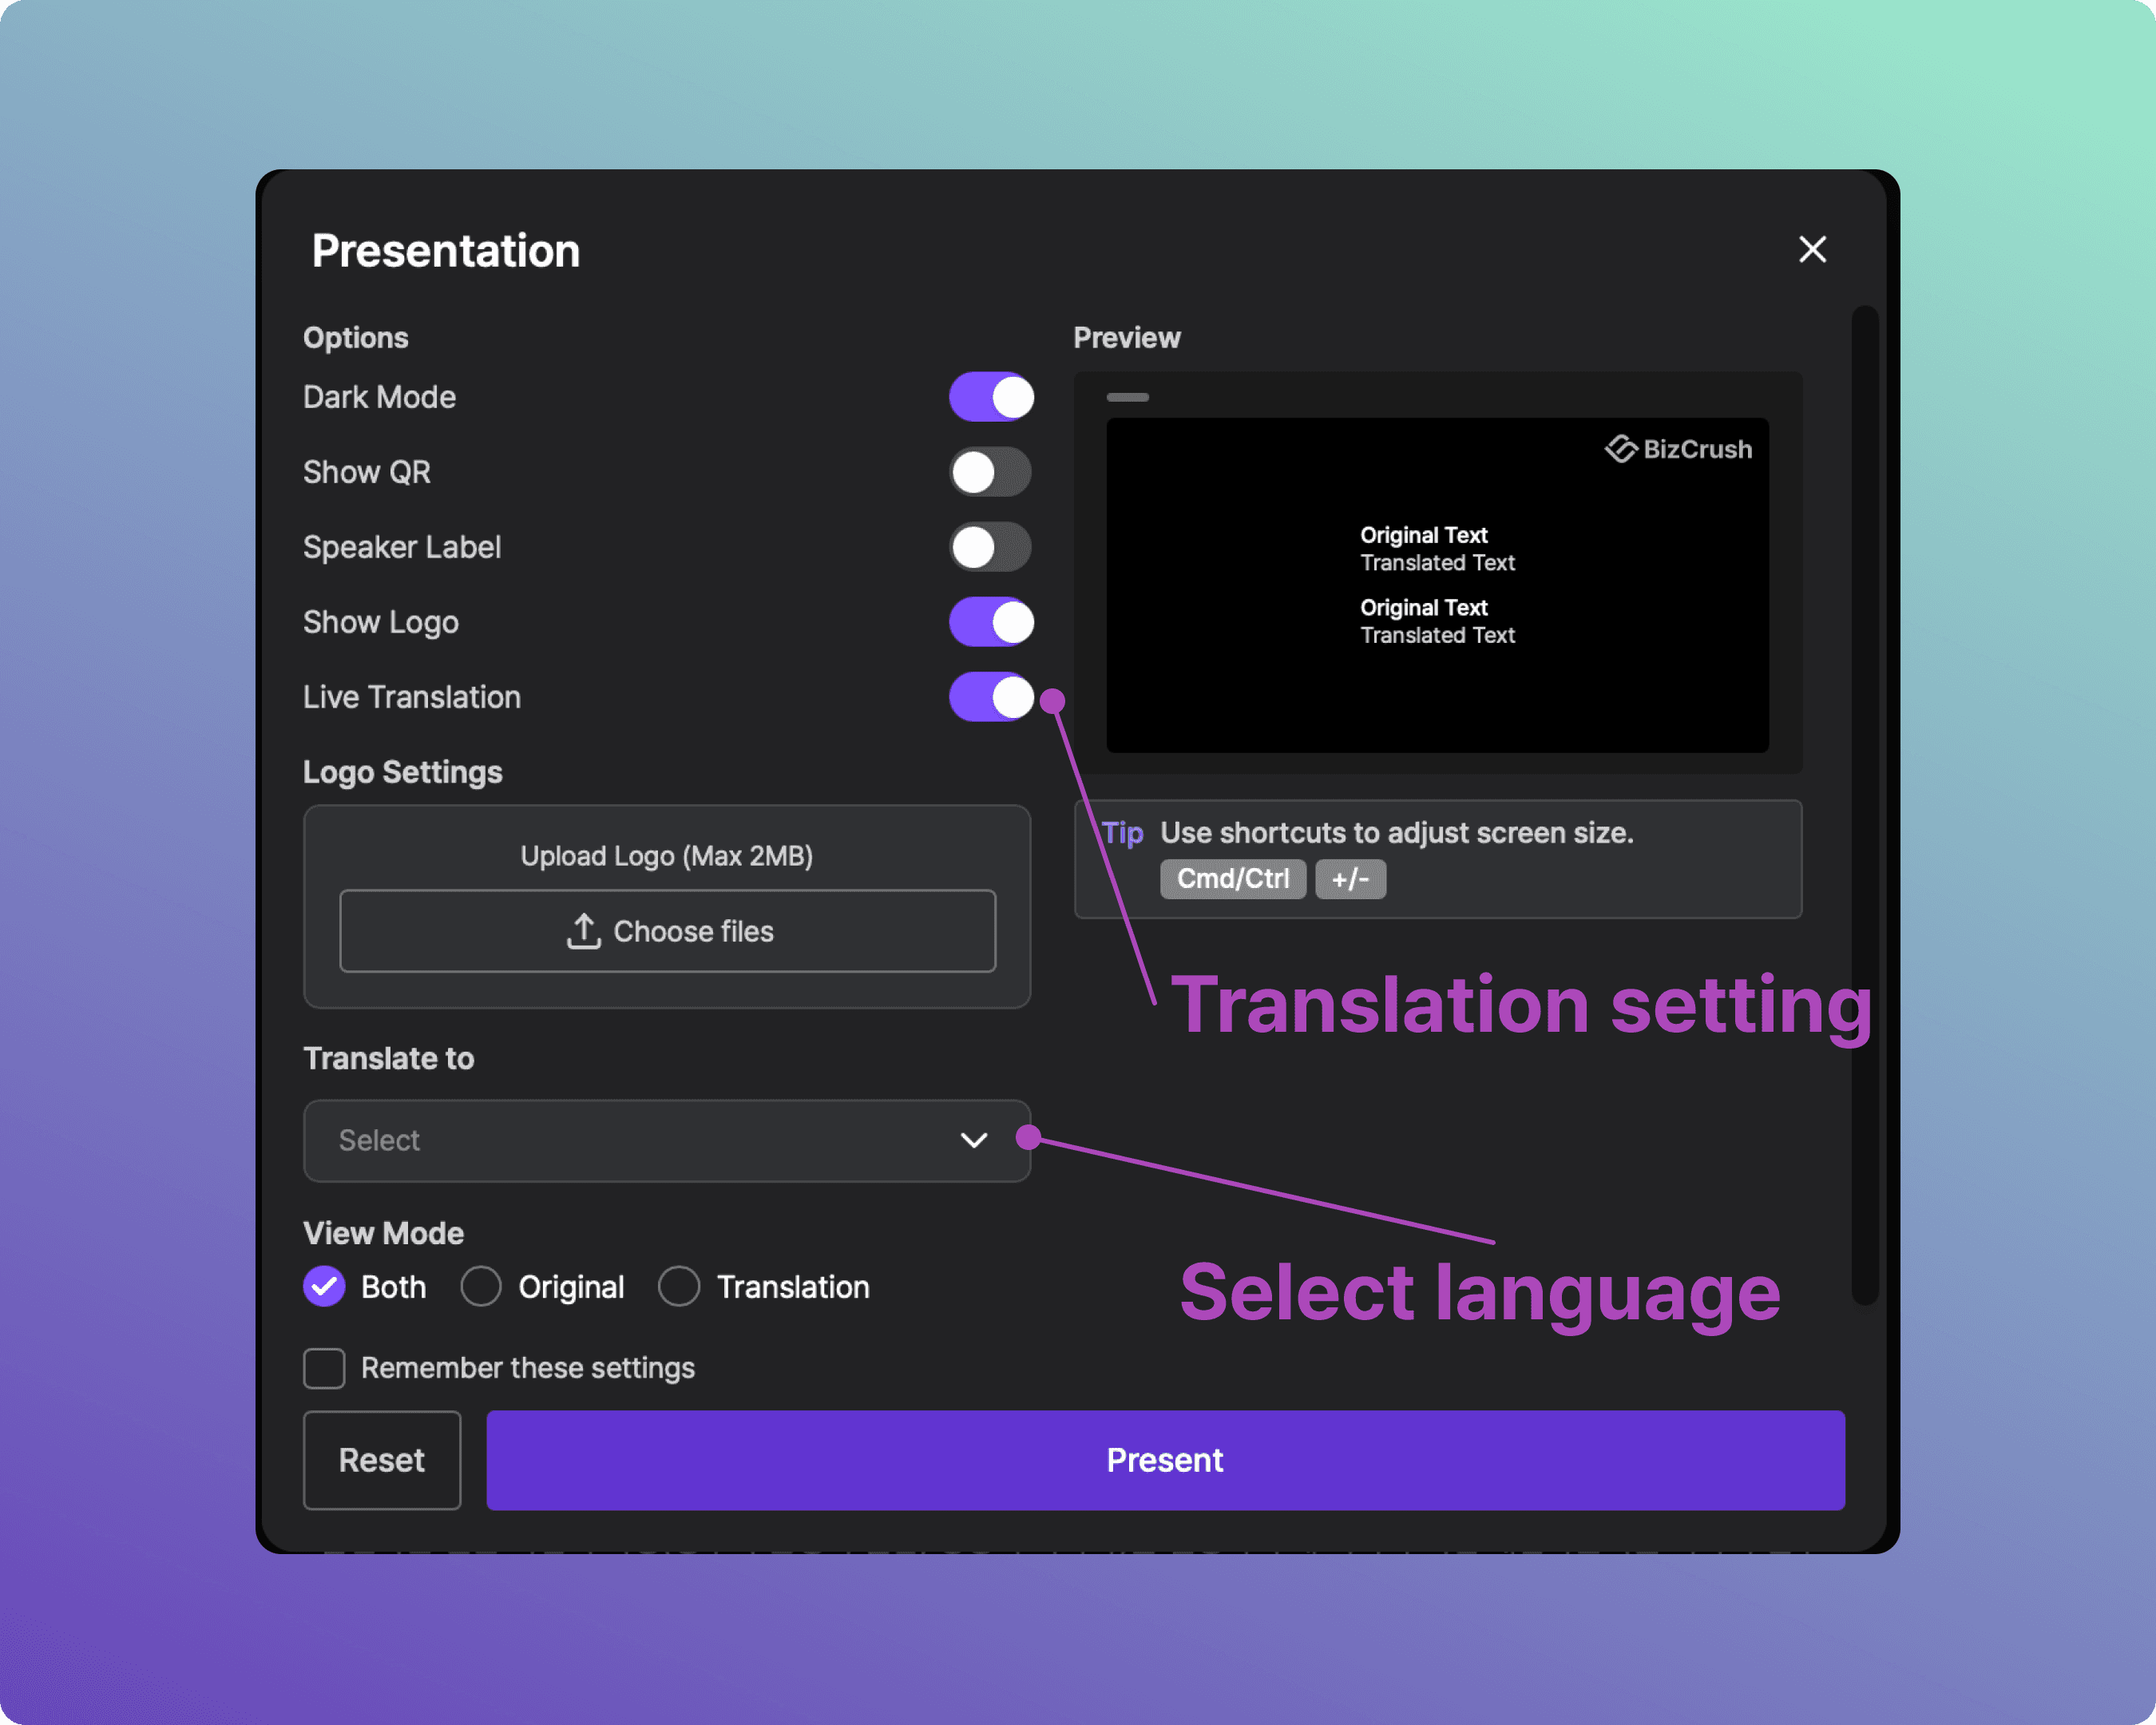
B-6. Launch Presentation Mode
Once you are done configuring, click the [Present] button at the bottom. A dedicated subtitle screen will launch, and real-time translated text will appear as soon as audio is recognized.
B-7. Enter Full-Screen Mode
For a clean look on the venue screen, switch your browser to full-screen mode so the address bar disappears.
Chrome (Windows): Press F11.
Chrome (macOS): Press Control + Command + F.
Safari (macOS): Press Control + Command + F. (Note: Uncheck "Always Show Toolbar in Full Screen" in the View menu so the top bar doesn't block subtitles.)


4. Assigning Co-hosts
If the host needs to focus purely on presenting, you can delegate meeting management to your staff by assigning them as Co-hosts.
Note: Co-hosts must create a BizCrush account before the event.
What Co-hosts Can Do
Edit live transcripts, start and stop recording, change meeting names, assign speaker labels, and generate and send follow-up emails.
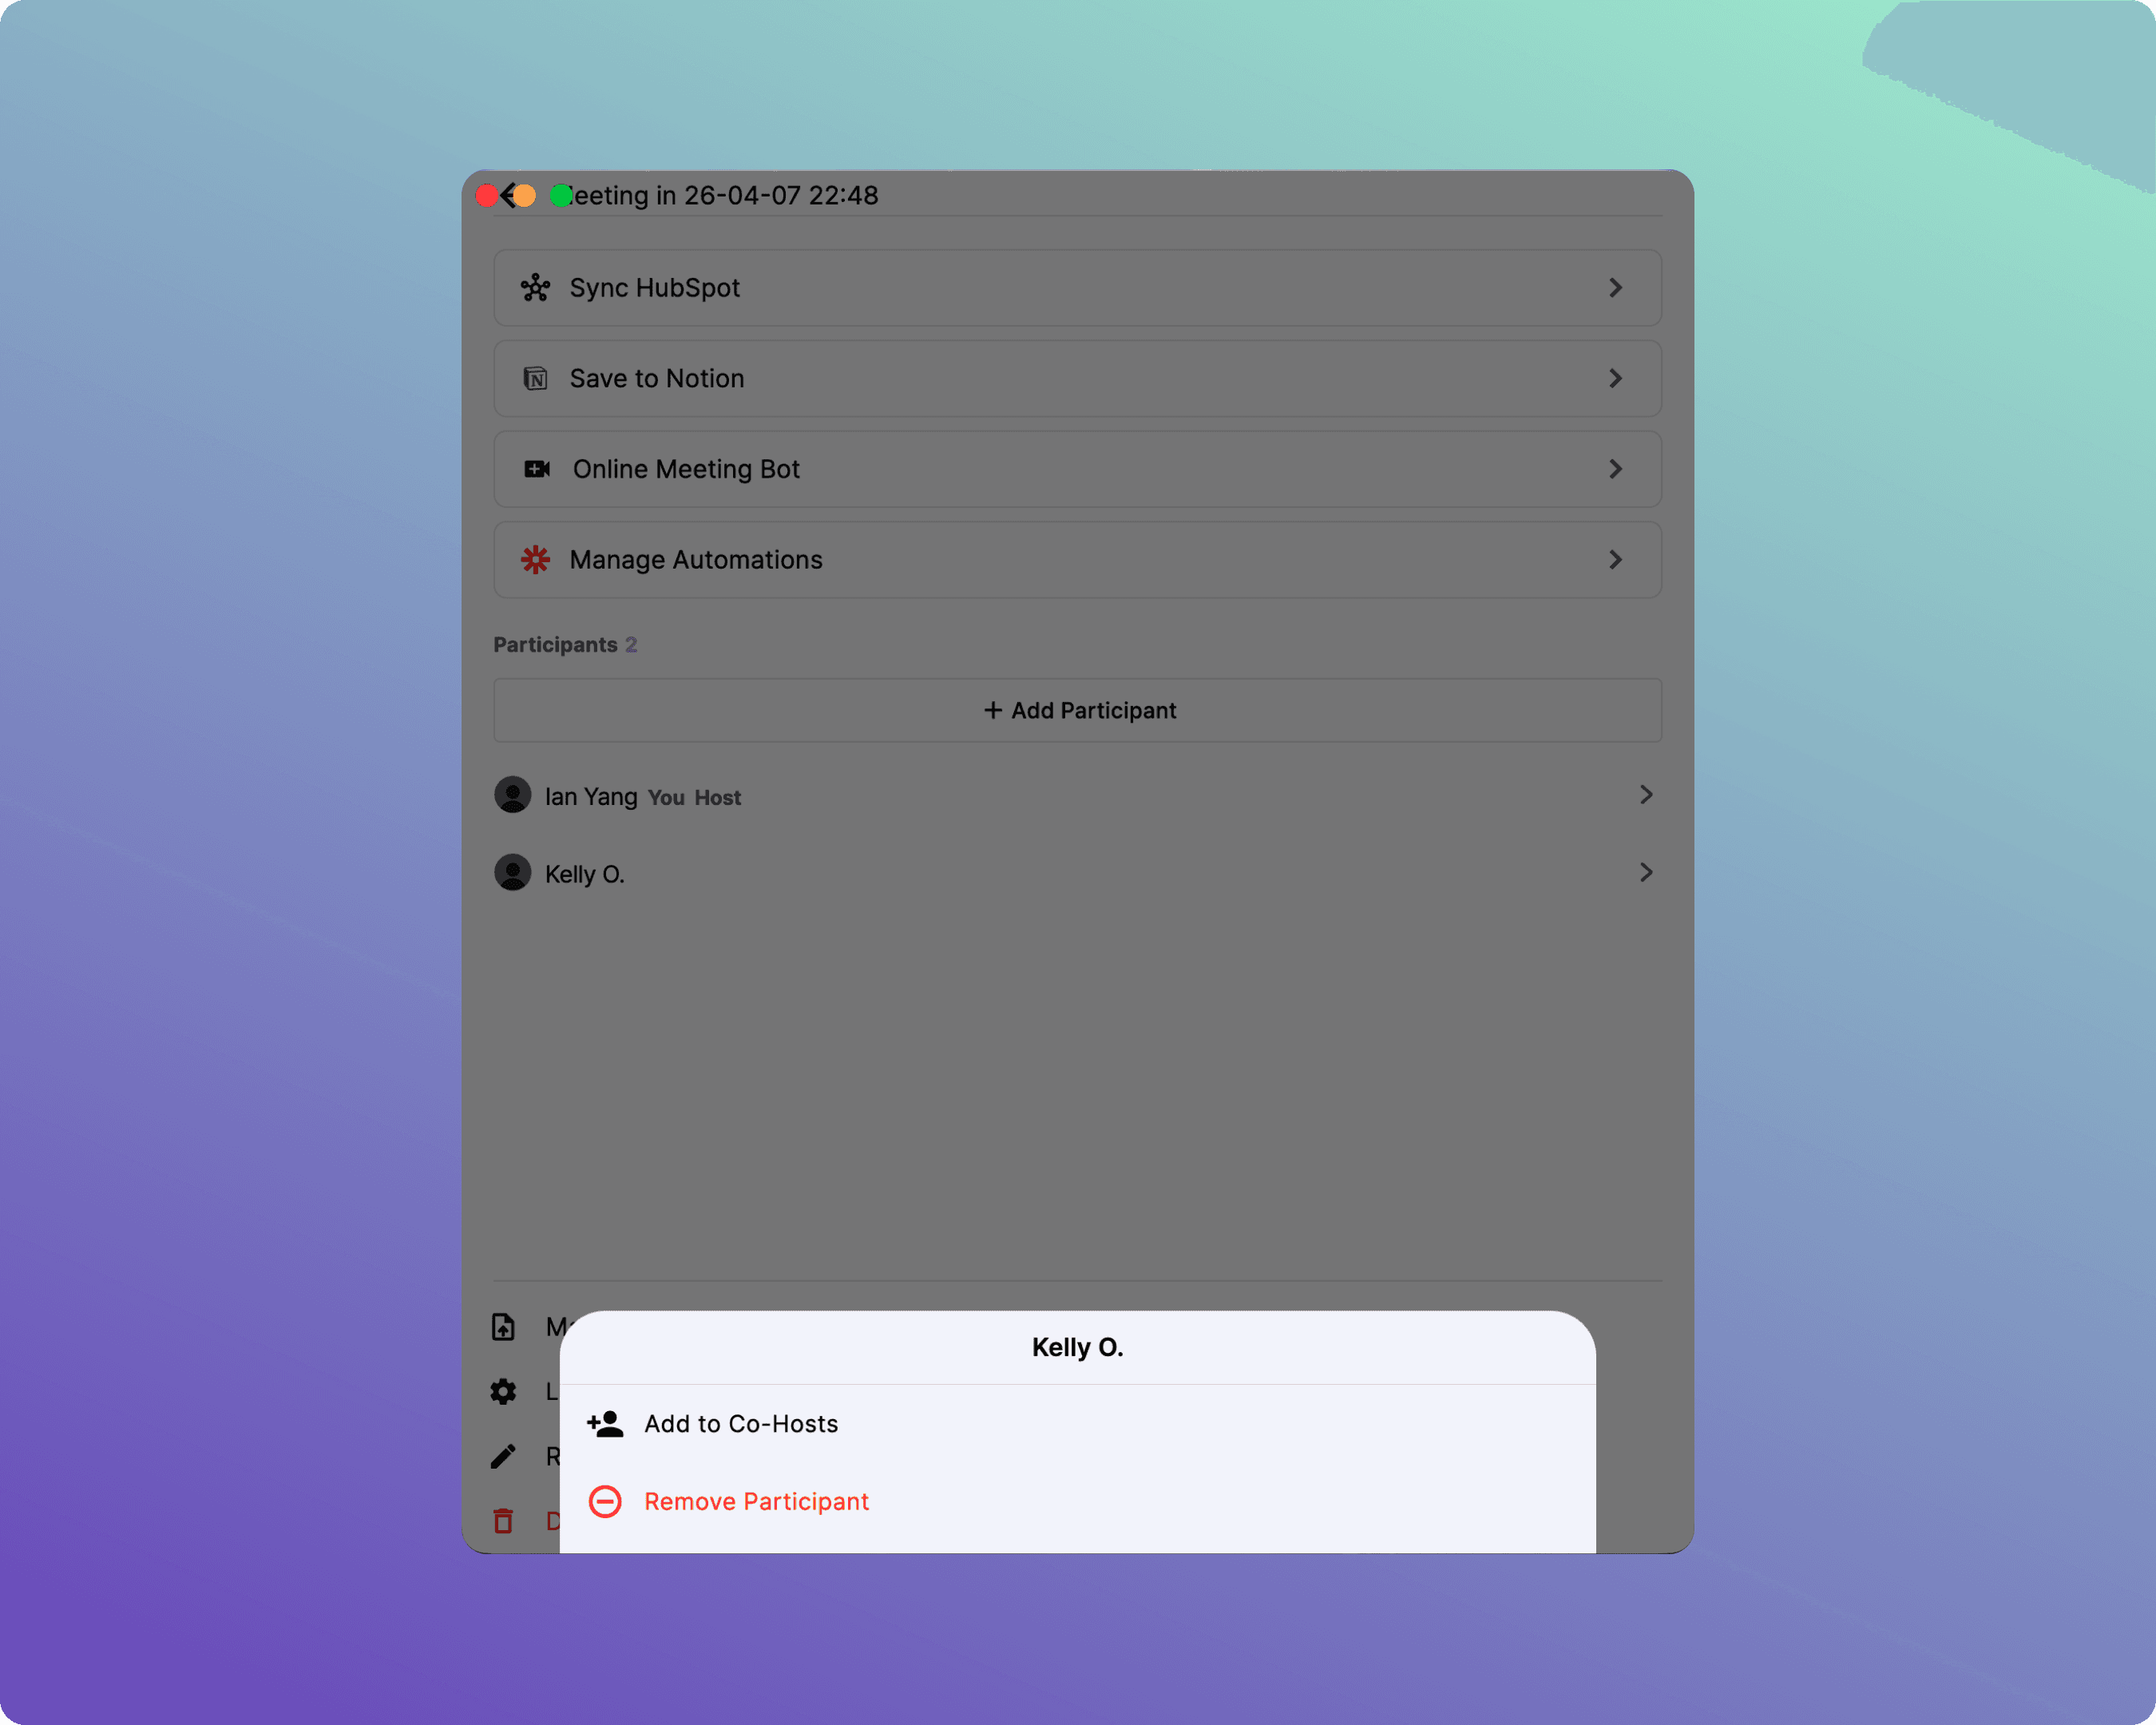
How to Assign a Co-host
Open the [☰ Side Menu] in the top right corner.
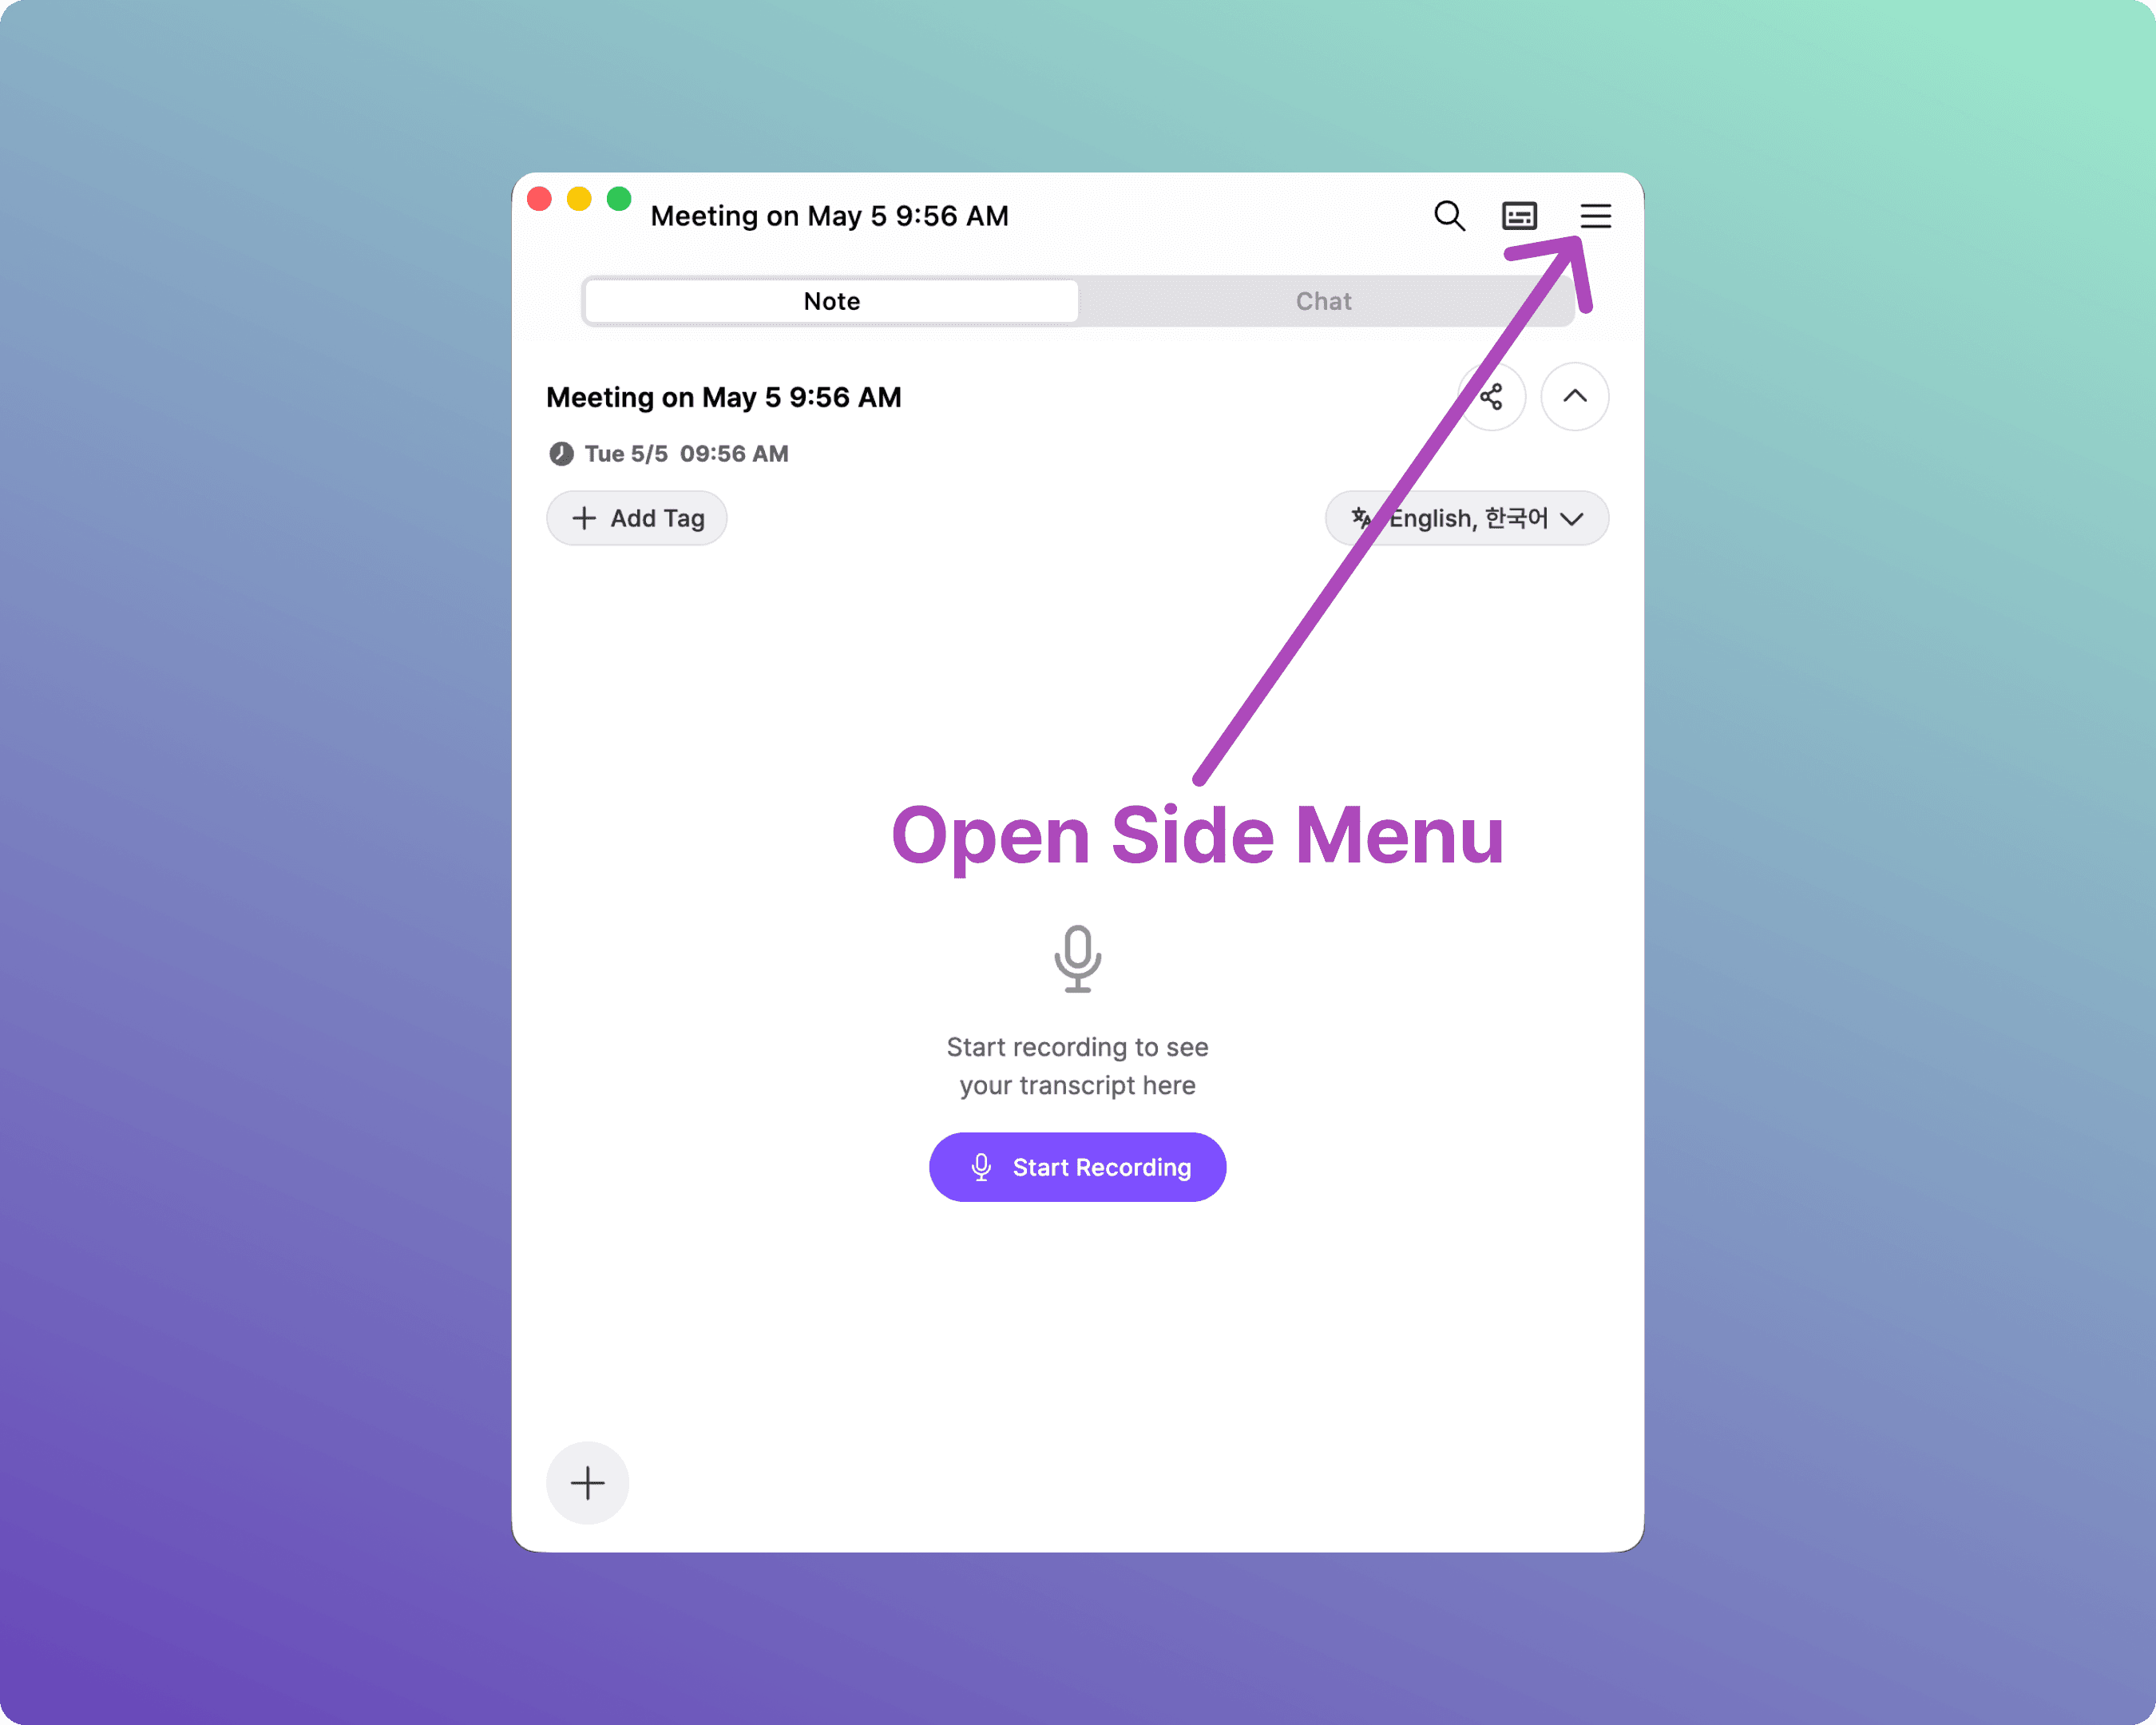
Select [+ Add Participant].

Enter your staff member's email address to invite them.
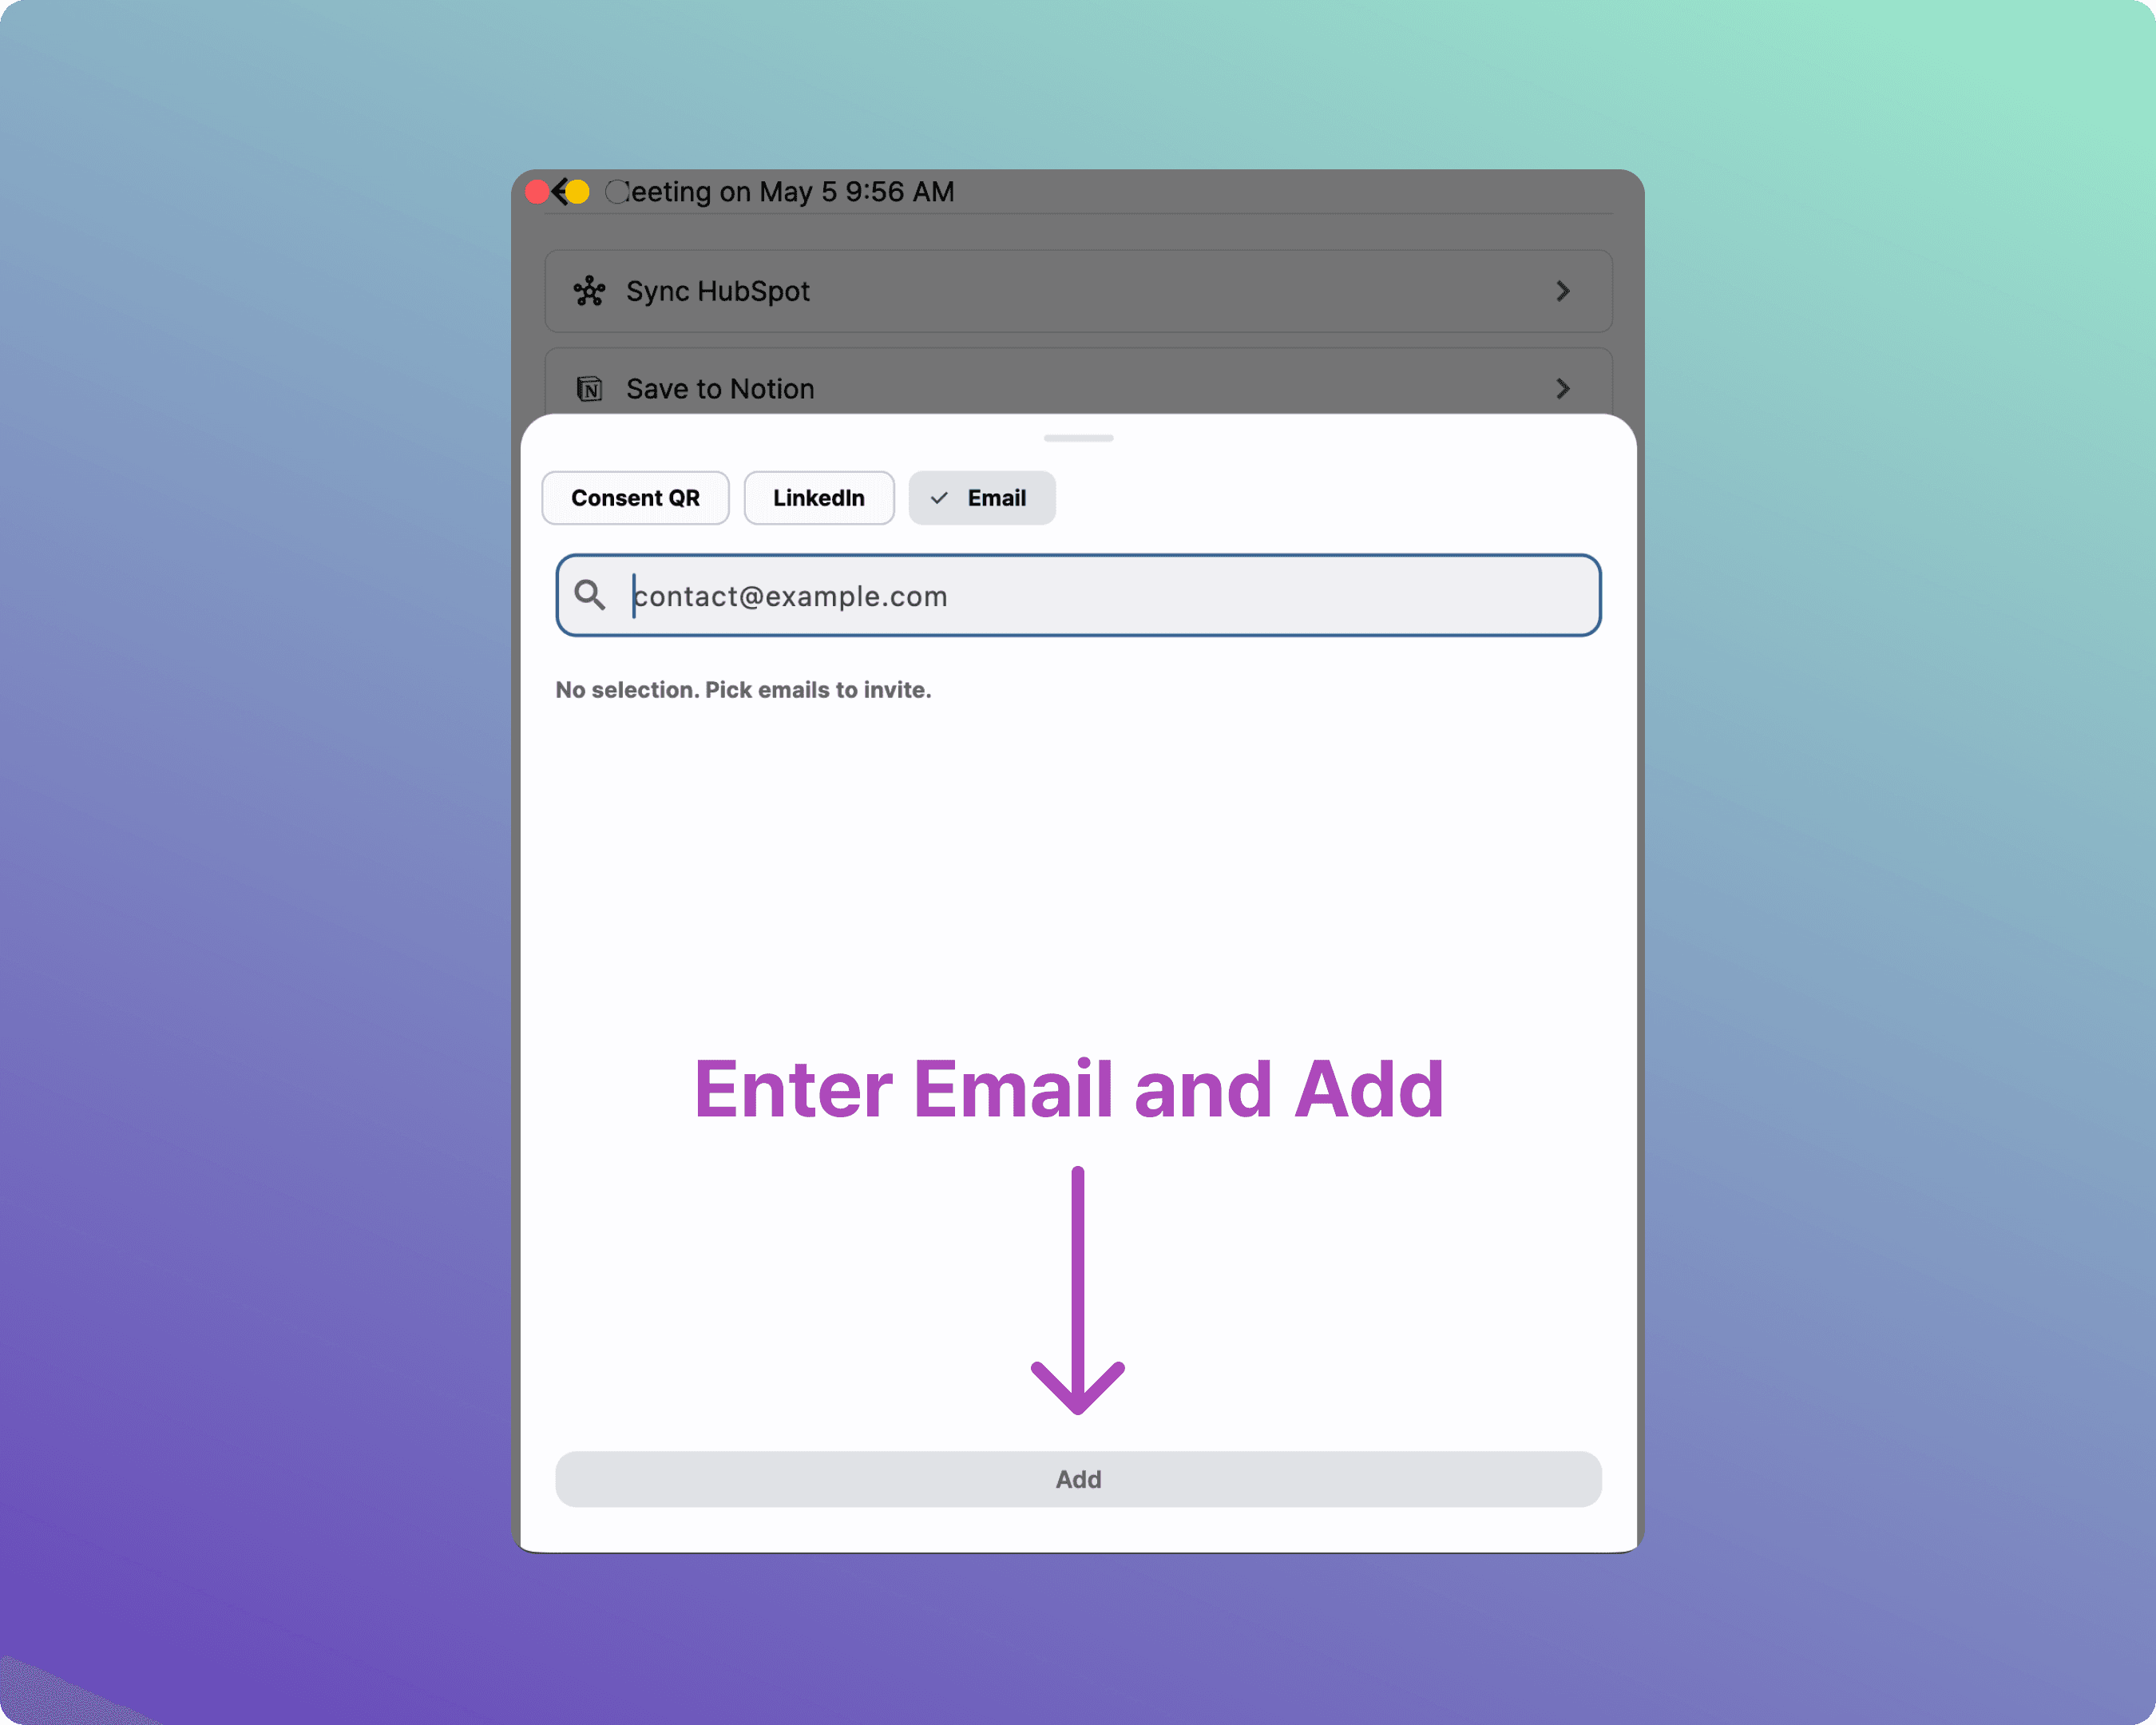
Long-press (click and hold for 3 seconds) on the invited user's name to open the Co-host menu.
Select [Add to Co-Hosts].
5. Registering Custom Keywords
Pre-registering industry jargon, proper nouns, or acronyms dramatically improves speech recognition and AI summary quality.
How to Register Keywords
Open the [☰ Side Menu] in the meeting room.
Click [Manage Context] at the bottom.
Choose your preferred method:
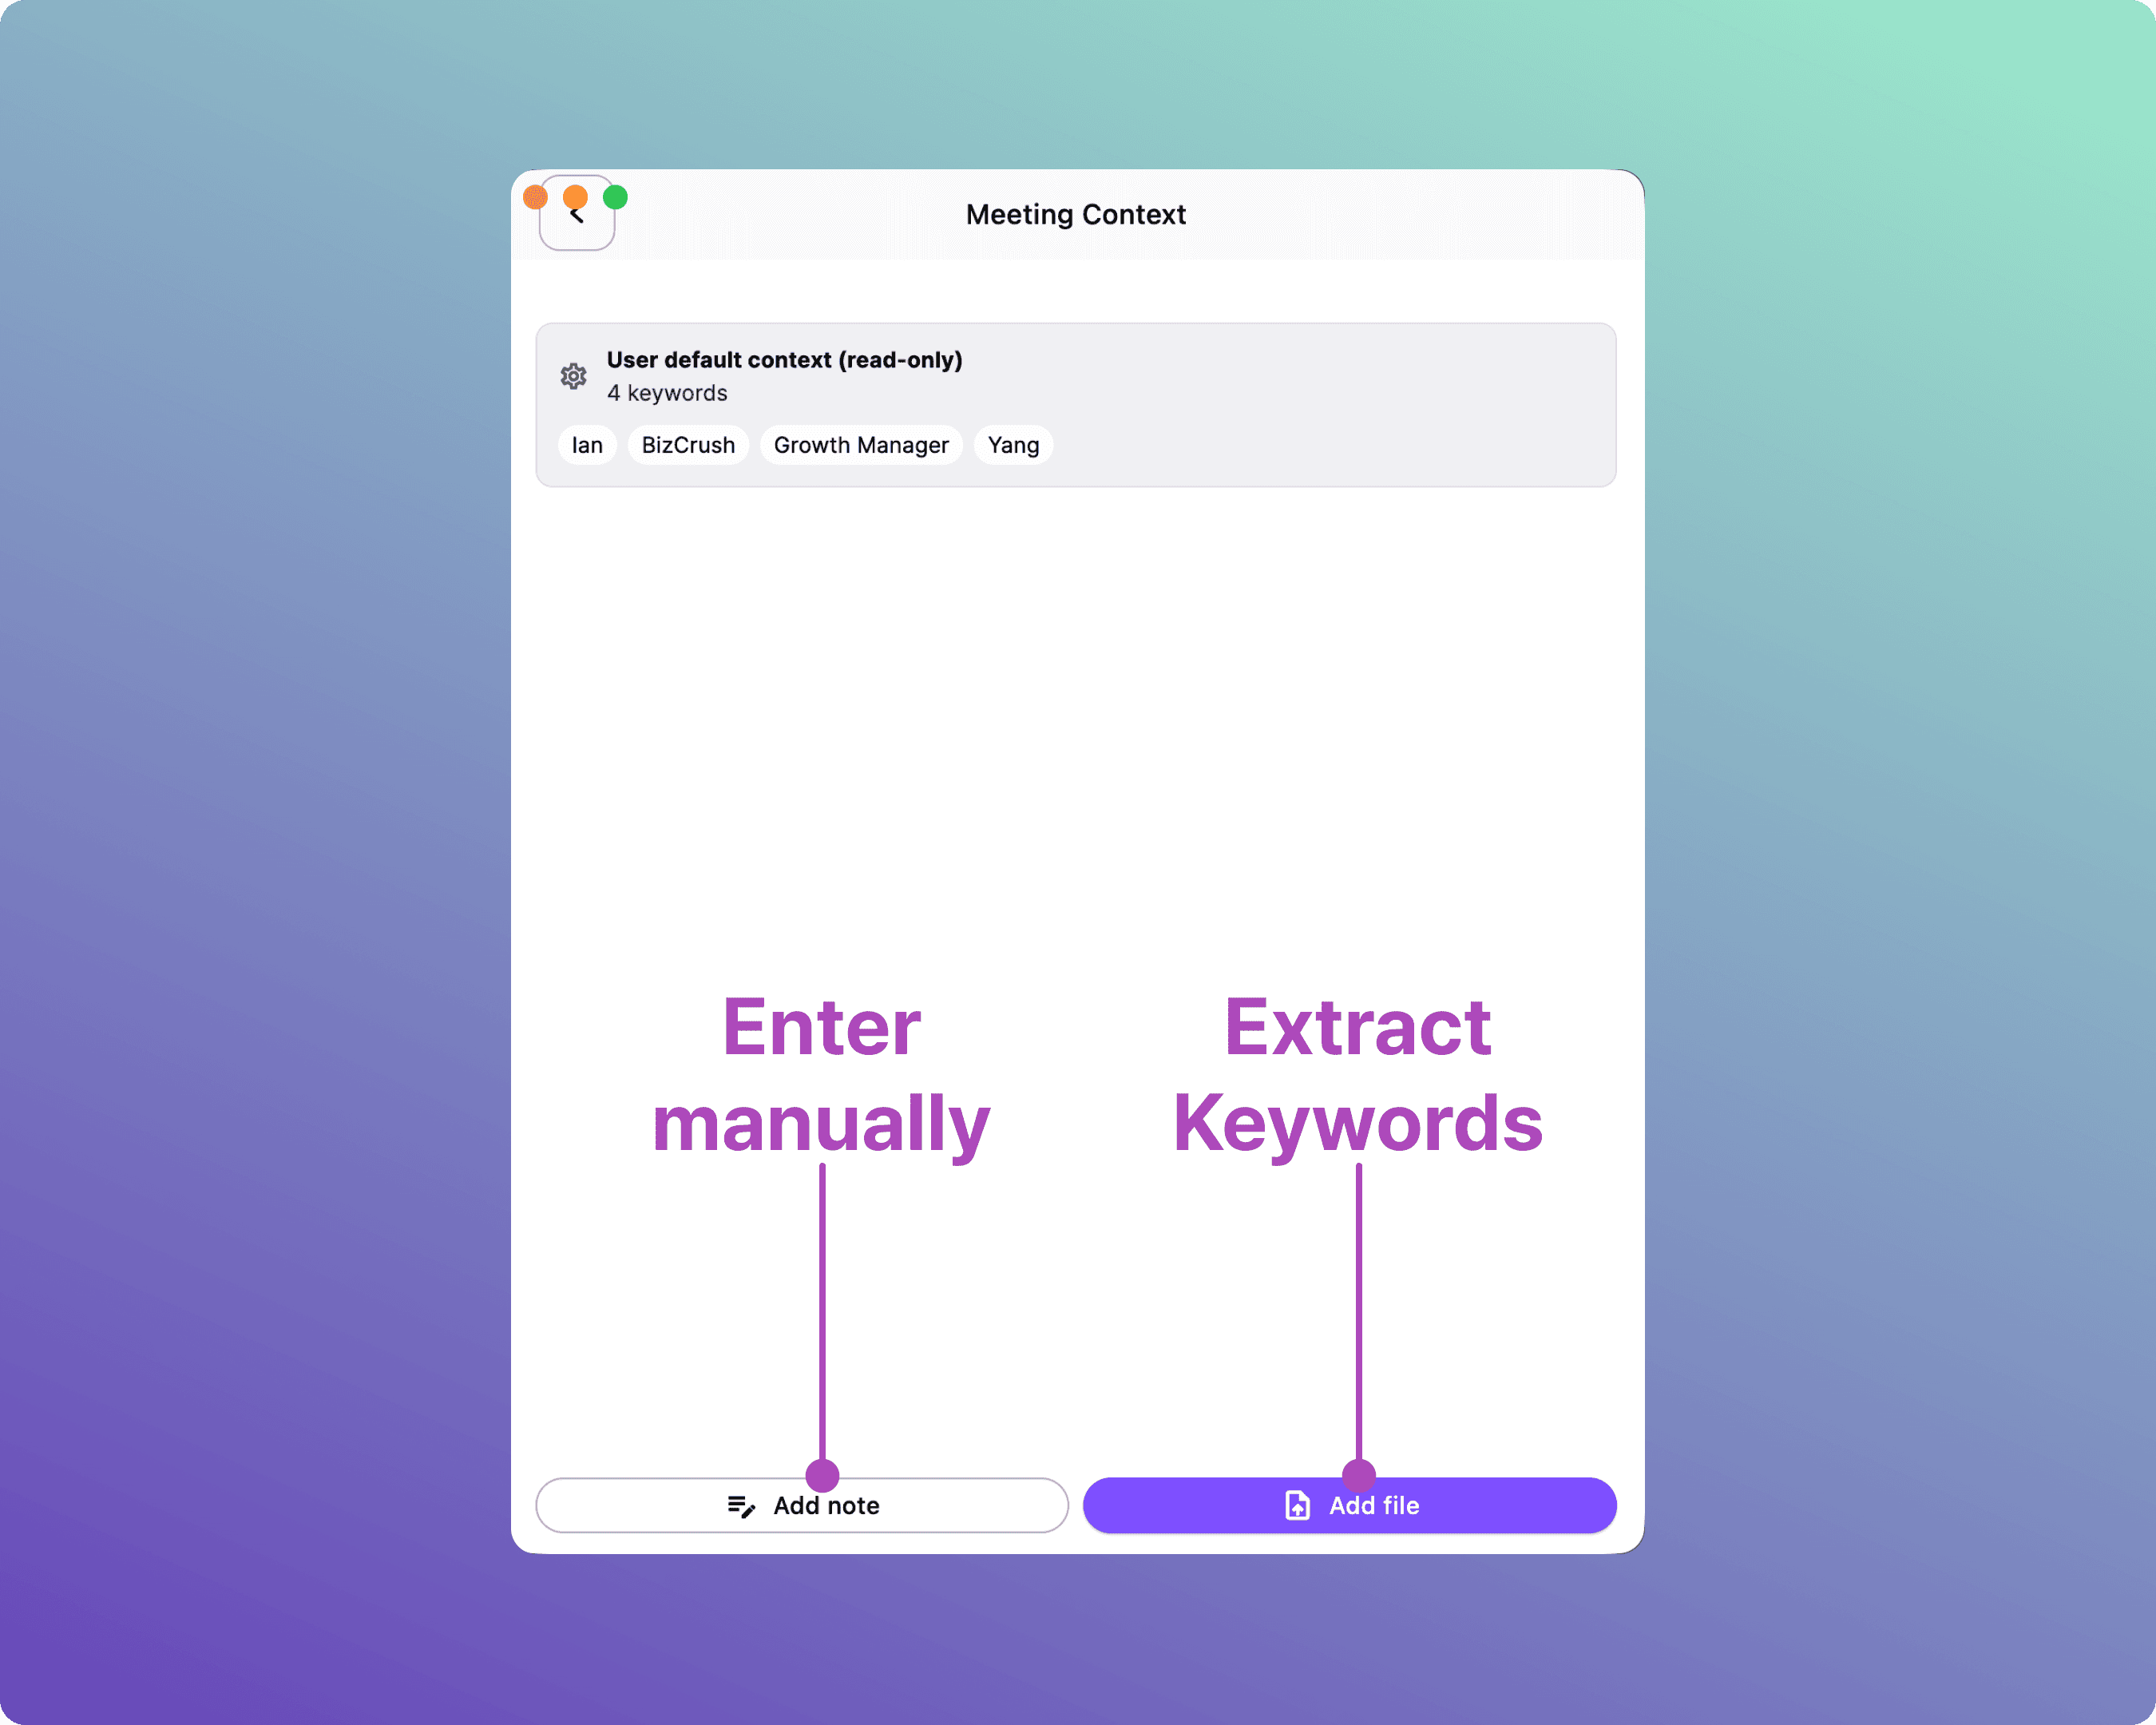
Upload PDF File: Upload your presentation deck, event agenda, or briefing doc. Key terms are extracted automatically.
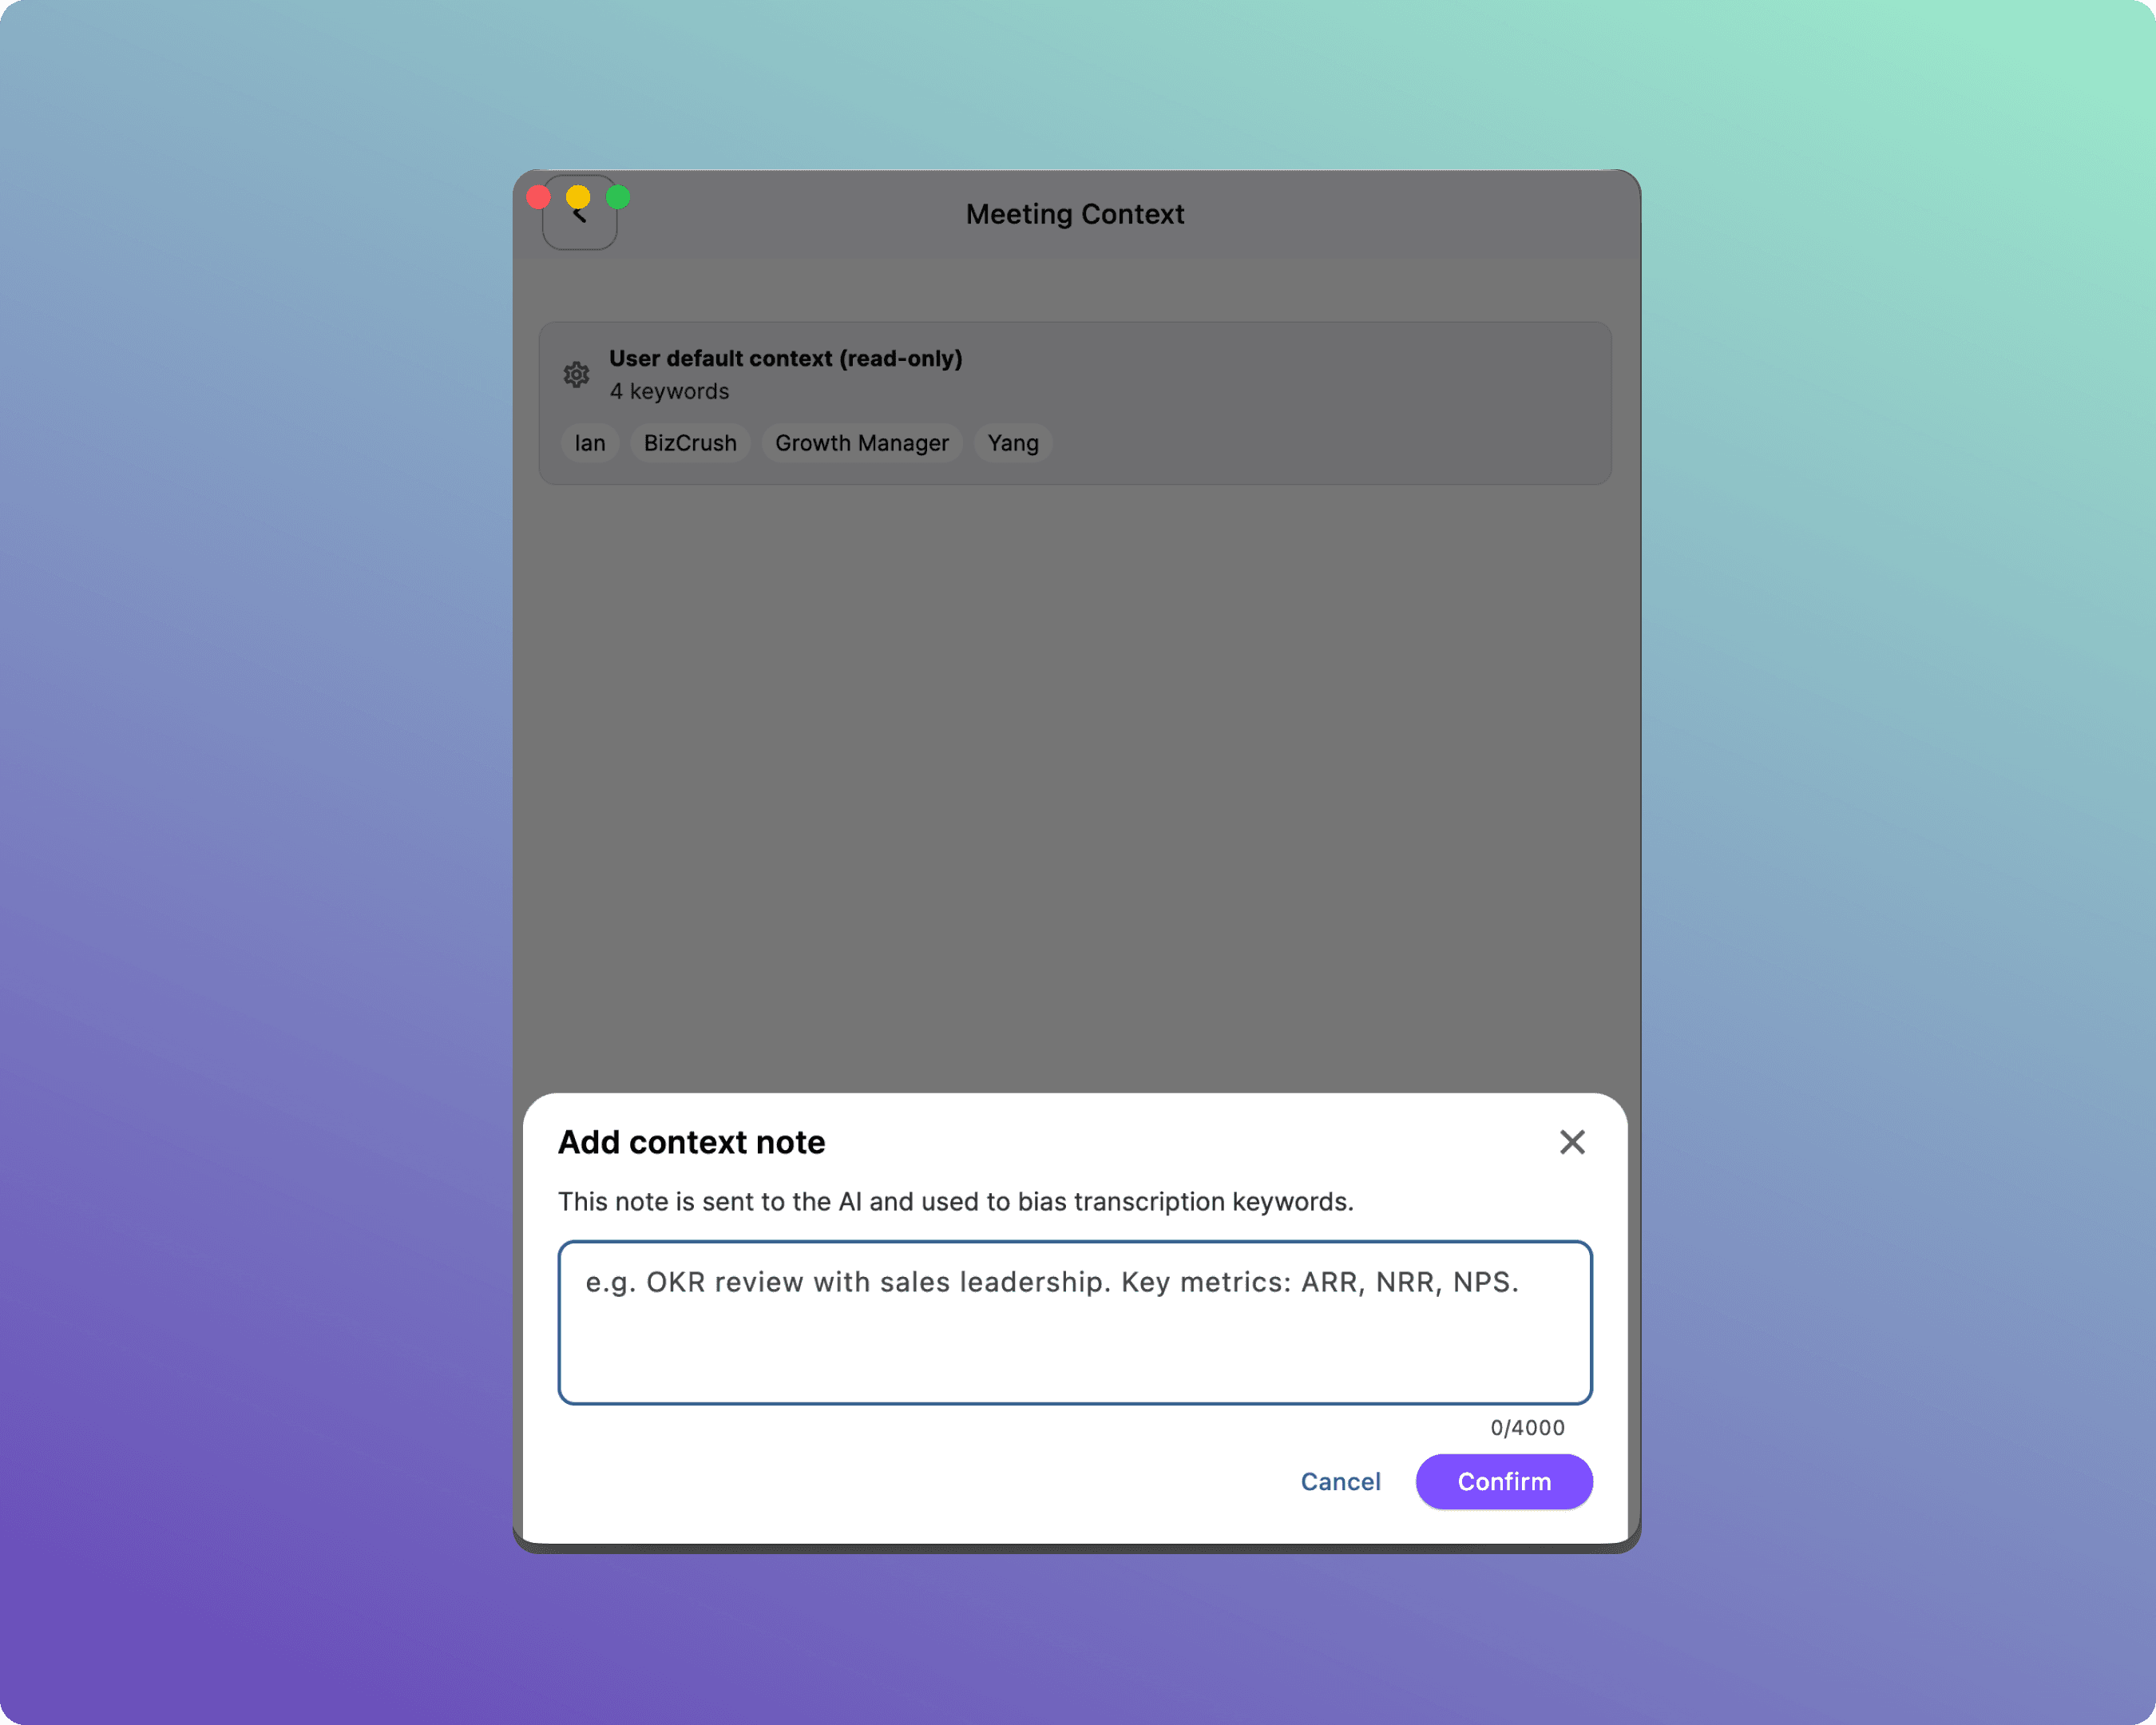
Add Note: Type specific words directly into the Enter keyword field and click [Confirm].
Tip: Focus on unique proper nouns — event names, speaker names, and specific acronyms (e.g., GSKA, K-Fest).
6. Sharing Subtitles with Attendees
BizCrush allows attendees to view subtitles directly on their own smartphones or laptops without downloading any app.
Note: There are two QR codes depending on the experience you want to provide.
Feature | Meeting Room QR | Presentation Mode QR |
|---|---|---|
Where to find it | Bottom toolbar → Share options | Presentation Settings → Show QR |
What attendees can do | Change translation languages themselves, view summaries, access full transcript history, use Live Audio Translation. | Only view the exact subtitles being shown on the main projector (read-only). |
Best used when… | Attendees want to choose their own translation language and follow translated audio. | Audience members in the back of the room need a mirrored view of the main screen on their own devices. |
How to Share the Meeting Room
Click the [Sharing Menu].
Either copy the link to send via email or chat, or display the generated QR code on your screen for attendees to scan.
Tip: Put this QR code on your opening presentation slide or print it on flyers at the venue entrance.
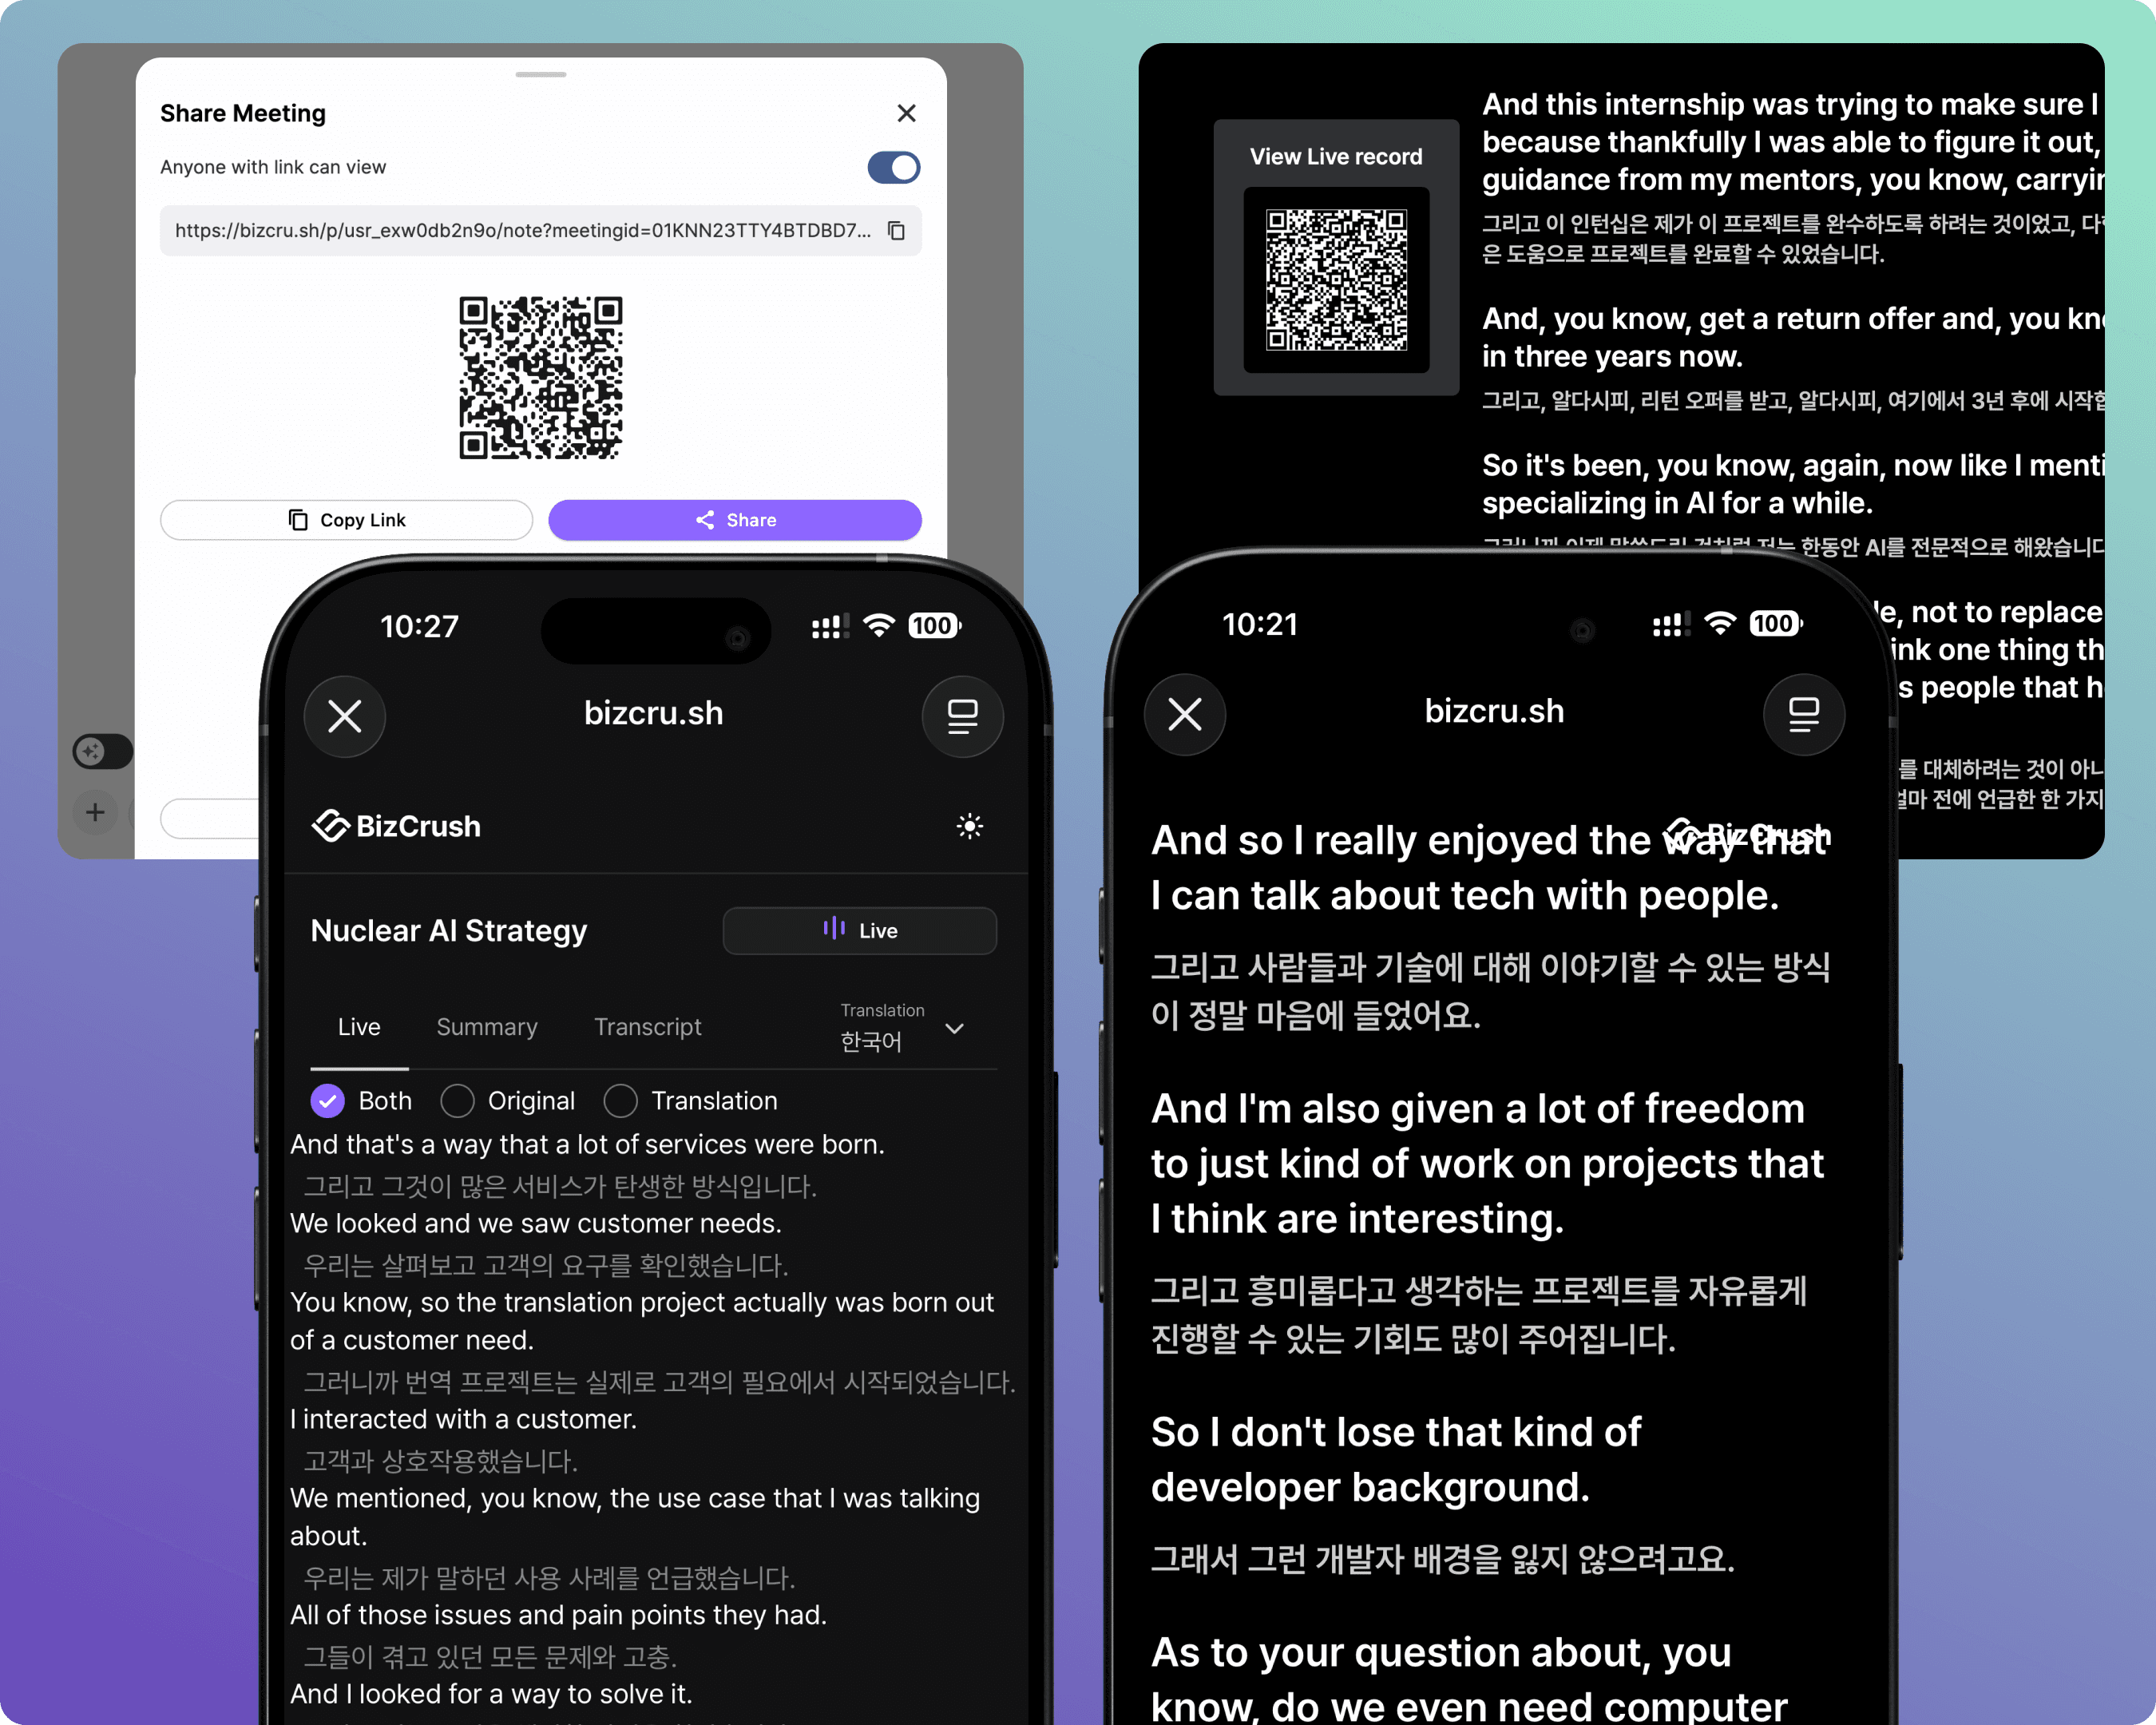
Attendee Screen — Meeting Room
When an attendee scans the meeting room QR code or joins via a shared link, the screen below appears.
They can switch between the Live, Summary, and Transcript tabs in their browser to view the content.
They can choose the original transcript, translation, and display format in their preferred language.
When they select a language using the Live Audio Translation feature, the translated audio plays in real time.
They can stay connected for up to one hour after the meeting ends.
How to Share Presentation Mode
When attendees scan the Presentation Mode QR code, they are directed to a dedicated viewer for the subtitles.
To enable access, turn on the [Show QR] option in the settings panel.
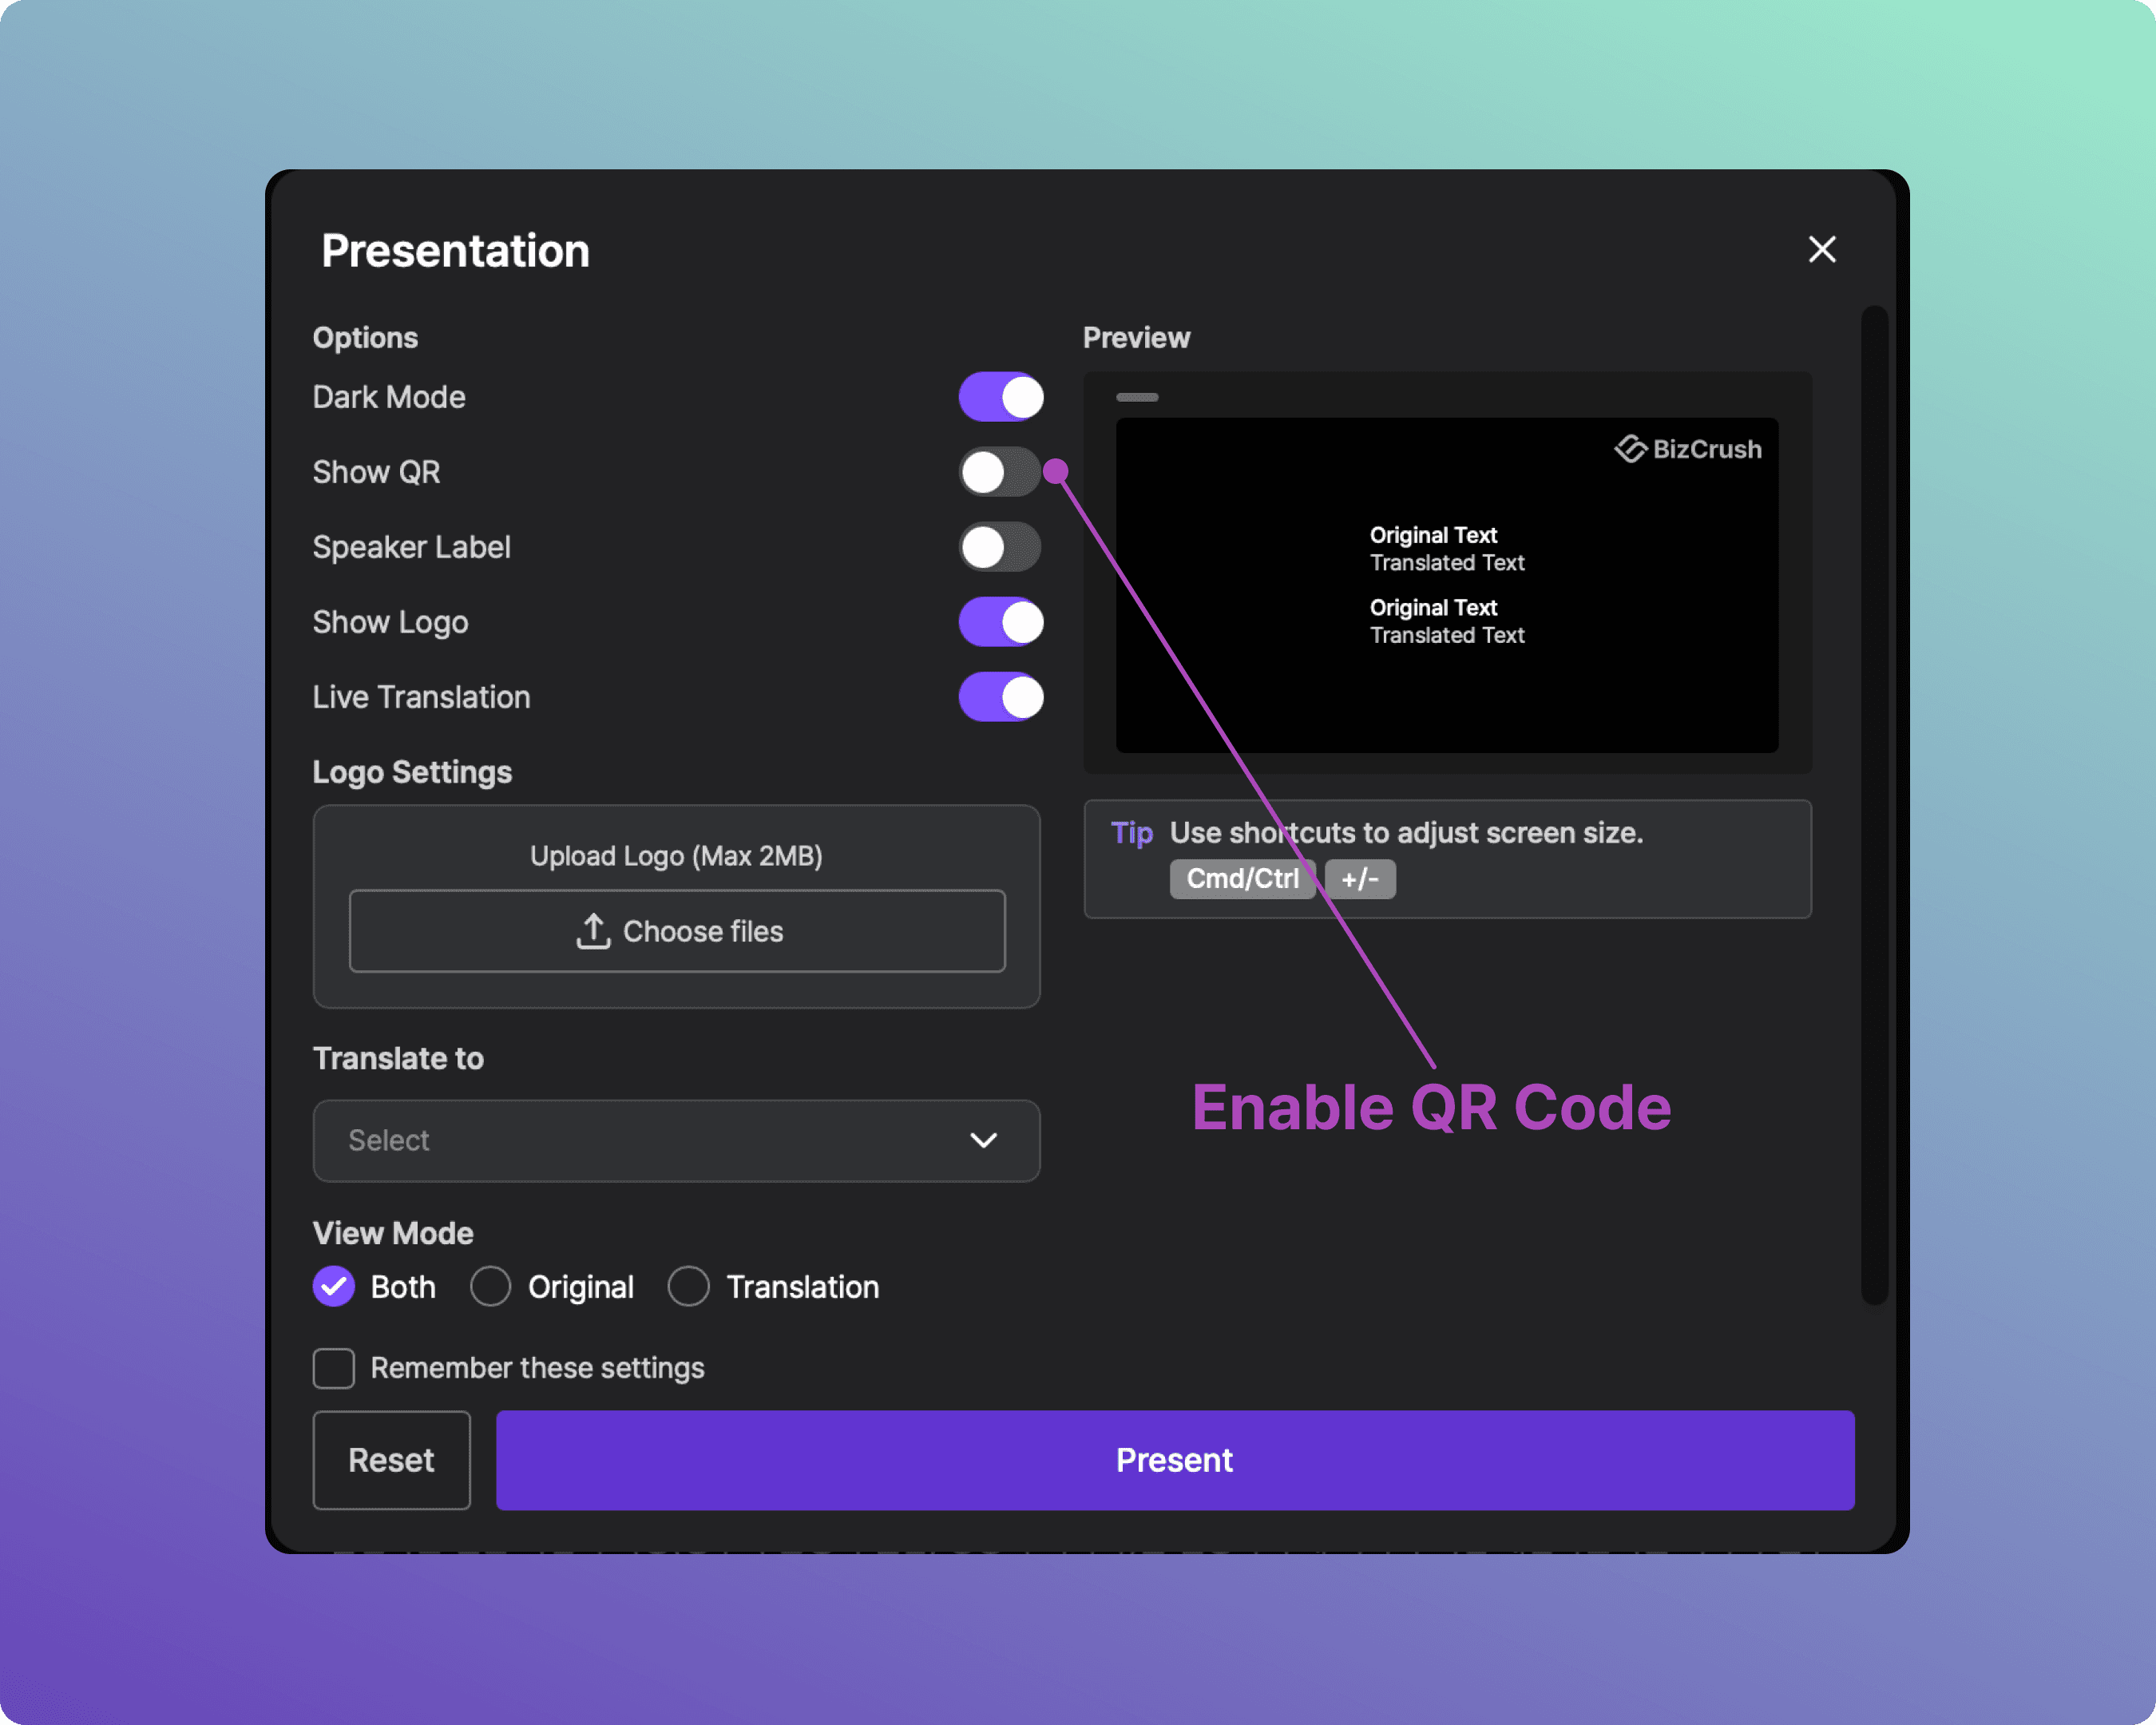
Attendees can then scan the QR code to view the subtitles via a browser on their preferred device.
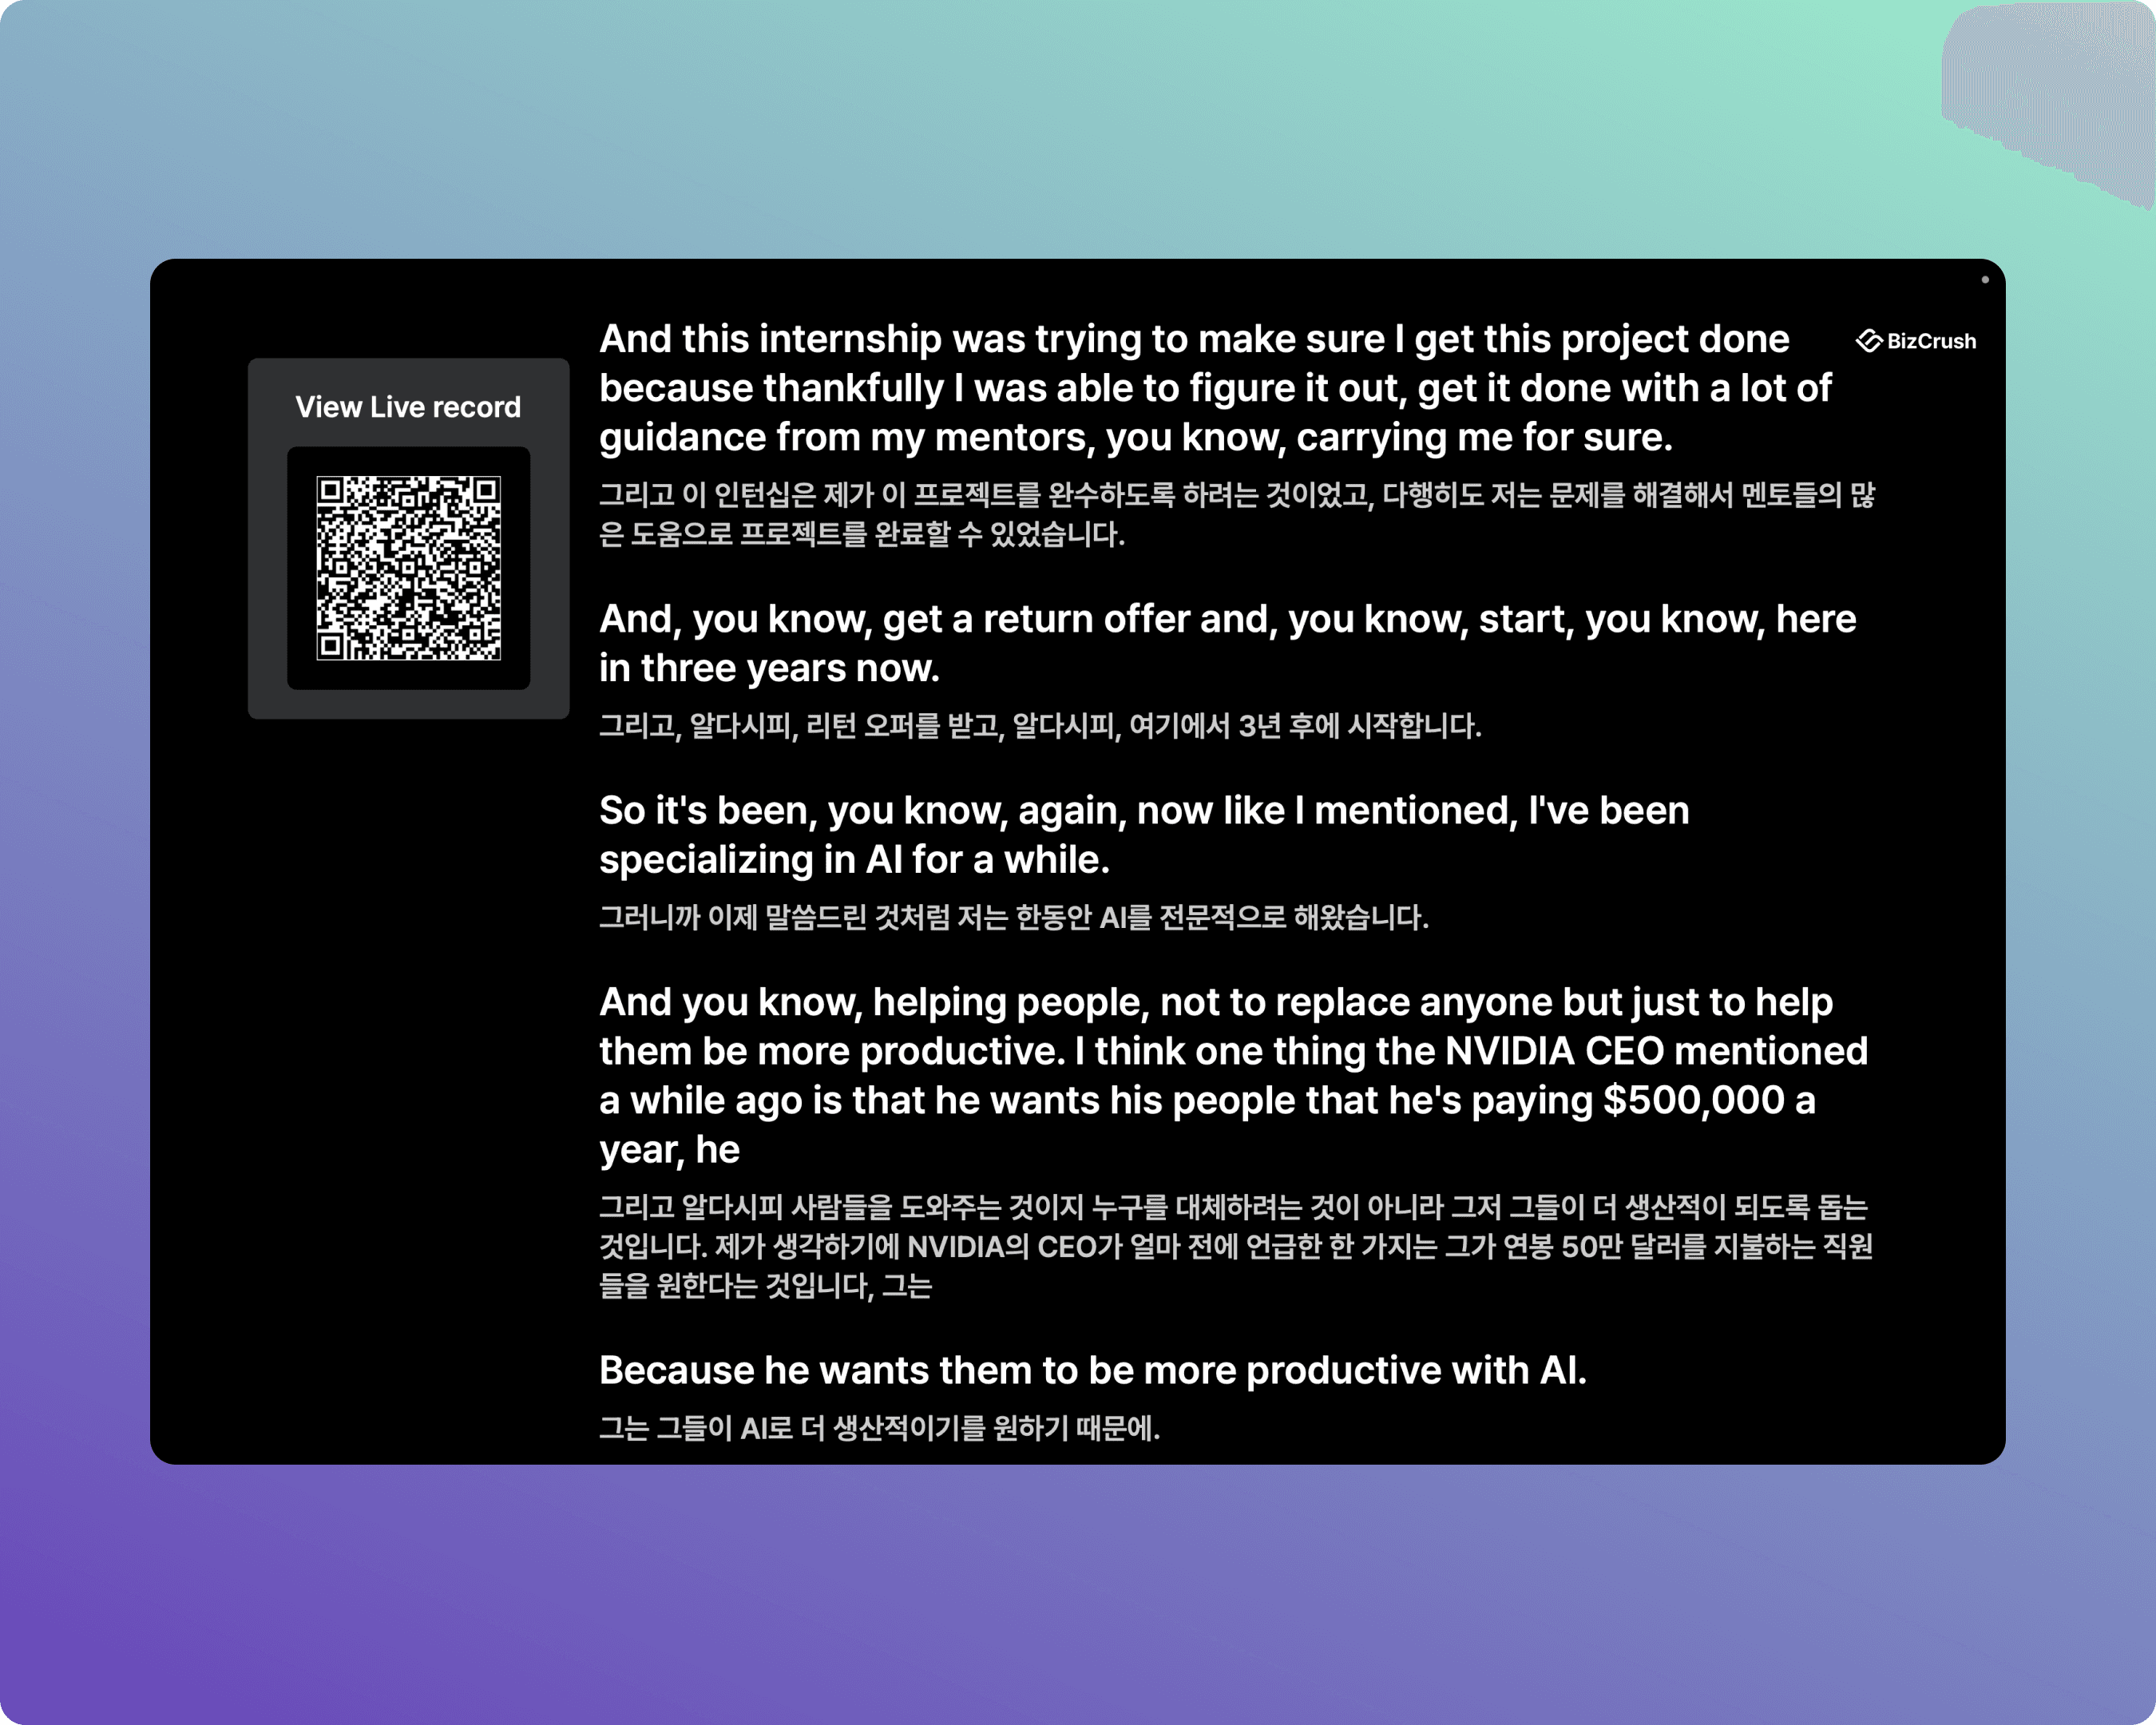
Attendee Screen — Presentation Mode
When an attendee scans the Presentation Mode QR code, the screen below appears.
They are redirected to the dedicated subtitle viewer in their browser.
They cannot adjust settings such as language.
They see the same subtitles as the main screen, mirrored on their own device.

7. Event Day Checklist & Troubleshooting
Pre-Session Checklist
Desktop App launched and logged in
Meeting created, and recording started
Spoken Language and Translation Language confirmed
Custom keywords registered
Overlay turned on and positioned (if using Overlay mode)
Share link / QR code tested and displayed for attendees
Microphone audio check (speak into the venue mic and confirm text appears)
Common Issues & Solutions
Q. The microphone is blocked / no text is appearing.
A.Go to your computer's OS settings → Privacy/Security → Microphone and ensure BizCrush has permission to access your microphone. Also, move the laptop or phone closer to the venue's PA speakers or the presenter.
Q. The Overlay subtitles aren't showing up.
A.Make sure you are using the Desktop App — Overlay does not work on the mobile app or web browser version. Then check that the Overlay toggle is turned ON in the settings.
Q. Presentation Mode isn't working.
A.Ensure that the meeting is actively recording on the host device. If the link was opened before recording started, refresh the browser page.
Q. Accuracy drops because the venue is too noisy.
A.BizCrush uses AI noise cancellation, but in highly reverberant rooms, physical placement matters. Place the recording device as close to the PA speaker output or the presenter as possible.
Q. I have privacy concerns about recording.
A.Click the Padlock icon in the bottom toolbar to turn on Privacy Mode. When enabled, no voice data or transcripts are saved to your device or our servers — only real-time translation will function.
Need Help?
If you have any questions or require technical support for your event, please contact us anytime at business@bizcrush.ai.
BizCrush
Growth
May 6, 2026
5
min

Tutorials
[BizCrush API] Quick Start Guide
Discover how to integrate BizCrush's real-time AI transcription and translation into your platform in just a few simple steps.
What You Can Build
🎙️ Real-time Speech-to-Text via WebSocket (15 languages, auto-detected)
📁 File transcription + speaker diarization (who said what + timestamps)
🤖 AI meeting summaries + Q&A (Claude-powered, custom prompts)
🔗 MCP server — control BizCrush from Claude or Cursor with natural language
⚡ Zapier — push meeting data to Slack, Notion, and Google Docs automatically
STEP 1 — Get Your API Key
Go to https://bizcru.sh → Sign up (Google login supported)
Navigate to Settings → https://bizcru.sh/en/settings
Scroll down to the API Keys section
Click the purple "Issue API Key" button
⚠️ Copy it immediately — it will NOT be shown again!
Save it:
BIZCRUSH_API_KEY=sk-prod-xxxxxx
You can issue up to 5 keys per account.
QUICK START — File Transcription
Base URL: https://extapi-stt.bizcrush.aiAuth: ?api_key=YOUR_API_KEY (query parameter)
curl -X POST "<https://extapi-stt.bizcrush.ai/stt?api_key=YOUR_API_KEY>" \\\\

  -H "Content-Type: application/json" \\\\

  -d '{"audio_url": "<https://example.com/audio.mp3>", "enable_diarization": true}'
Response includes:
text— full transcriptdetected_language— auto-detected language codeutterances[]— speaker-diarized segments withstart_ms,end_ms,speaker,confidence
Set the timeout to 600+ seconds for long audio files.
QUICK START — Live STT via WebSocket (Python)
pip install websockets
import asyncio, json, websockets

async def live_stt(api_key):
    url = f"wss://extapi-stt.bizcrush.ai/?api_key={api_key}&format=json"
    async with websockets.connect(url) as ws:
        # 1. Send config
        await ws.send(json.dumps({"encoding": "pcm16"}))
        resp = json.loads(await ws.recv())
        print("Connected:", resp)  # {"connected": true}

        # 2. Stream PCM16 audio as binary frames (640 bytes = 20ms chunks)
        # 3. Receive interim + final results:
        async for msg in ws:
            data = json.loads(msg)
            if "chunk" in data:
                status = "FINAL" if data["chunk"]["is_final"] else "interim"
                print(f"[{status}] {data['chunk']['text']}")

asyncio.run(live_stt("YOUR_API_KEY"))
Audio format: PCM16 — 16kHz, mono, 16-bit little-endian, 640 bytes/chunk (20ms)
QUICK START — Live STT (JavaScript / Browser)
const ws = new WebSocket(
  "wss://extapi-stt.bizcrush.ai/?api_key=YOUR_API_KEY&format=json"
);

ws.onopen = () => ws.send(JSON.stringify({ encoding: "pcm16" }));

ws.onmessage = (event) => {
  const data = JSON.parse(event.data);
  if (data.connected) console.log("Connected! Start sending audio...");
  if (data.chunk) {
    console.log(`[${data.chunk.is_final ? "FINAL" : "interim"}] ${data.chunk.text}`);
  }
};

// Send raw PCM16 audio as binary frames
function sendAudioChunk(pcmData) {
  if (ws.readyState === WebSocket.OPEN) ws.send(pcmData);
}
QUICK START — Meeting REST API
Base URL: https://extapi.bizcrush.aiAuth: X-API-Key: YOUR_API_KEY (header)
# Create a meeting
curl -X POST <https://extapi.bizcrush.ai/v1/create-meeting> \\
  -H "X-API-Key: YOUR_API_KEY" \\
  -H "Content-Type: application/json" \\
  -d '{"title": "Hackathon Demo", "participant_ids": ["<em:teammate@email.com>"]}'

# AI Summary with custom prompt
curl -X POST <https://extapi.bizcrush.ai/v1/summarize-meeting> \\
  -H "X-API-Key: YOUR_API_KEY" \\
  -H "Content-Type: application/json" \\
  -d '{"meeting_id": "MEETING_ID", "user_prompt": "List action items only"}'

# Ask AI about a meeting
curl -X POST <https://extapi.bizcrush.ai/v1/ask-ai-for-meeting> \\
  -H "X-API-Key: YOUR_API_KEY" \\
  -H "Content-Type: application/json" \\
  -d '{"meeting_id": "MEETING_ID", "message": {"text": "What were the key decisions?"}}'

# Get live transcription (poll every 1s)
curl -X POST <https://extapi.bizcrush.ai/v1/get-live-transcription-chunks> \\
  -H "X-API-Key: YOUR_API_KEY" \\
  -H "Content-Type: application/json" \\
  -d '{"meeting_id": "MEETING_ID", "last_updated_at": "1970-01-01T00:00:00Z", "limit": 100}'
MCP SETUP — Use BizCrush from Claude or Cursor
Add to your .mcp.json:
{
  "mcpServers": {
    "bizcrush": {
      "type": "sse",
      "url": "<https://bizcrush-mcp-1071354765717.us-central1.run.app/sse>"
    }
  }
}
Then just talk to Claude naturally:
"Summarize my last meeting."
"Get the transcript from today's call."
"Send a message to meeting XYZ."
Supported Languages (auto-detected)
Code | Language | Code | Language |
| English |
| Japanese |
| Korean |
| Chinese |
| Hindi |
| Spanish |
| French |
| Portuguese |
| Arabic |
| Russian |
| Indonesian |
| German |
| Vietnamese |
| Italian |
| Thai |
API Endpoints Overview
STT API (https://extapi-stt.bizcrush.ai)
Method | Endpoint | Description |
|
| File transcription with speaker diarization |
|
| Real-time streaming STT |
Meeting REST API (https://extapi.bizcrush.ai)
Endpoint | Description |
| Create meeting + invite participants |
| List meetings (paginated) |
| Real-time STT polling |
| Final utterances with speaker diarization |
| AI summary (custom prompt supported) |
| AI Q&A about meeting content |
| Get cached summary |
| Push summary to Notion |
| Send chat message to meeting |
| Add participants |
Links
📖 Full API Docs | |
🔑 Get API Key | https://bizcru.sh/en/settings → API Keys → Issue API Key |
🌐 Homepage | |
💬 Questions | DM Kelly — kelly@bizcrush.ai |
BizCrush Inc.
Support: help@bizcrush.ai
Business: business@bizcrush.ai
BizCrush
Growth
April 16, 2026
5
min

Tutorials
Quick Start Guide
Getting Started with BizCrush: From Conversation to Connection in Minutes
BizCrush turns real conversations into clear notes, follow-ups, and next steps — in minutes. This guide walks you through your first recording and follow-up.
Before You Start
Note: This walkthrough is based on the mobile app. BizCrush is also available on Windows and macOS desktops.
Mobile: Search for BizCrush in the App Store or Google Play and download the app.
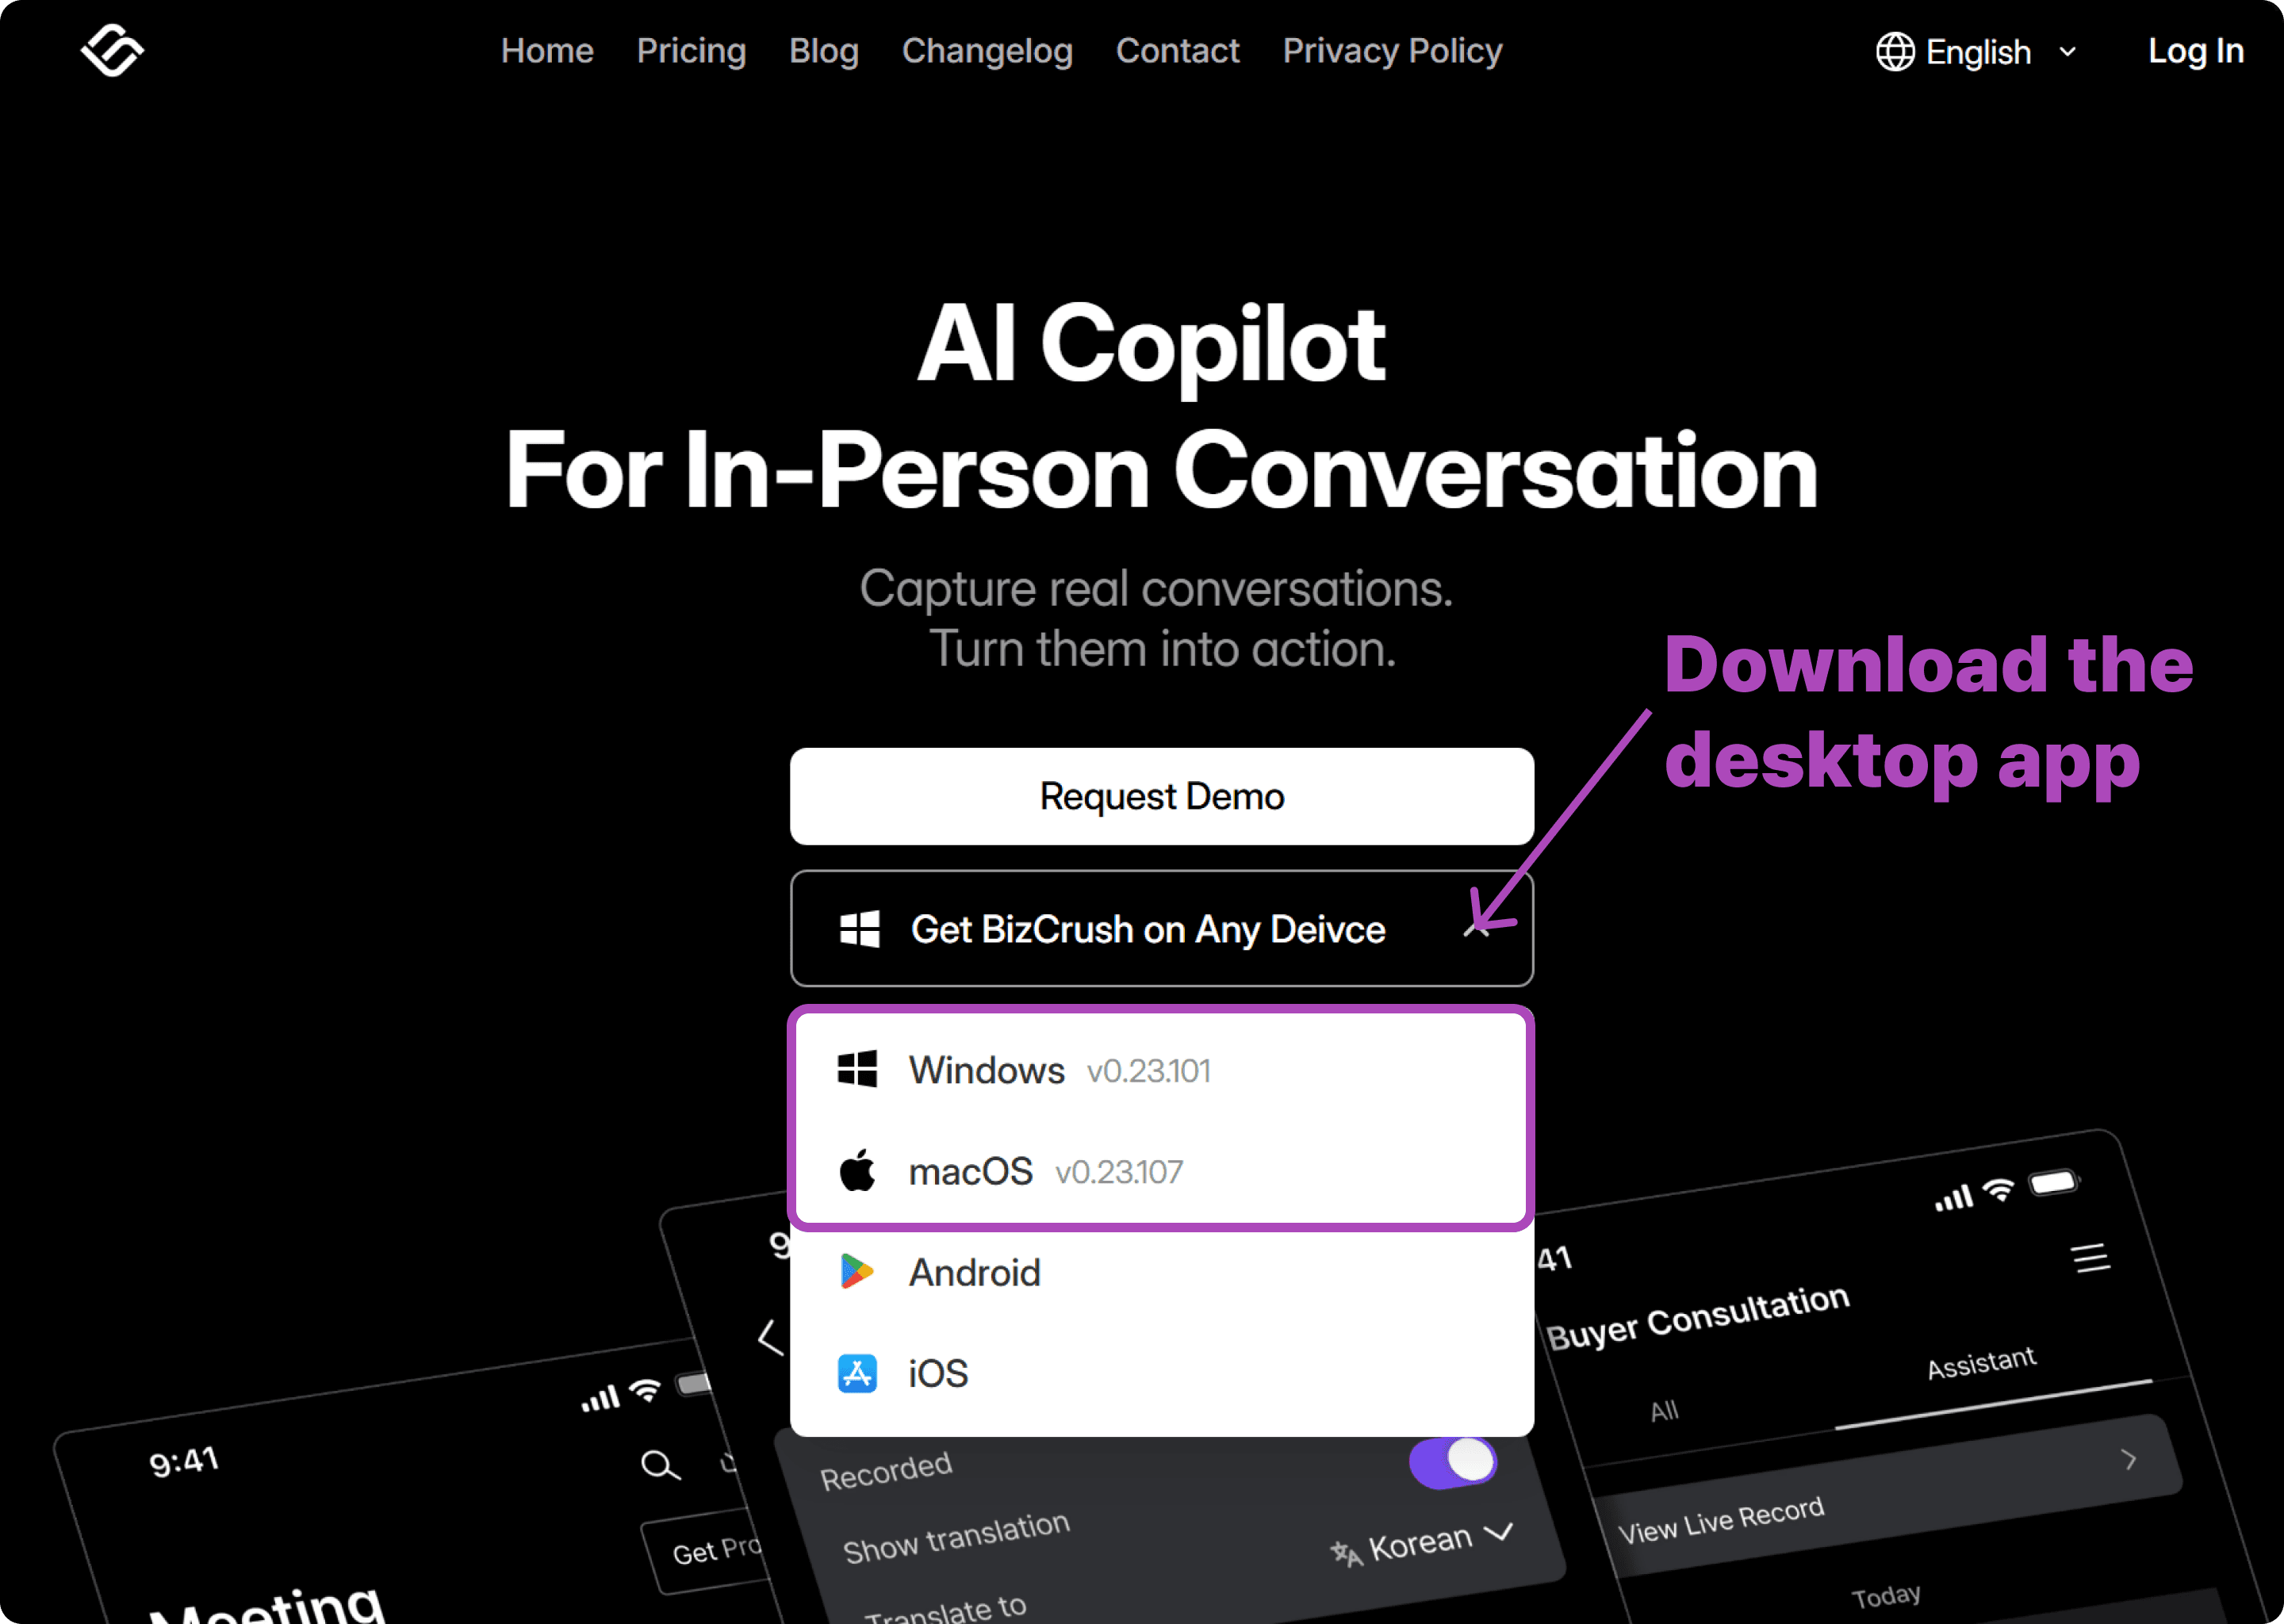
Desktop: Go to bizcrush.ai and click Get BizCrush on Any Device to download the desktop version.
1. Create Your Account
Sign up with your Google, Apple, or email account.
Once you log in, you'll see the home screen where all your meeting rooms are listed.
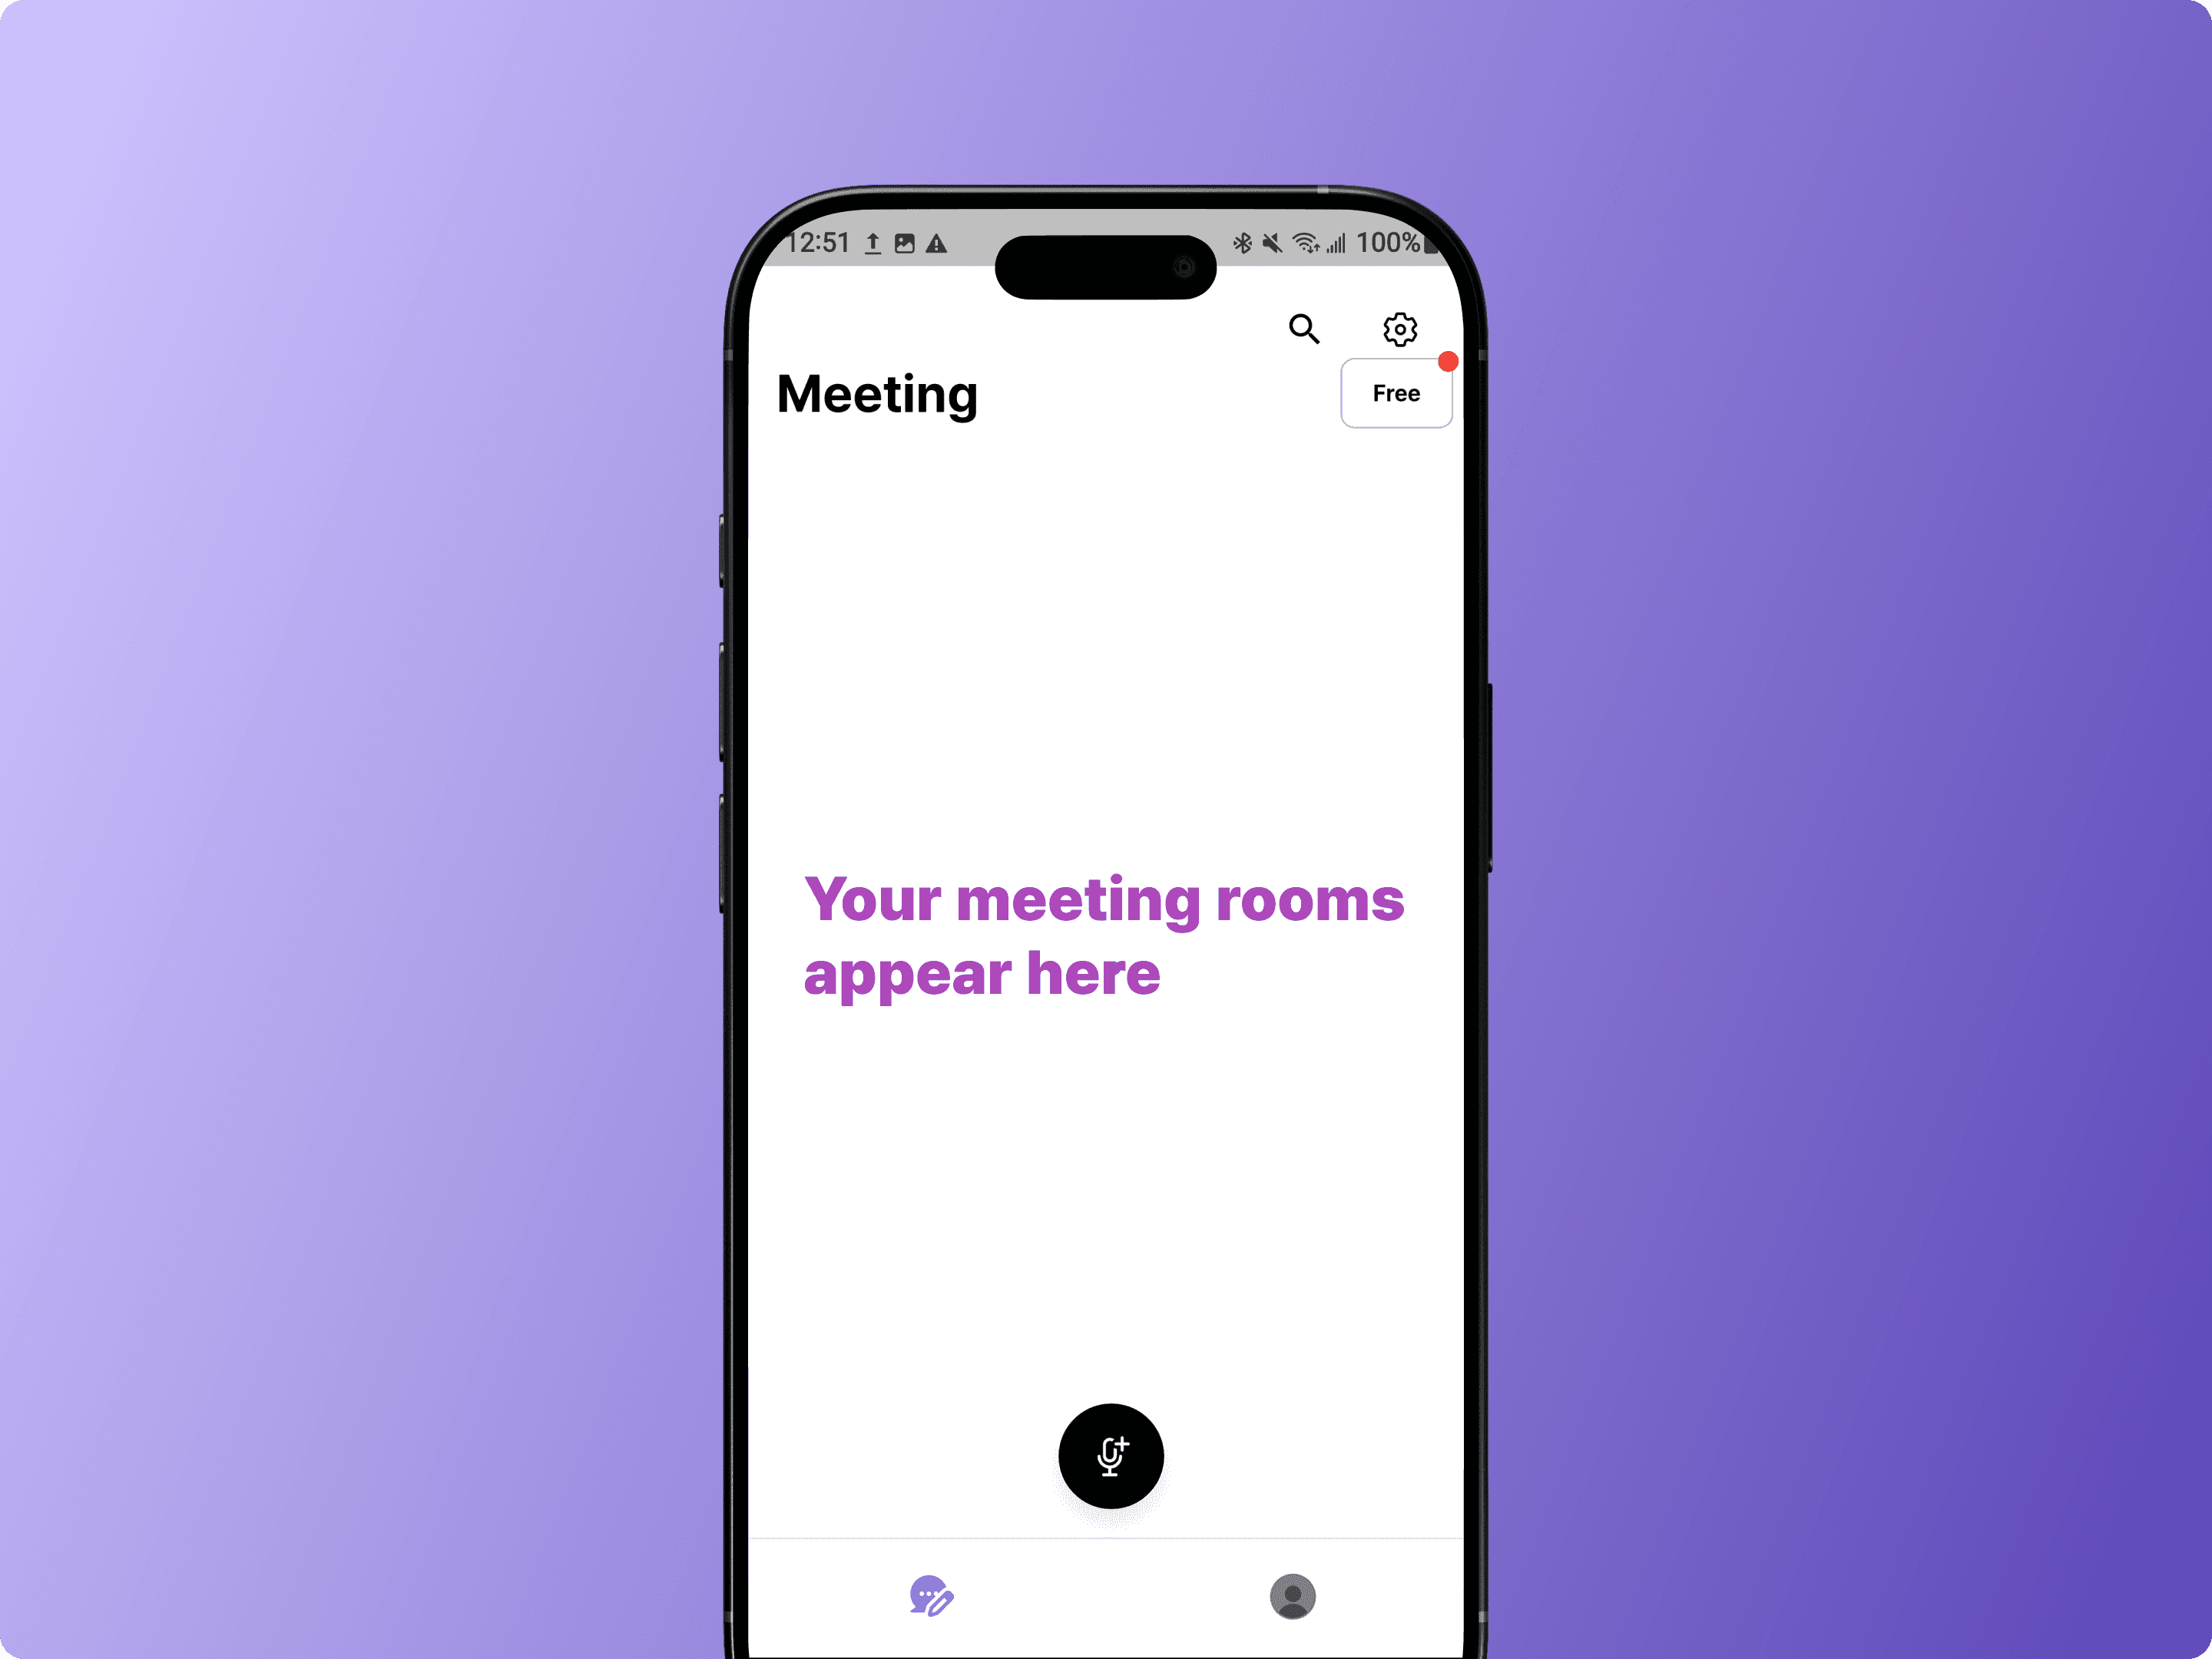
What's a Meeting Room?
A Meeting Room organizes your recordings, transcripts, and participants in one place.
You can create separate rooms for different meetings, or keep multiple recordings in the same room.
2. Record Your First Meeting
There are two ways to get started. Choose the one that fits your situation.
Option A: Record a Live Meeting
First, make sure microphone access is enabled. When prompted, tap Allow to grant permission.
Note: If you've already denied microphone access, go to Settings > Apps > BizCrush > Permissions and enable it.
Tap the microphone button on the home screen to create a new meeting and start recording.

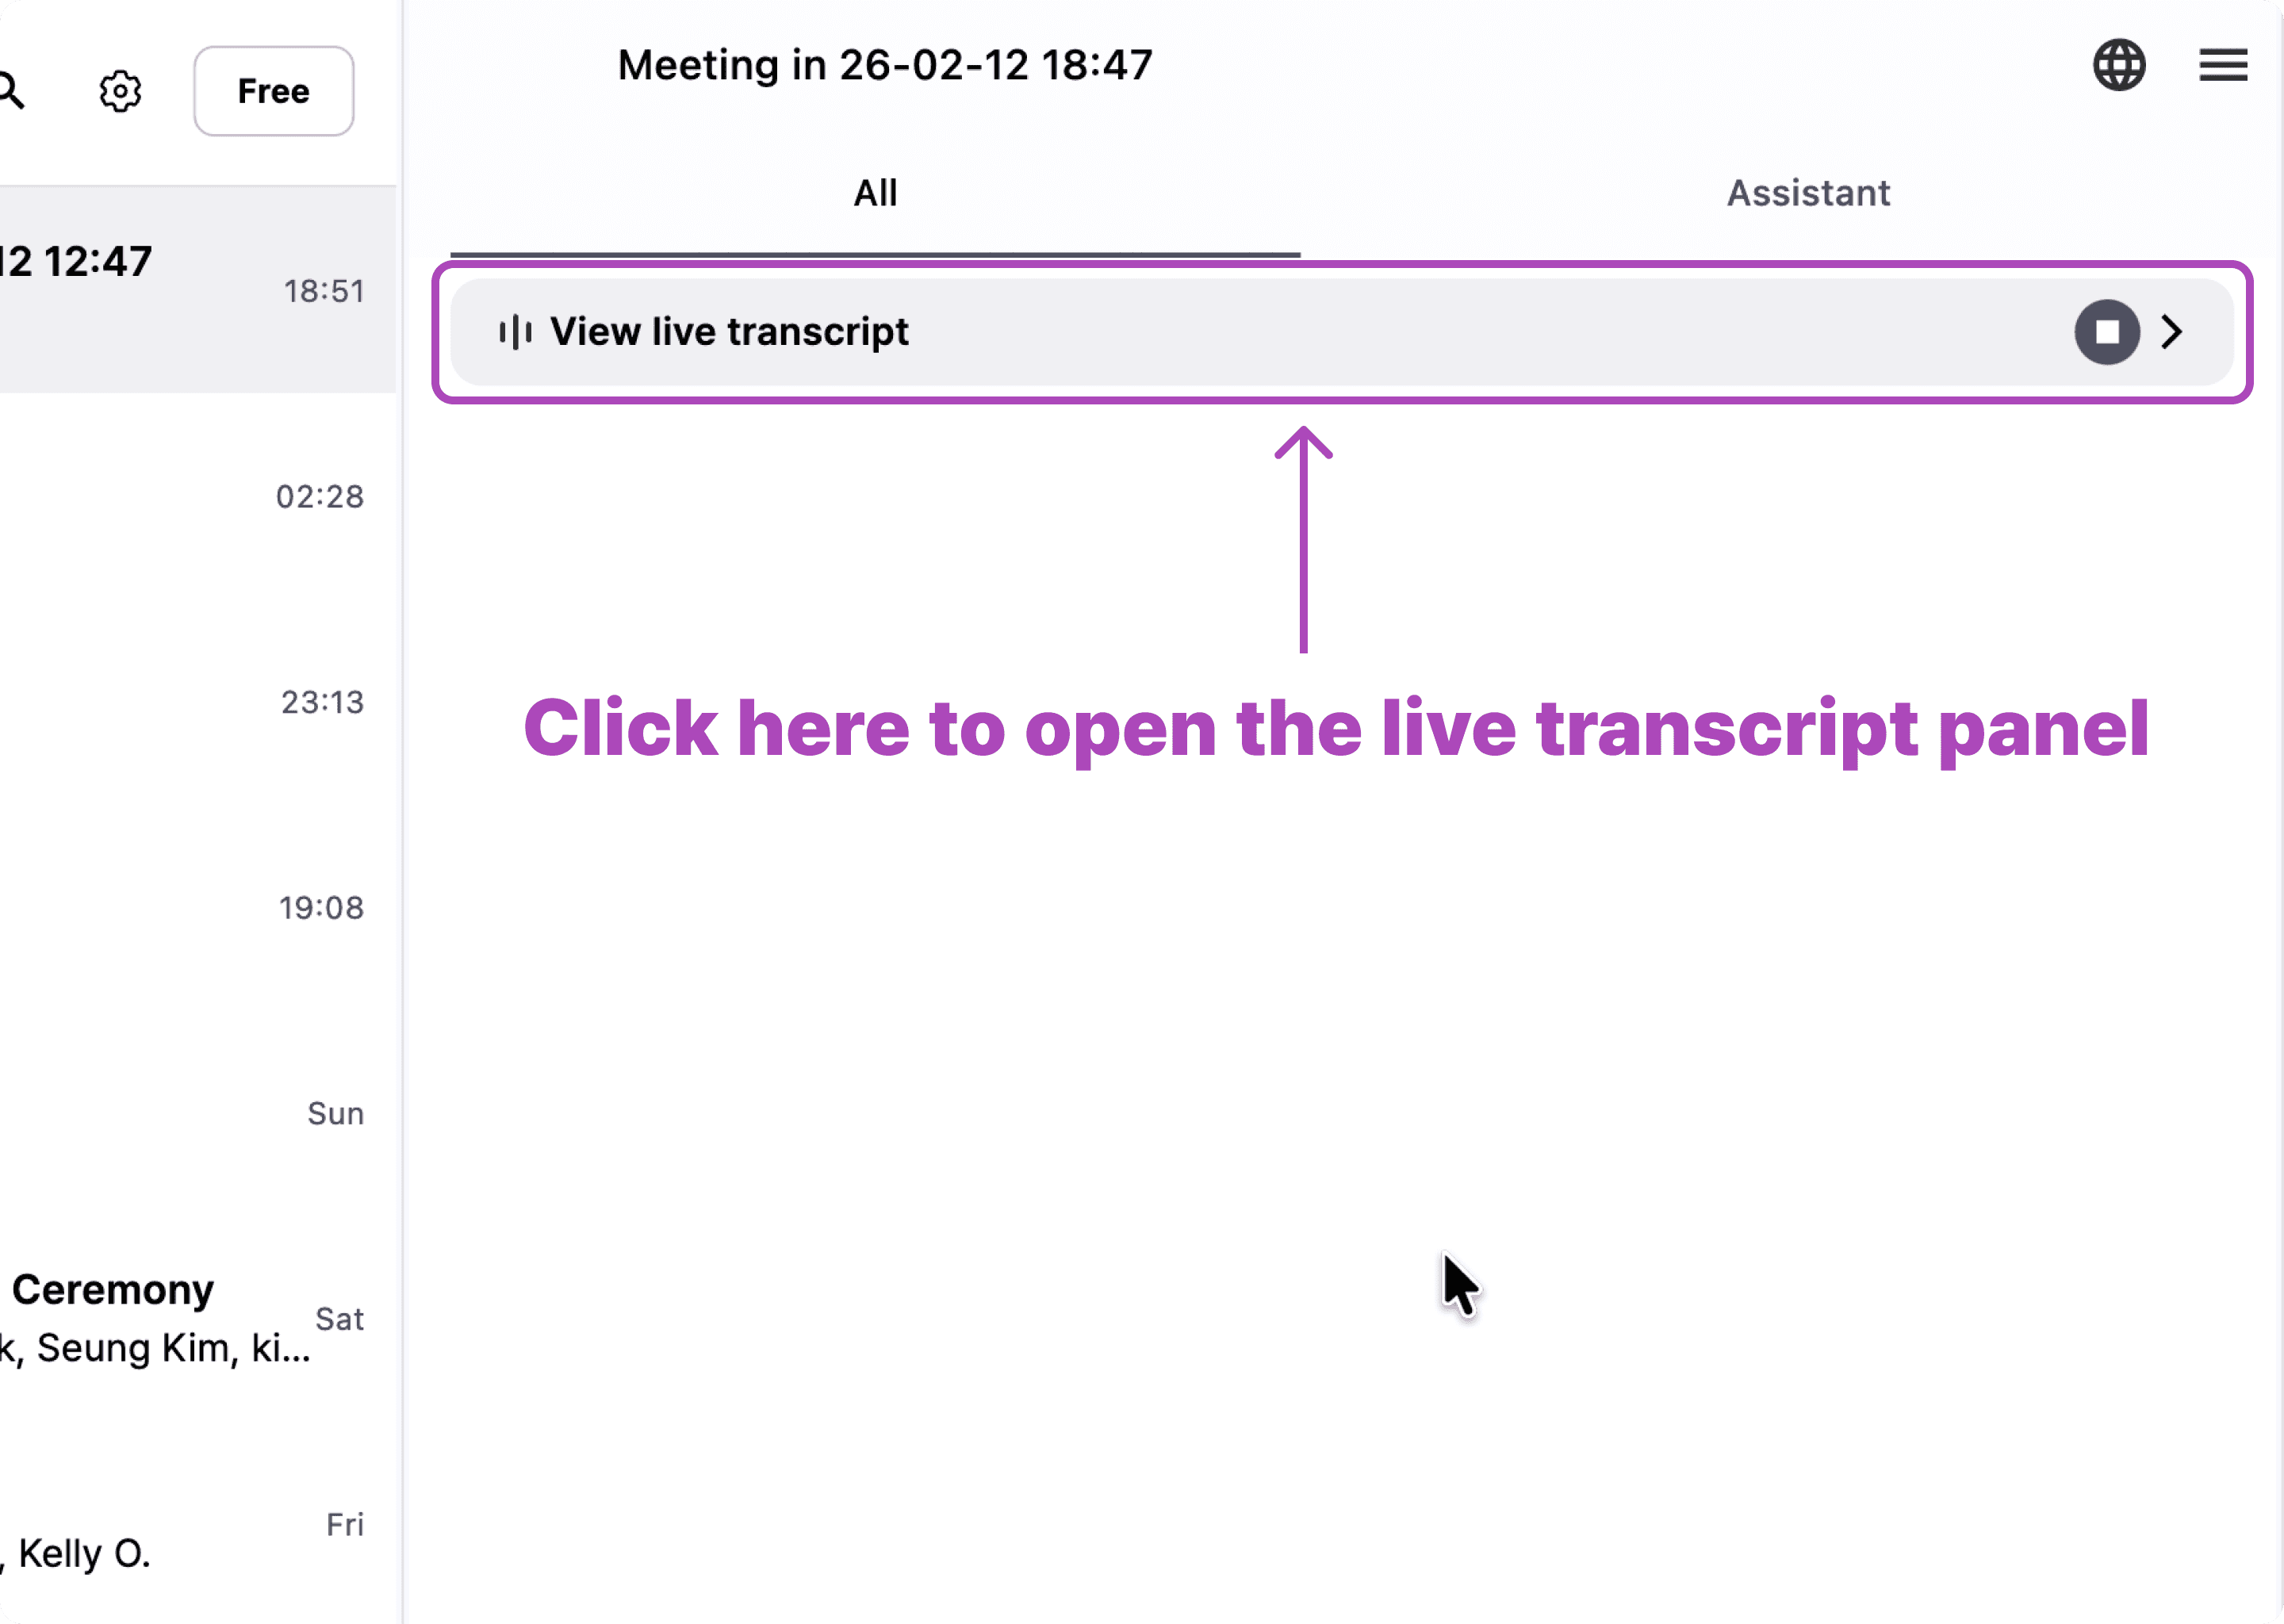
Once recording starts, tap View Live Transcript at the top to see real-time transcription and translation.
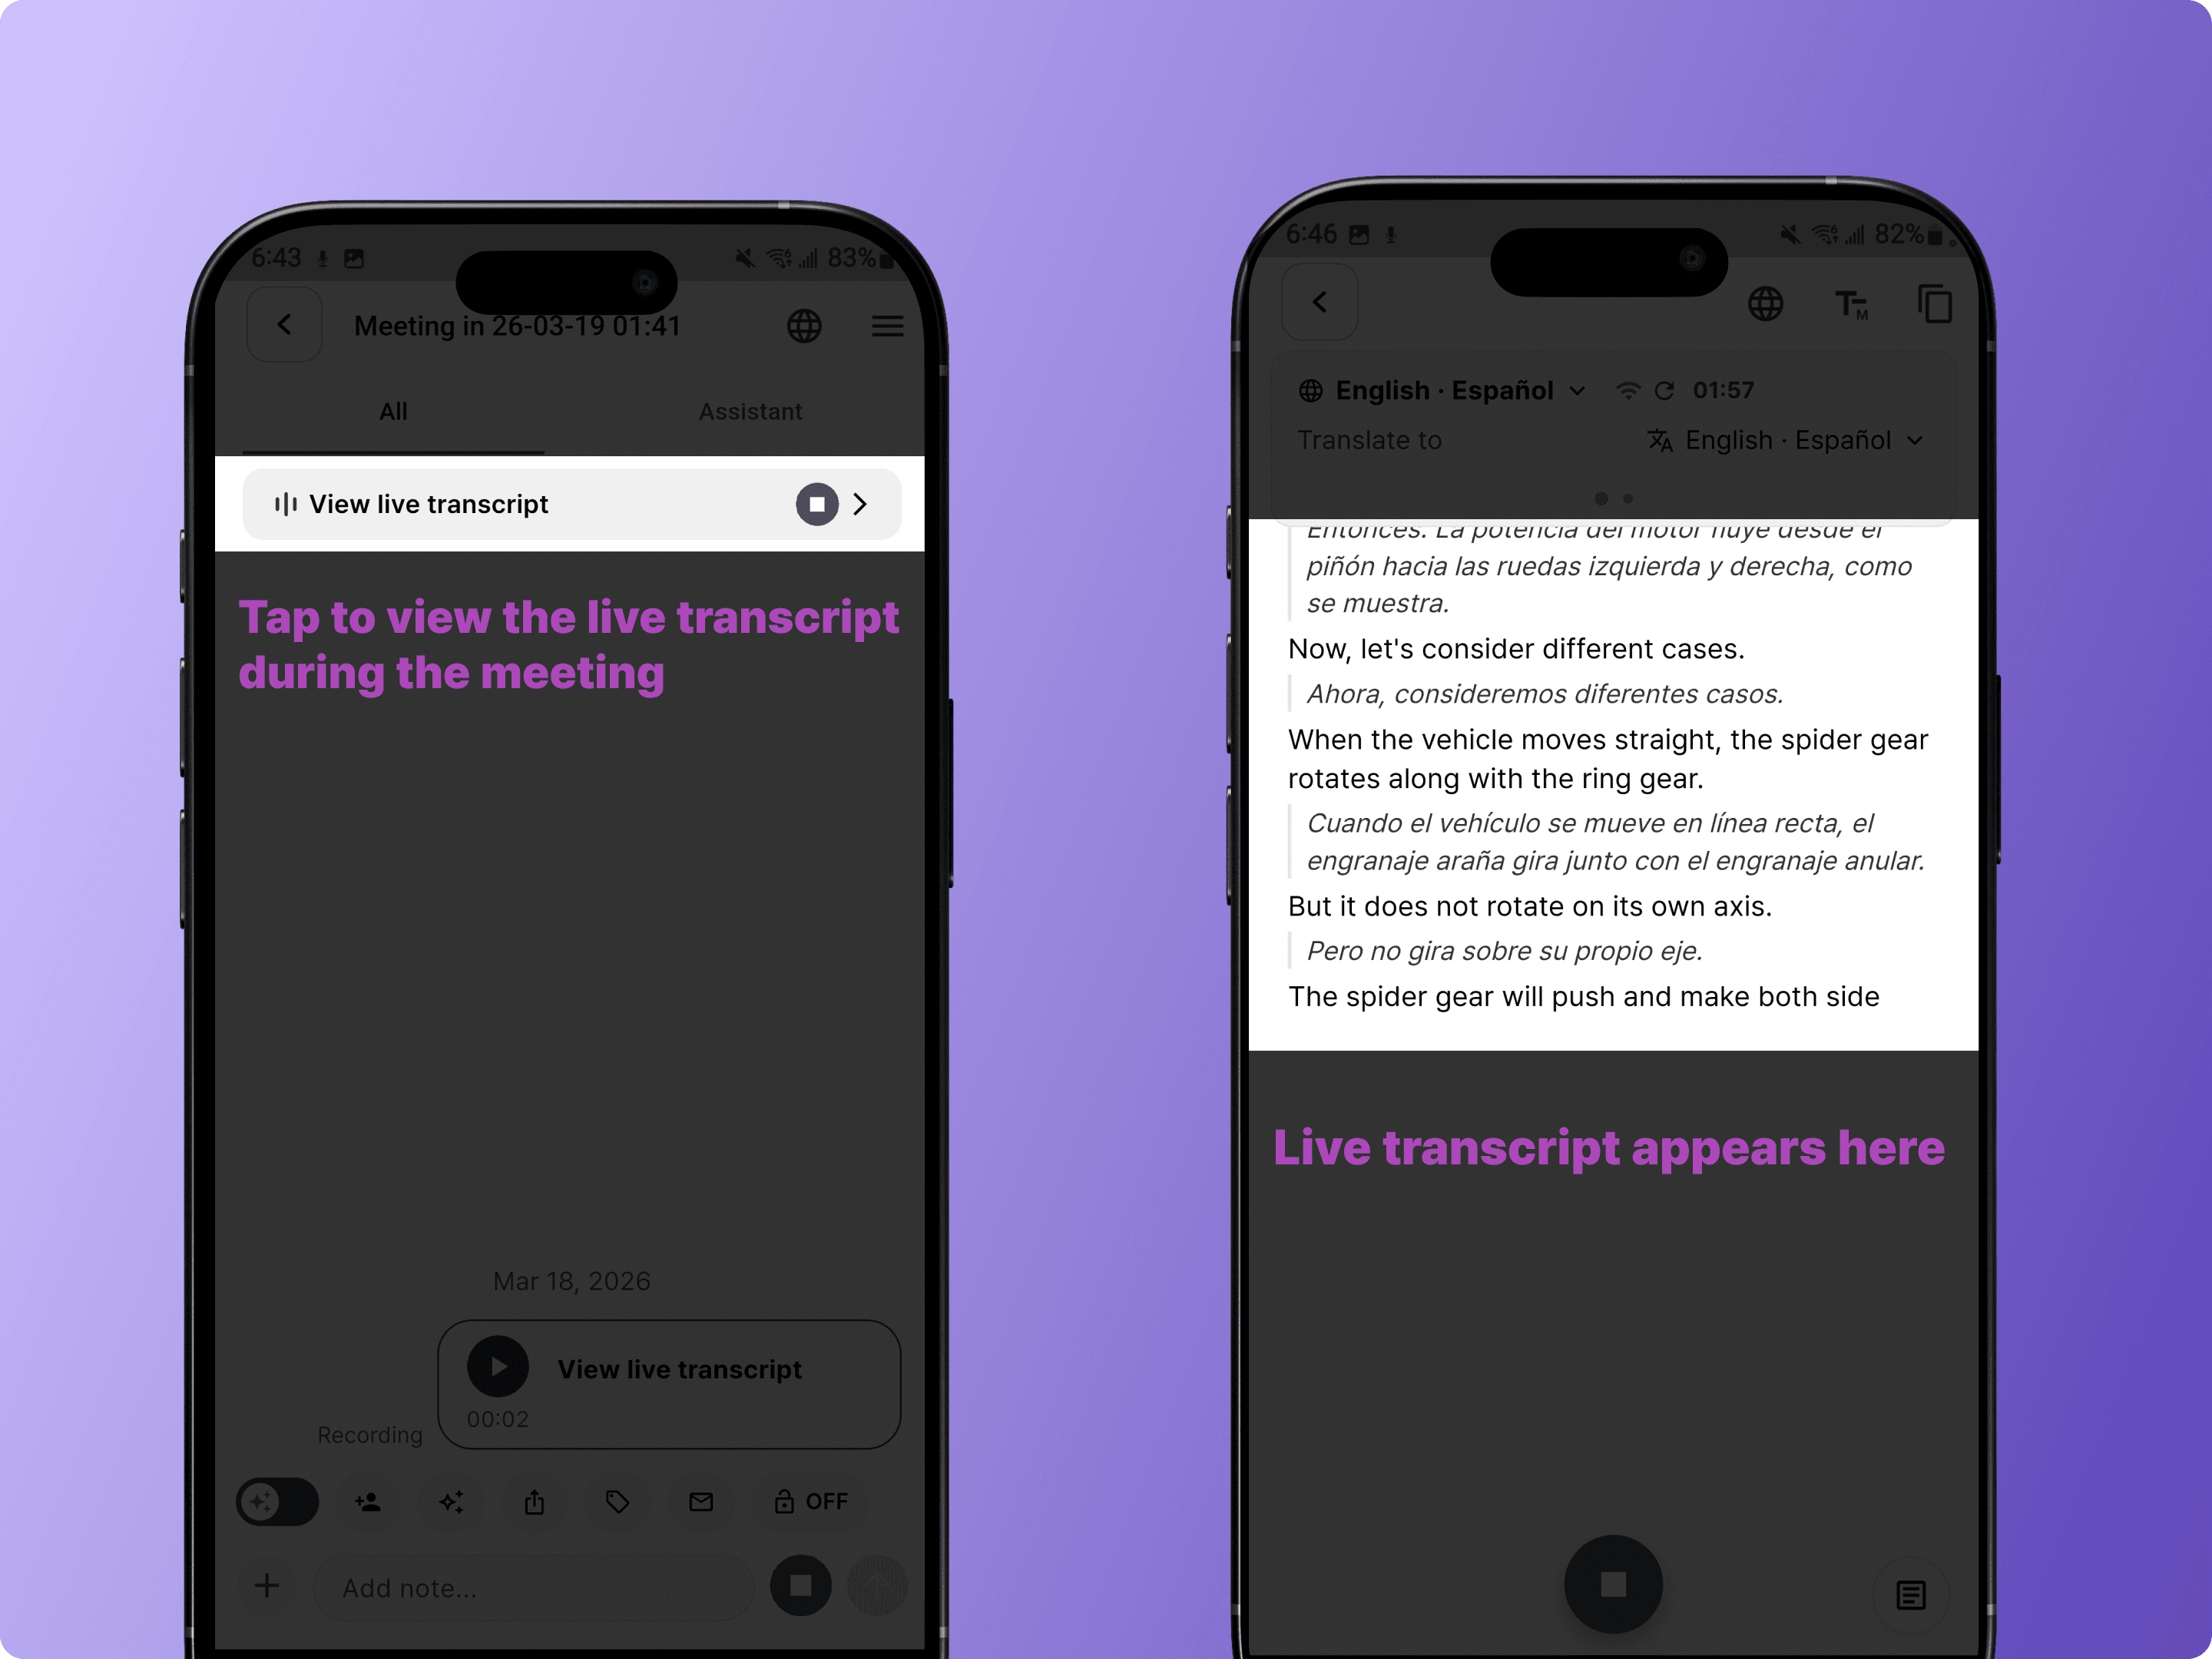
When the meeting is over, tap the Stop button to end and save the recording.

Note: To generate the post-meeting transcript and summary, you must tap the stop button to end and save the meeting.
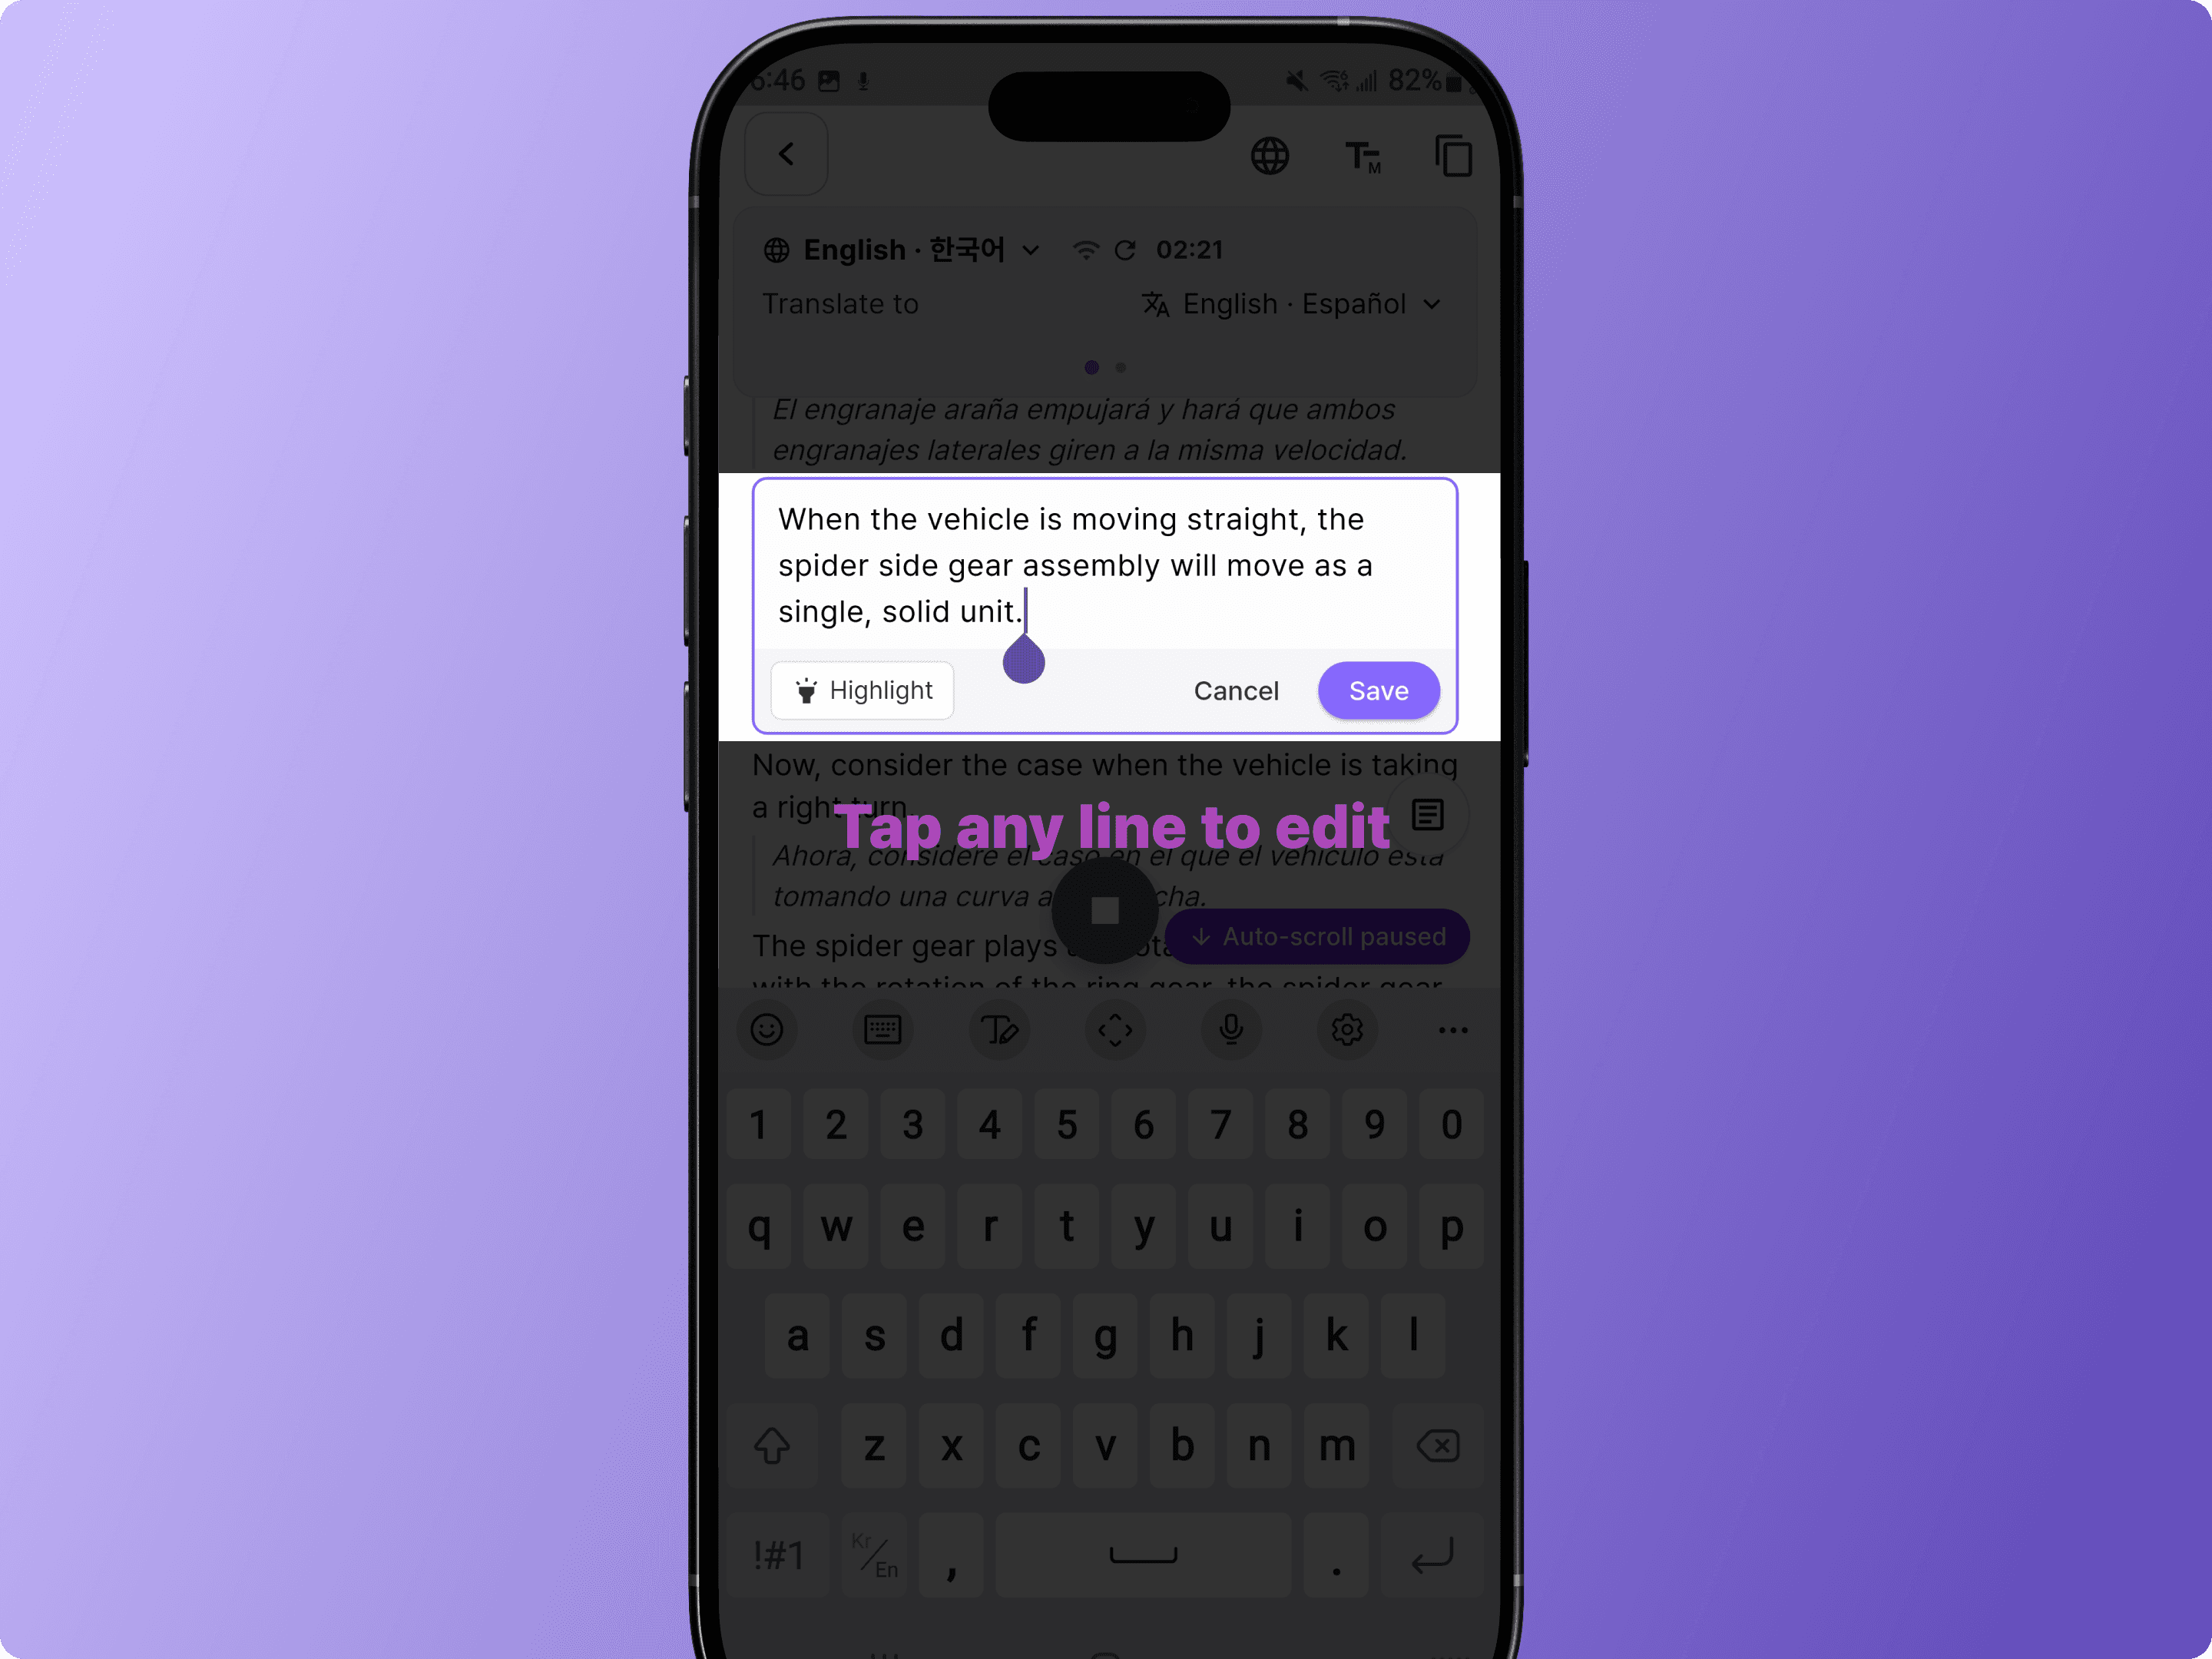
Tip: You can edit the transcript directly by tapping any line, even while recording is still in progress.
Option B: Import an Existing Recording
Use this option if you already have a recorded audio file, such as .mp3 or .m4a.
Tap the + icon in the meeting room toolbar.
Select <Upload audio>, then choose the file you want to import.
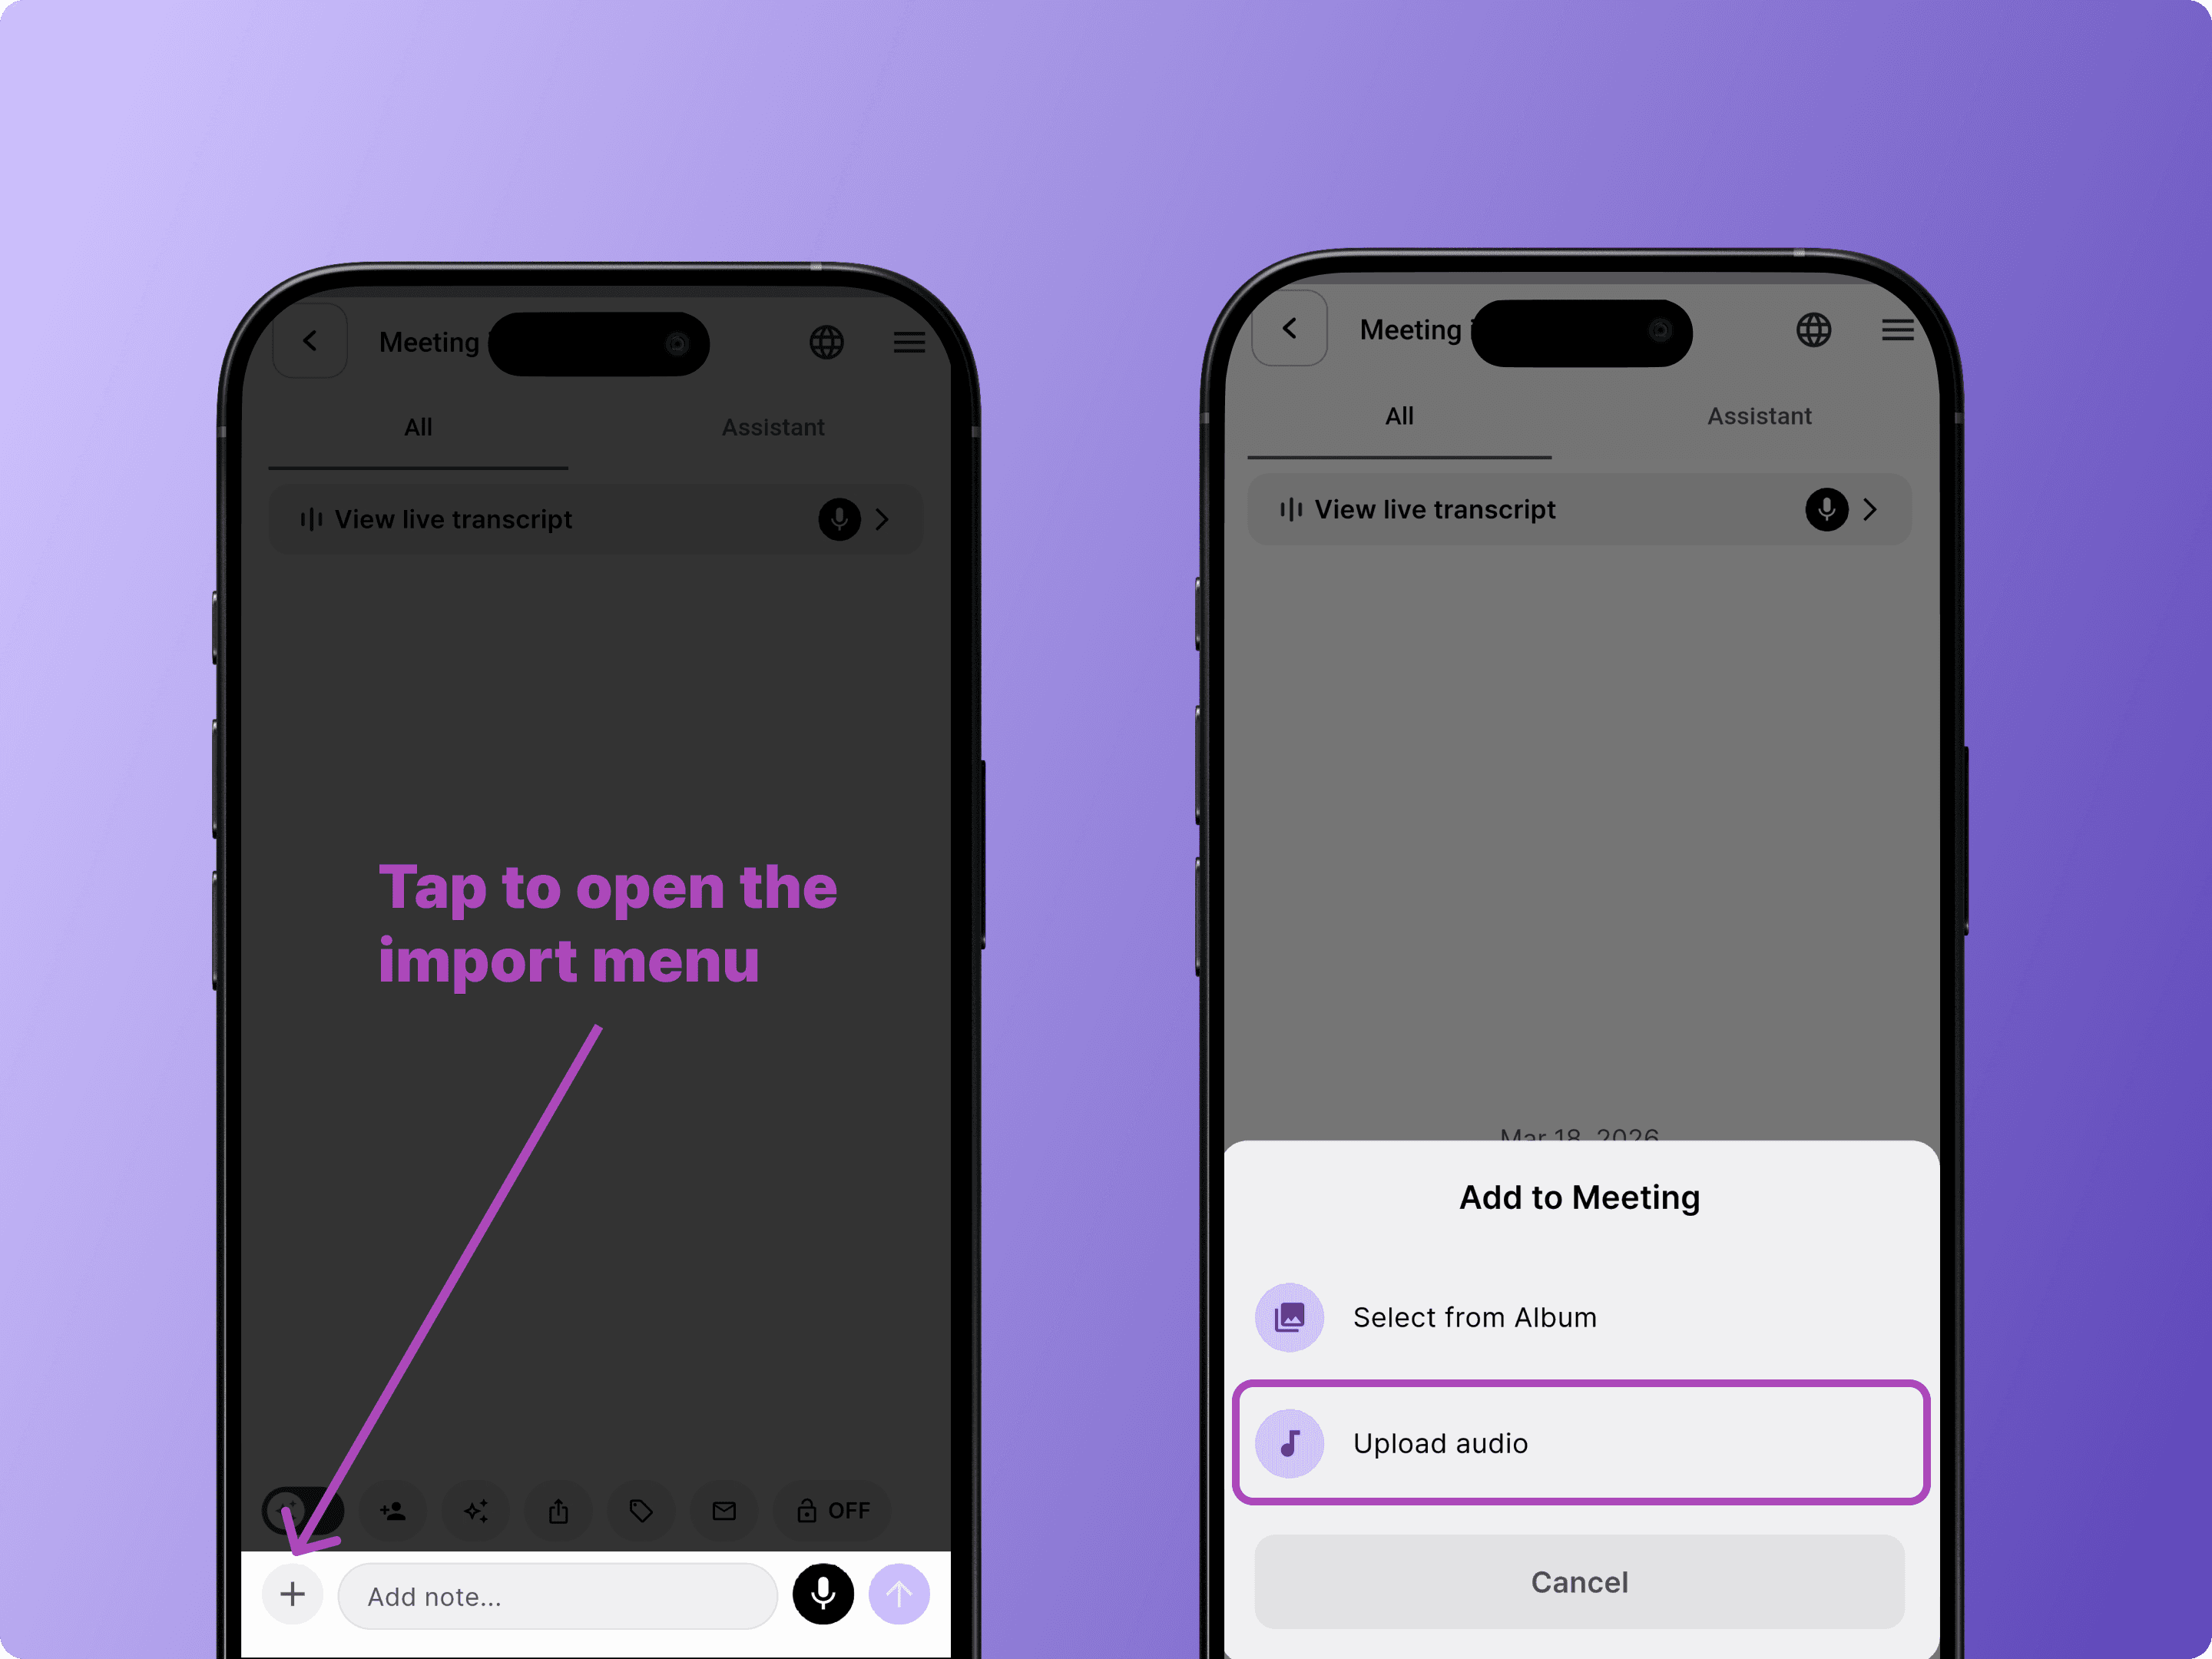
BizCrush will automatically transcribe the file and generate a summary.
3. Set Up Translation
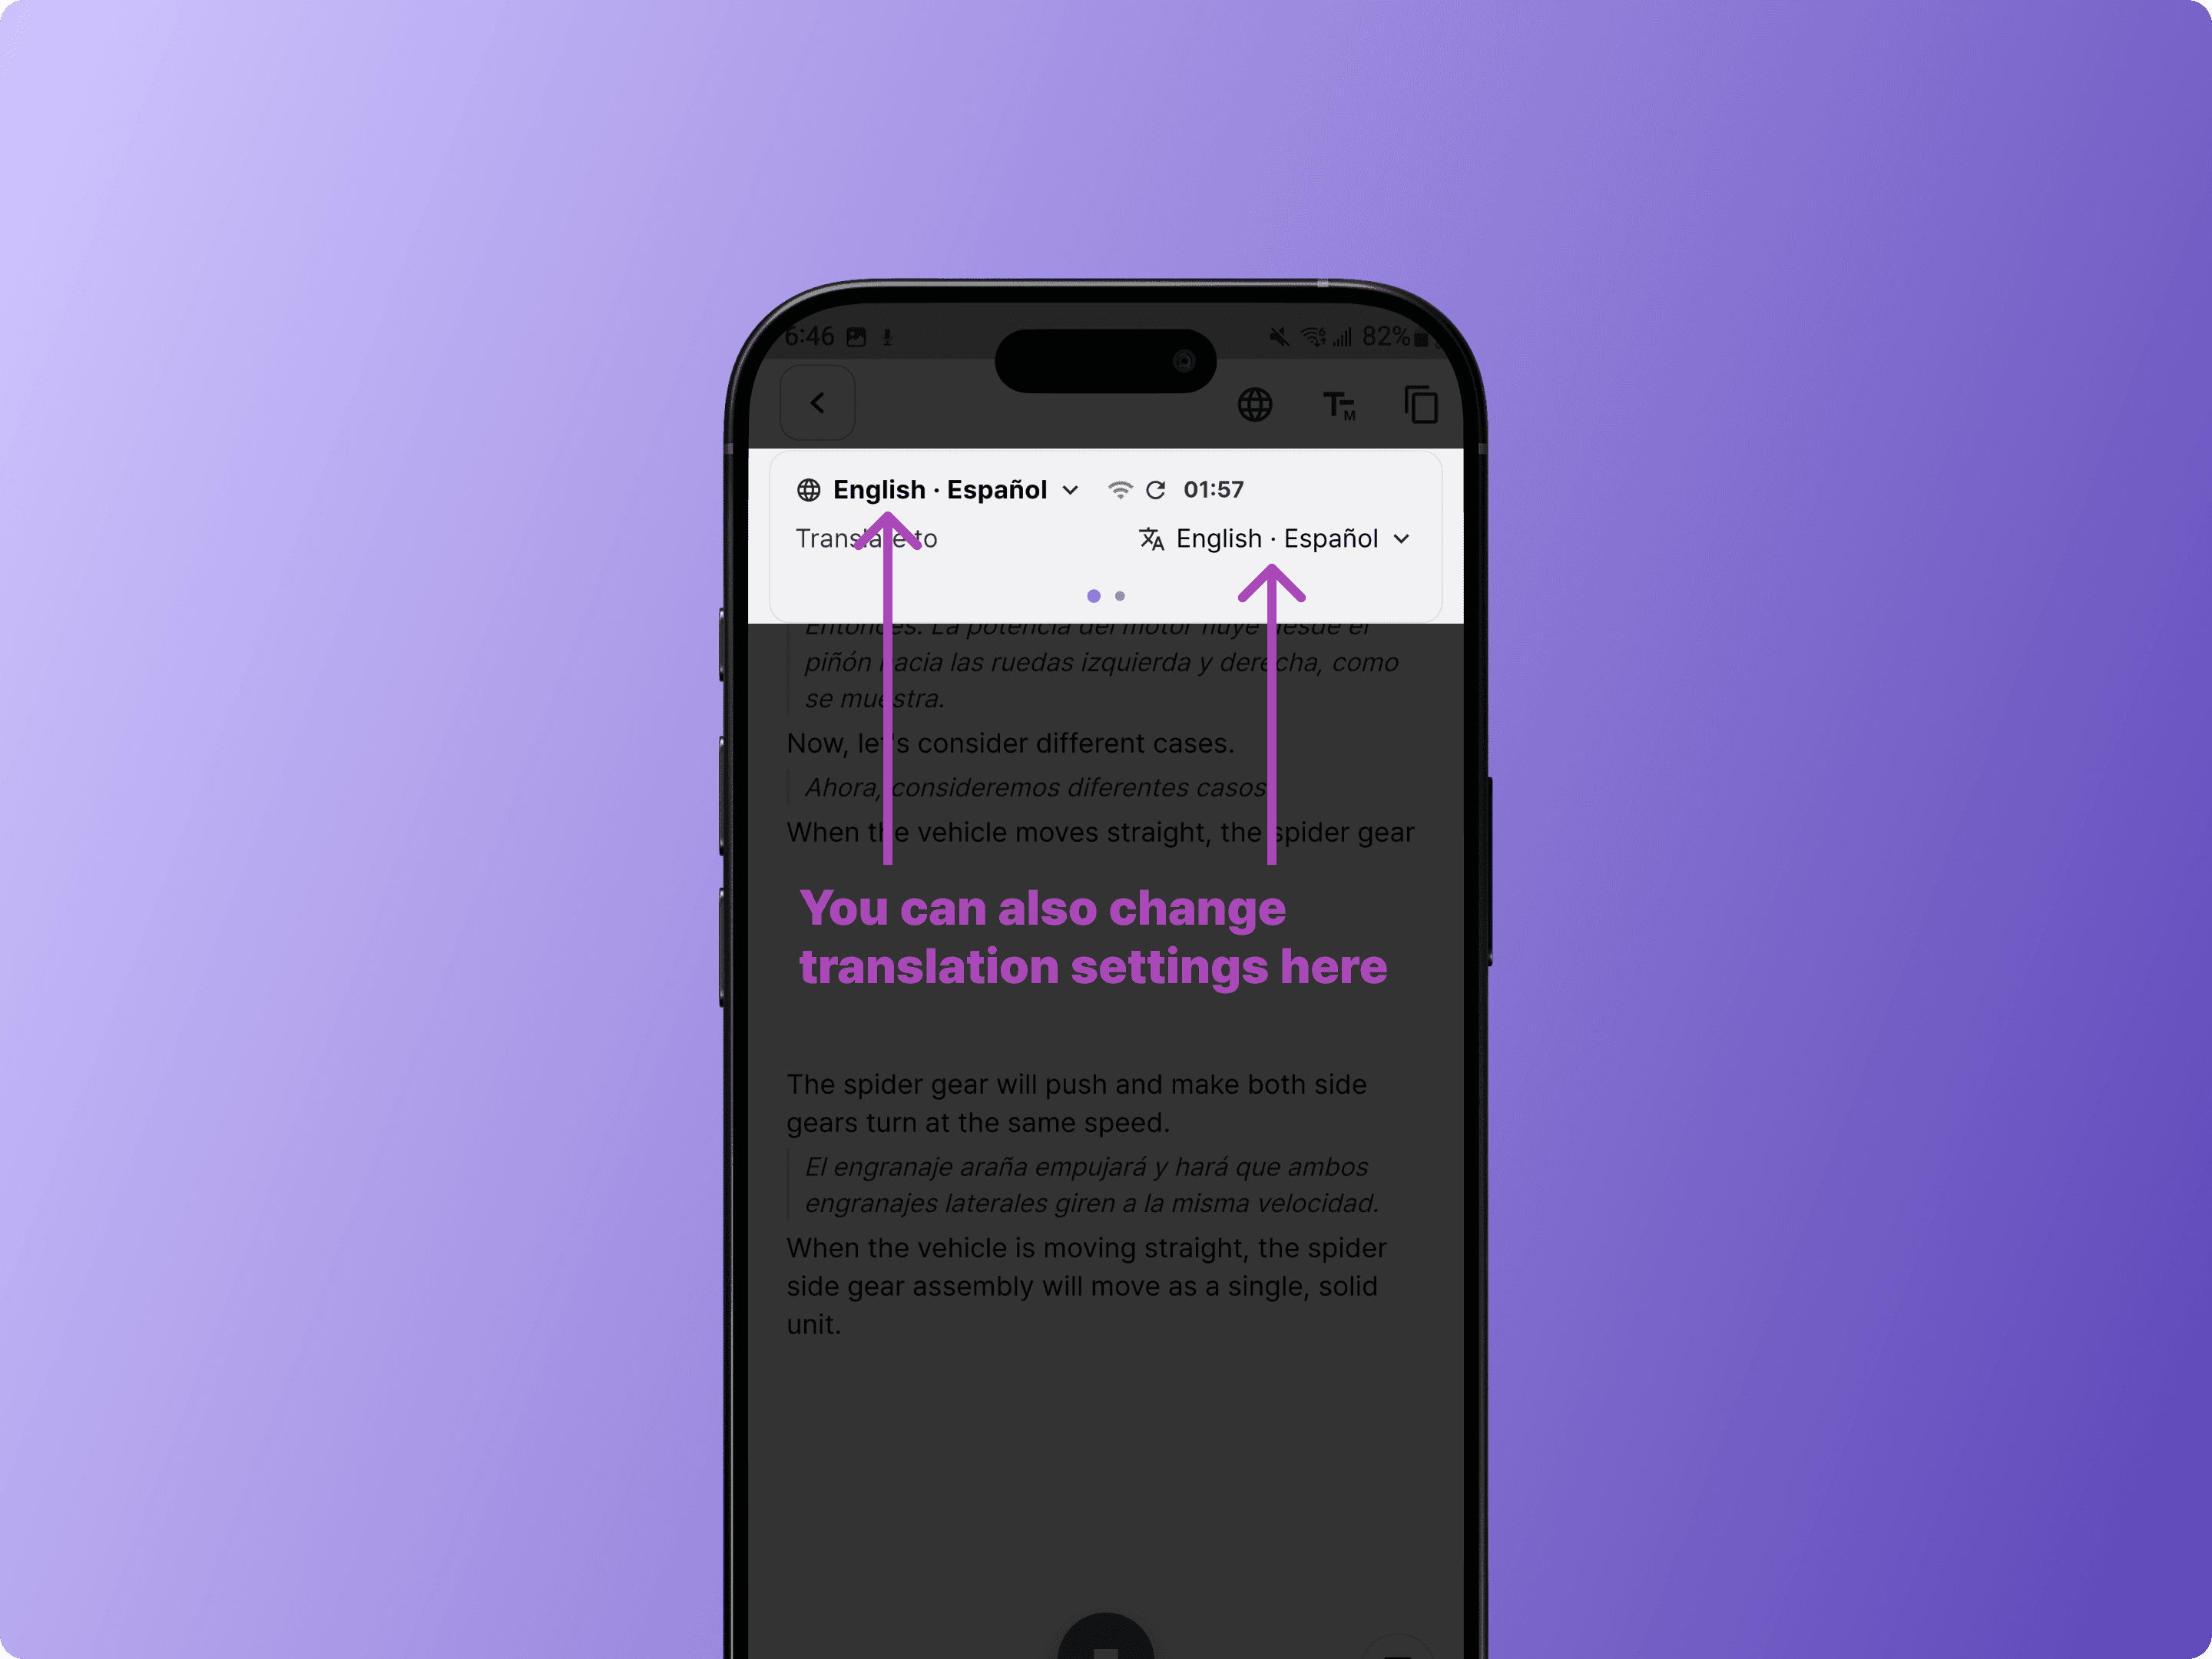
For multilingual meetings, tap the globe icon in the meeting room to open Language Settings.
BizCrush can detect up to 3 spoken languages at once and translate into up to 2 preferred languages in real time.
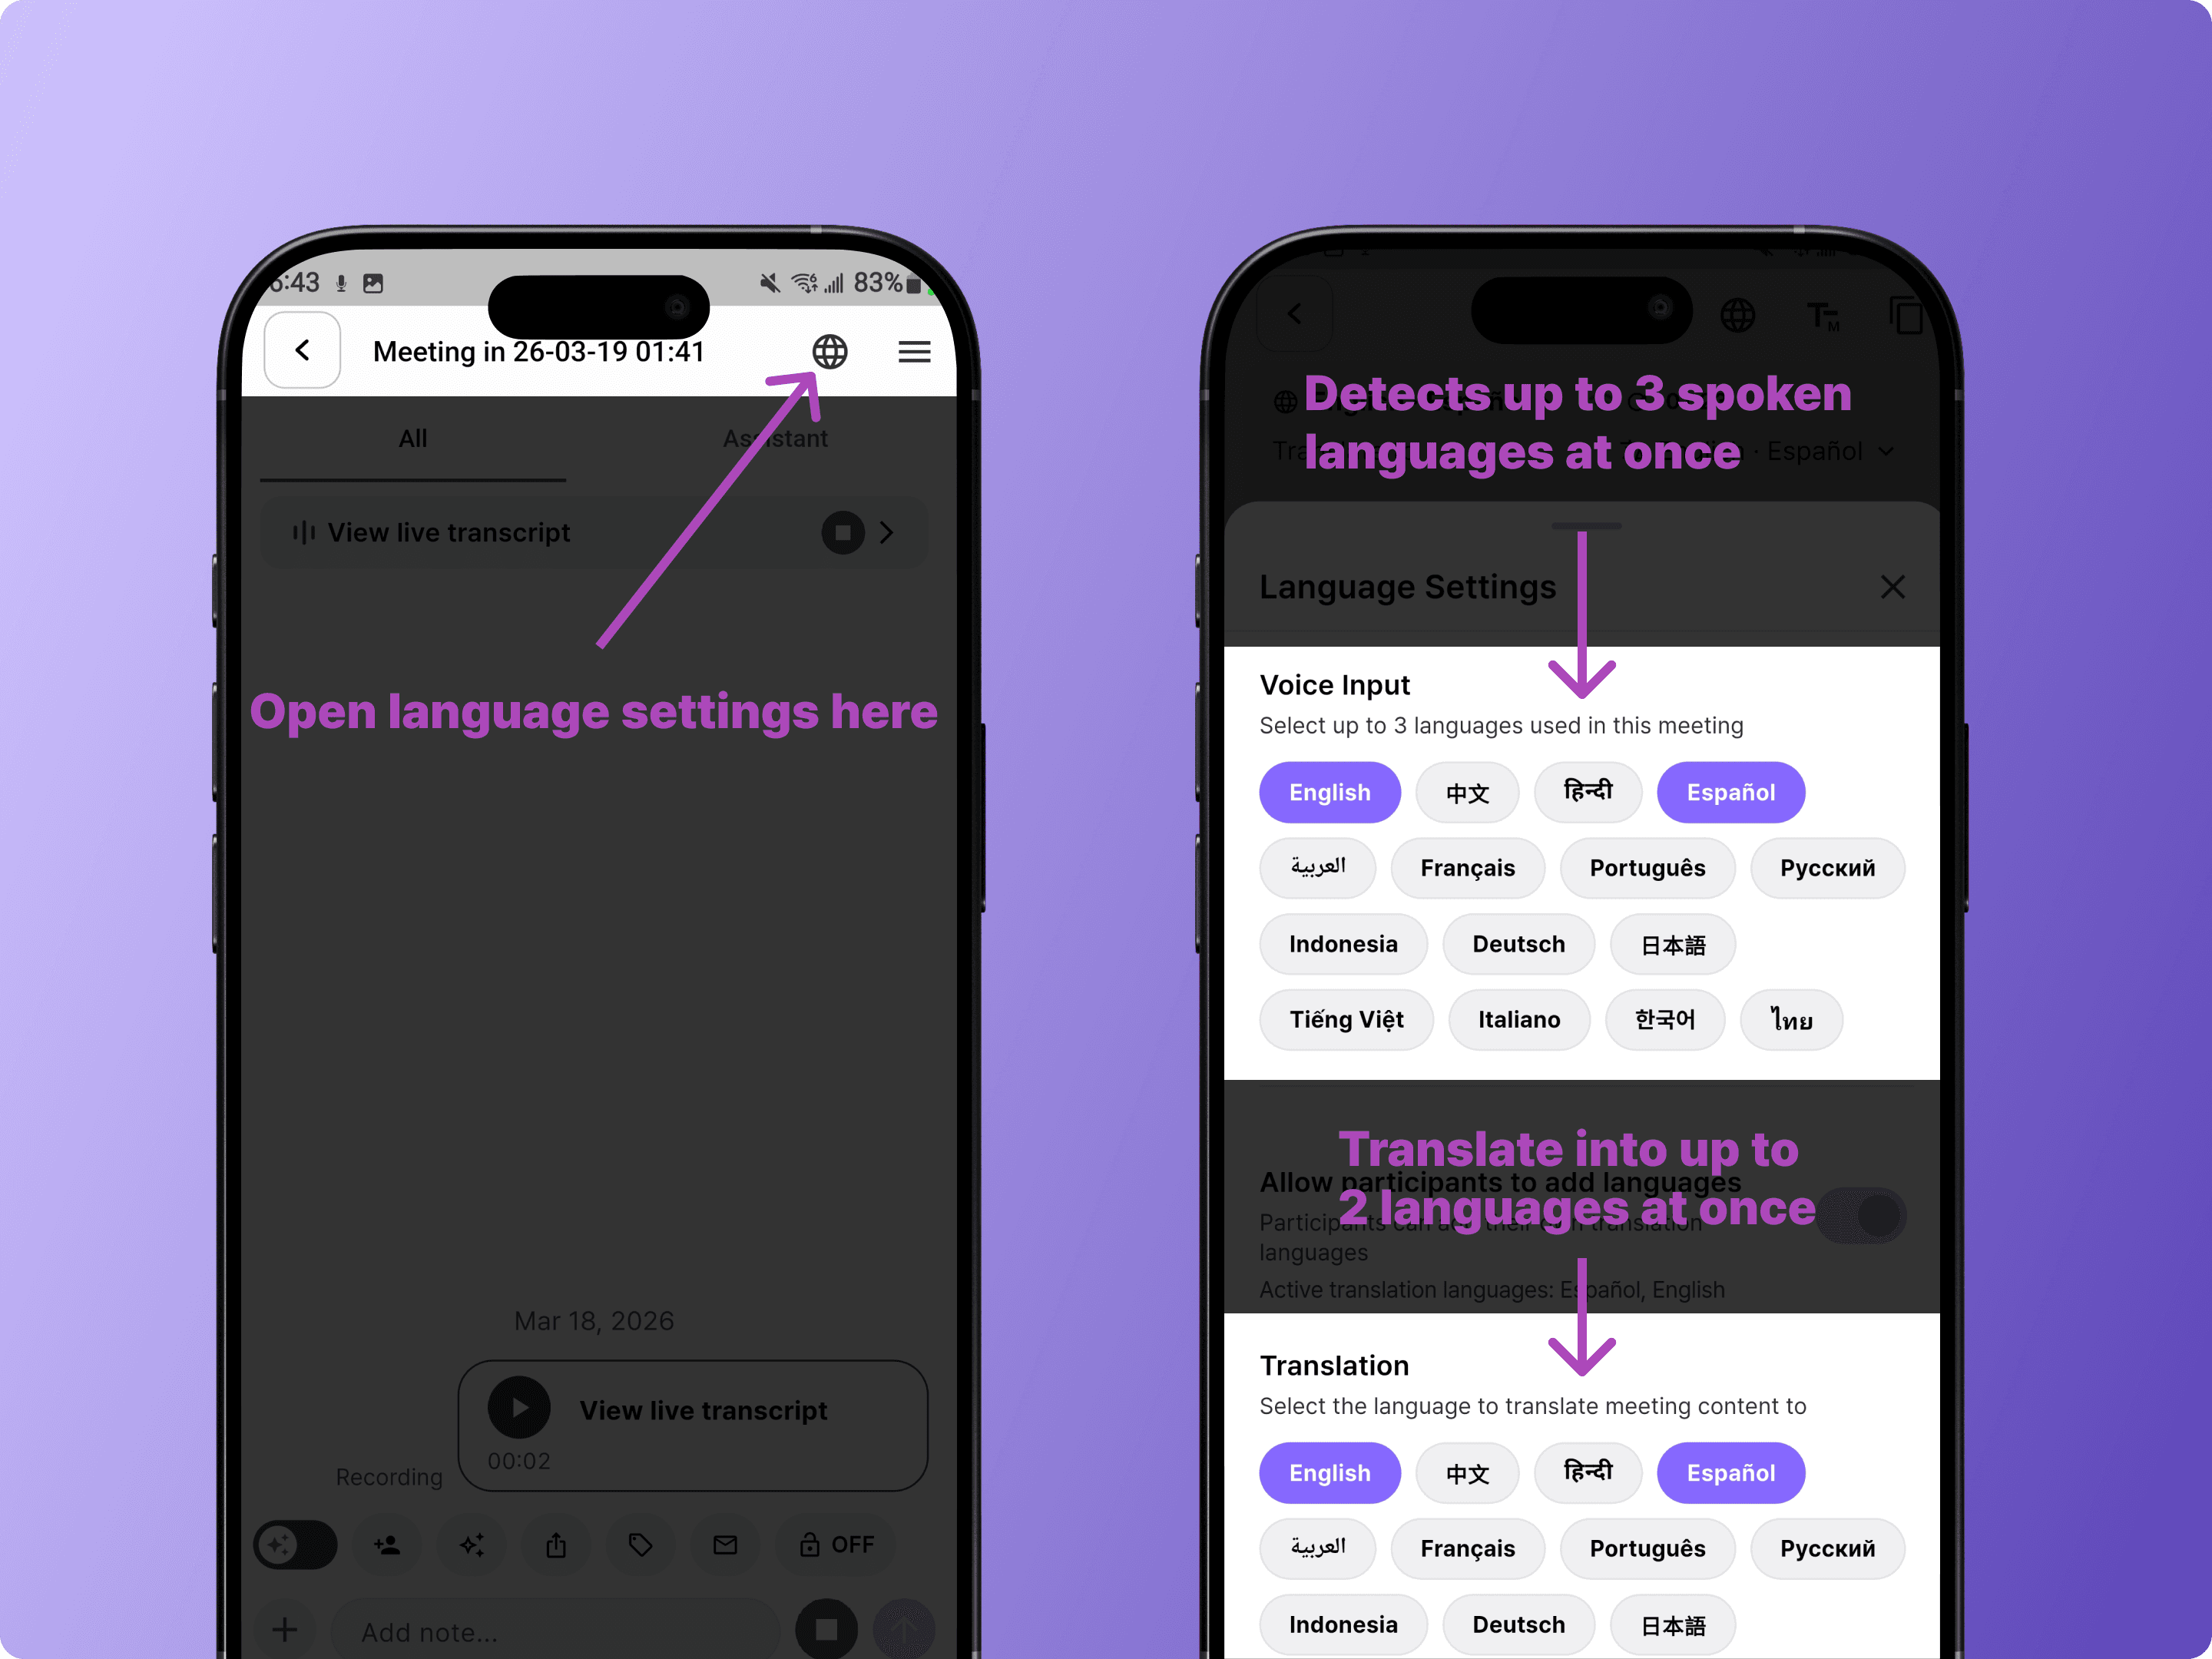
You can also change the translation language directly from the transcript view.
4. Review Your Transcript and Summary
After the meeting ends, BizCrush automatically generates a refined post-meeting transcript and summary.
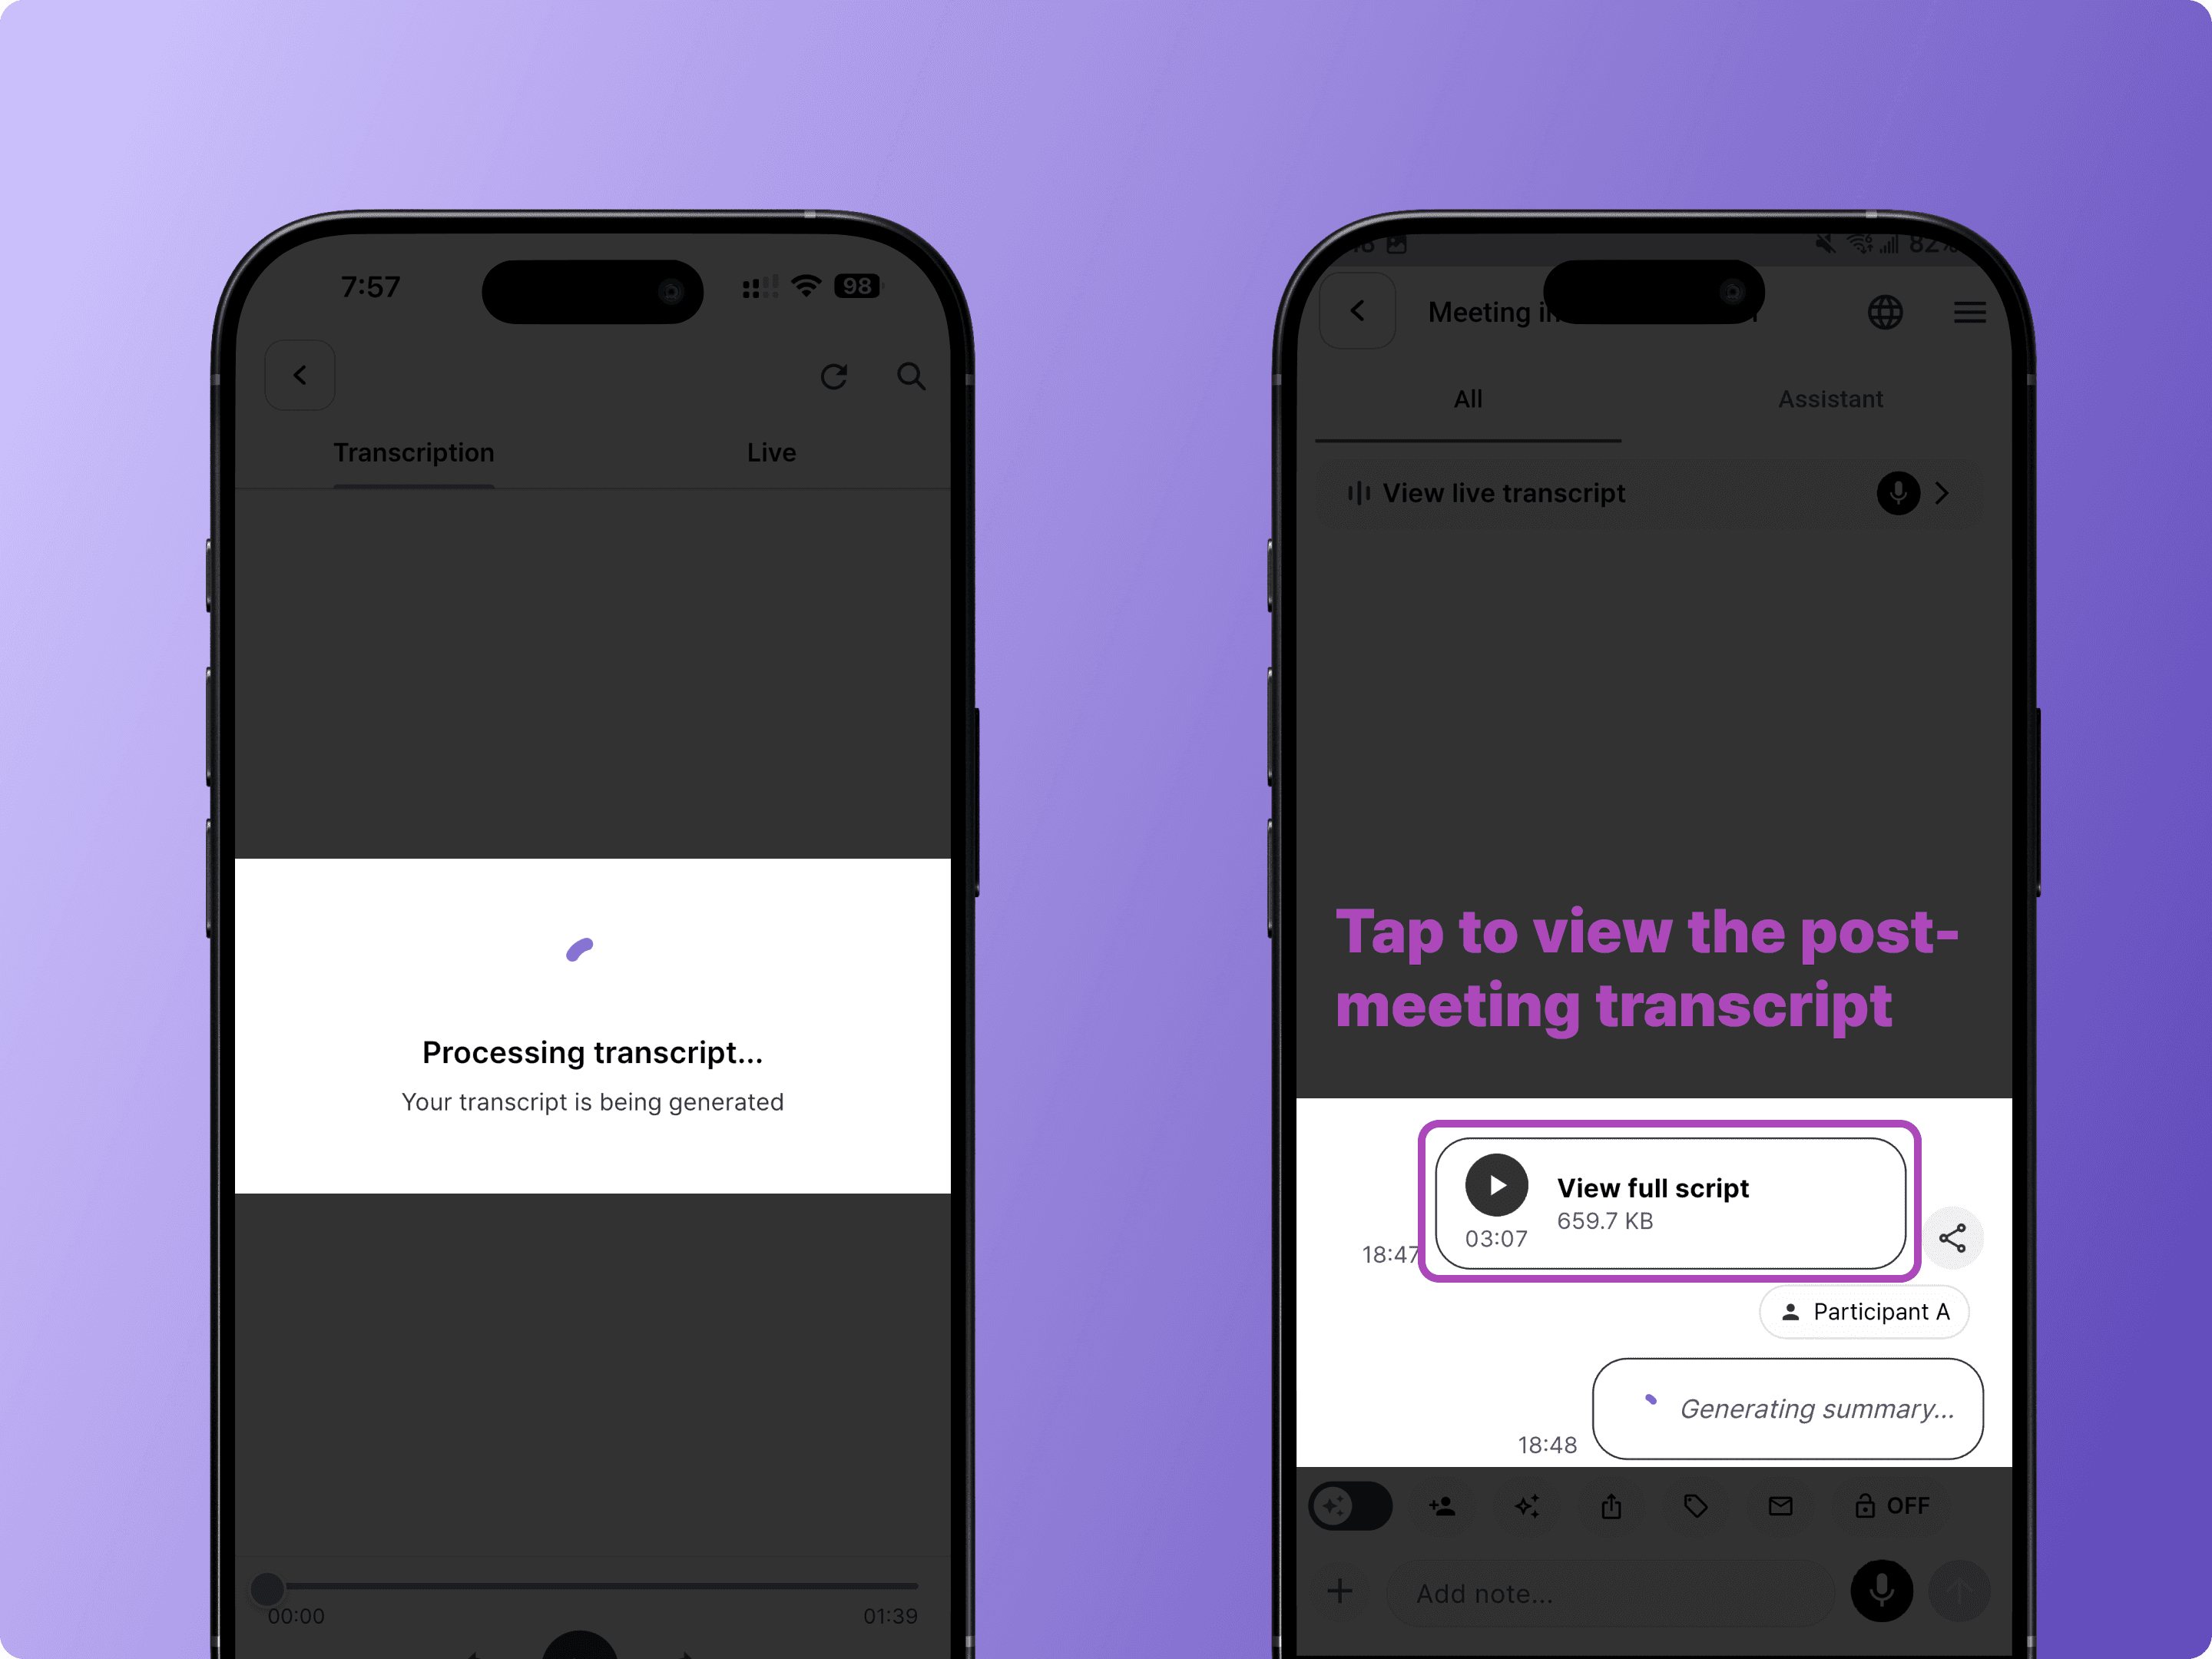
Note: Summary generation may take a few minutes depending on the recording length.
View the Summary
Tap the AI Summary card in the meeting room to view the full summary, including key discussion points and structured sections.
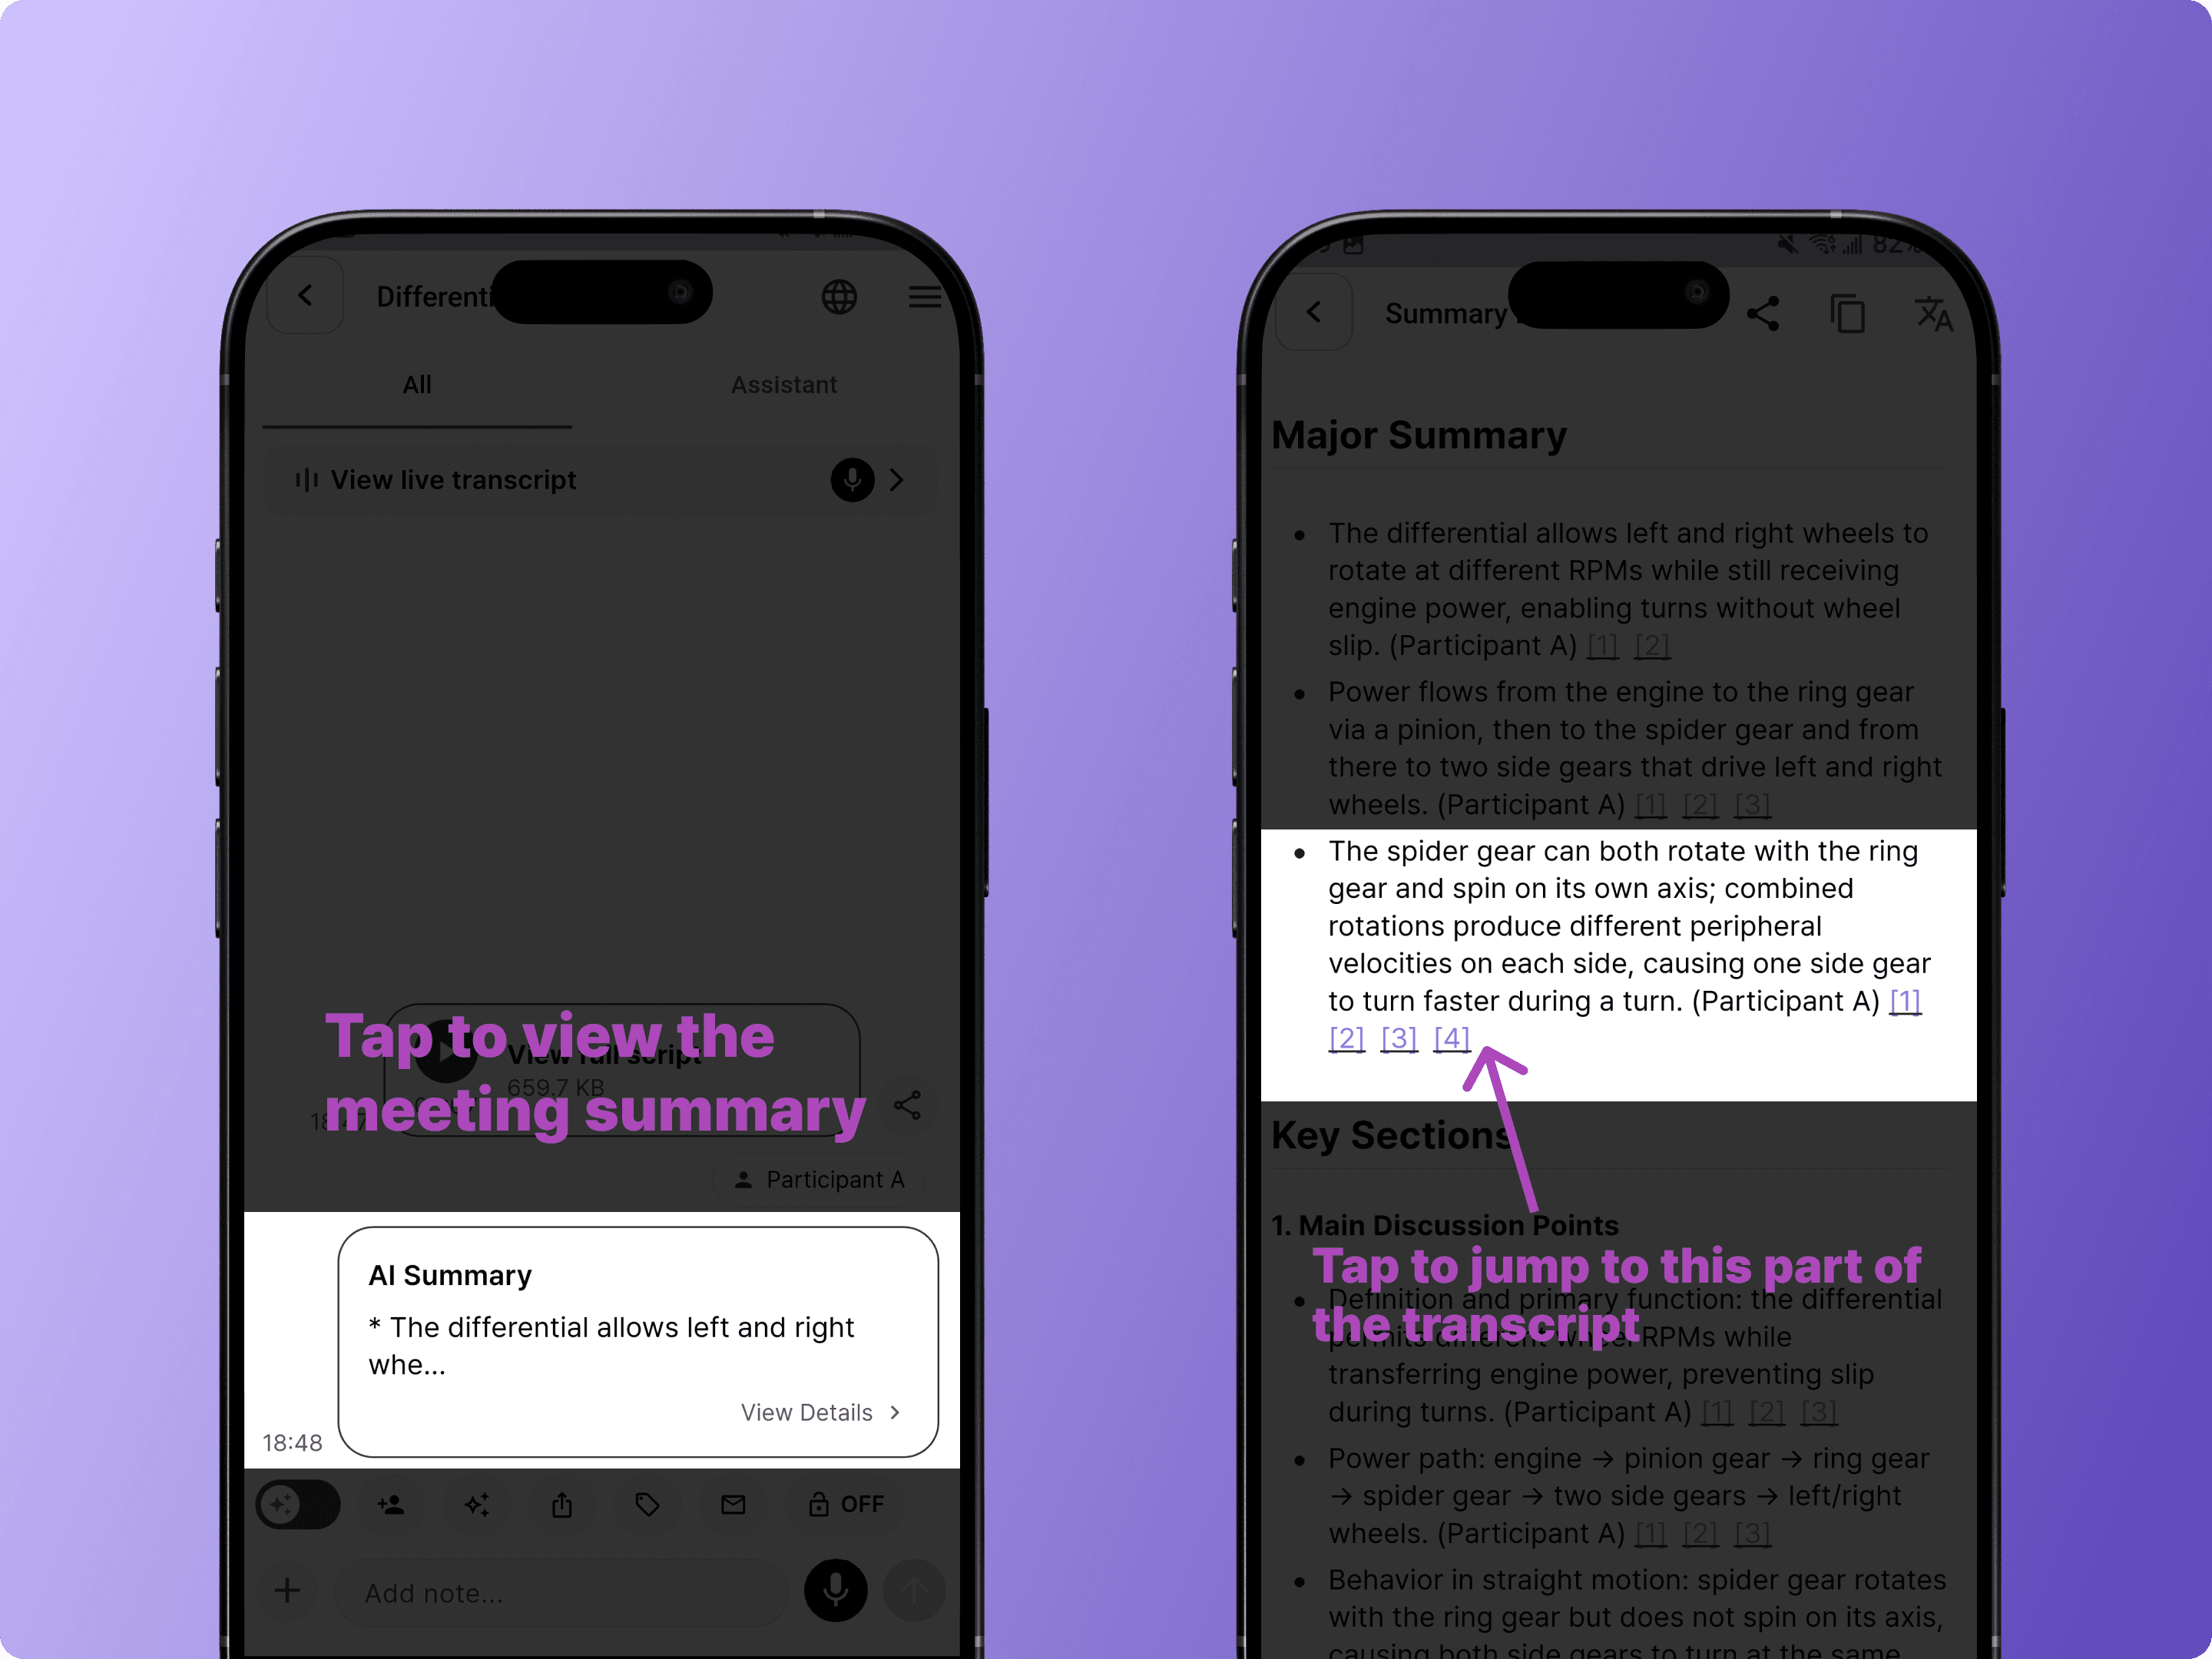
Tap any referenced section to jump directly to that part of the transcript.
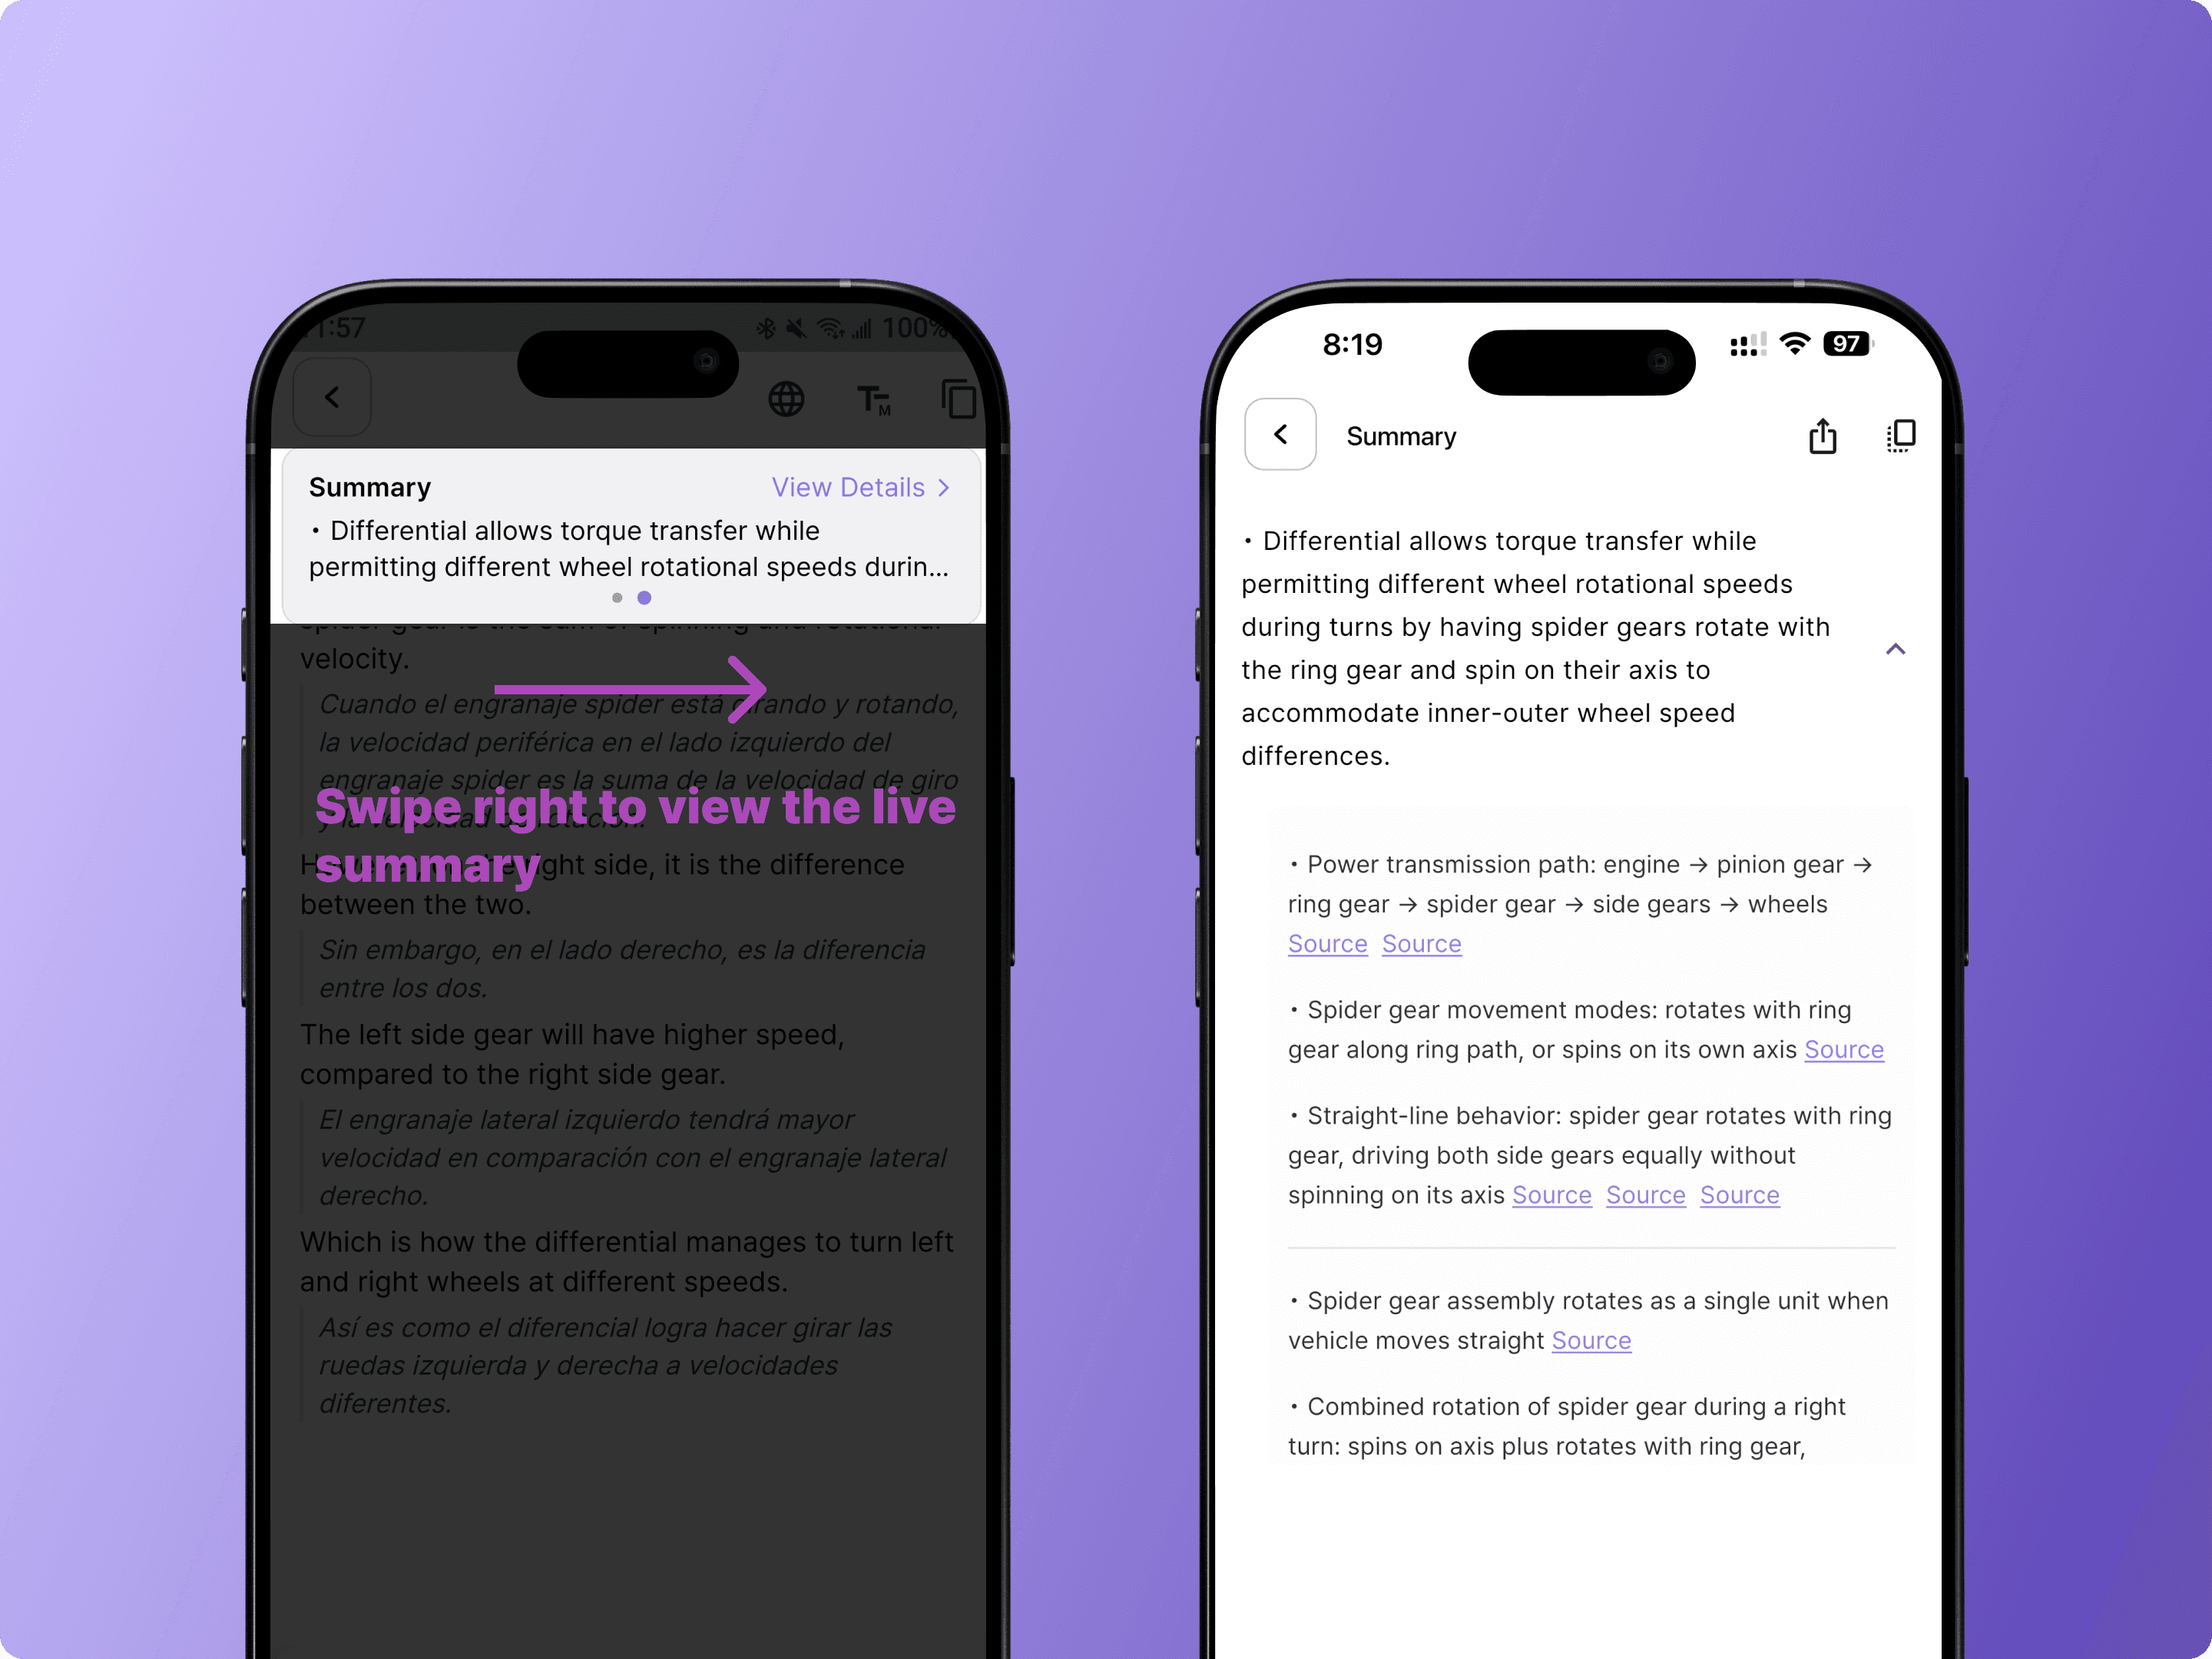
Swipe for Live Summary
During recording, you can swipe right on the transcript view to check the live summary as each discussion topic wraps up.
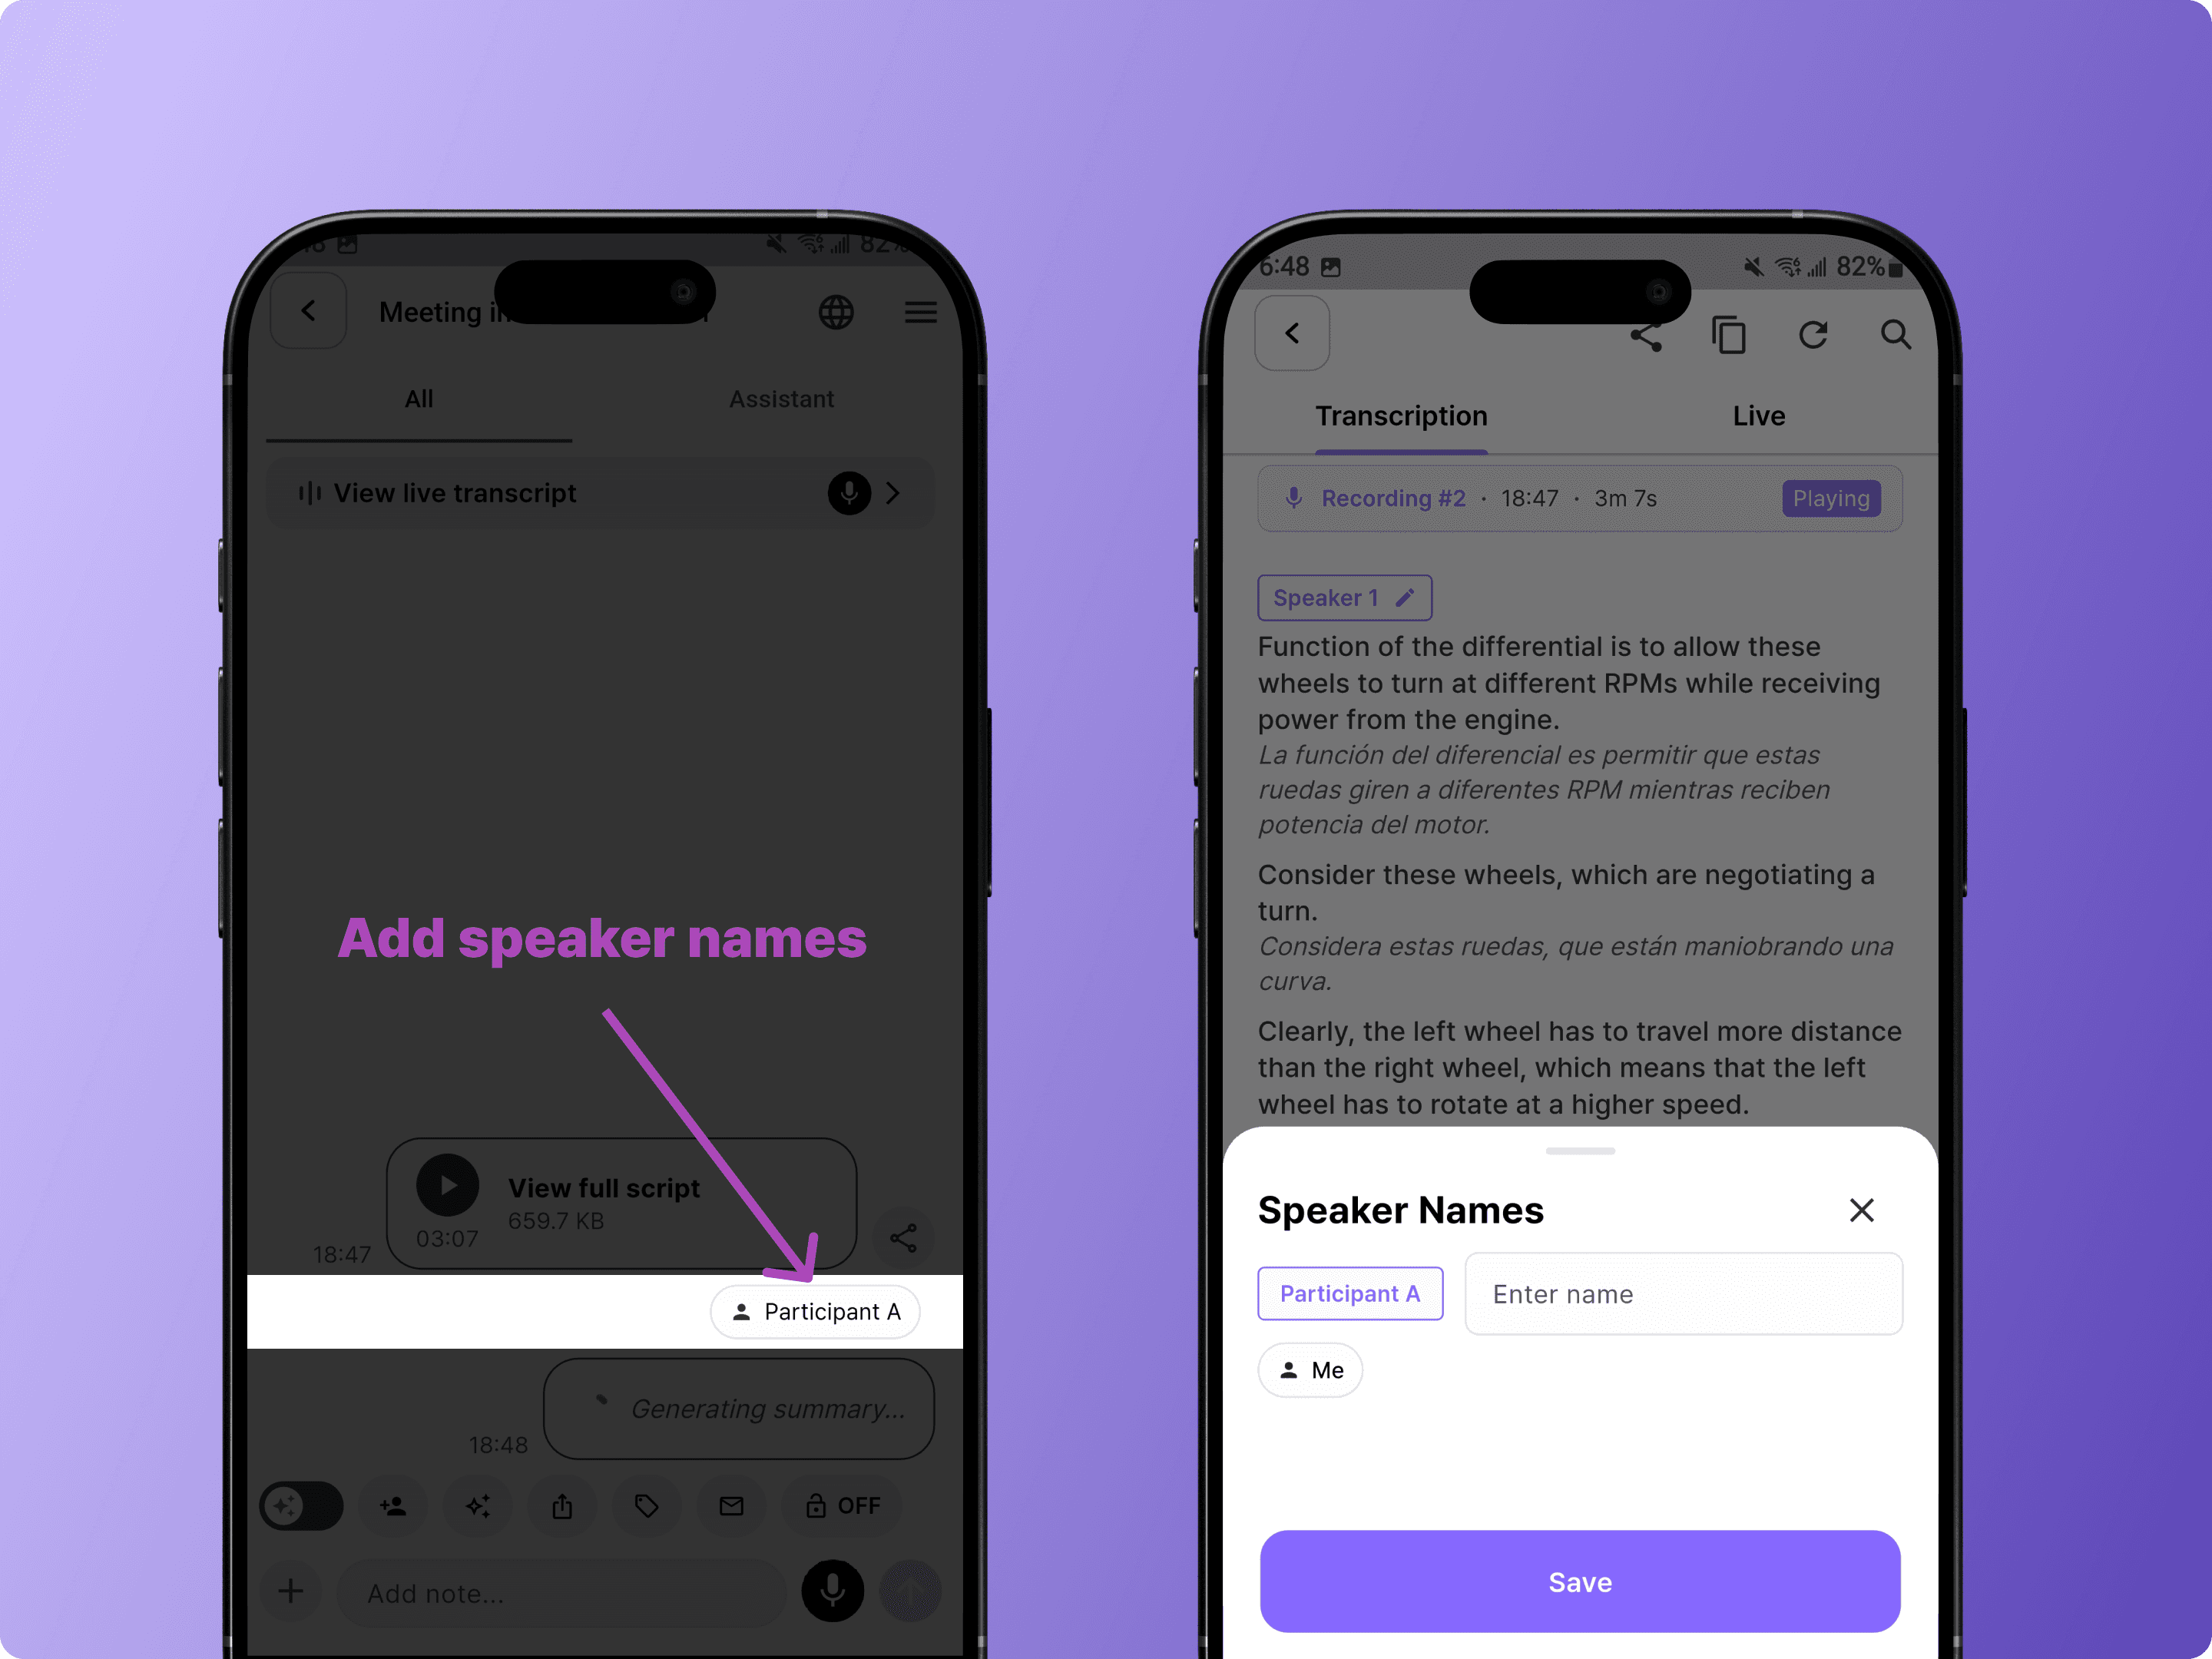
Assign Speaker Names
Tap a speaker label to assign names. This makes follow-up emails more personalized and helps you review conversation history by person.
Tip: Register your voice in Settings
BizCrush can better identify who's speaking.
Go to Settings > Meeting Settings > Voice Enrollment
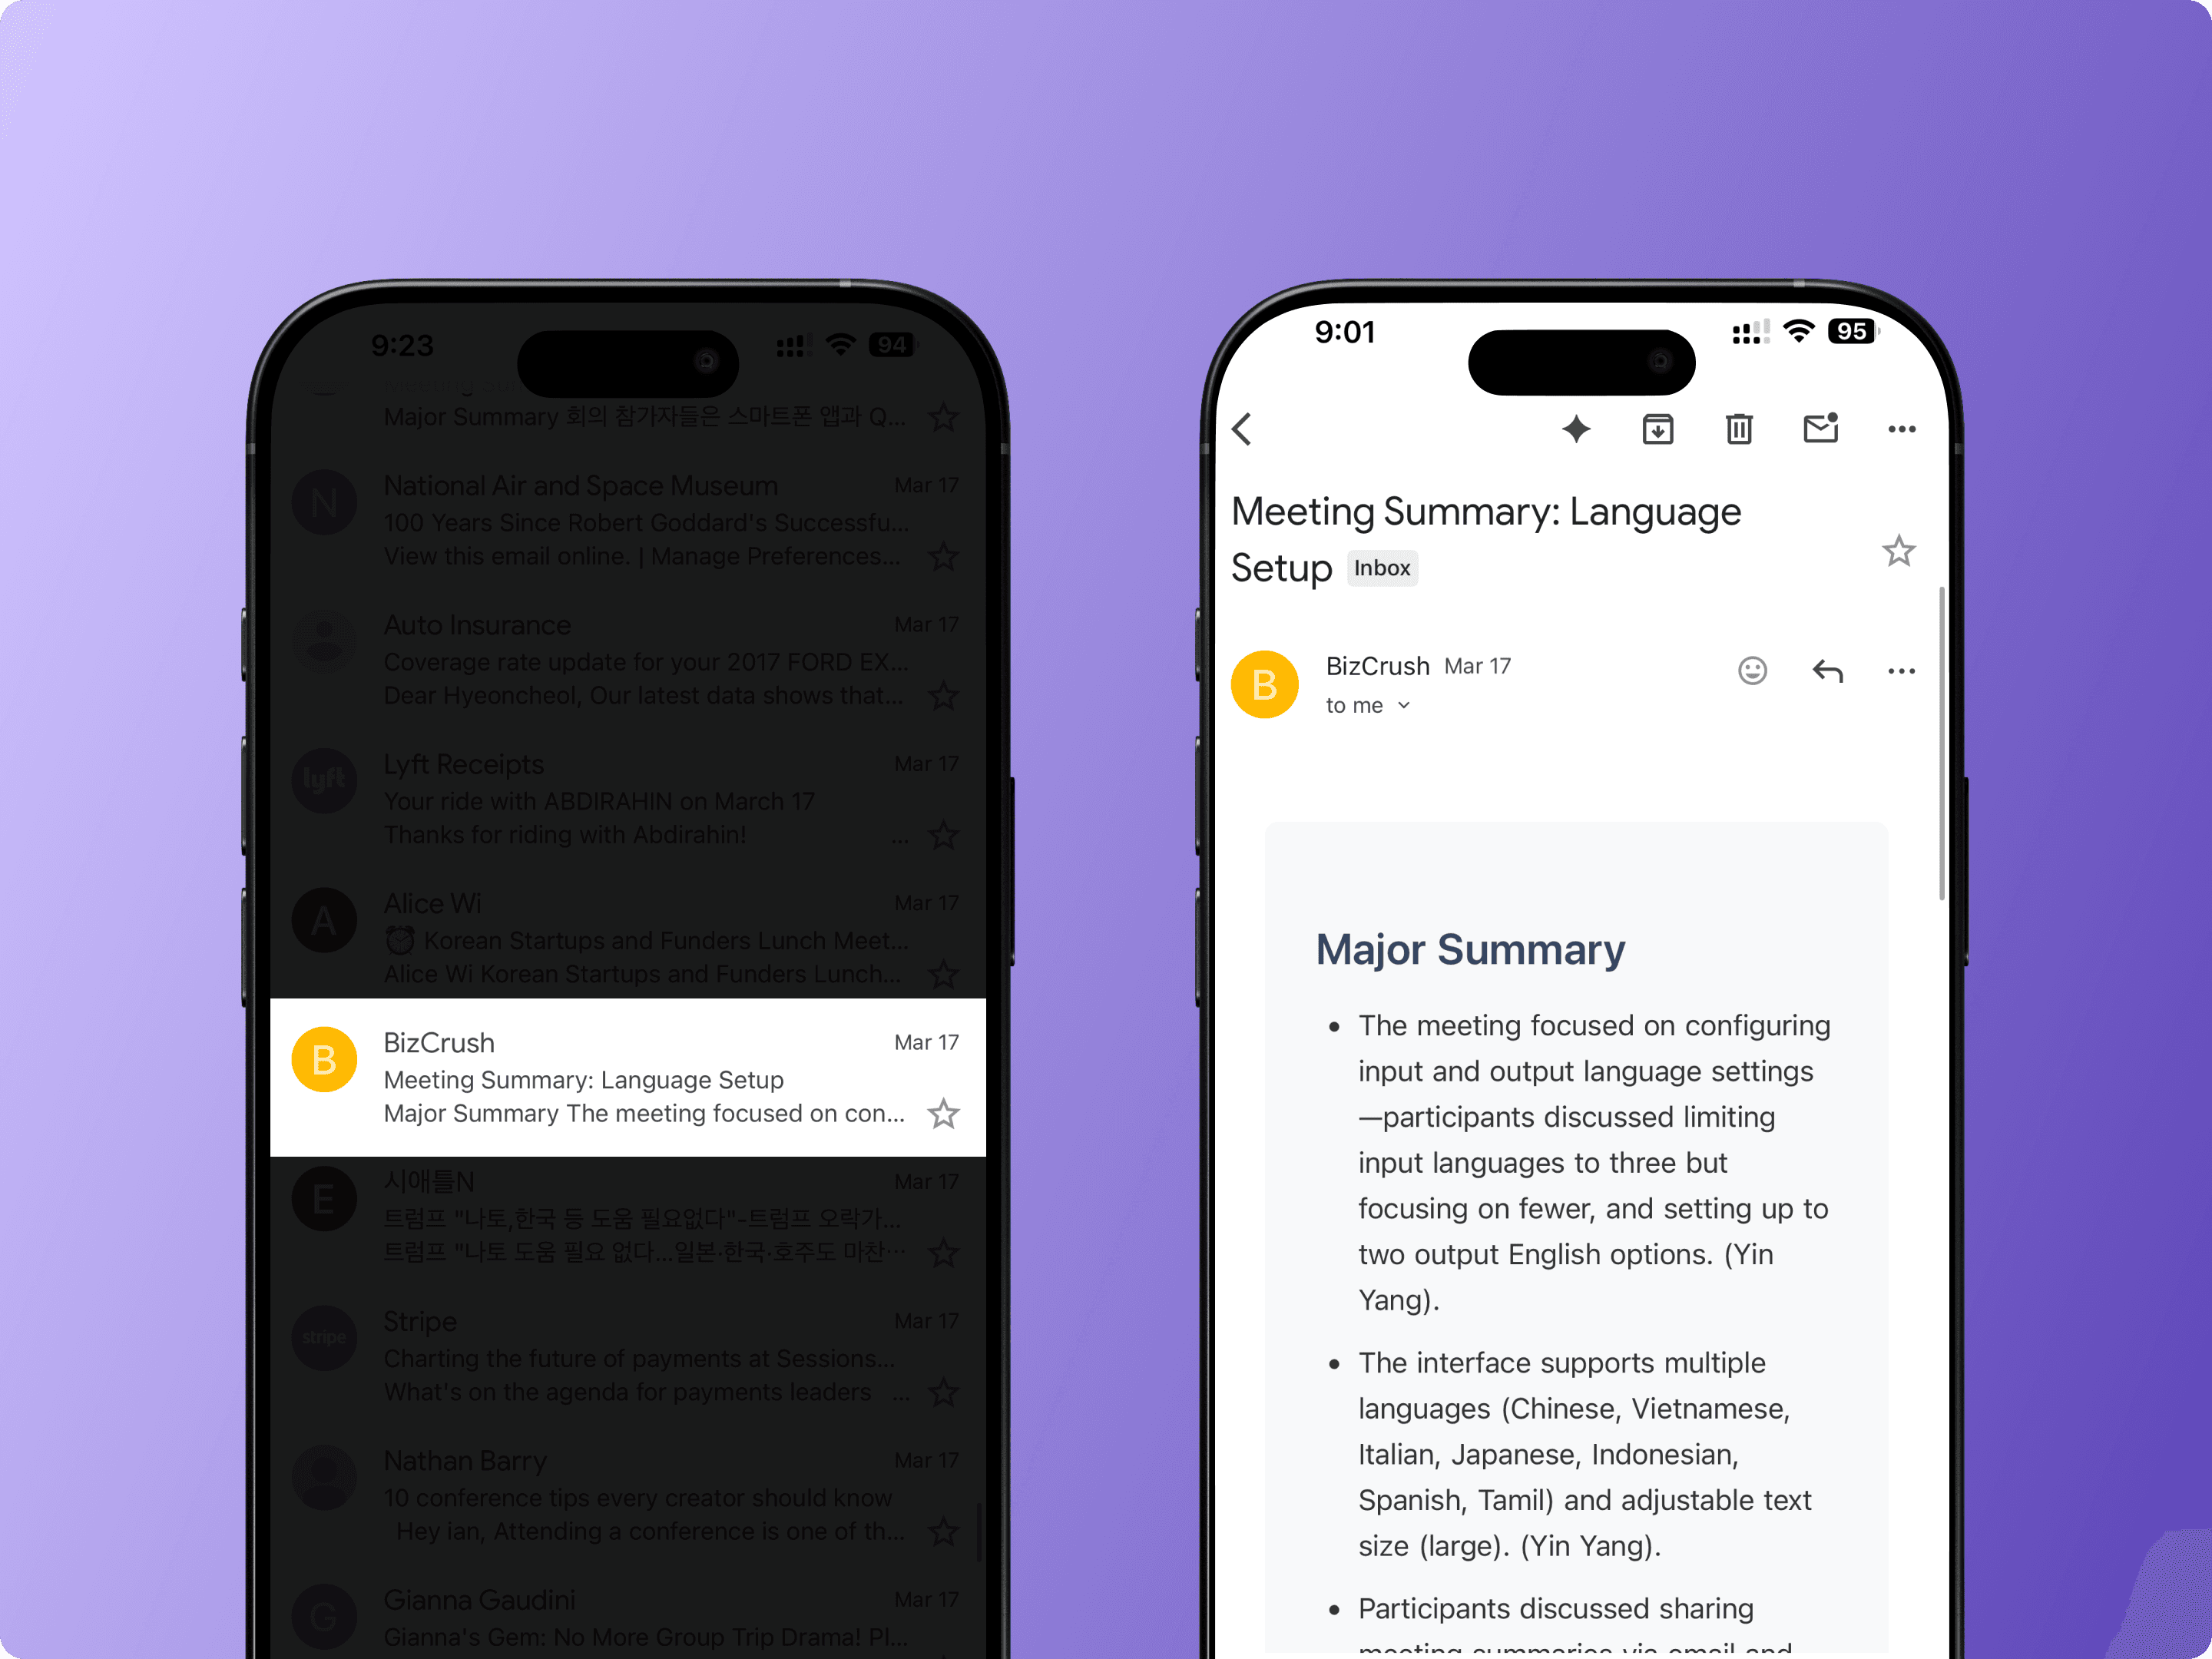
Get Your Summary by Email
As soon as the recording ends, BizCrush automatically creates a structured summary and sends it to all invited participants in the meeting rooms via email.
If you have a preferred summary format, you can customize it on the desktop version. Drag the meeting record into the <Ask AI> feature and request a tailored summary.
Depending on recording length, this may take a few minutes.
5. Generate a Follow-Up Email
Once the summary is ready, tap the email icon in the meeting room toolbar. BizCrush will generate a follow-up email based on your meeting content.
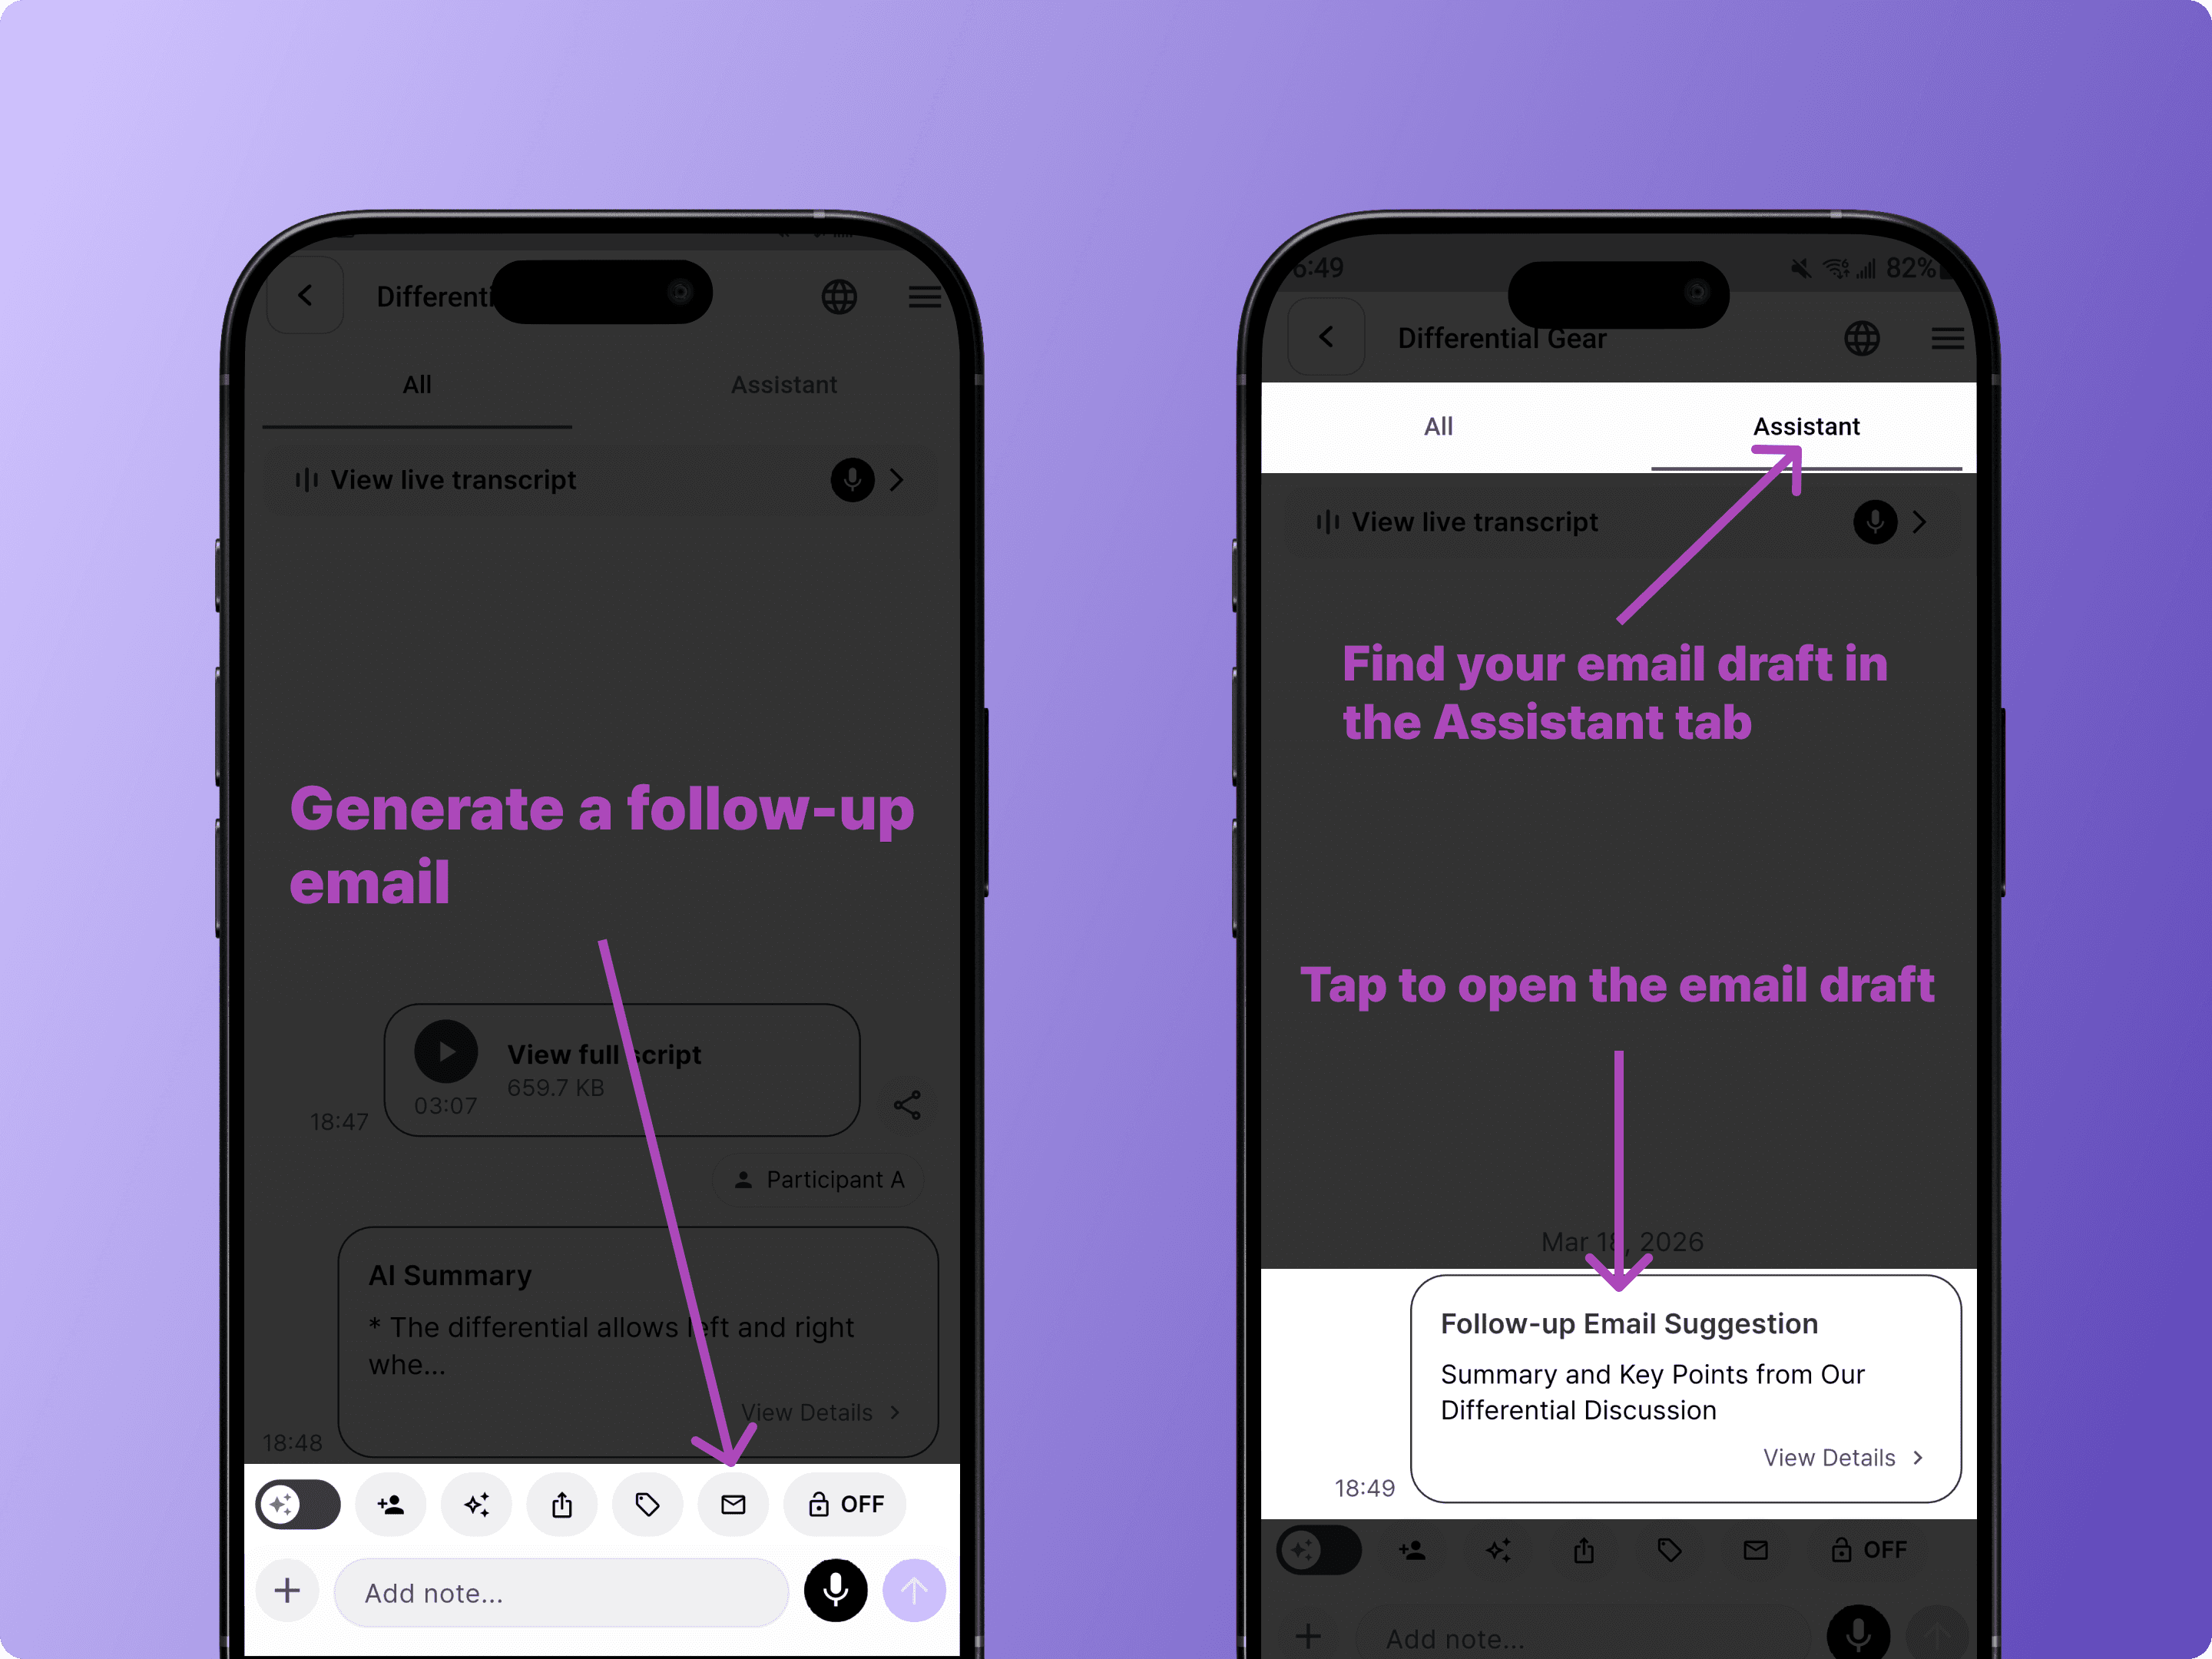
Open the email draft to review, edit, or send it.
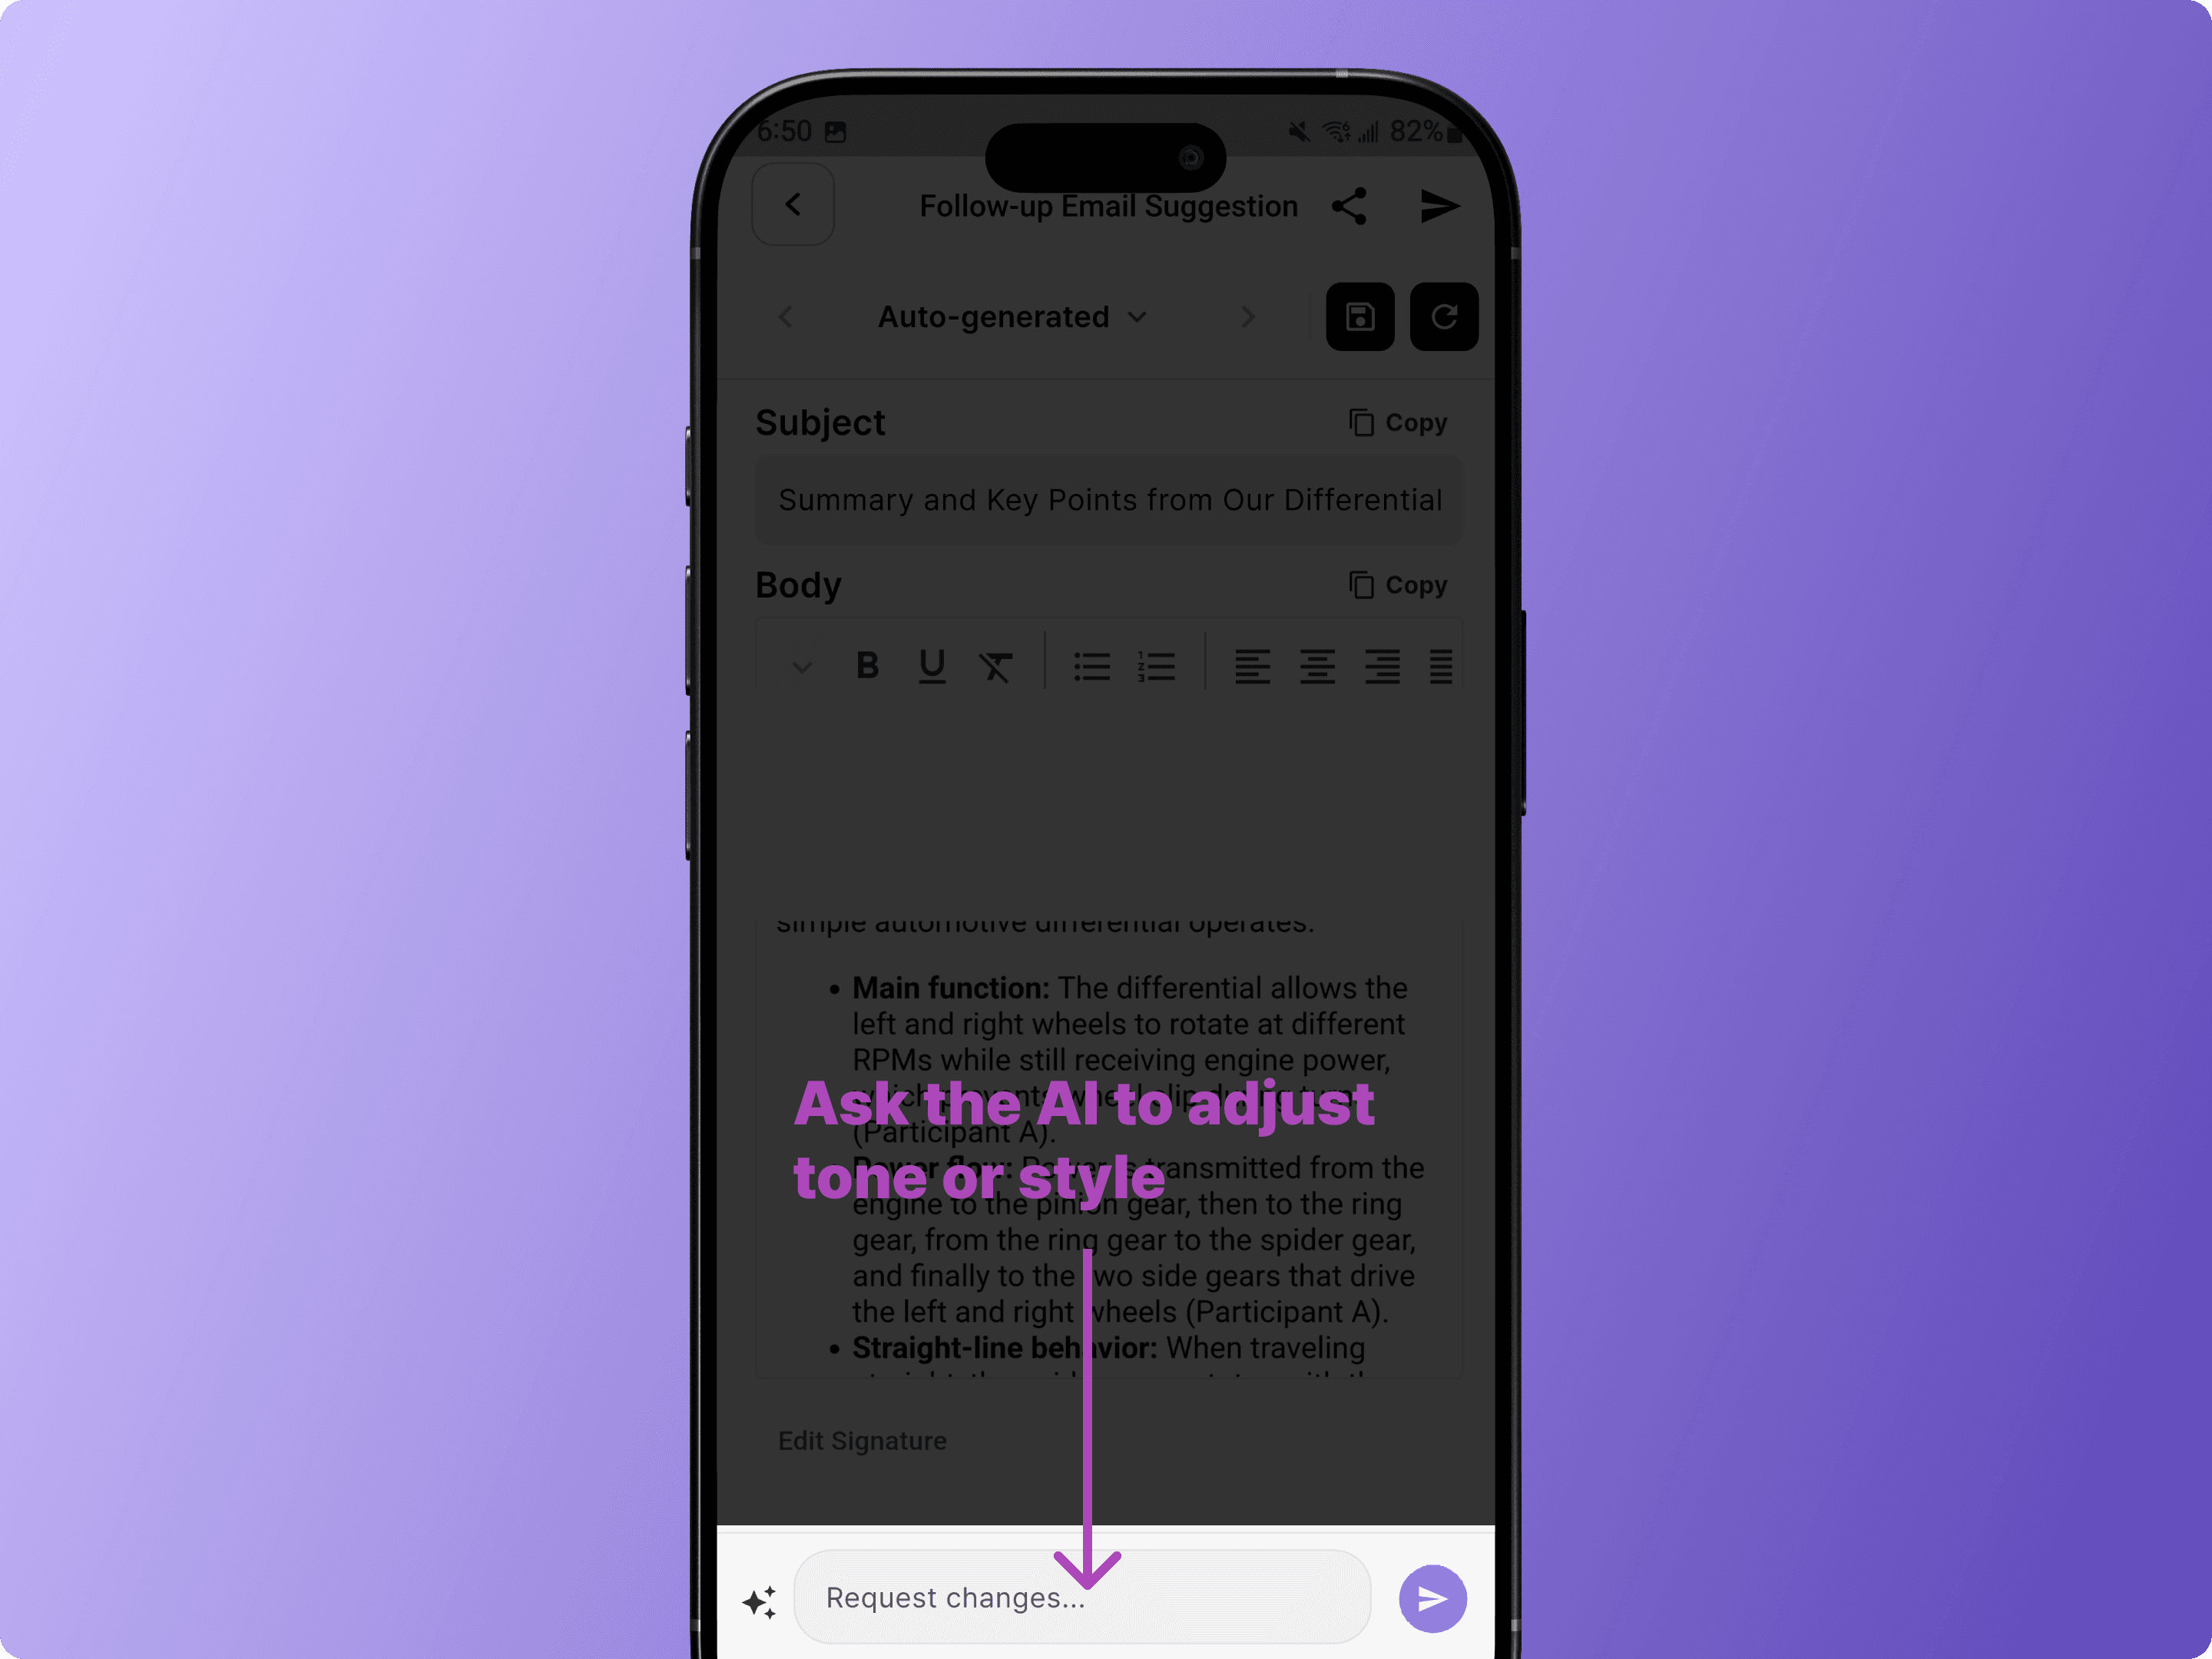
You can also ask the AI to adjust the tone or style — for example, type "Please make the tone more polite" in the request field.
6. Export and Share
Export to HubSpot or Notion
Tap the menu icon (☰) in the top-right corner of the meeting room to open the settings menu.
From there, you can sync your meeting to HubSpot or save it to Notion.
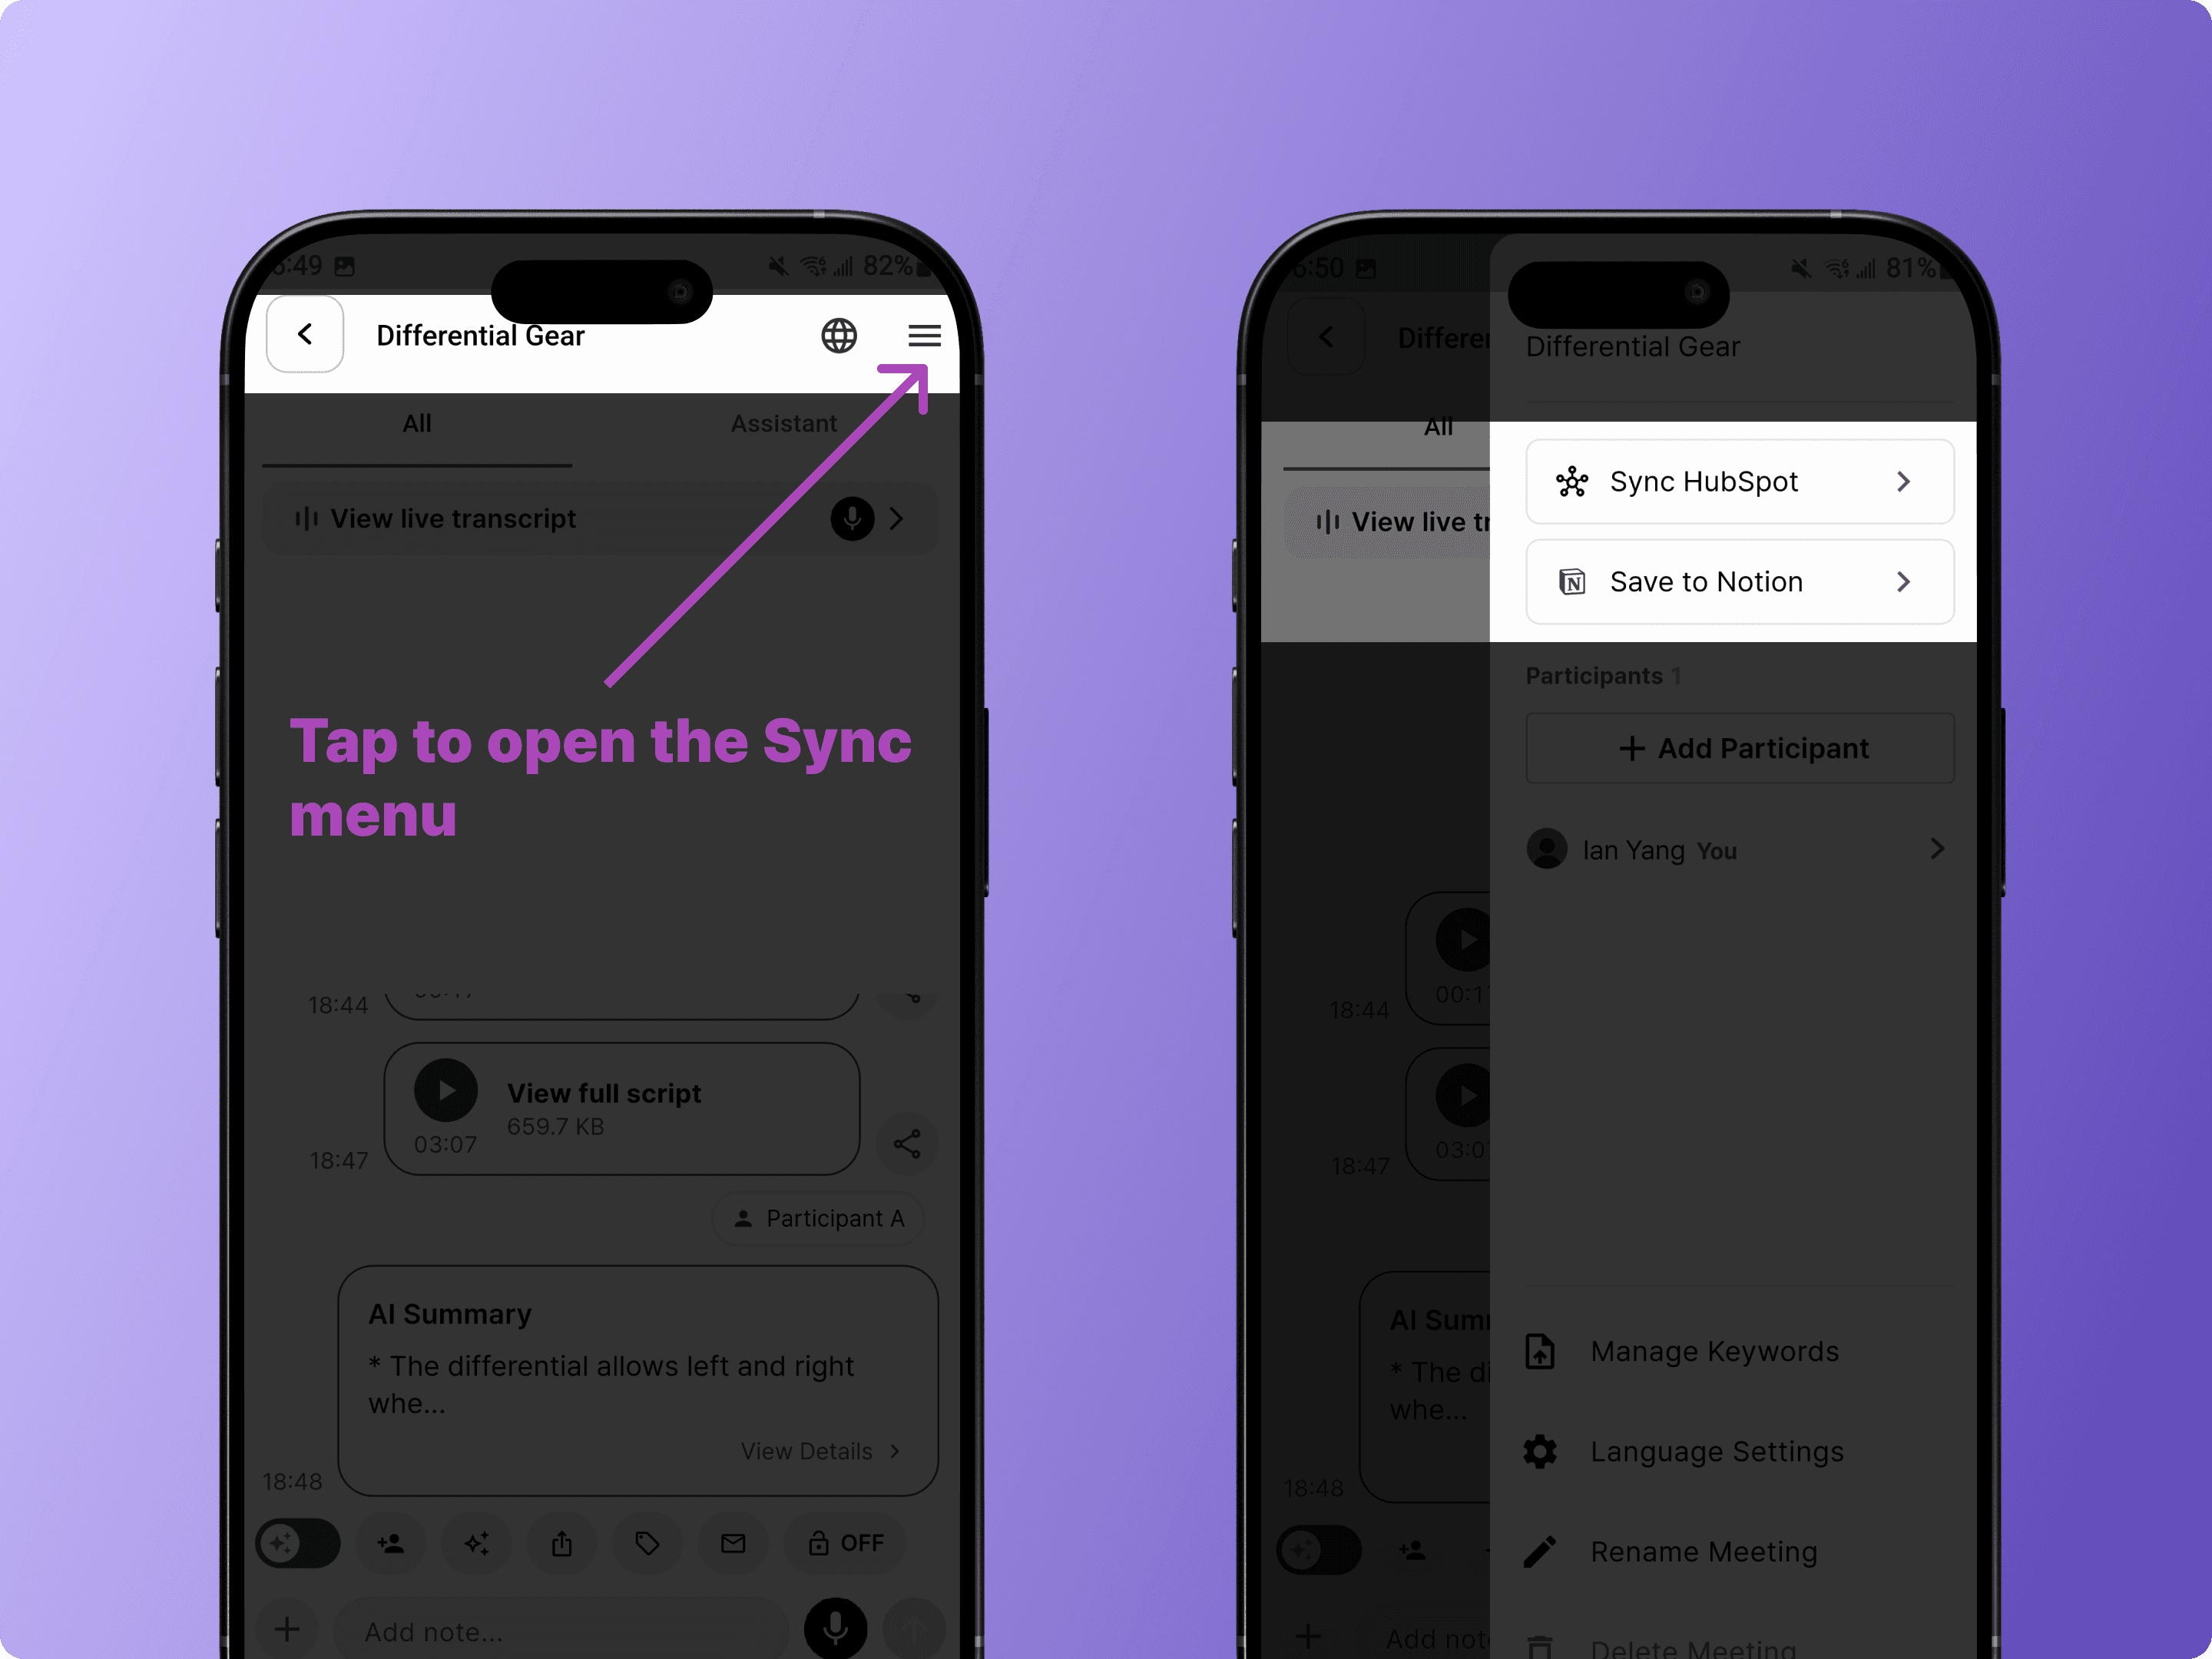
Note: You'll need to log in to HubSpot or Notion the first time you connect.
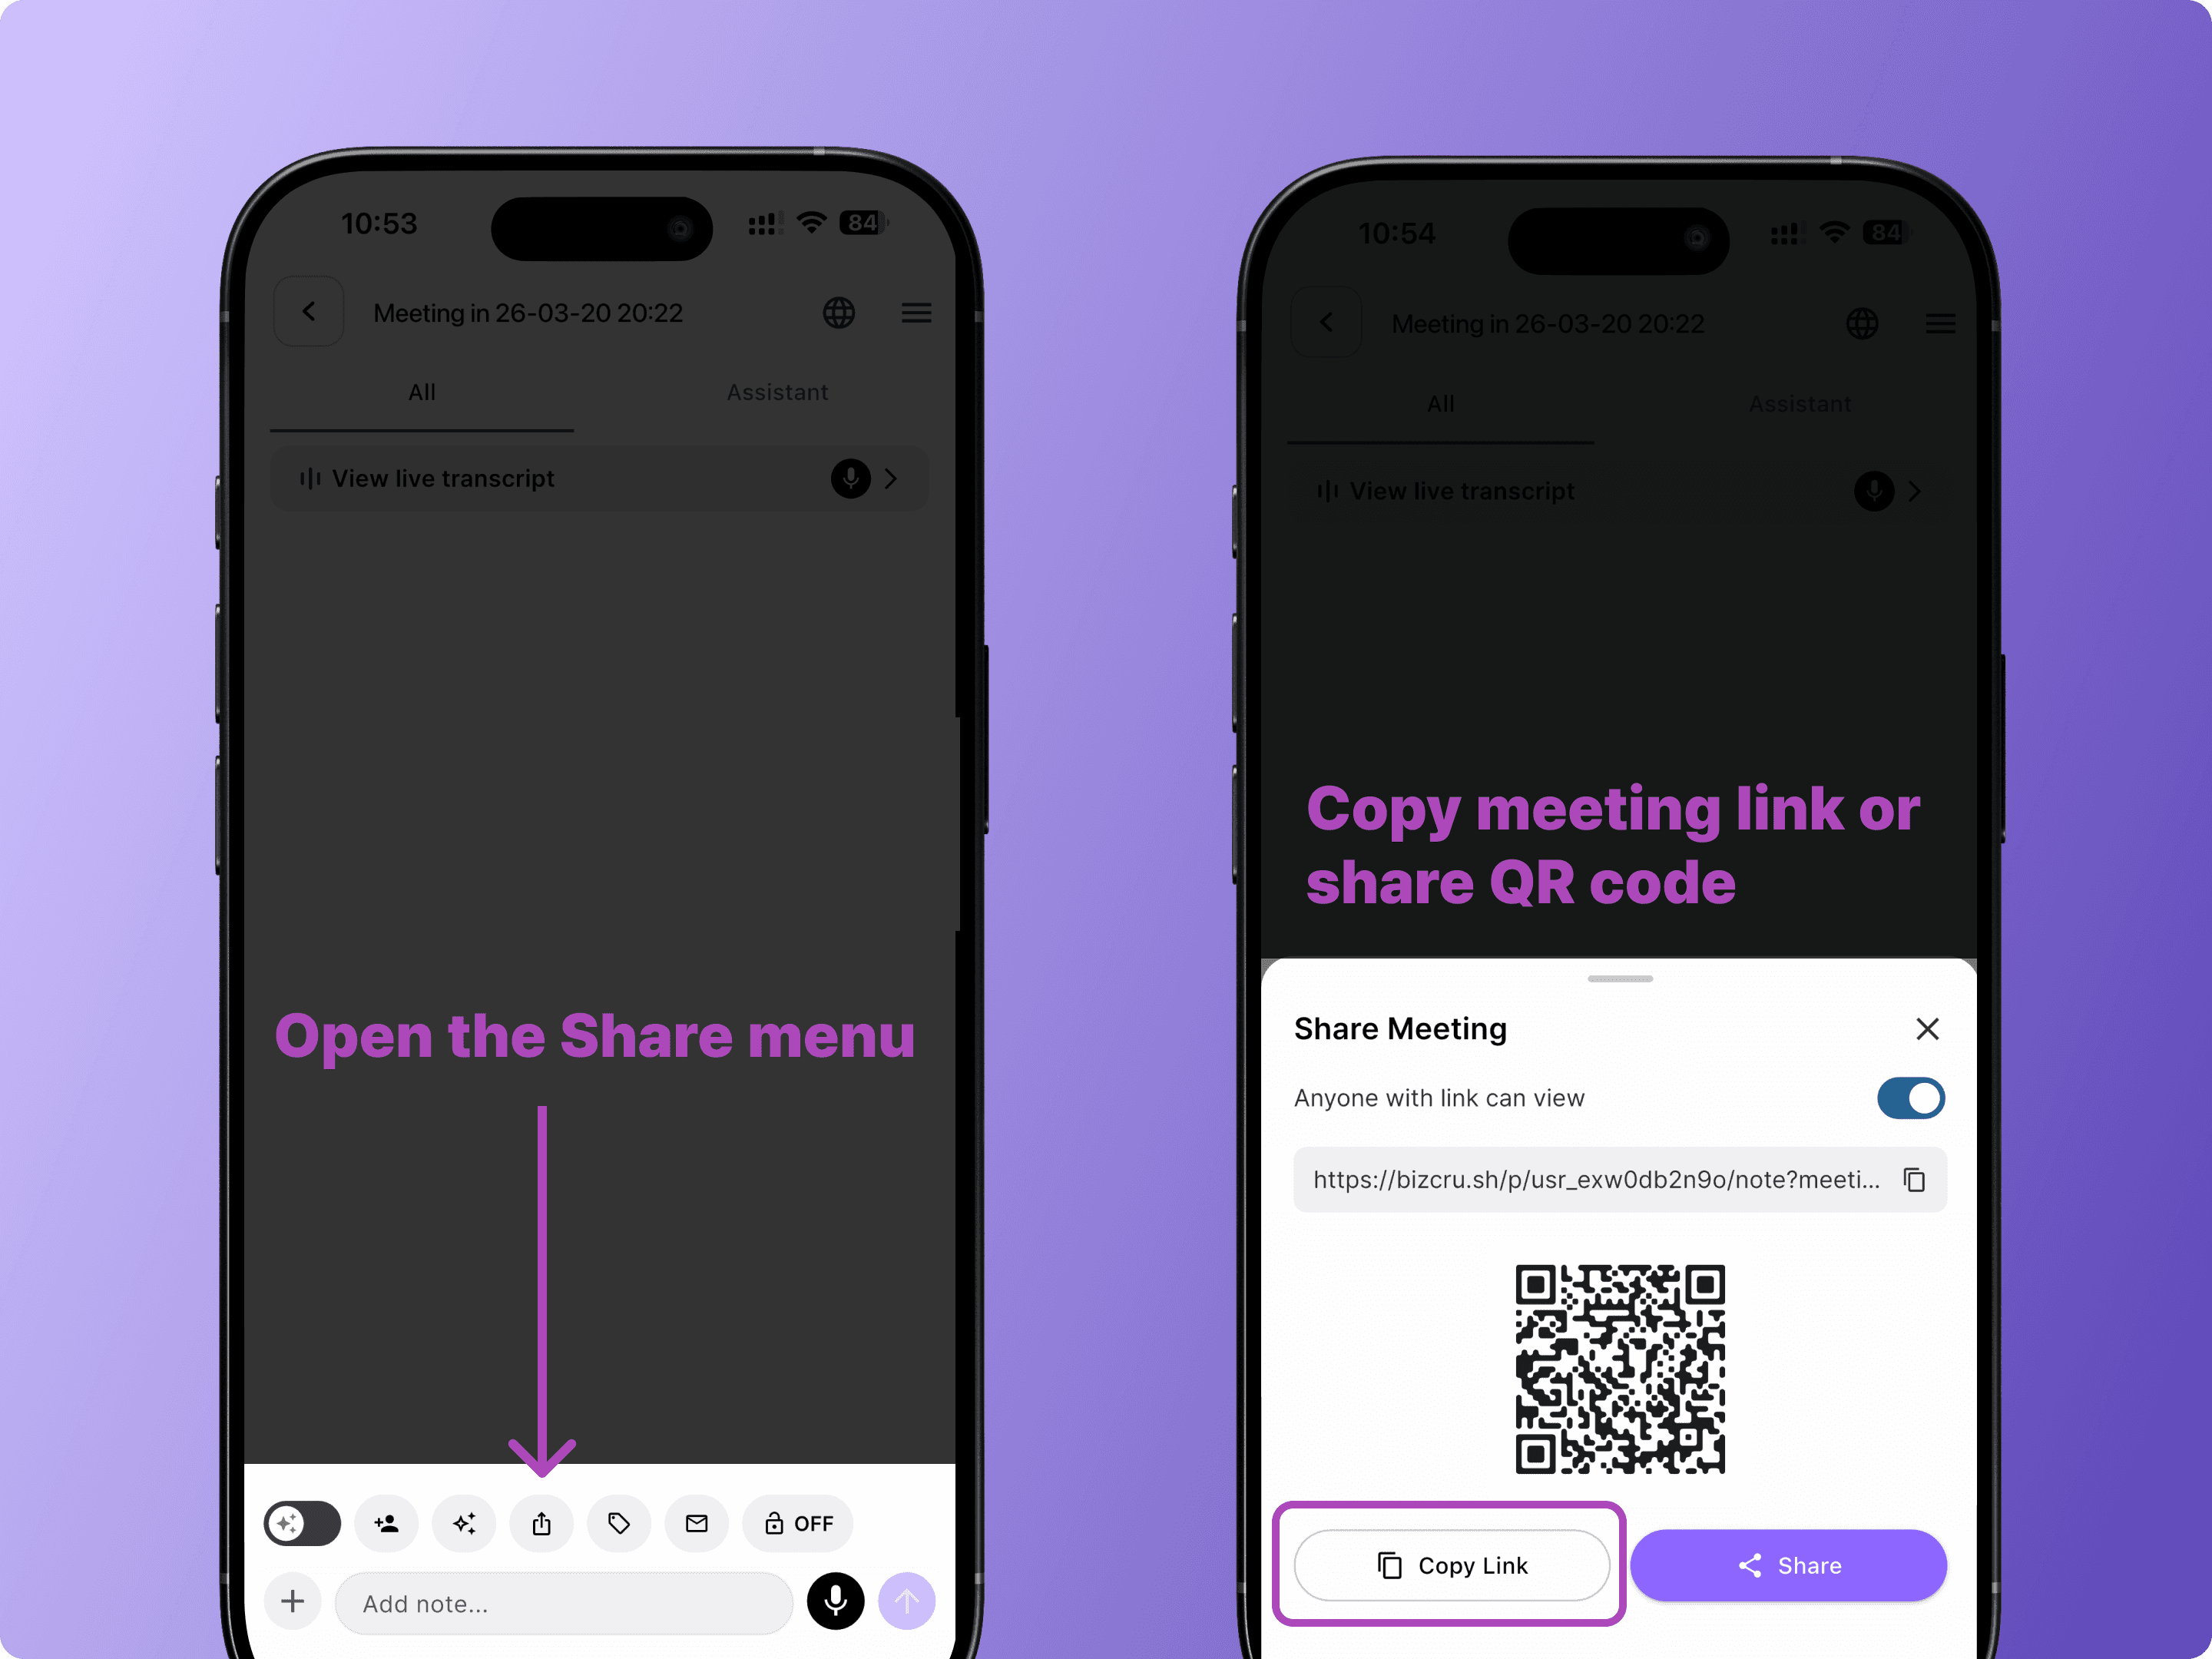
Share a Live Meeting
Share your live meeting with anyone — no app install or sign-up required
Tap the share icon in the toolbar to copy a link or display a QR code.
Recipients can view the live transcription and translation directly in their browser.
With <Anyone with the link can view> enabled,
Anyone can view the live transcript during the meeting or for up to one hour after the meeting ends.
No login or sign-up required—access available through a web browser.
Tip: If a participant signs up through the shared meeting room:
The host receives additional BizCrush meeting usage credits
The new user can access and revisit the meeting anytime from their logged-in account
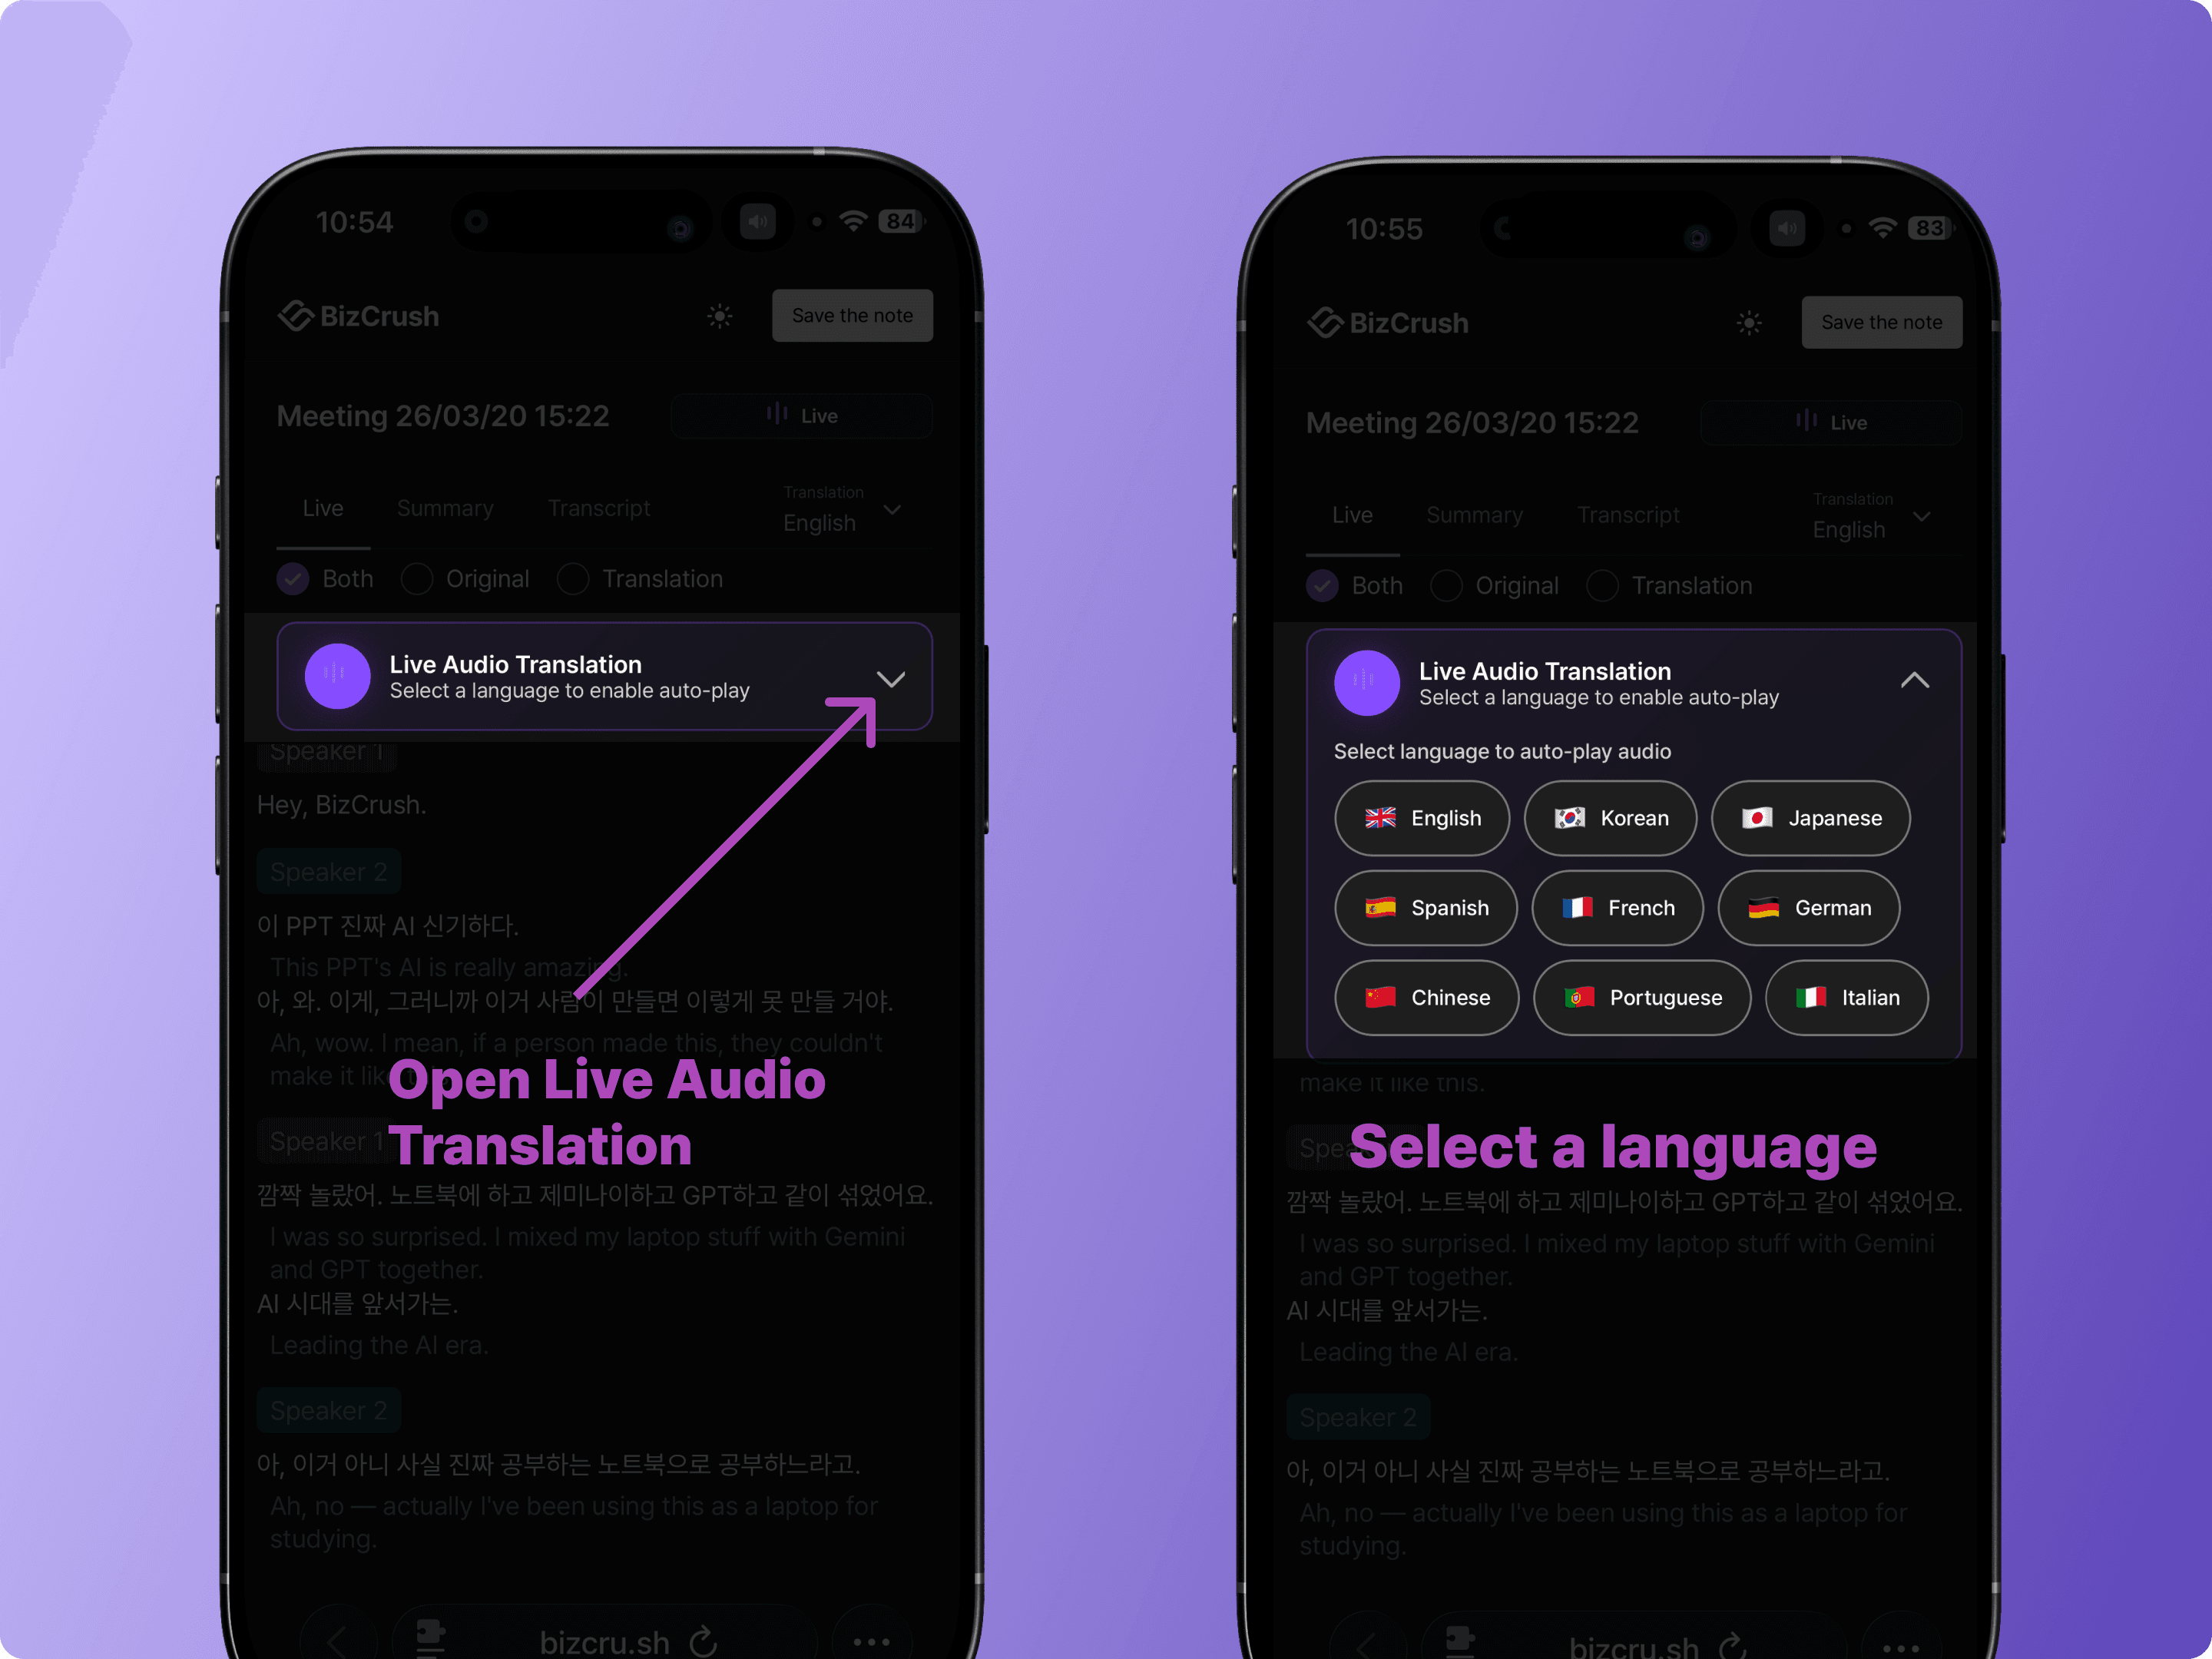
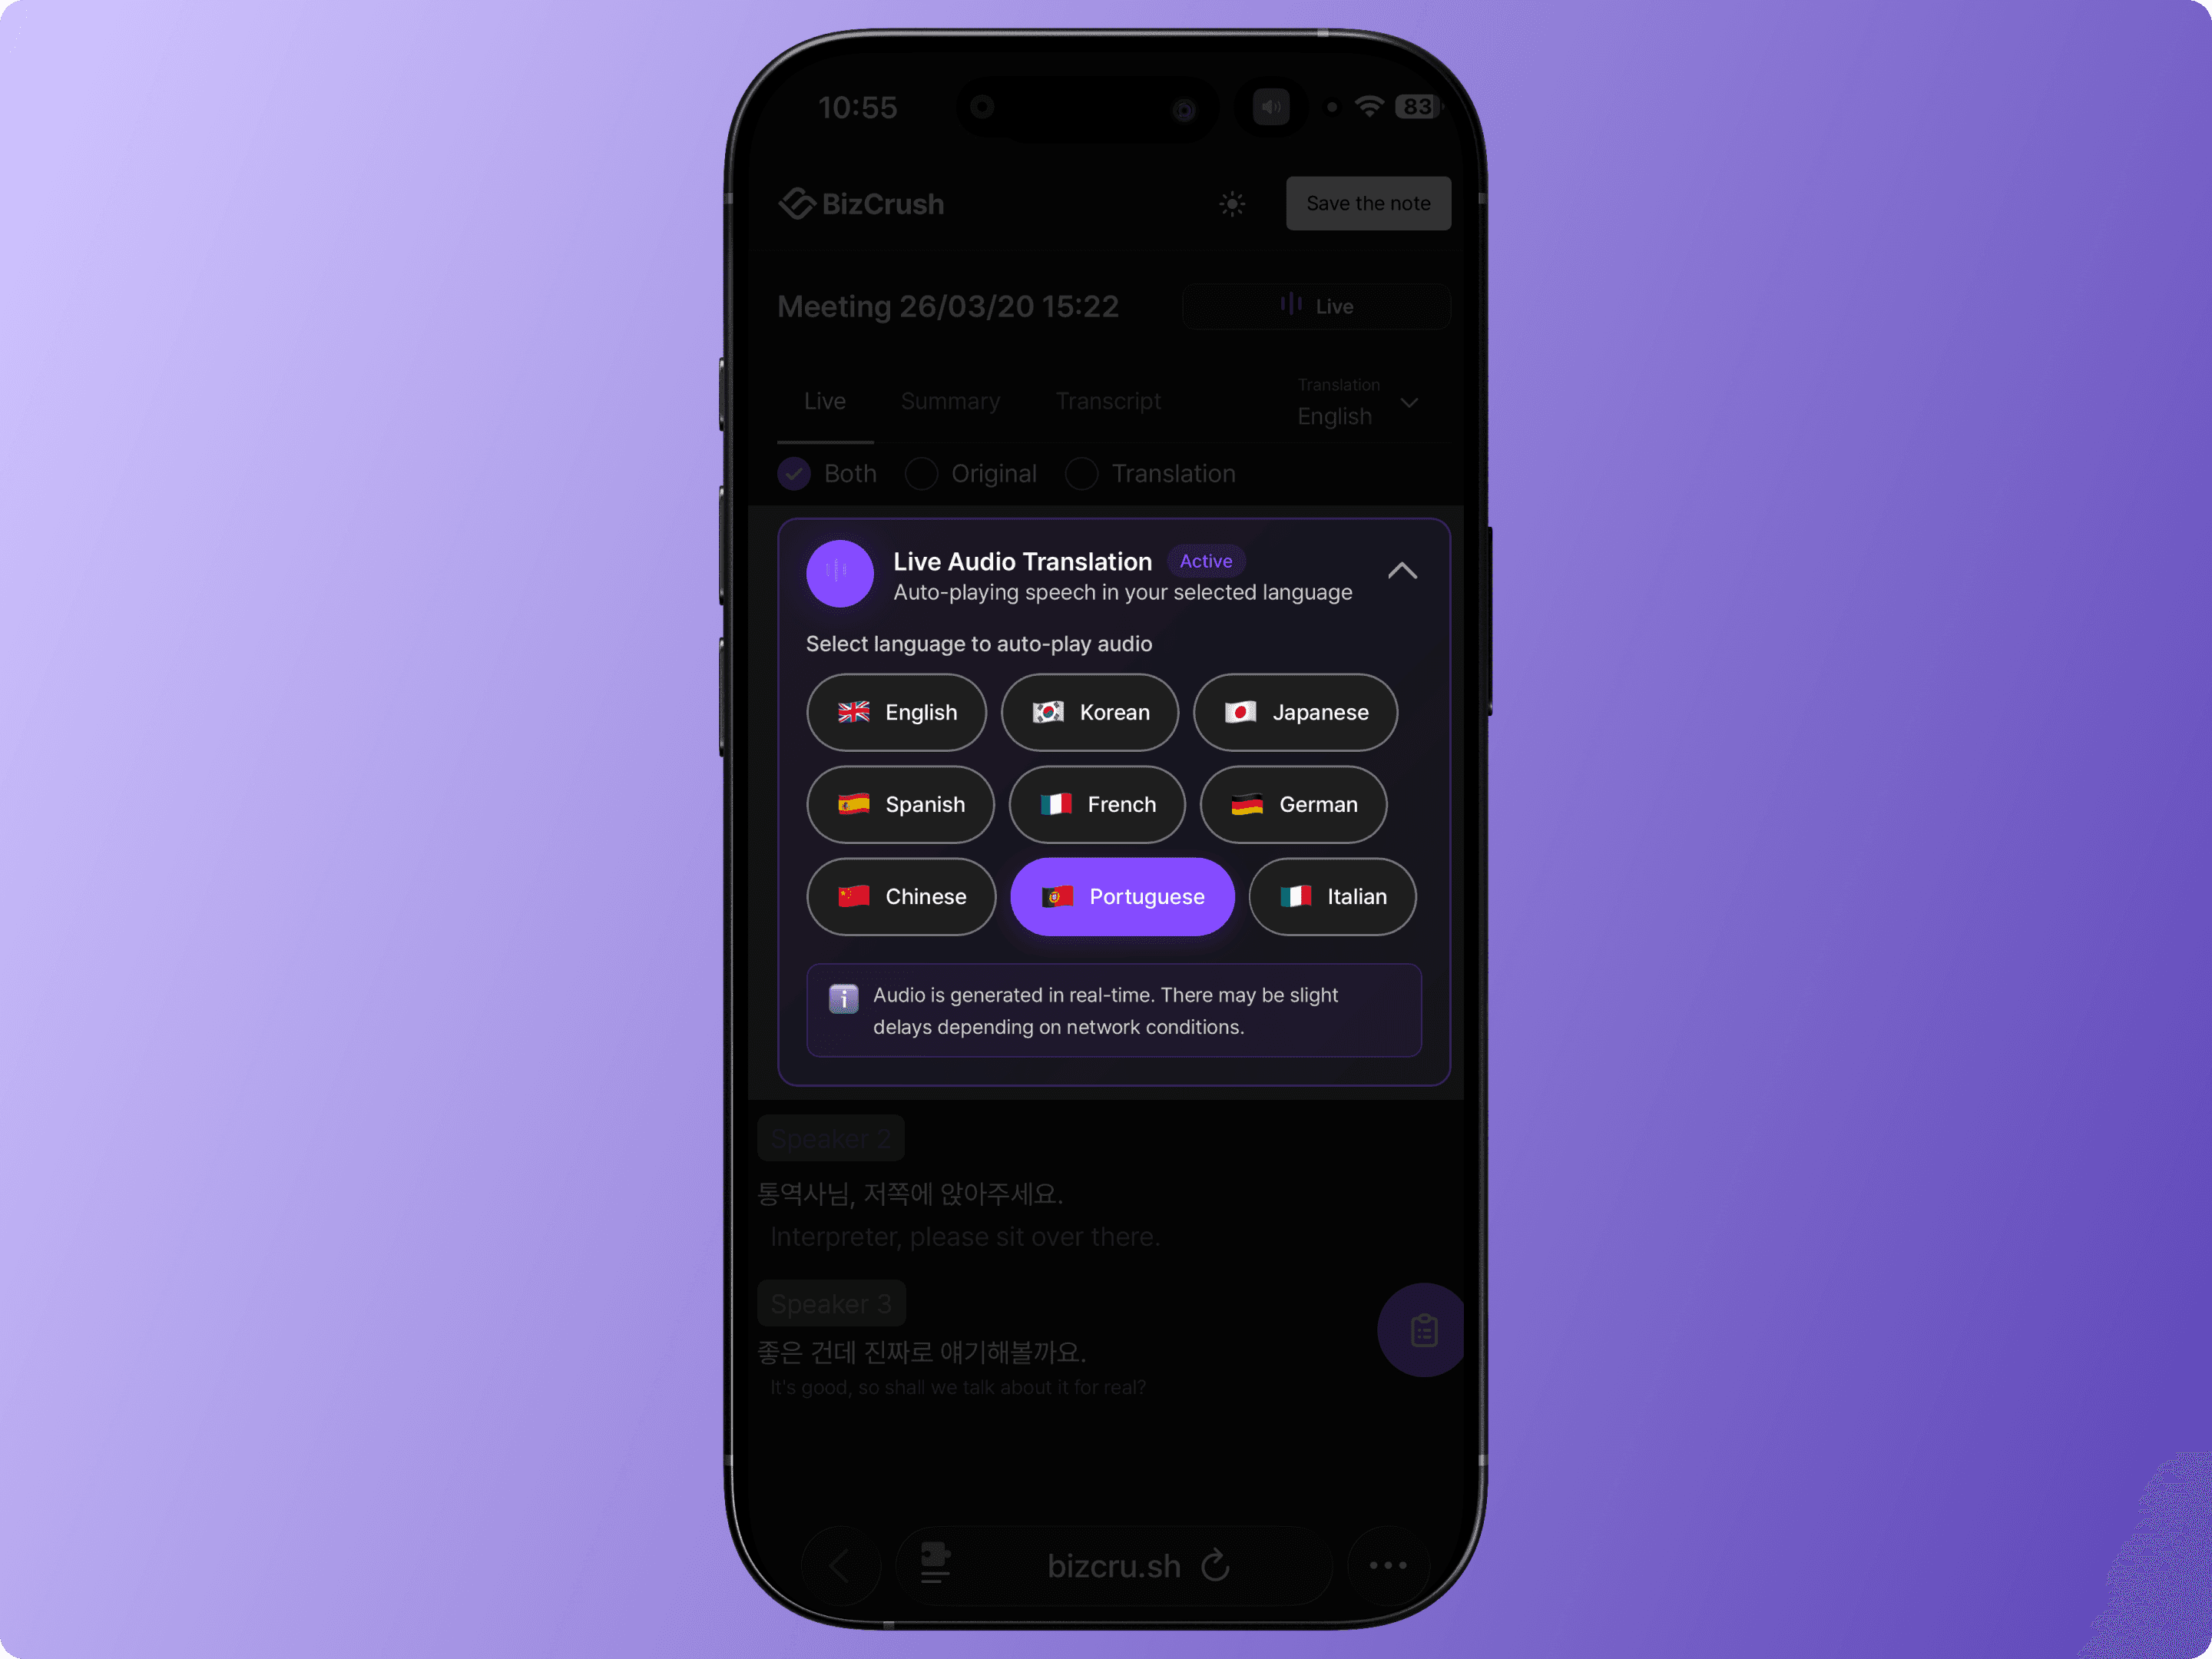
Live Audio Translation for Viewers
Anyone viewing the shared meeting in their browser can hear real-time audio translation. They simply select their preferred language from the Live Audio Translation menu.
Use Privacy Mode for Confidential Meetings
For meetings that involve private or confidential discussions, you can enable Privacy Mode.
Privacy Mode allows you to use real-time transcription and translation without retaining any voice recordings.
To enable Privacy Mode, tap the lock icon in the toolbar before or during the meeting.
As long as Privacy Mode is enabled before the recording is completed, audio will not be stored.
When Privacy Mode is enabled:
Real-time transcription and translation function as usual during the meeting.
No voice recording files are saved anywhere.
If you delete the meeting room after the meeting, no data remains on the server.
For organizations with stricter data requirements, BizCrush also supports:
Private cloud deployment.
On-premises deployment.
Enterprise configurations where data is stored only within the organization’s internal systems (e.g., internal wiki), and not on our private servers.
FAQ
What do I do if microphone access is blocked?
When you first open the app, a permission pop-up appears.
If you denied it, go to Settings > Apps > BizCrush > Permissions and allow microphone access.
Does BizCrush send meeting summaries by email?
BizCrush sends the meeting summary automatically after you end the meeting.
For longer recordings, summary generation may also take a few minutes.
Why didn’t I receive a meeting summary email?
Tap Stop to end the recording before closing the app—otherwise, the summary won’t be generated.
Summary emails are sent to the email address linked to your sign-in account from: no-reply@mail.bizcrush.ai
If you don't see it in your email, check your spam folder and add the sender to your contacts.
What is Privacy Mode?
Privacy Mode allows you to use live transcription and translation without retaining any voice recordings.
No audio data is stored on your device or on the server.
If the meeting room is deleted after the meeting, no data remains on the server.
Can BizCrush be used for confidential or security-sensitive meetings?
Yes. With Privacy Mode enabled, no voice recordings are stored. Only real-time transcription is provided during the meeting.
Does BizCrush comply with recording consent laws?
Recording consent laws vary by location. In the United States, requirements differ by state.
We recommend informing all participants and obtaining consent before recording.
What languages are supported?
BizCrush supports up to 45 languages.
Live Translation can recognize up to 3 languages at once and translate into 2 languages in real time.
Which CRMs does it integrate with?
BizCrush currently integrates with HubSpot and Notion.
You can export meeting notes automatically and share them with teammates.
For enterprise, we also support options like storing meeting records in your internal wiki.
If you need any additional integrations, feel free to email us.
Can I use it on both mobile and desktop?
Yes. BizCrush supports iOS, Android, Windows, and macOS.
With the same account, you can view and edit your data across devices.
Where are my recordings stored?
Original recordings are stored on your device only.
For multi-device sync, an encrypted copy is temporarily stored on the server for 48 hours and then automatically and permanently deleted.
Can I upload existing recordings?
Yes. You can upload audio files you already have, transcribe them, and generate summaries.
What file formats can I upload?
BizCrush supports common audio formats, including MP3, M4A, WAV, and OGA.
What's the difference between live transcription and post-meeting transcription?
Live transcription captures speech as it happens in real time.
Post-meeting transcription is generated after the recording ends, with AI refining the text for better readability and accuracy.
Where is the meeting summary?
As soon as the recording ends, BizCrush automatically organizes the meeting content into a structured summary, which is sent via email to all invited participants and to each meeting room.
If you have a preferred summary format, you can customize it on the desktop version. Drag the meeting record into the <Ask AI> feature and request a tailored summary.
Depending on recording length, this may take a few minutes.
How does email follow-up work?
BizCrush analyzes the conversation and creates a personalized follow-up email draft based on the meeting content.
You can edit it or ask the AI to adjust the tone before sending.
If you skip this step, the summary won't be created.
Can I use BizCrush for free?
Yes. BizCrush offers up to 7 hours of use with a free subscription, but advanced features like translation and live audio translation use tokens faster.
You're All Set
Start your first meeting with BizCrush today — BizCrush handles the notes and follow-up.
Questions or Partnership? Reach us anytime at business@bizcrush.ai.
BizCrush
Growth
April 1, 2026
5
min

Usecase
From Noisy Job Sites to Global Events: How BizCrush Works in the Real World
From Noisy Job Sites to Global Events: How BizCrush Works in the Real World
When people think about communication tools, they imagine quiet offices or Zoom calls.
But that’s not where communication actually breaks. It breaks in real-world environments — on job sites, at crowded in-person events, and in fast-moving situations where you can’t pause and type something into Google Translate.
Recently, we’ve seen BizCrush used in places like this — where conventional tools simply don’t work.
On a Construction Site — One Phone, No Setup
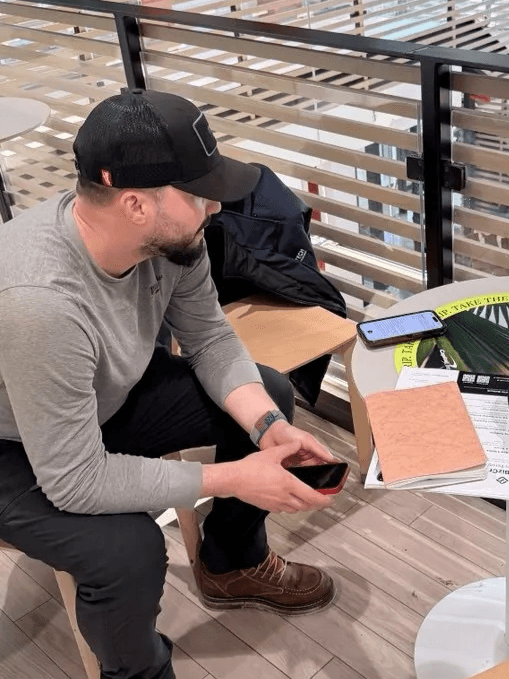
A Portuguese-speaking worker on a U.S. construction crew struggled with daily communication.
Instructions were fast. The environment was loud. And there was no room for misunderstanding.
This wasn’t just about translating words, but it was about keeping up with real-time coordination.
Using BizCrush on his phone — no setup required — he got:
real-time translation
audio playback in his preferred language
real-time summary and records, even in a noisy environment
For the first time, he could follow conversations as they were happening.
He didn’t slow the team down anymore. He became part of it.
Construction is one of the most linguistically diverse industries in the U.S.
But almost no tools are built for it.
The Cross-Border Event — 80+ People, Bilingual Captions on Screen
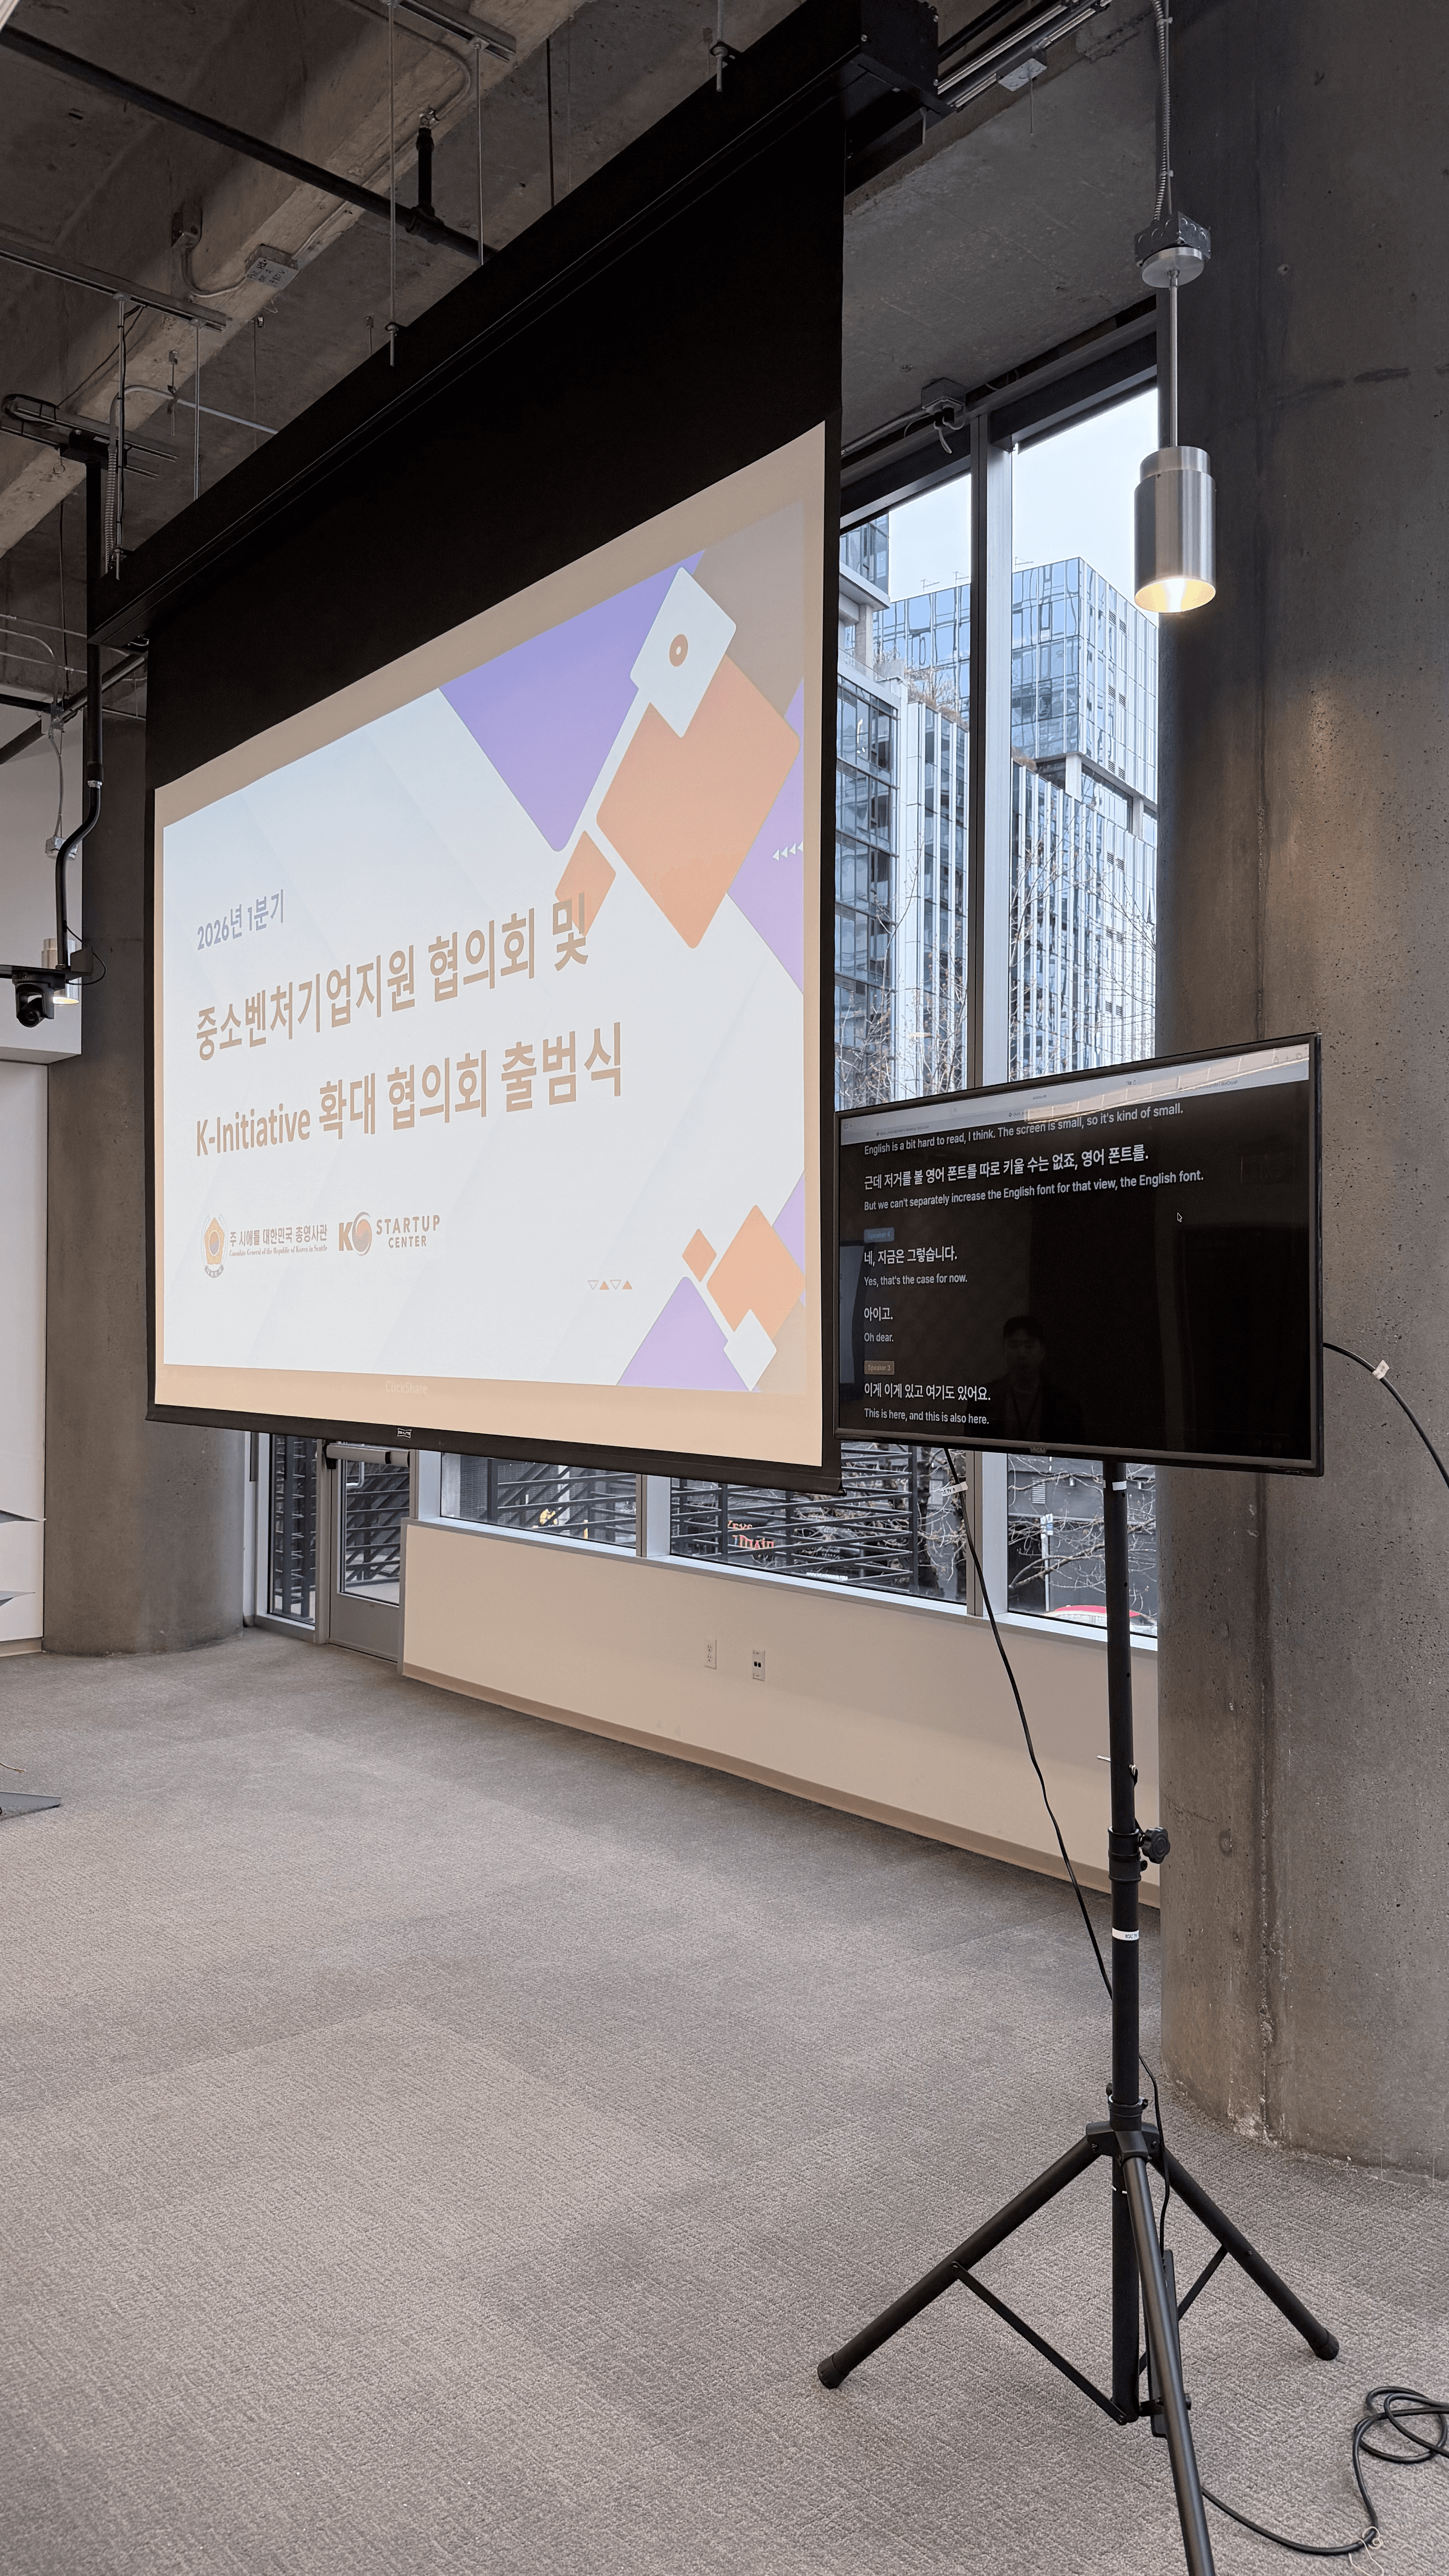


At the K-Initiative launch event hosted by the Korean Consulate General and KSC Seattle, the challenge was different — language barriers in cross-border, multicultural settings.
More than 80 people. Two languages: Korean and English.
Usually, organizers have two options:
Hire interpreters (expensive and limited)
Or accept that some people won’t fully understand
Instead, BizCrush was used to provide during the session:
real-time Korean–English translation
bilingual subtitles on a shared screen
Now, over 80 attendees followed every speaker in both languages, in real time—no interpreters, extra hardware, or pre-event setup beyond a screen.
Everyone in the room could follow every speaker in real time. It worked at the event scale.
What These Cases Have in Common
The environments were completely different:
a noisy construction site
a formal international event
But the core problem was the same:
People needed to understand each other in real time under pressure
And BizCrush worked without:
extra devices
extra hardware
or complicated setup
Why This Matters
For people working across languages — in the field, at events, or in global teams —
The real question isn’t “how advanced is the feature?”
It’s: Does it work where I actually need it? These cases show that it does.
If This Sounds Familiar
If you’re dealing with similar challenges, such as running cross-border events, managing multilingual teams, or operating in environments where communication can’t slow down, we’d love to hear from you. BizCrush is built for real-world communication where things move fast, environments are unpredictable, and understanding can’t wait.
📩 business@bizcrush.ai

Kelly Oh
Co-founder & CMO
March 27, 2026
5
min

Tutorials
How to Upgrade Your BizCrush Plan
A quick visual guide to switching from Free to a paid BizCrush plan. Simple steps with clear screenshots.
Upgrading to a paid BizCrush plan takes only a few steps.
Here is how to upgrade in just a few clicks.
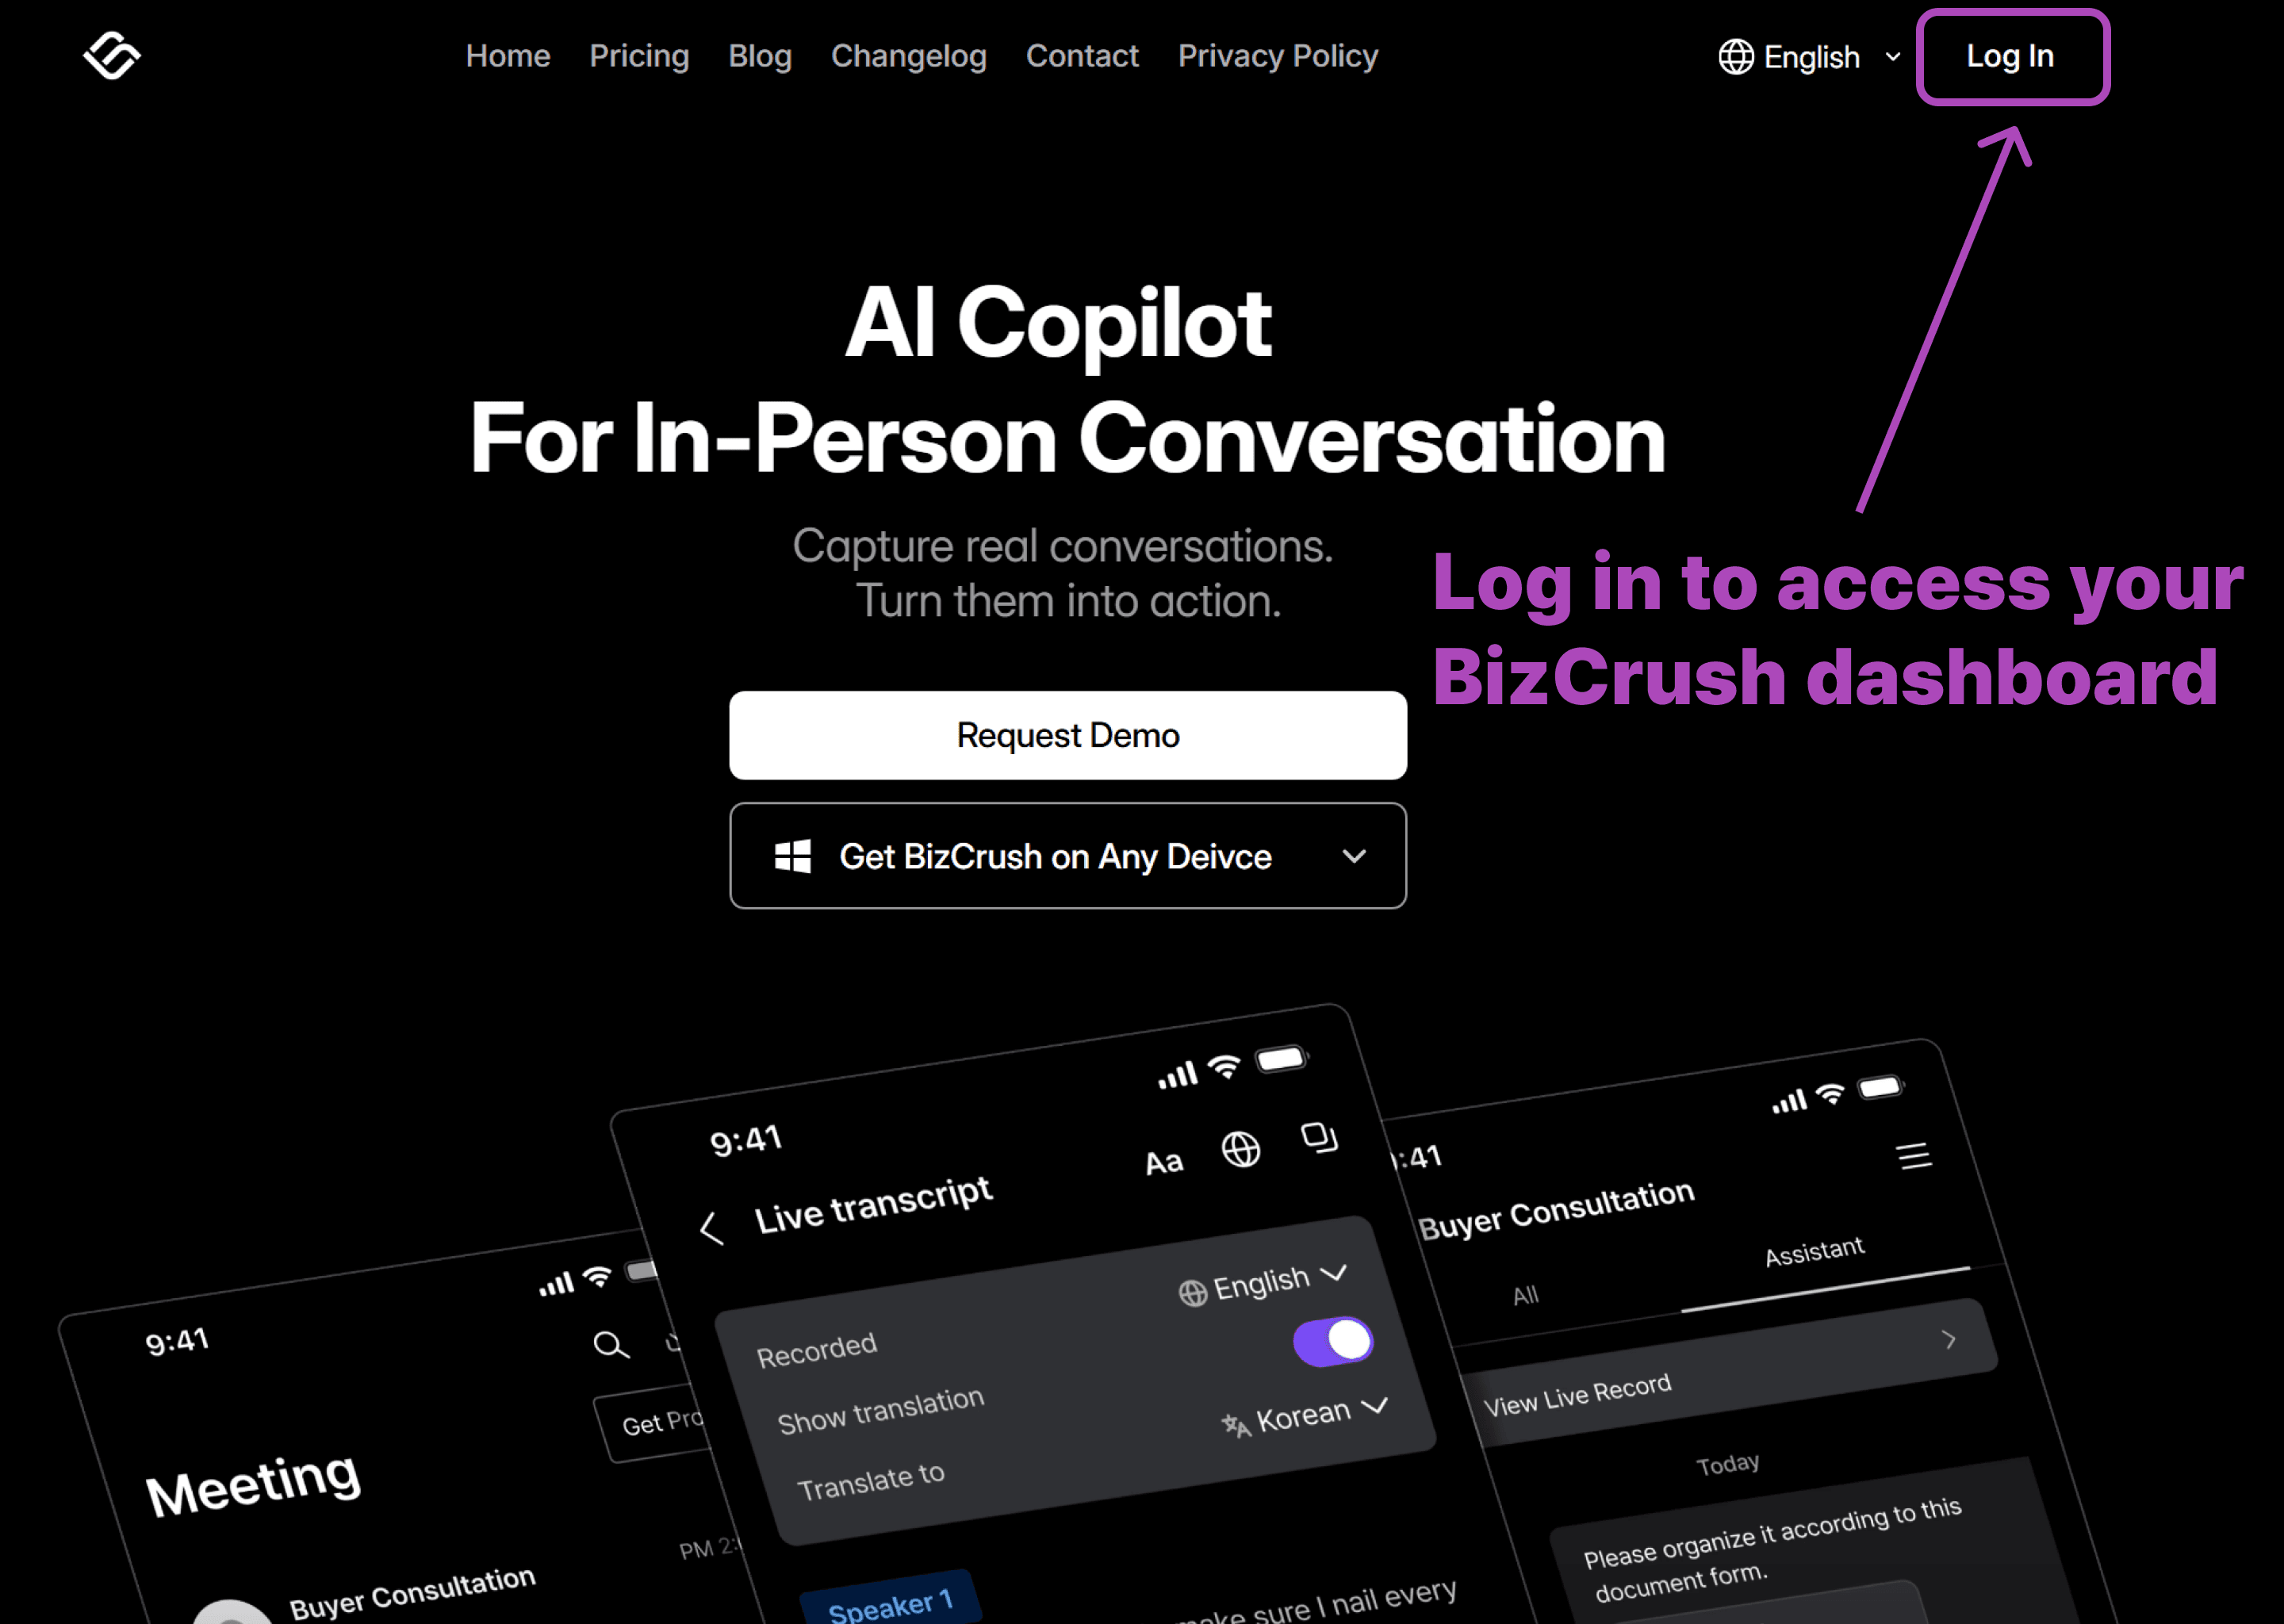
1. Log in to Your BizCrush Account
Start by signing in from the BizCrush homepage. You’ll need to be logged in to access your billing dashboard.
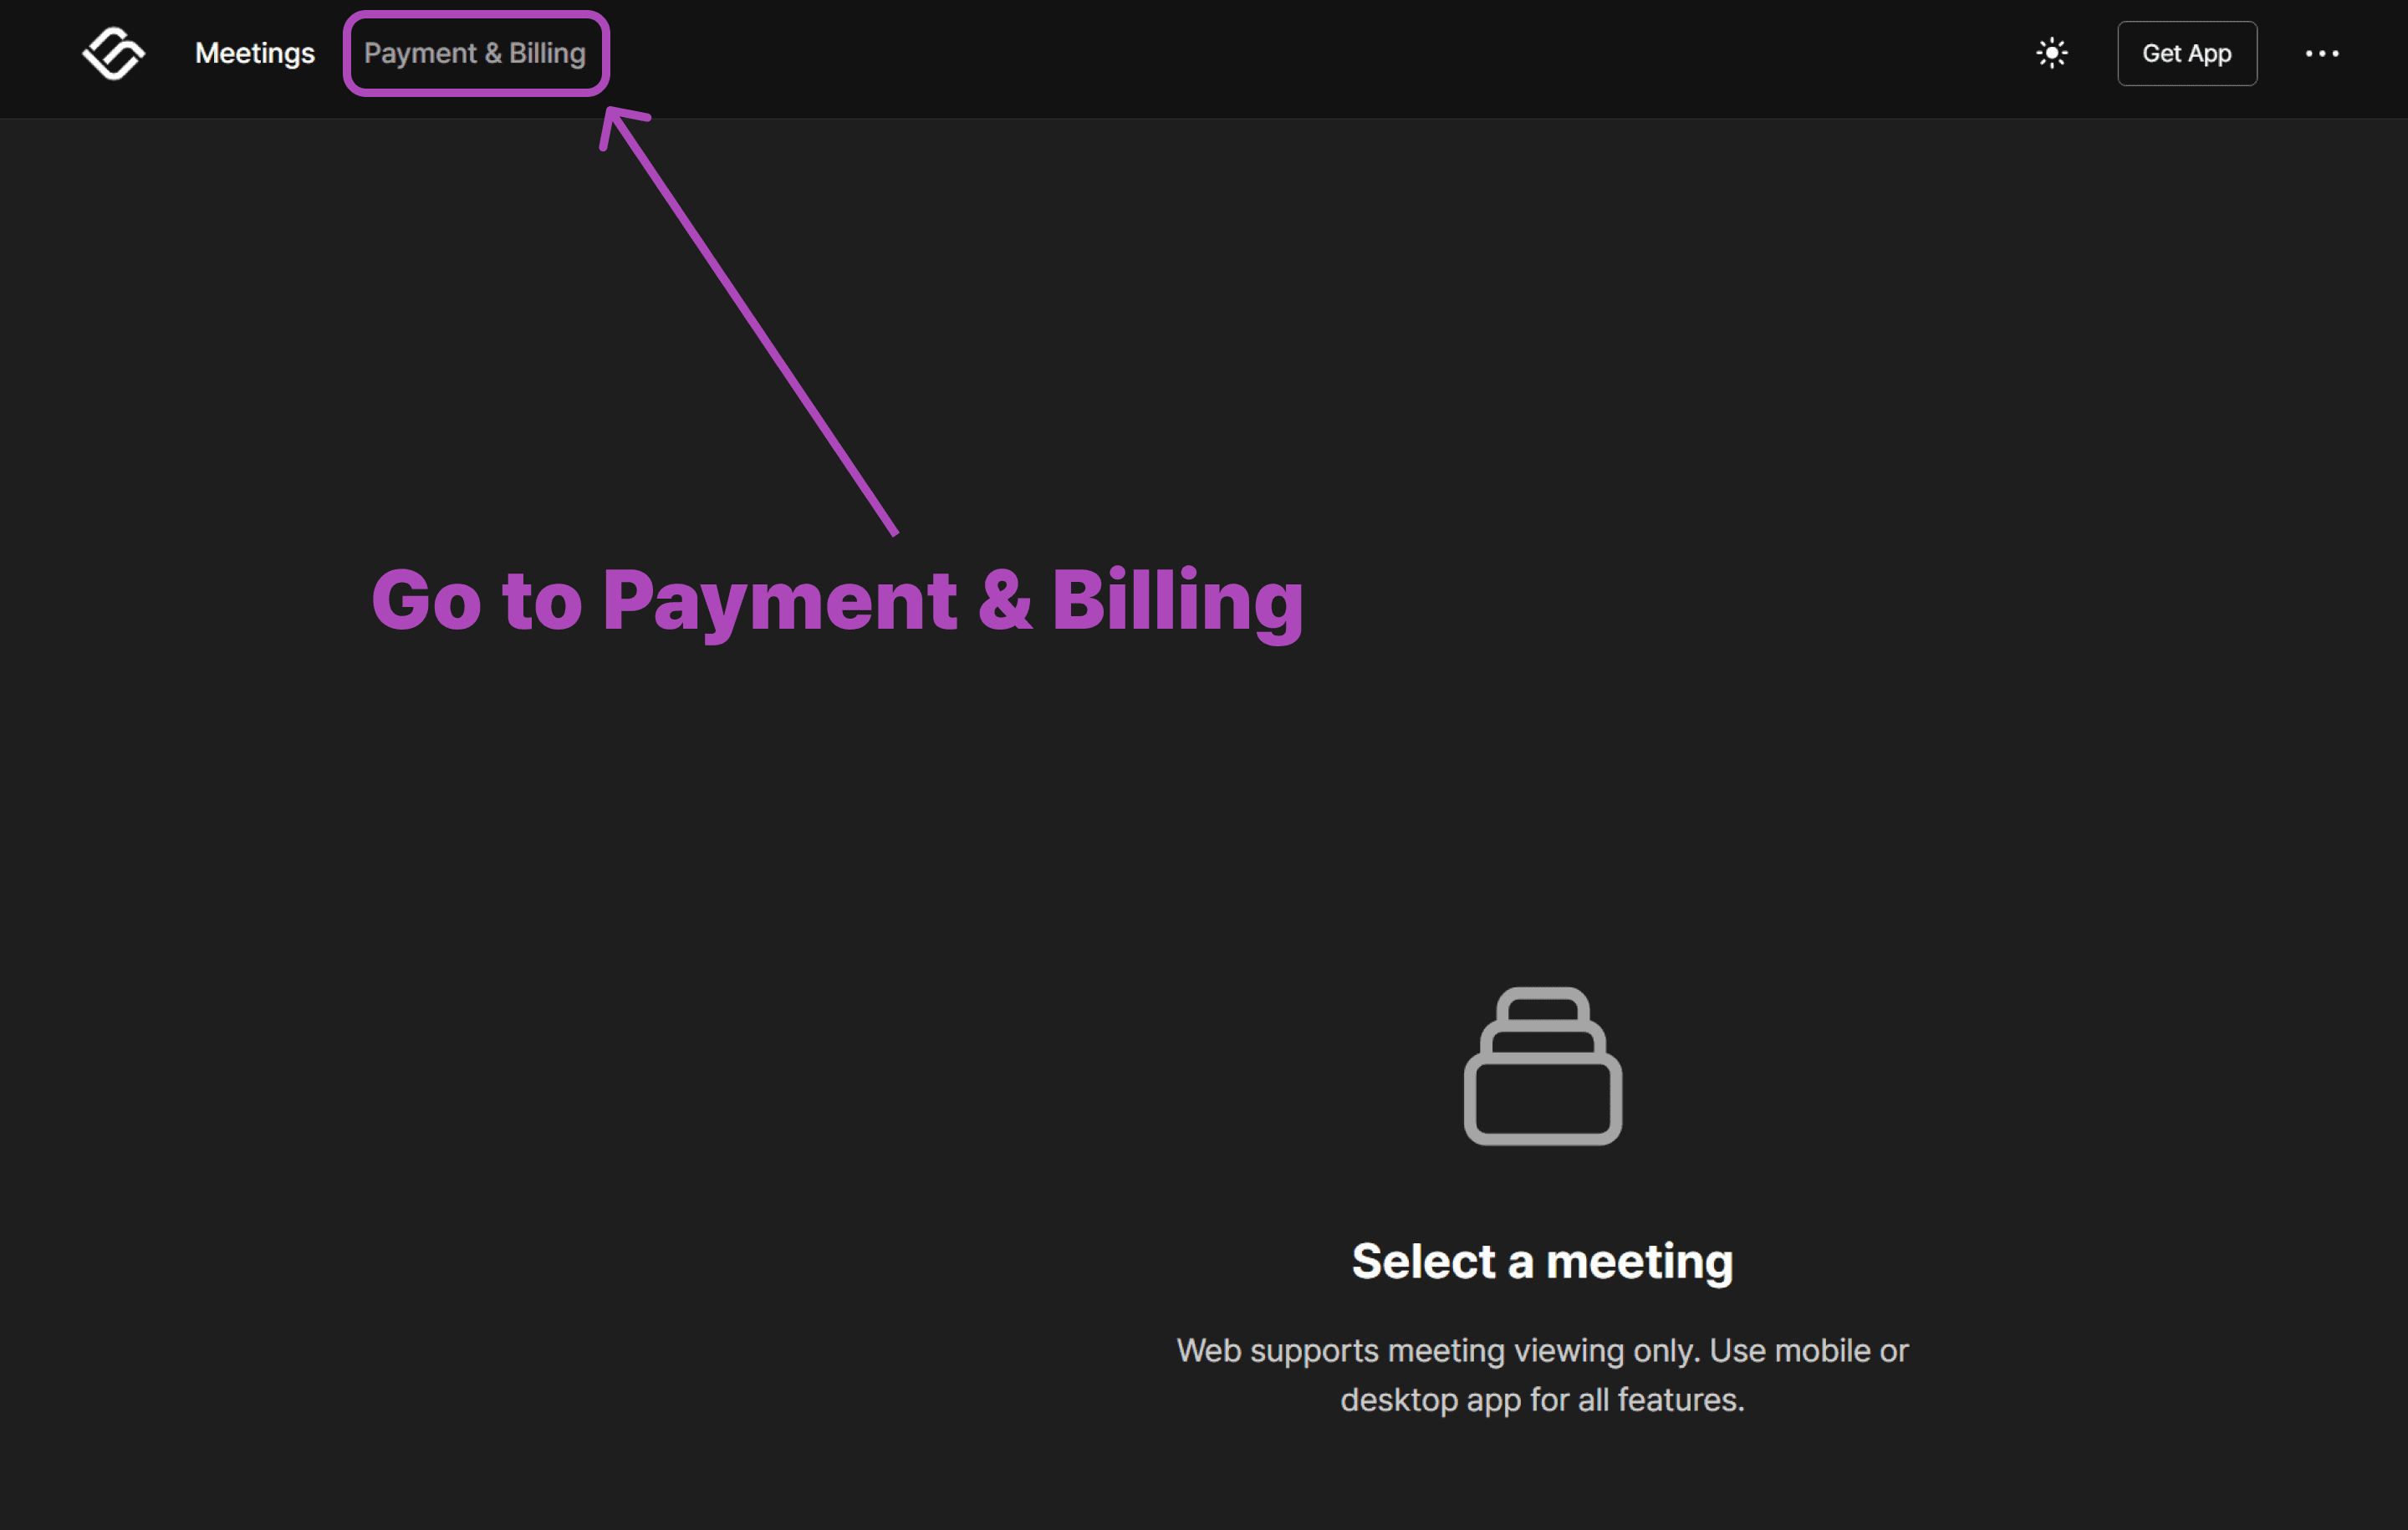
2. Open the Payment & Billing Page
Once you’re in, head to the Payment & Billing section. This is where you can view your current plan and manage upgrades.
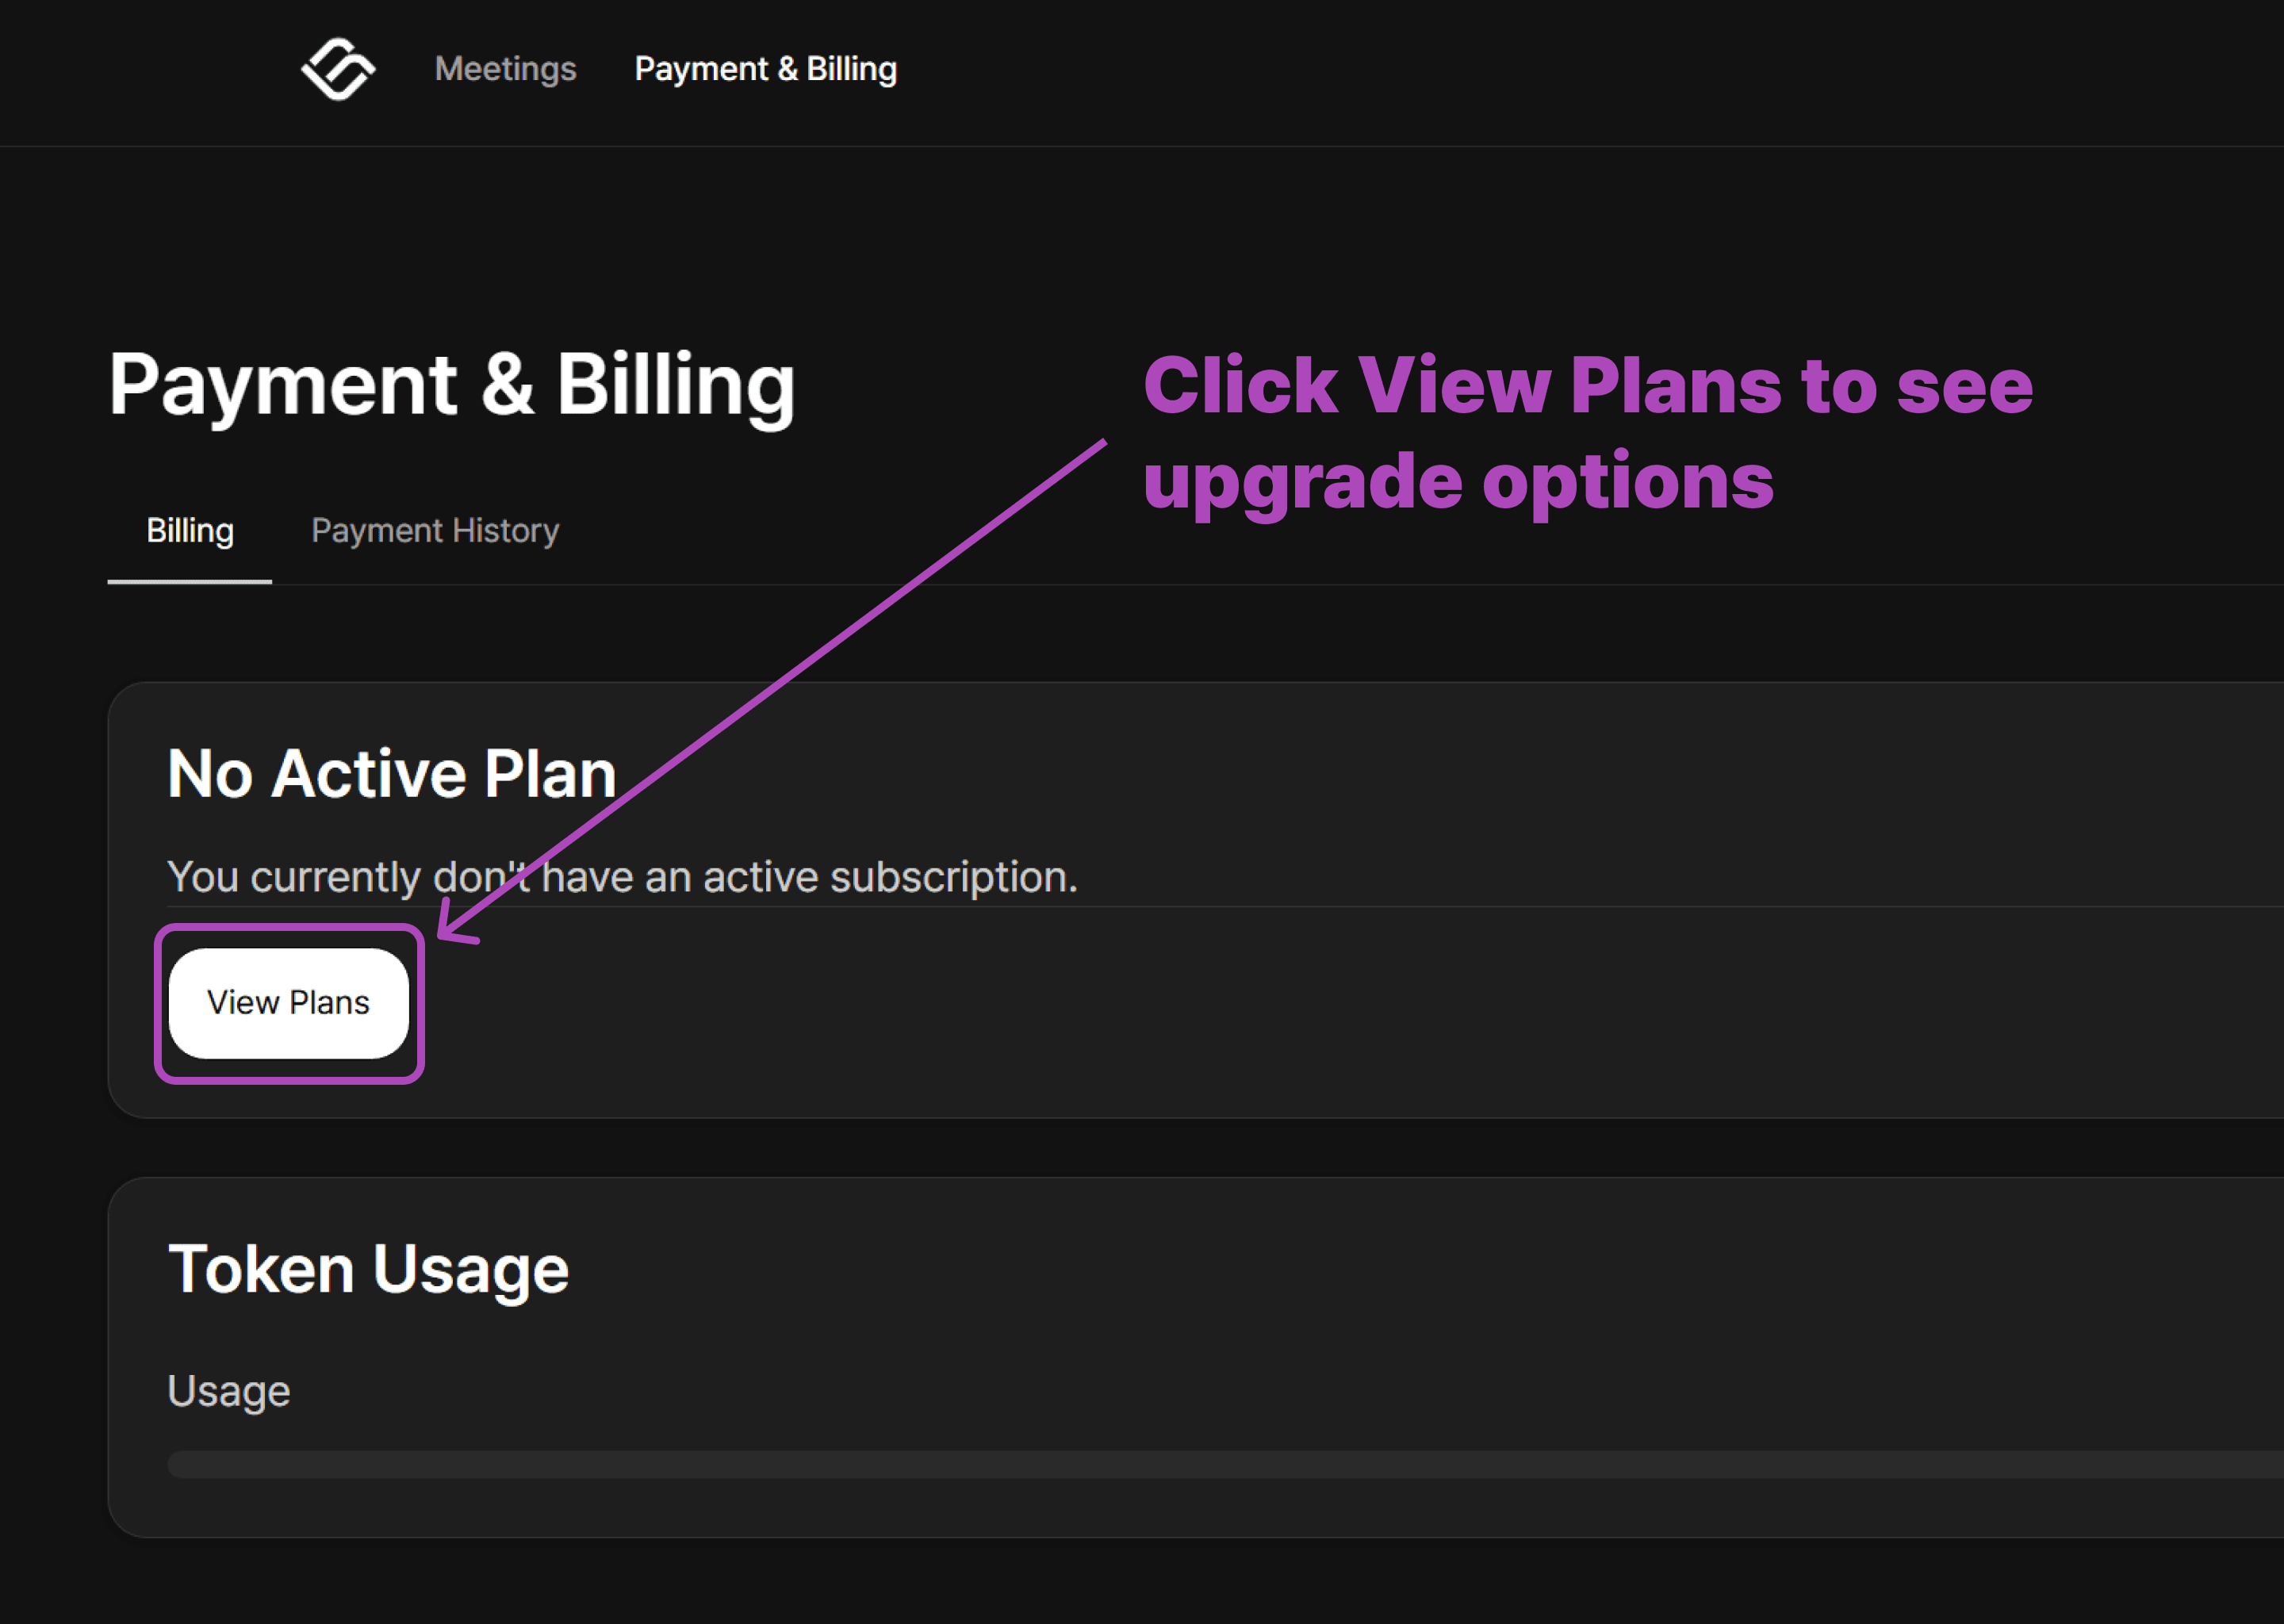
3. View Available Plans
On the Billing page, you’ll see a button to explore available plans. Click View Plans to continue.
4. Select Your Paid Plan
Choose the plan that best fits your needs. Click the plan you’d like to upgrade to.
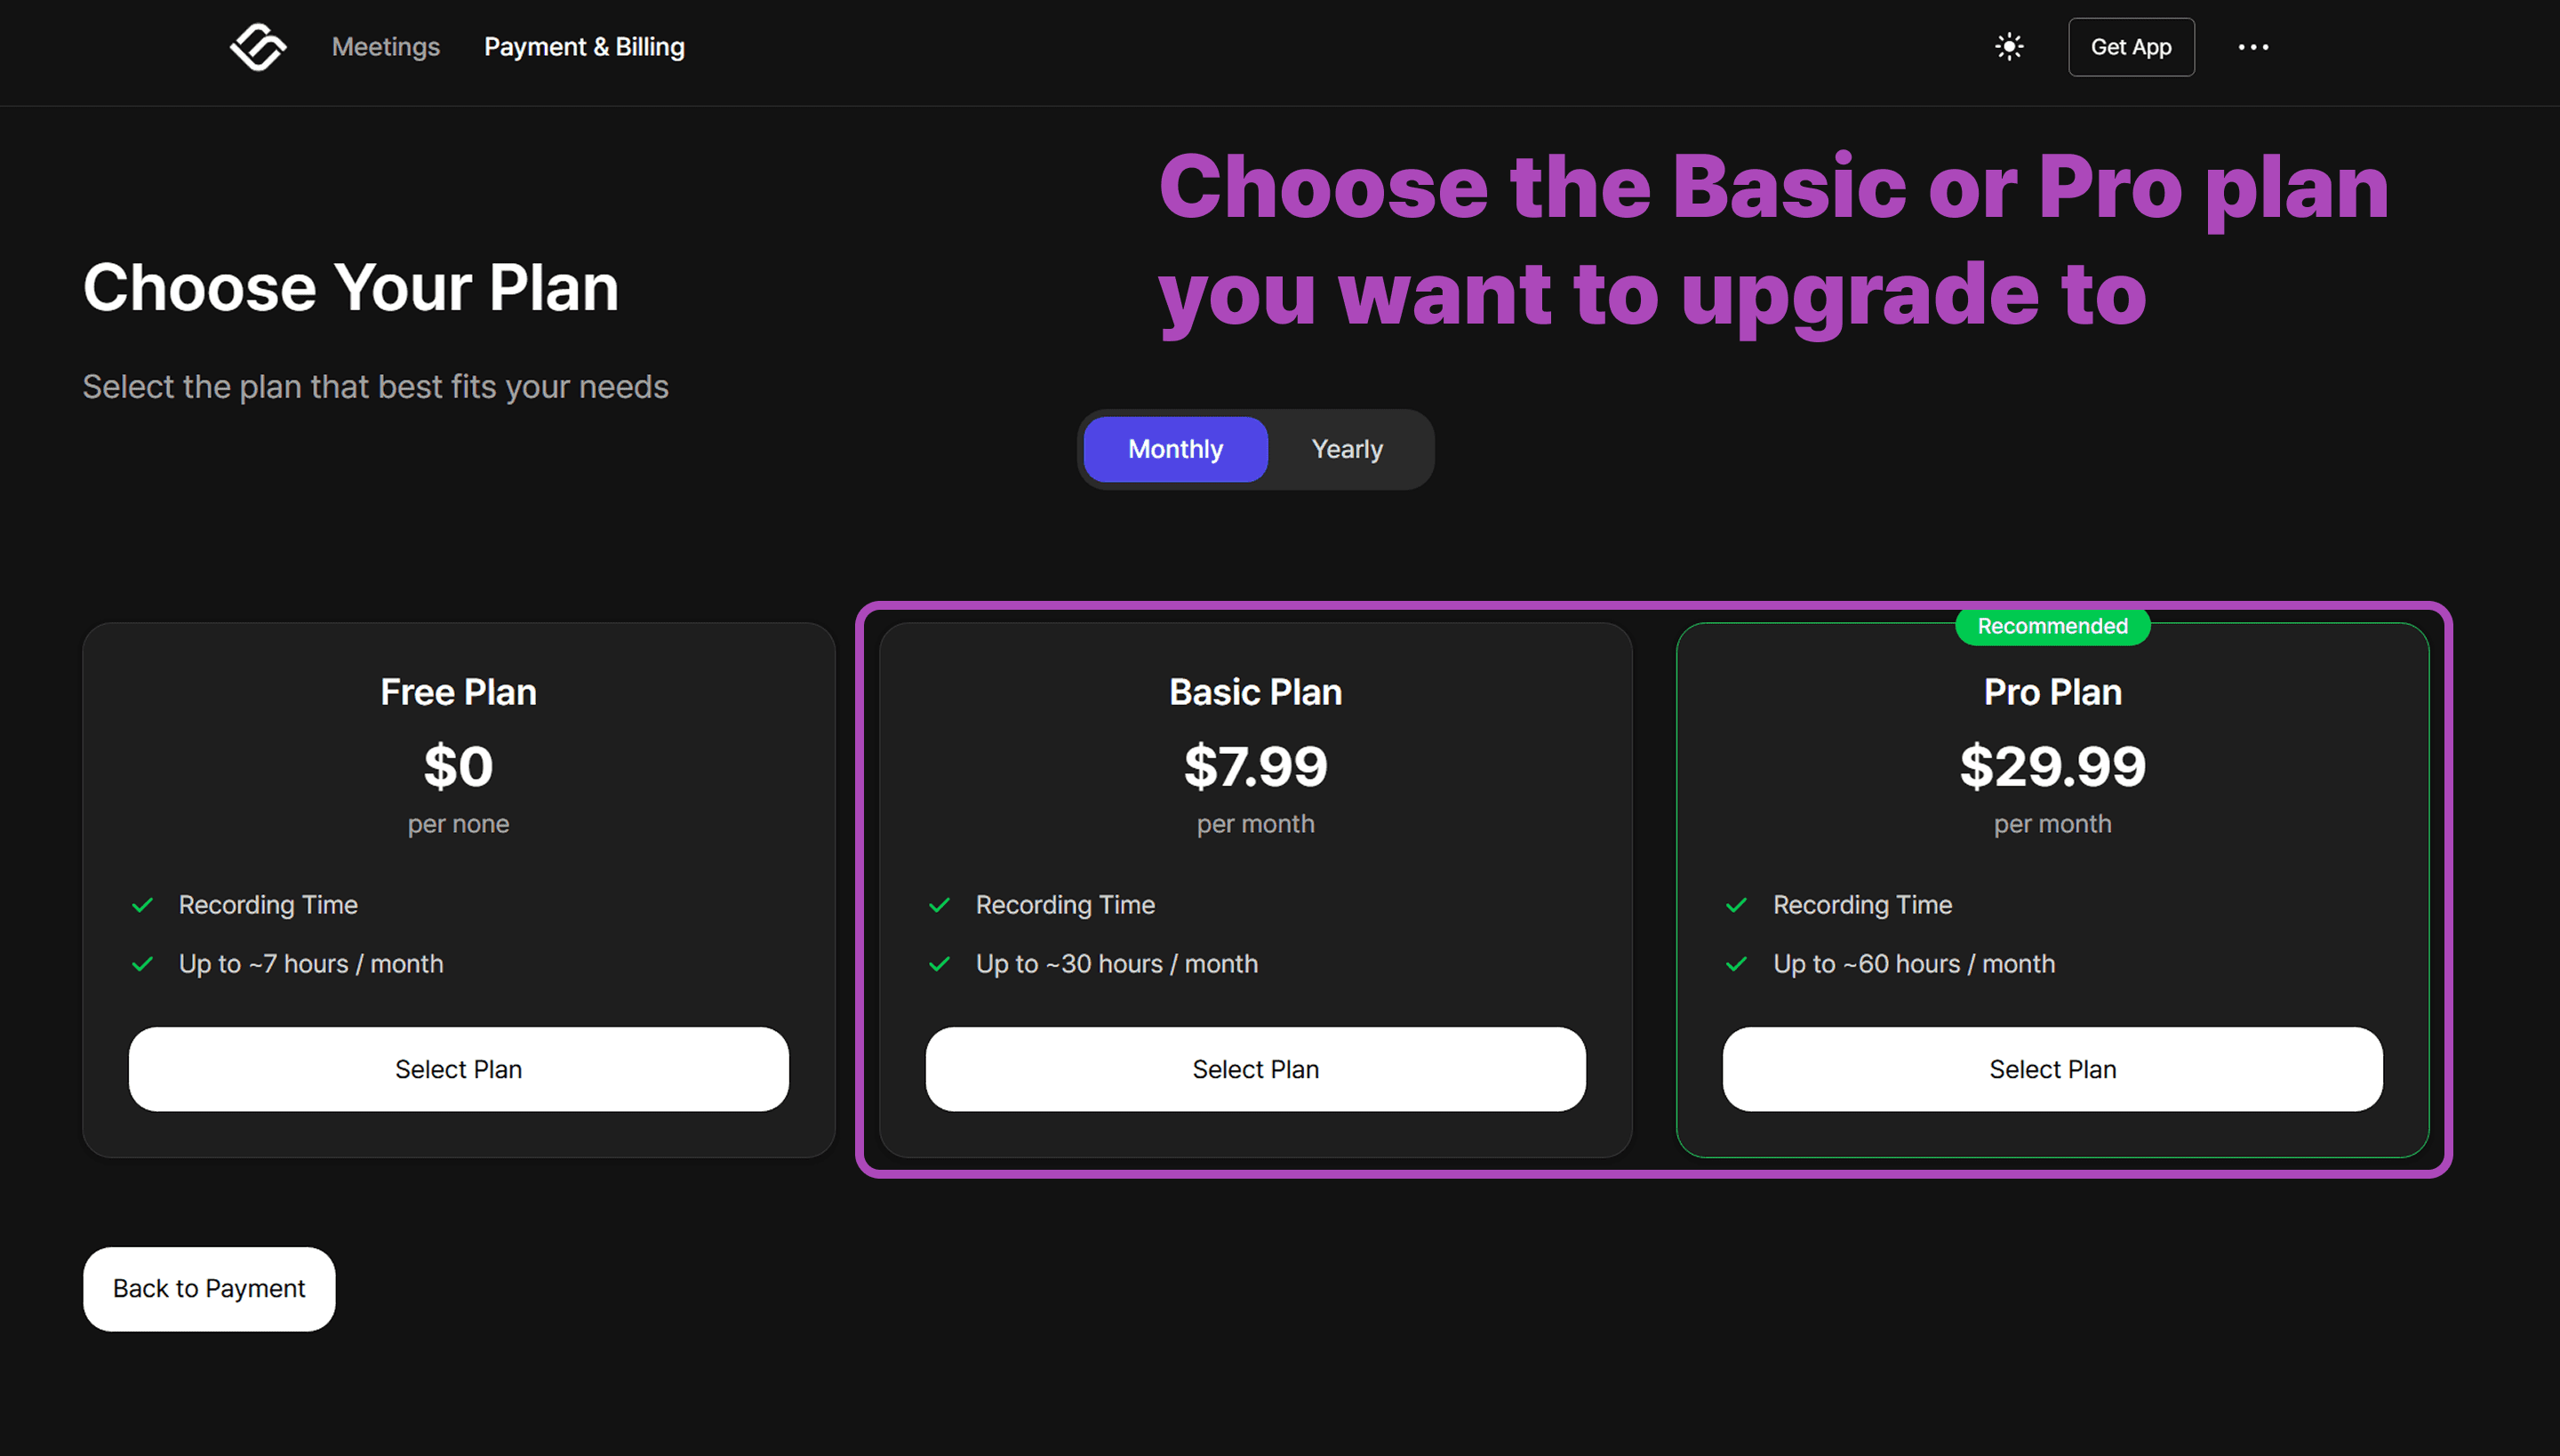
Save 17% when you choose annual billing instead of paying monthly.
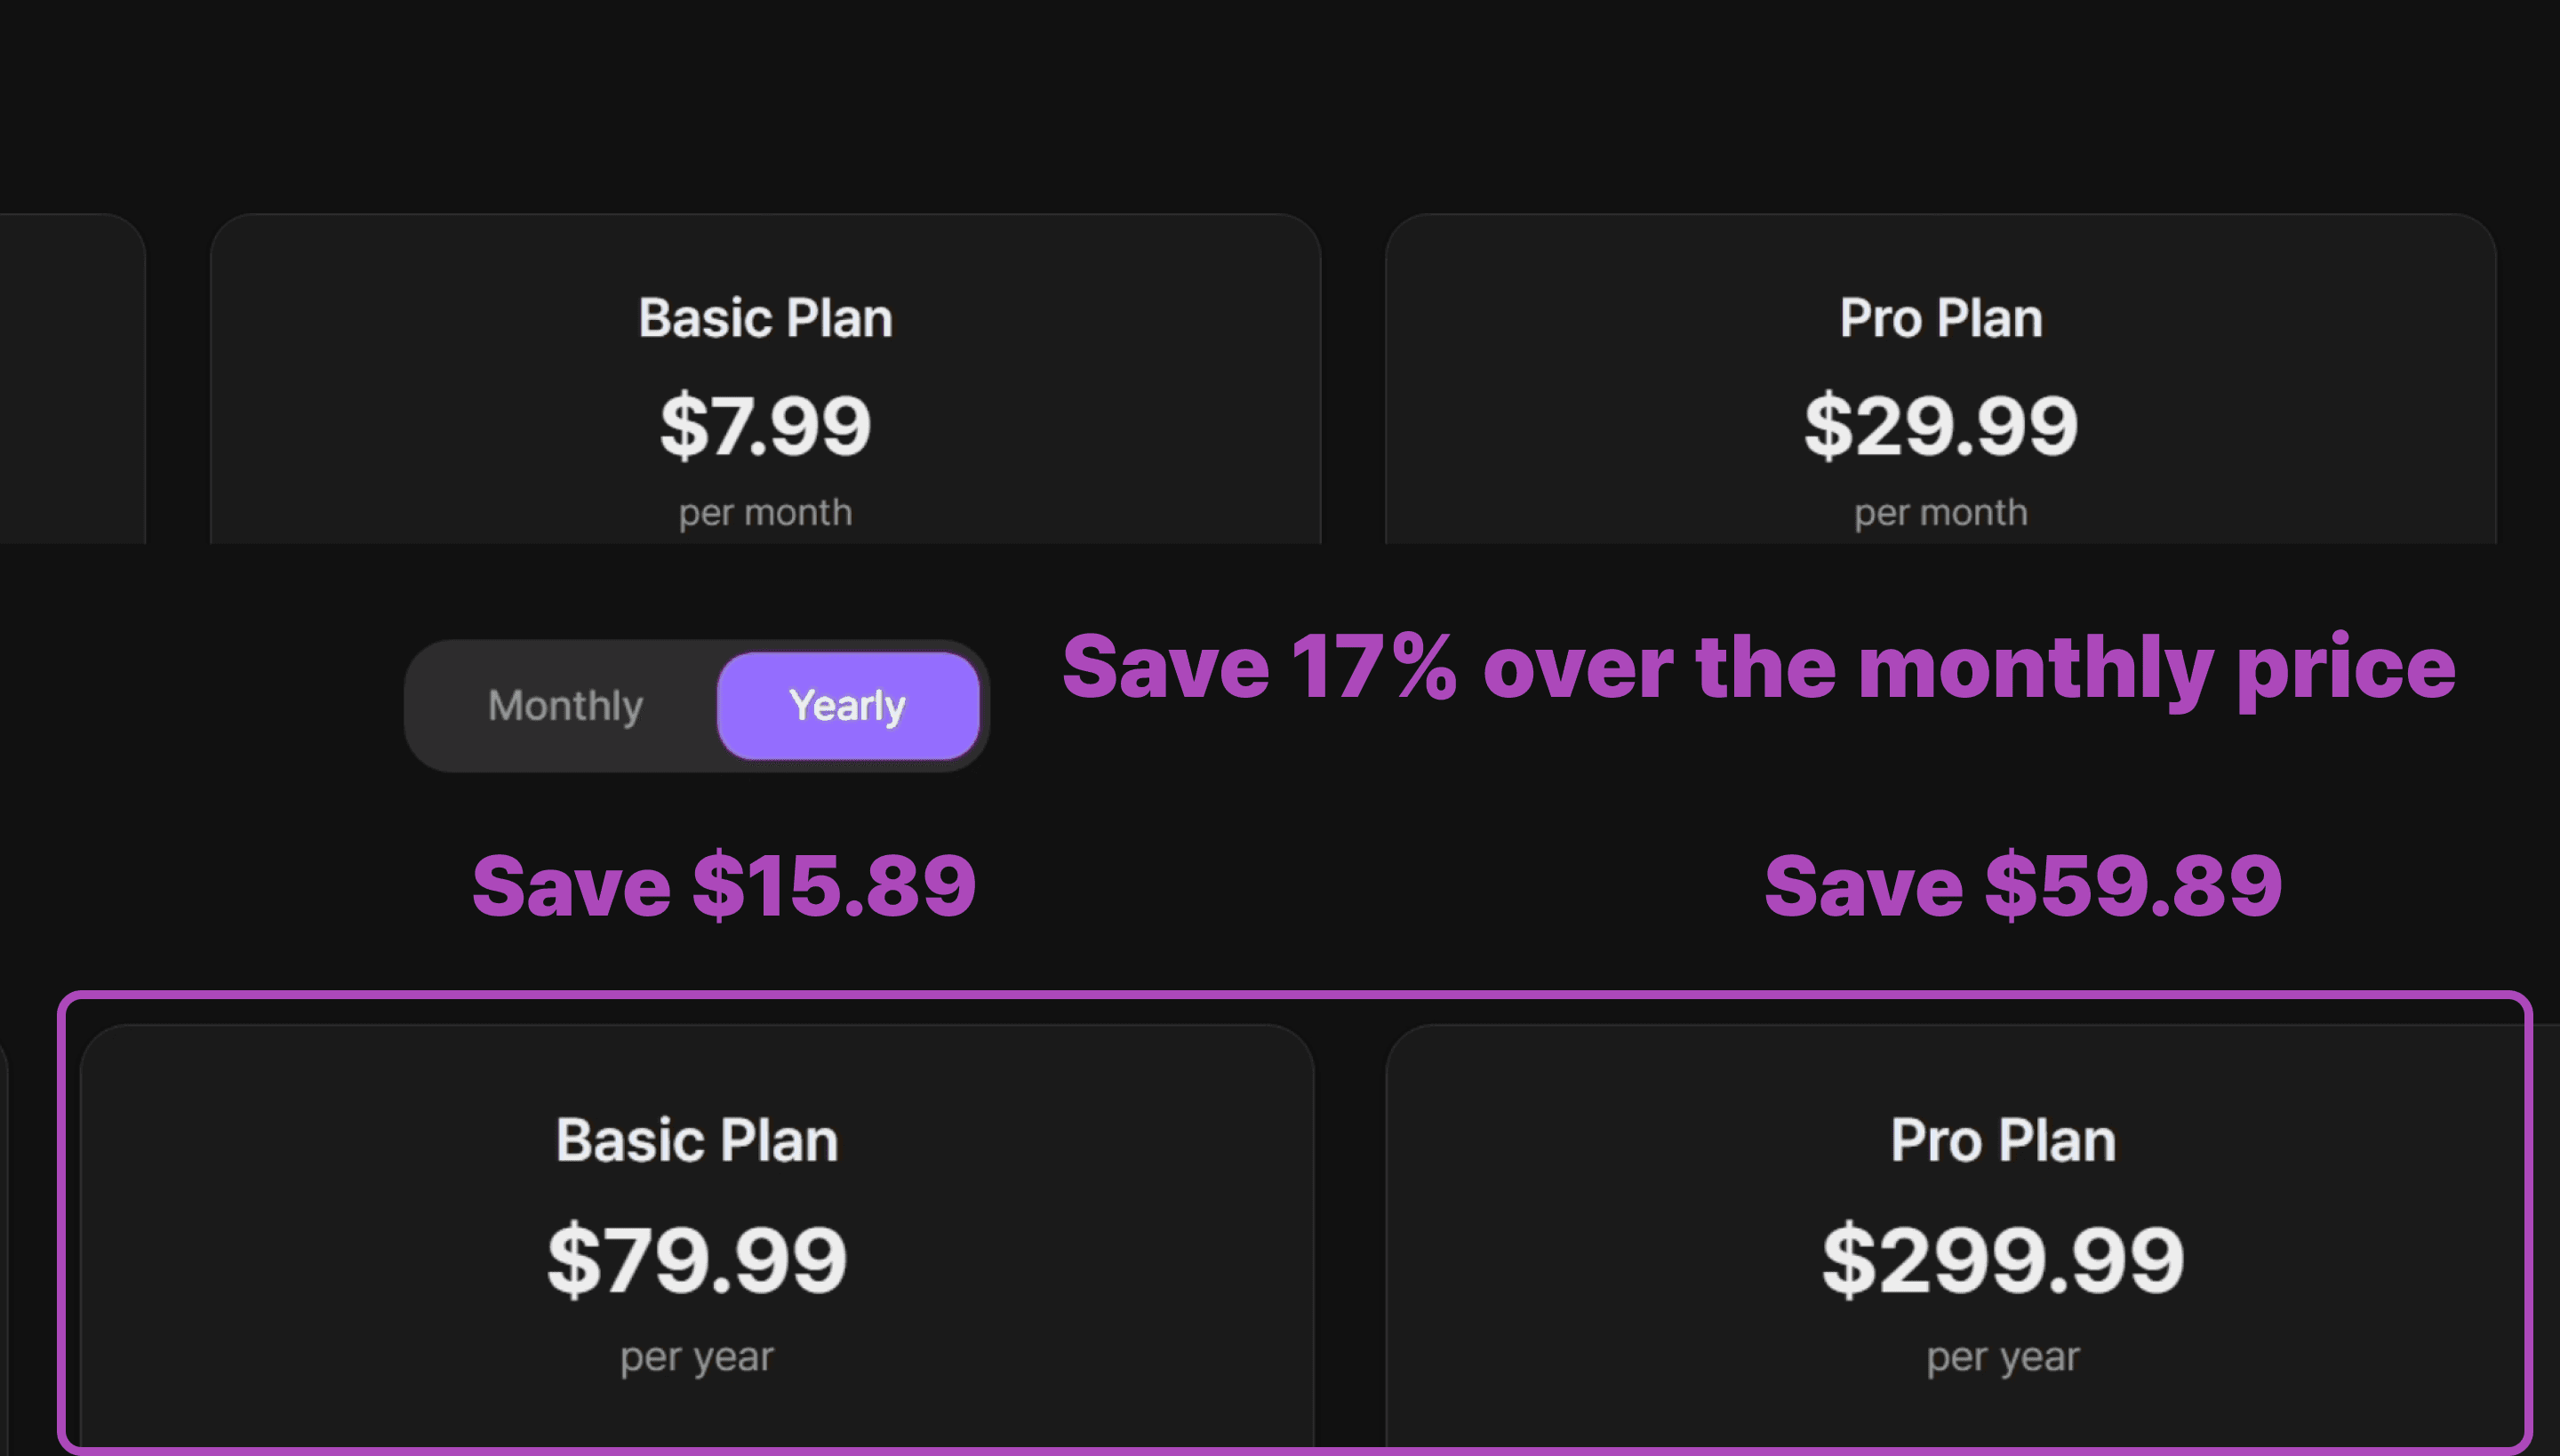
⚠️ Note
Annual billing is only available on web — not through the
mobile.
5. Complete Your Payment Through Stripe
When you select a paid plan, you’ll be redirected to a secure Stripe payment page. Follow the steps to enter your billing details and finalize your subscription.

That’s it!
Once payment is complete, your account switches to the new plan immediately.
Important: Switching from Mobile?
If you previously subscribed via the Apple App Store or Google Play Store, you must cancel that subscription first to avoid duplicate charges.
Cancel your subscription in the App Store or Play Store.
Wait for your current billing cycle to end and your account to return to the Free Plan.
Once your account is free, follow the steps above to upgrade via the web.
Need more help?
Contact us at business@bizcrush.ai
BizCrush
Growth
February 14, 2026
2
min

Tutorials
How to Use BizCrush Live Subtitle Mode
Real-time subtitles in a floating window that stays on top of any app. Perfect for meetings, presentations, and multitasking.
BizCrush’s Real-Time Subtitle PIP (Picture-in-Picture) Overlay lets you keep live captions (and translation) visible while you work in any app—slides, docs, browser tabs, or online meetings.
Here's a short video showing how to use real-time subtitles.
Or here's a simple visual to get you started.
1. Install the BizCrush Desktop App
PIP subtitles are a desktop-only feature. If you haven't already, head to our website to download the version for your OS.
2. Open the Real-Time Script Panel
Start a meeting and open your live transcript panel to set things up.
3. Set Your Languages
Choose your spoken language and the language you want subtitles translated into.
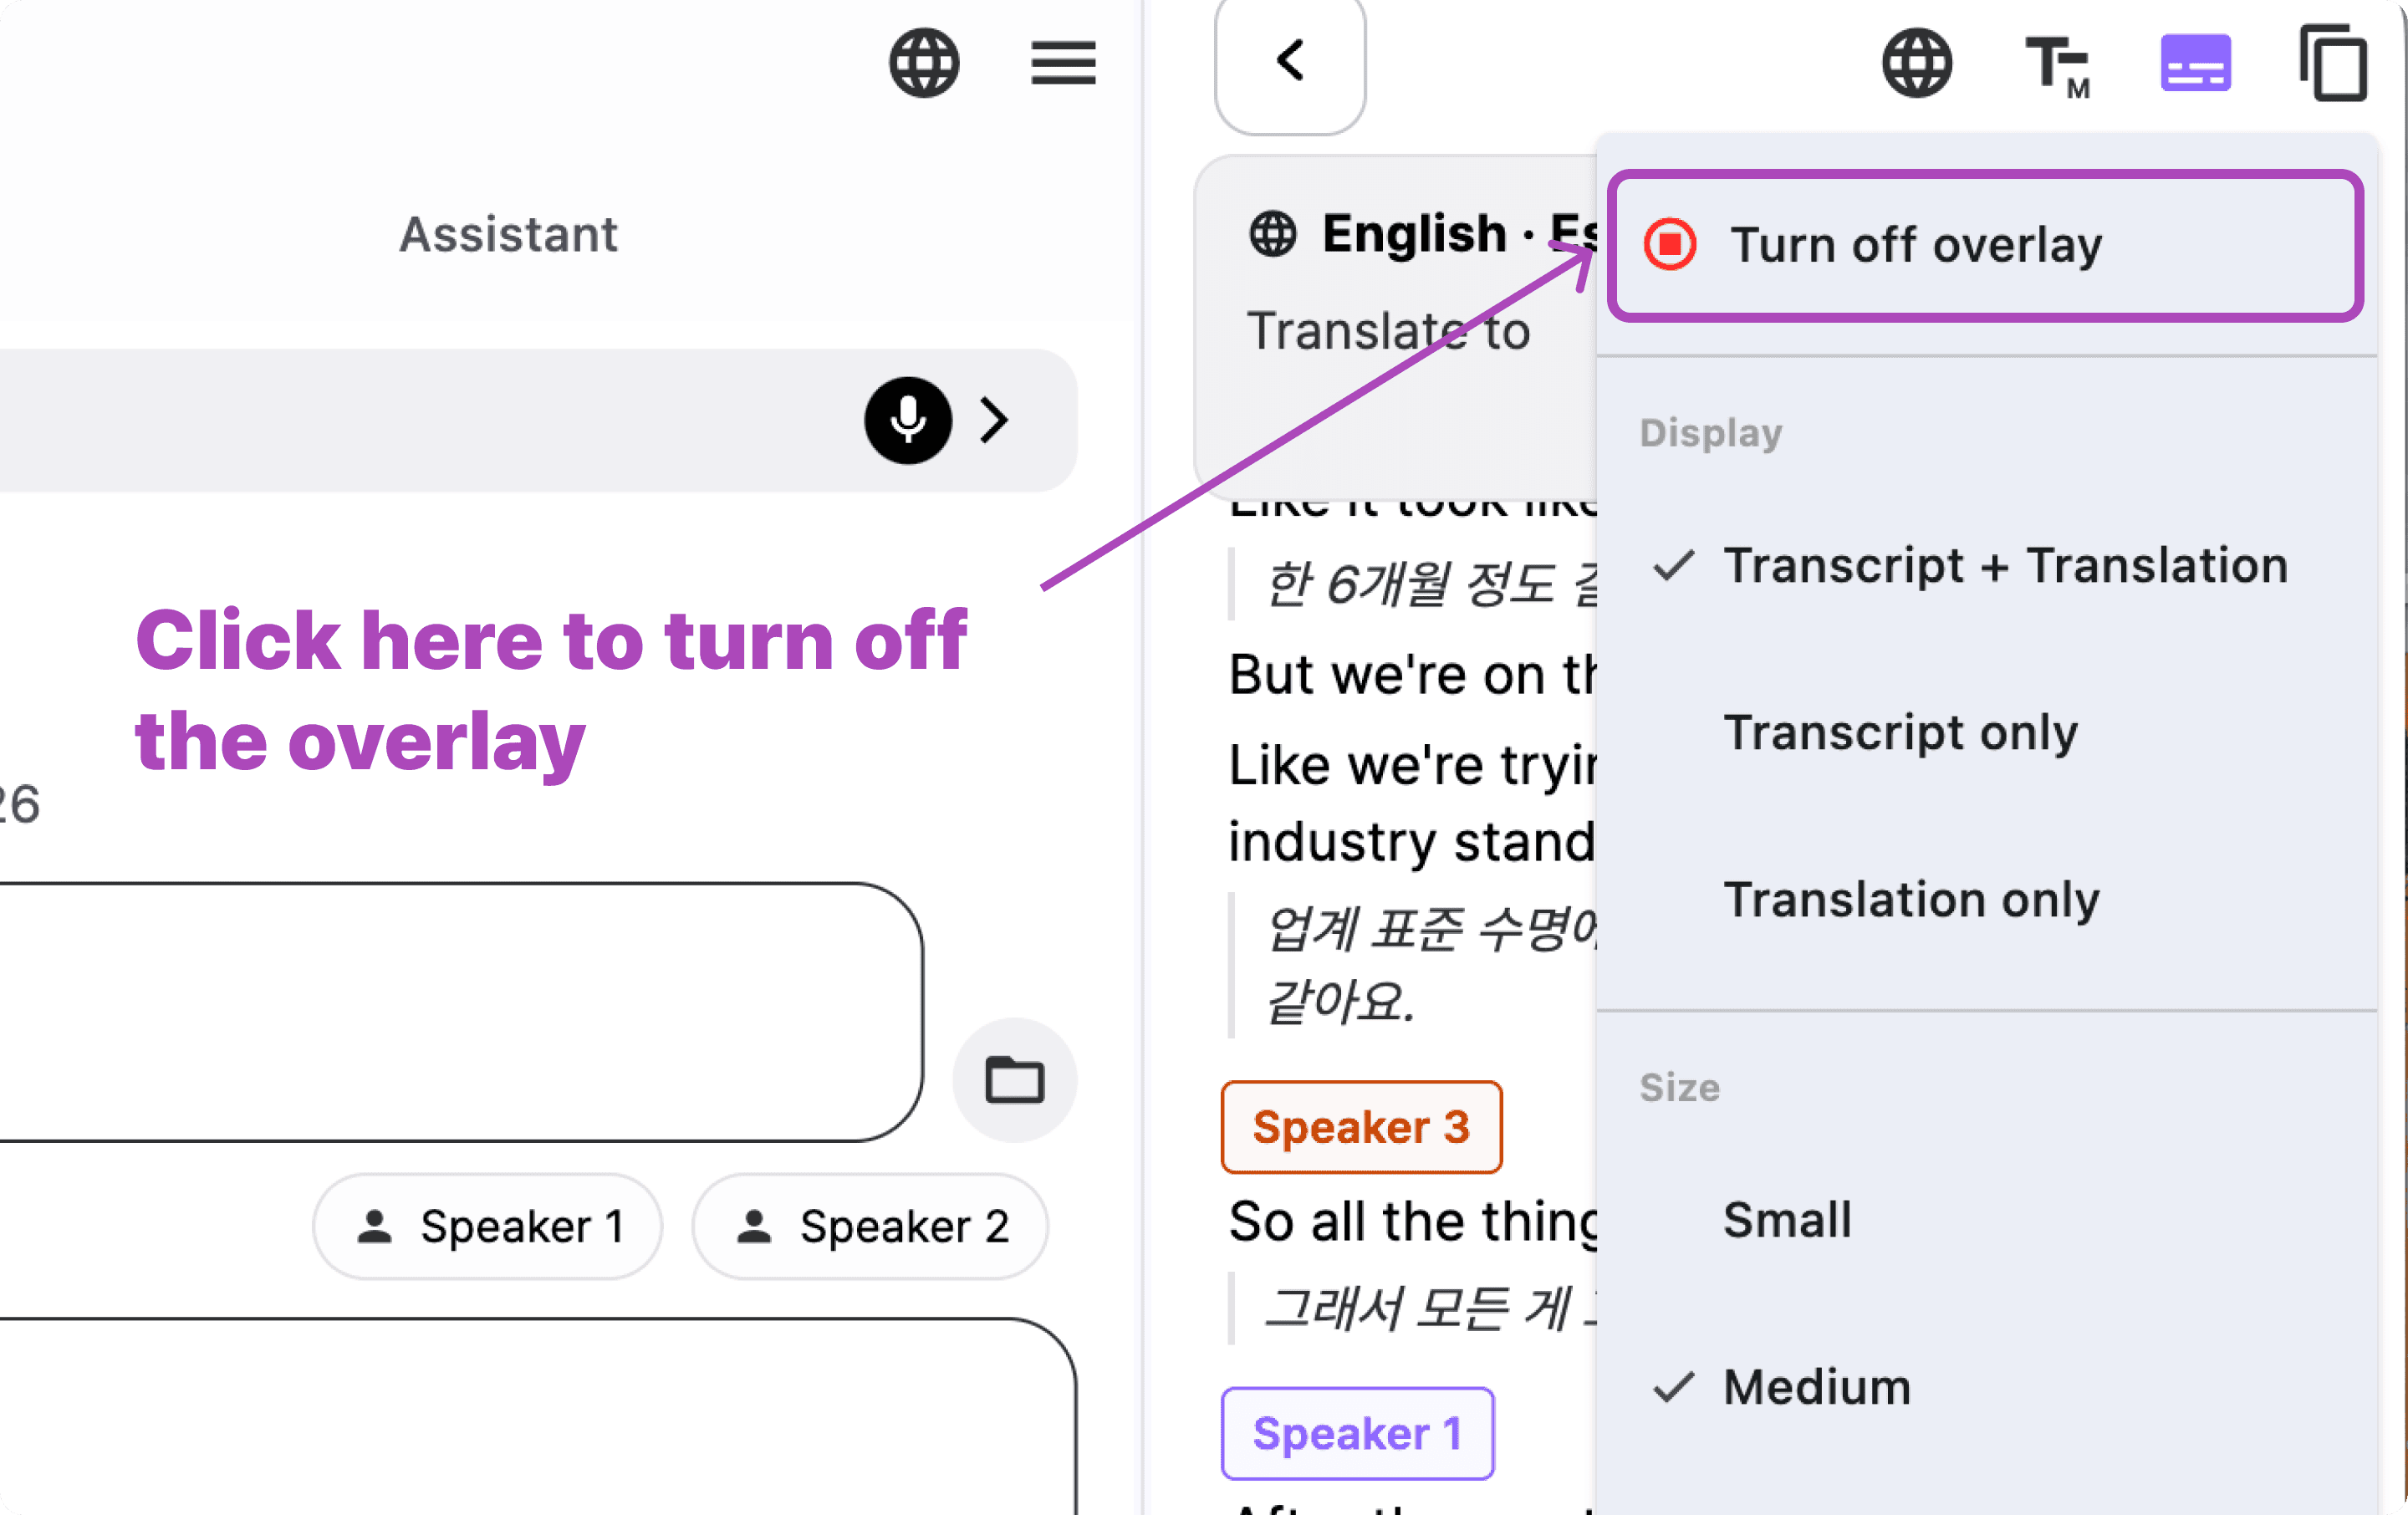
4. Open Subtitle Menu
Next, open the subtitle menu from the script panel’s top-right area.
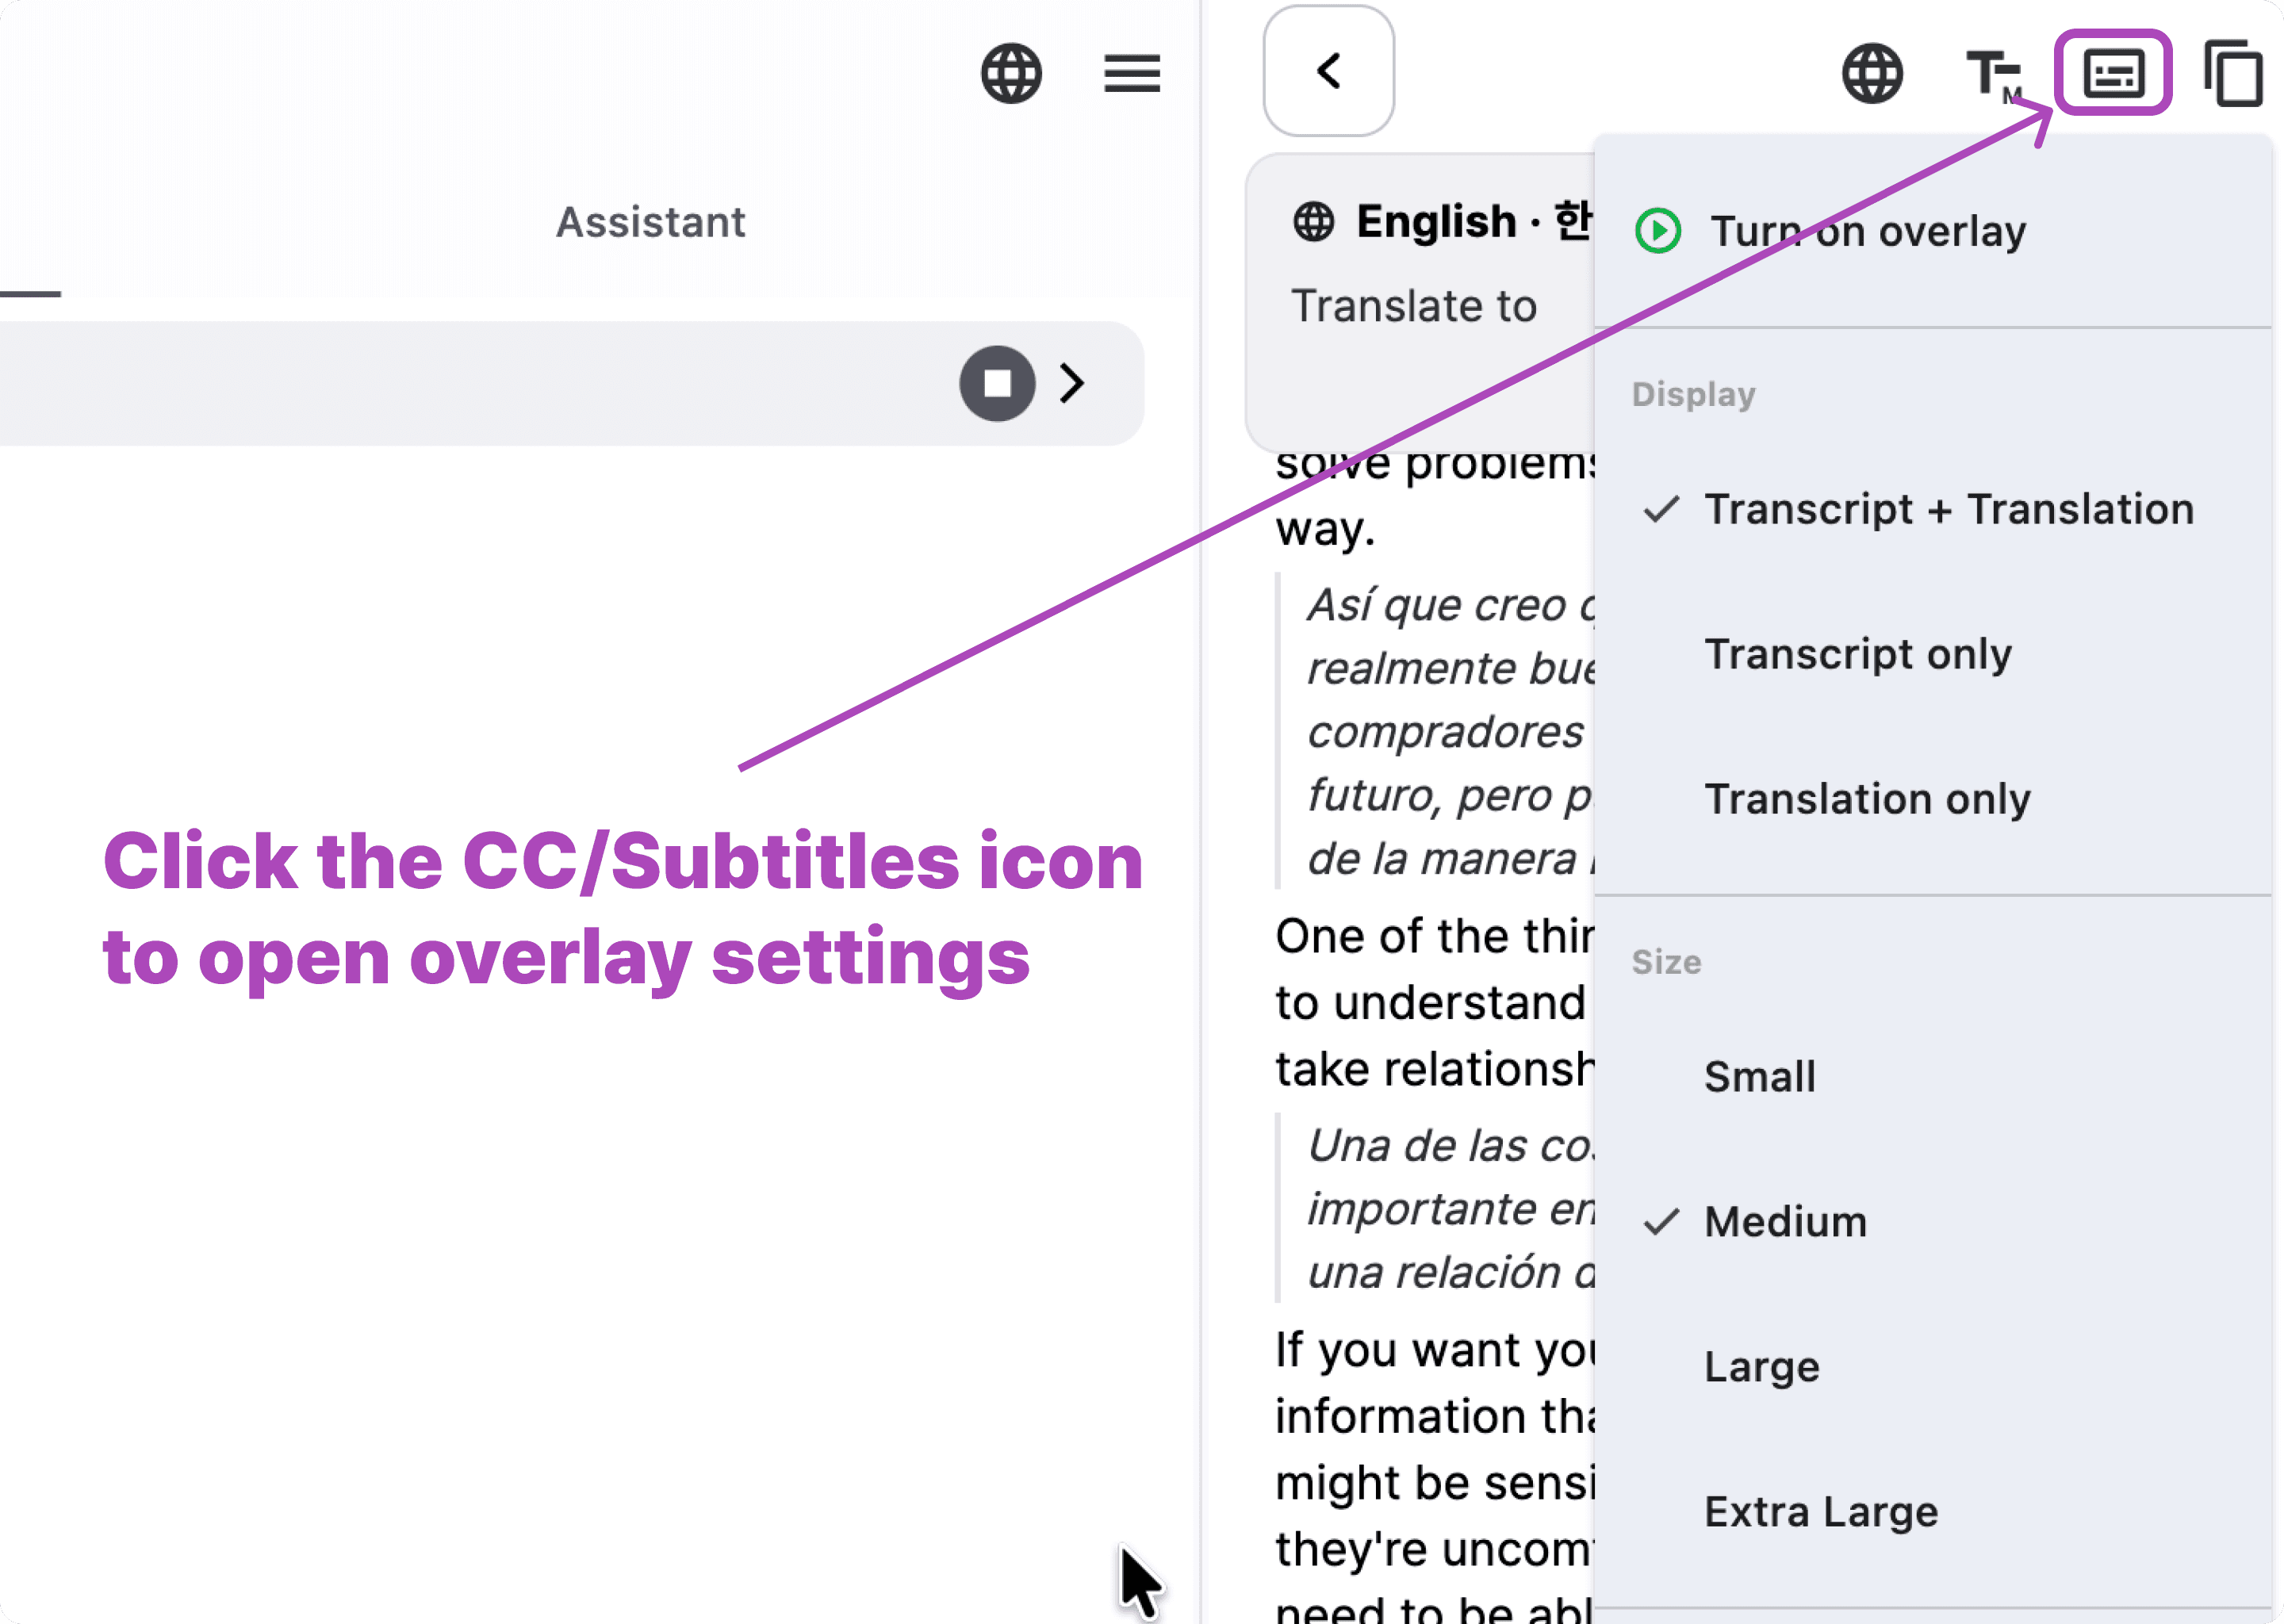
5. Customize Your Overlay Settings
The dropdown lets you choose display mode, text size, and how many lines appear.
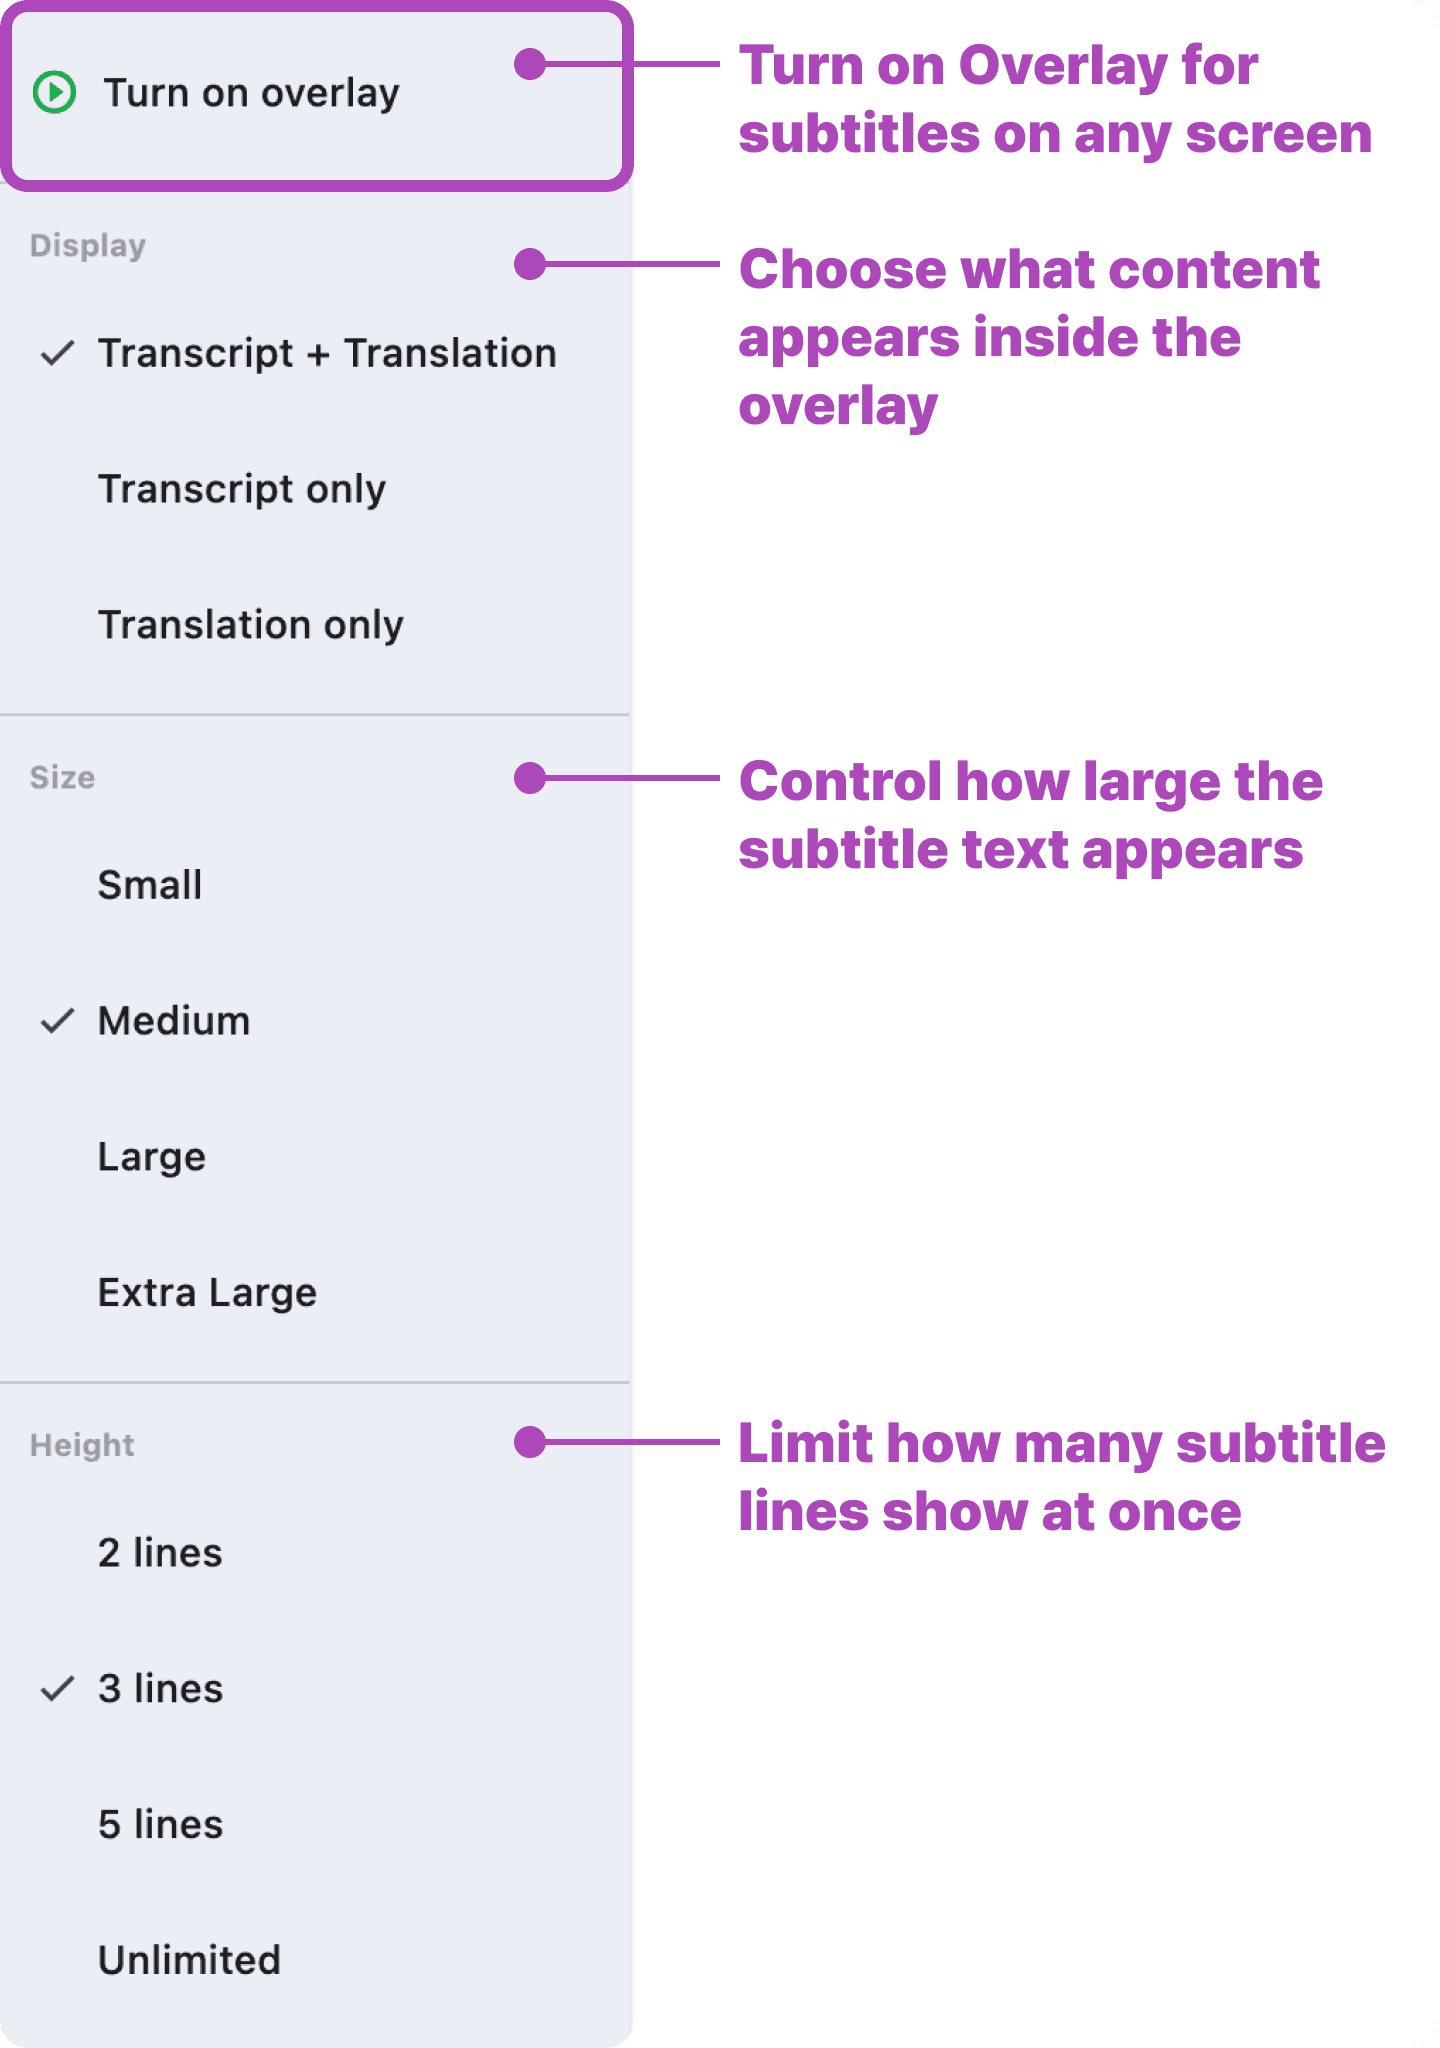
6. Turn On PIP Subtitles
Once you enable overlay mode, subtitles appear instantly in a floating window.
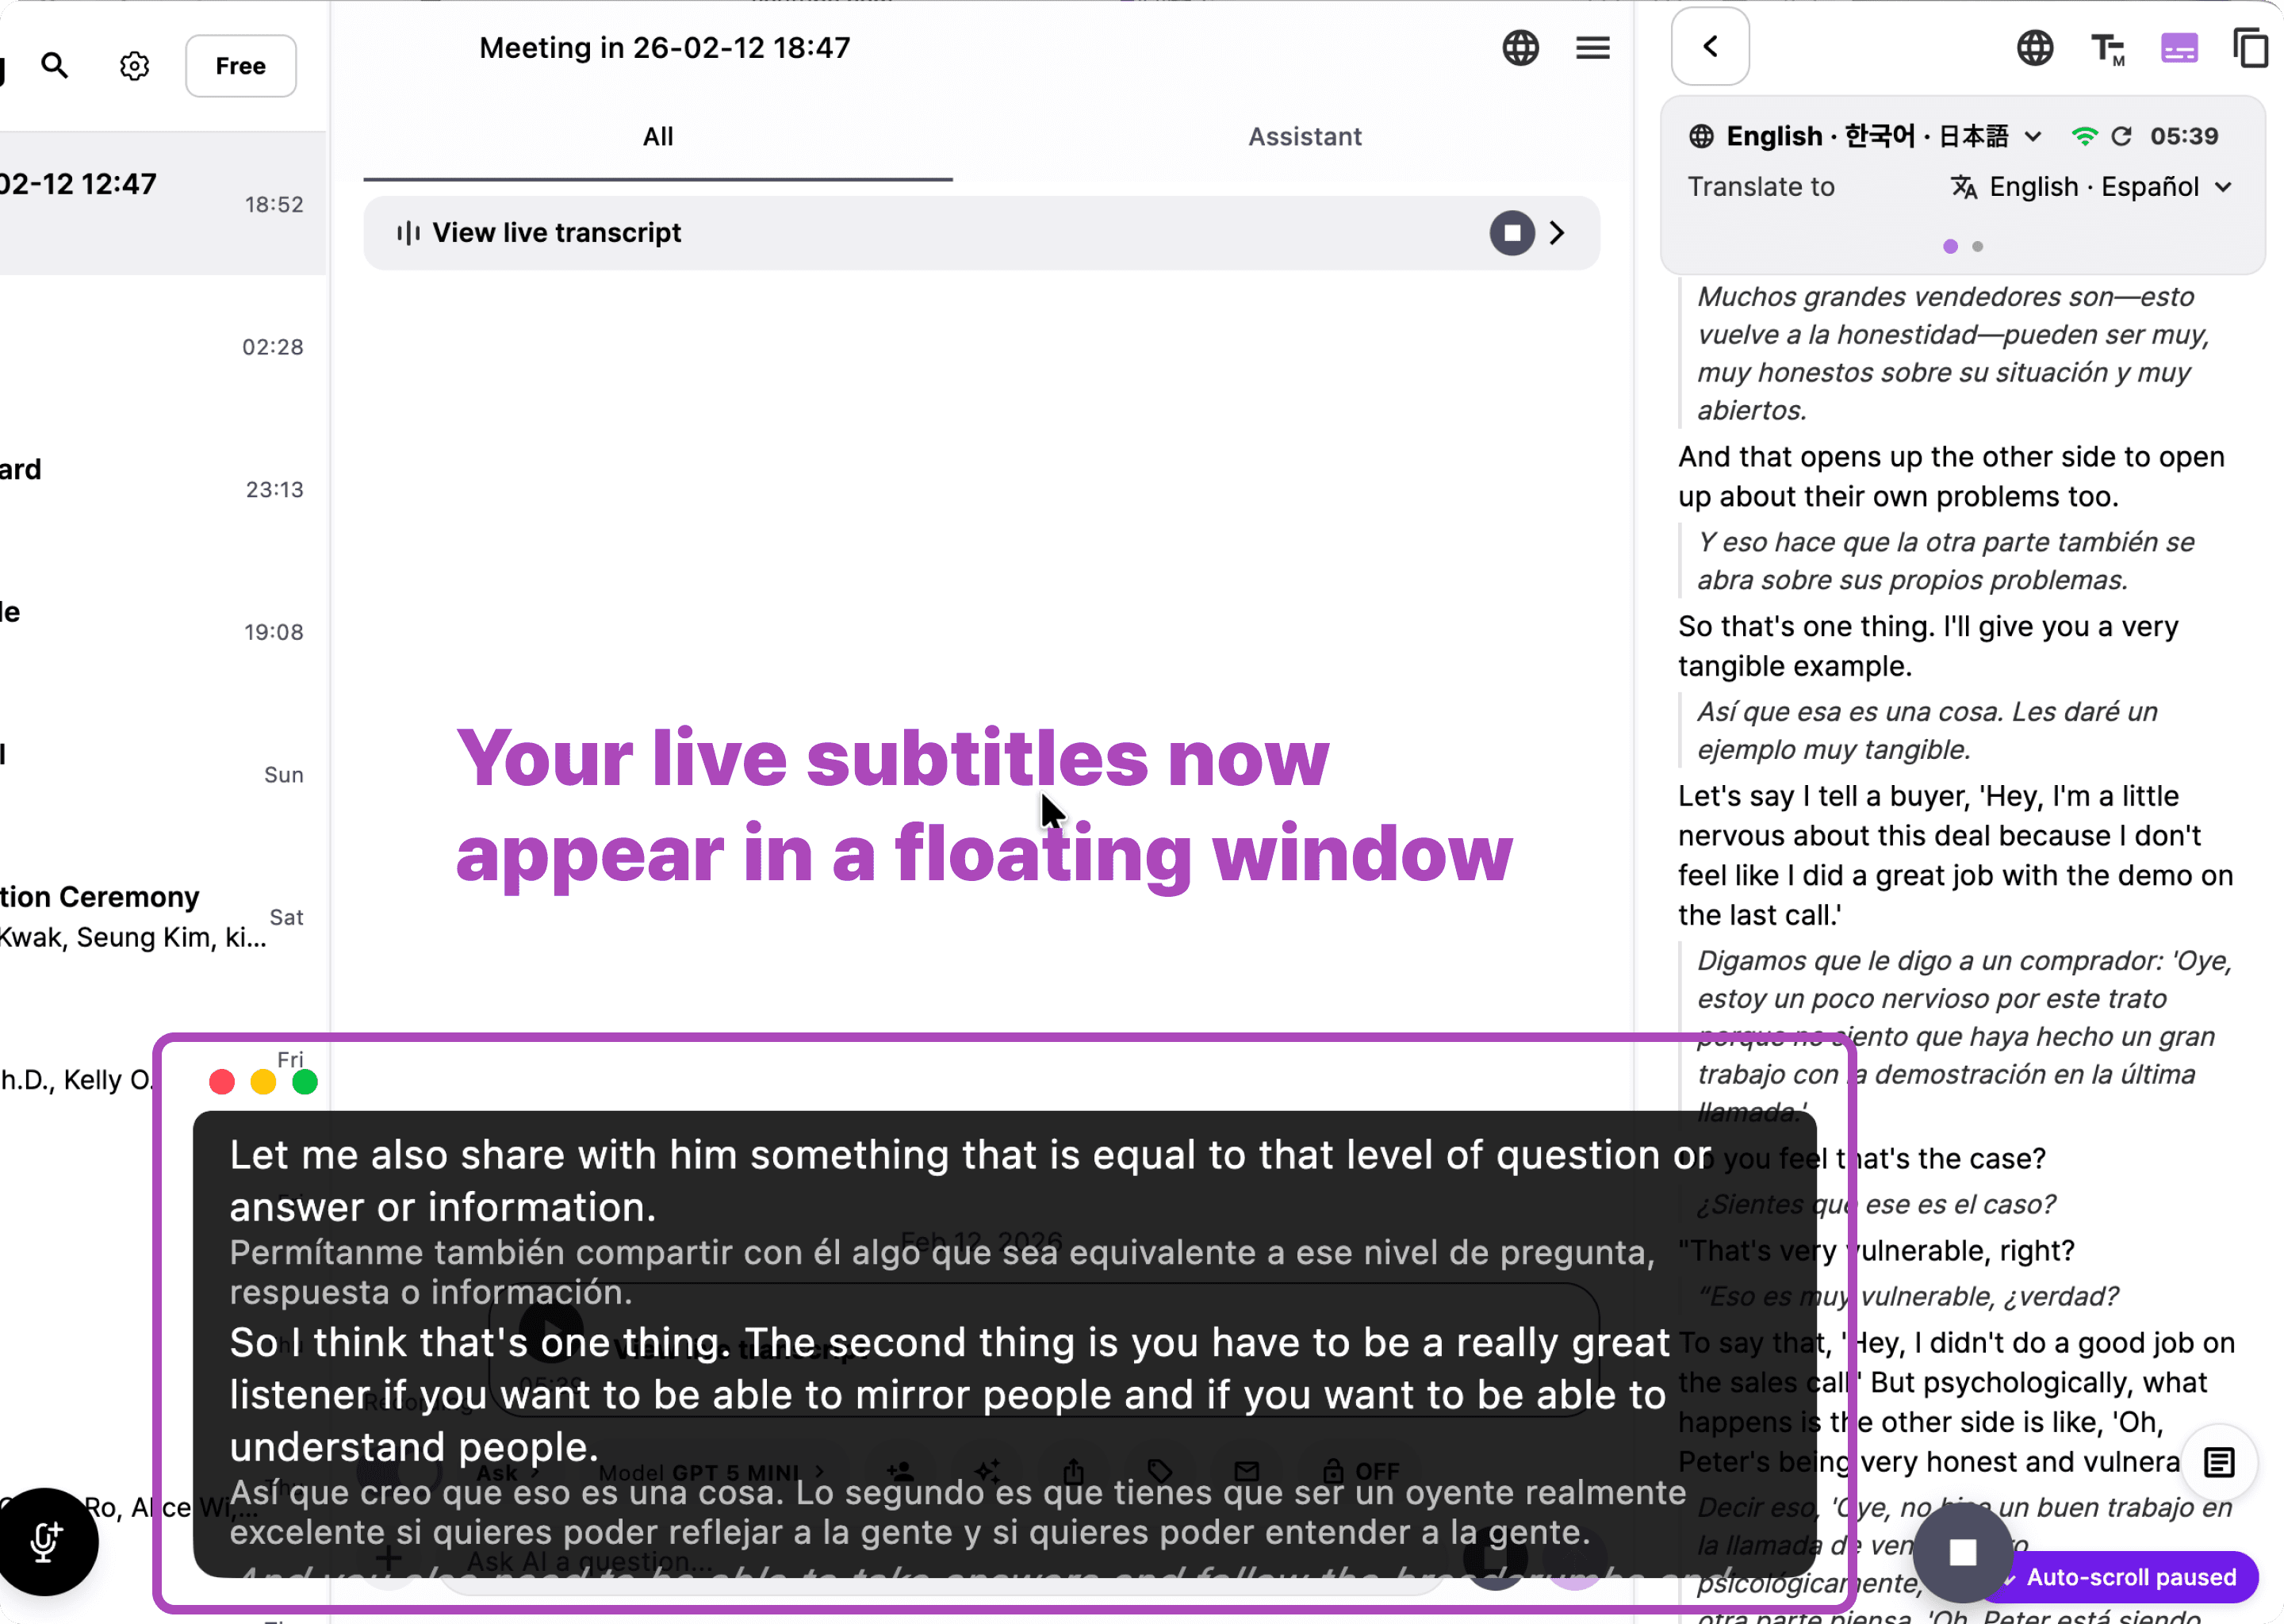
7. Move the Subtitle Window Anywhere
Drag the overlay to wherever it’s most comfortable on your screen.
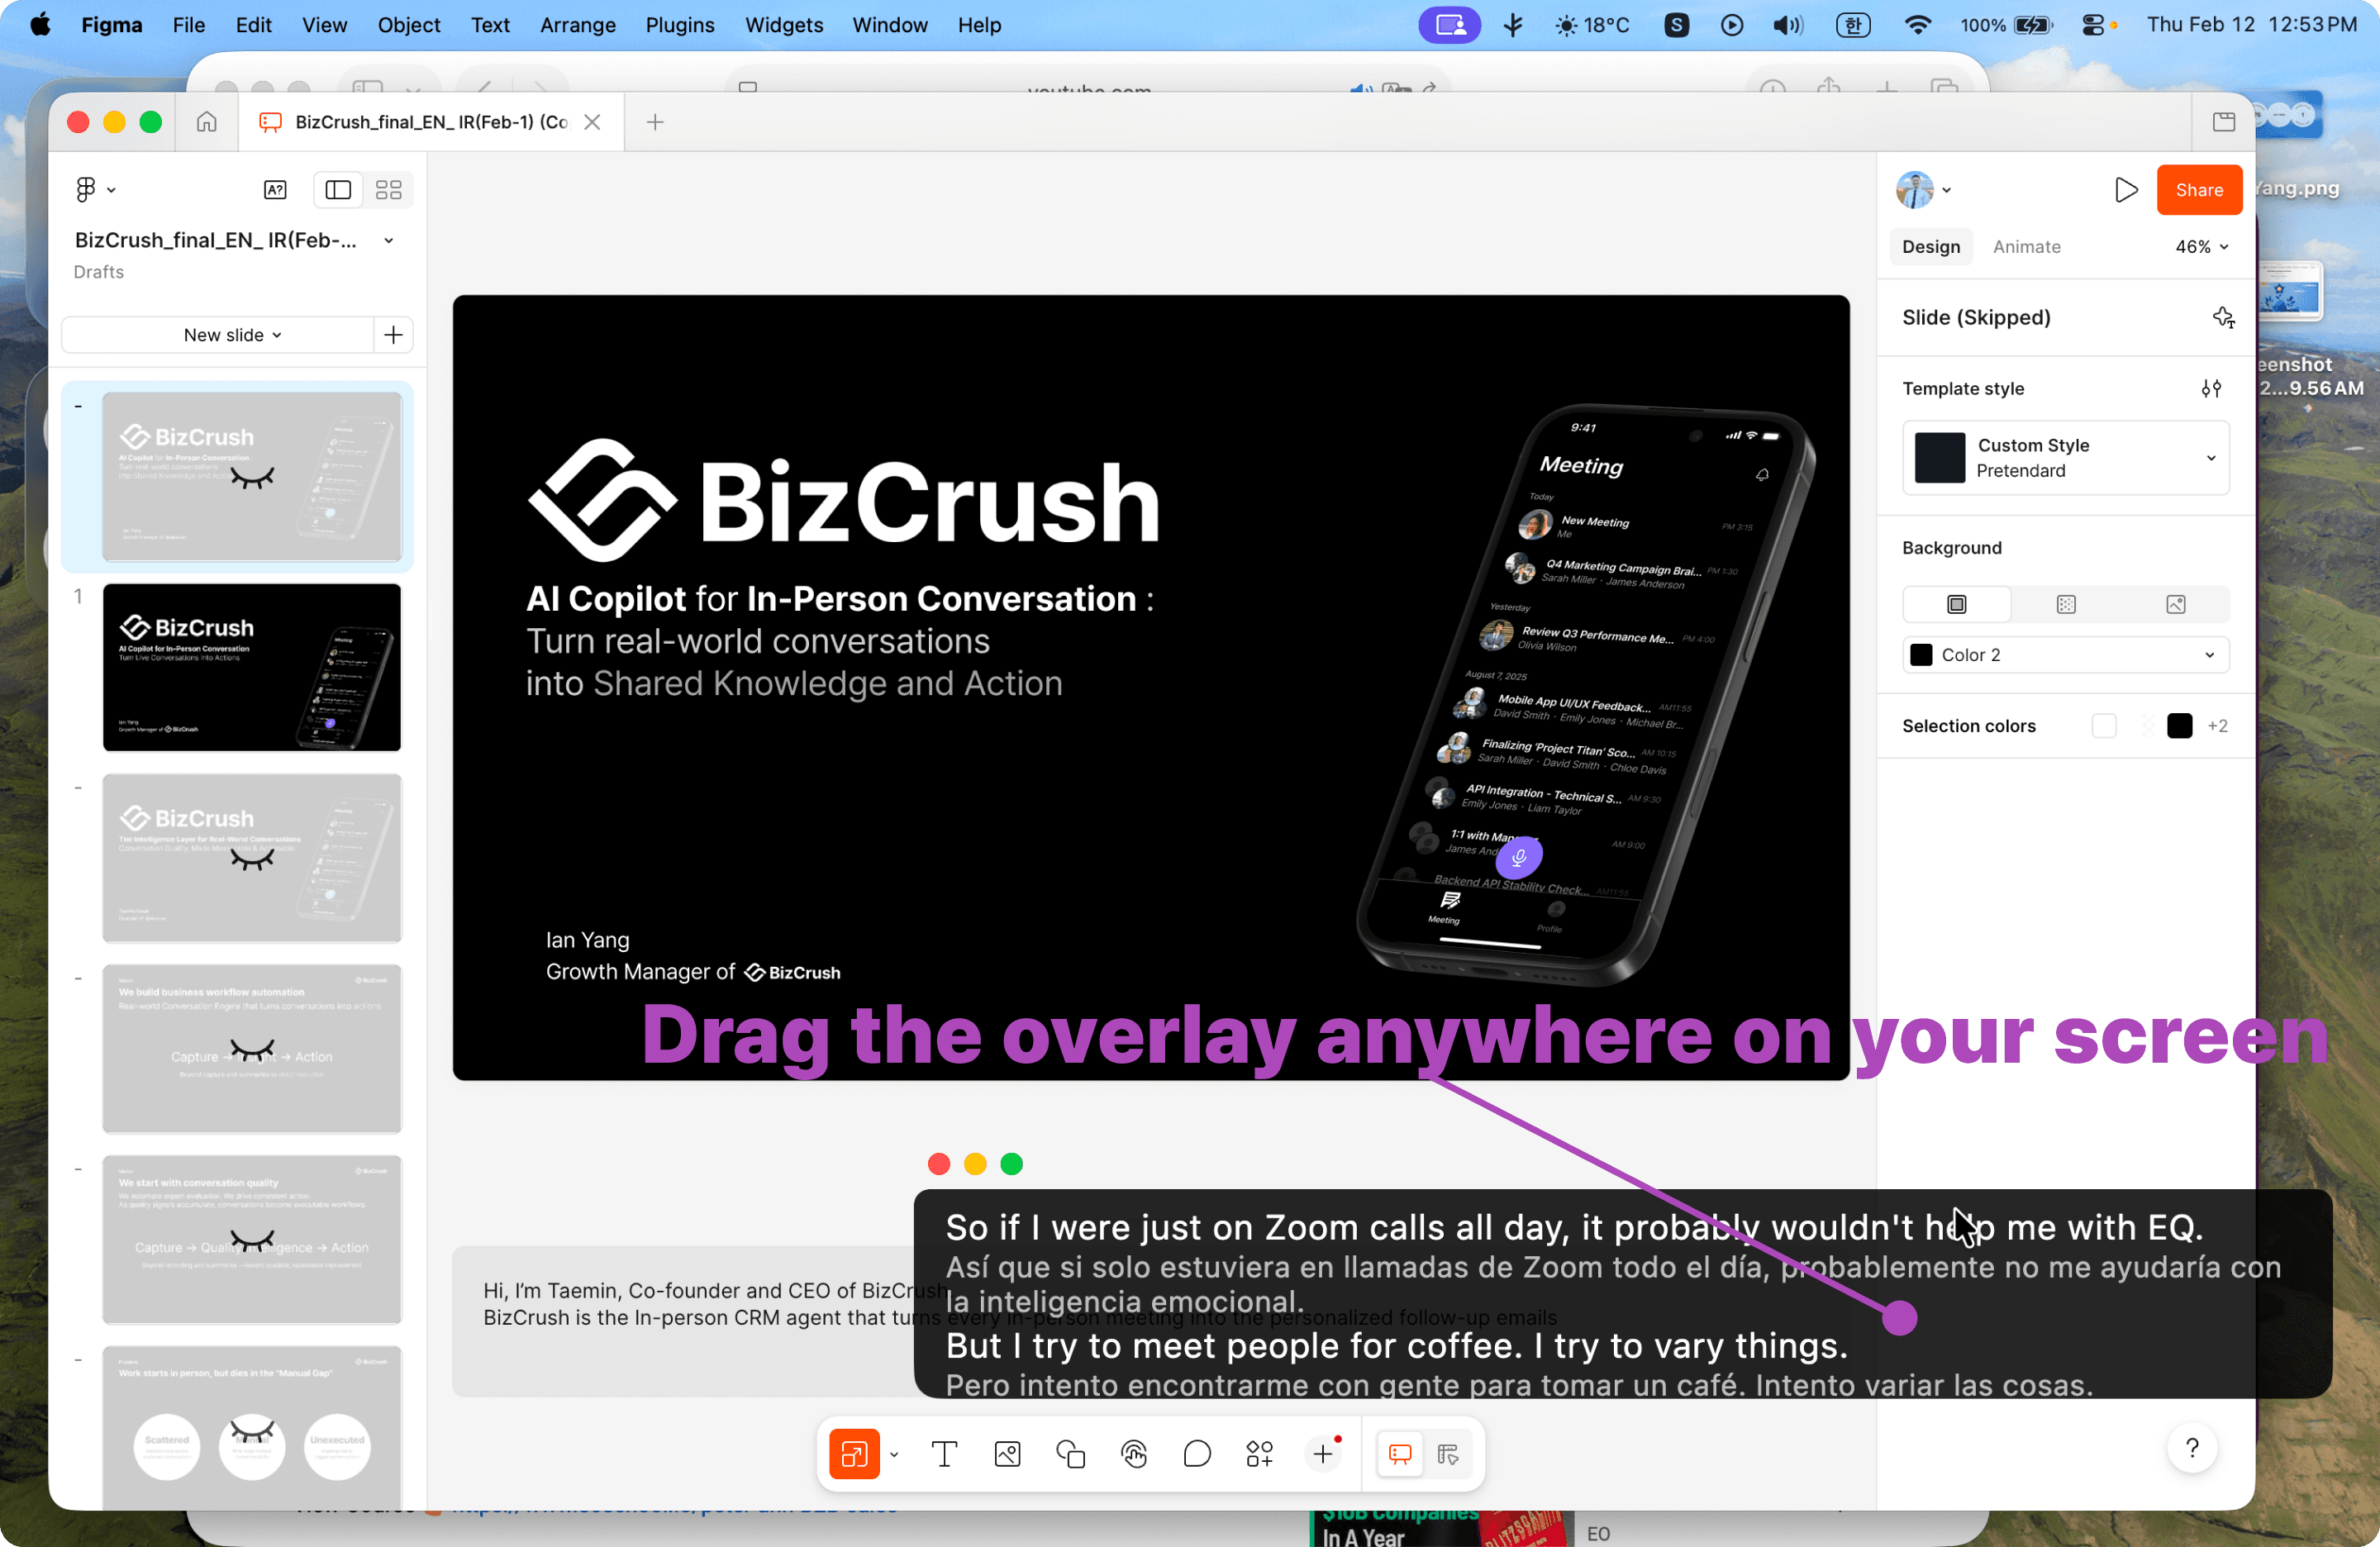
8. Use It While Presenting or Multitasking
Your subtitles stay visible on top of slides, browsers, or any app.
Great for presenters, trainers, and meetings.
9. Turn Off Anytime
Turn off the overlay window when you’re done.
Need more help?
Contact us at business@bizcrush.ai
Explore More updates
We’re making BizCrush smarter, faster and more connected every week.
See everything new → Change log
BizCrush
Growth
February 14, 2026
2
min
All
Insights
Tutorials
Community
Usecase
Product
Tutorials
BizCrush Enterprise Plan: Payment and Team Management Guide
This guide walks you through proceeding with the Enterprise Plan from your admin account and shows you how to add and manage team members in it.
The BizCrush Enterprise plan is designed for companies and teams that want to use BizCrush together under one shared workspace.
This guide walks you through how to review and pay for your Enterprise plan after your plan terms have been confirmed with the BizCrush sales team. You’ll also learn how to add or remove team members after payment is complete.
Before you begin
This guide is for customers whose Enterprise plan has already been configured by the BizCrush team.
Before starting payment, make sure you have completed the following:
You have discussed and confirmed your Enterprise plan terms with the BizCrush sales team.
You have shared the email address that will be used as the admin account.
You can sign up or log in to BizCrush using that admin email address.
If your plan terms have not been finalized yet, or if you do not see the payment button in your account, do not proceed with payment. Contact your BizCrush representative first.
For help, contact business@bizcrush.ai.
1. Log in with your admin account
Enterprise plan details and the payment button are only available from the admin account that was configured in advance.
Go to the BizCrush website and log in with the email address you provided to the BizCrush team as your admin account.
If you log in with a different email address, the Enterprise payment button may not appear. Make sure you are using the correct admin email before continuing.
2. Open the Billing page
After logging in, go to the Payment & Billing page from the top navigation menu.
On this page, you can review your current plan, Enterprise details, usage, member list, and payment status.
3. Review your Enterprise plan
On the Billing page, review the Enterprise plan details configured for your account.
You should see information such as:
Company name
Plan status
Billing period
Subscription change button
Click Update subscription, then select the Enterprise Plan card on the right.
Before continuing, make sure the plan details match the terms you discussed with the BizCrush sales team.
4. Complete payment through Stripe
Once you have reviewed the plan details, click the payment button.
You will be redirected to Stripe, where you can enter your company’s payment information and complete the transaction.
Before paying, confirm that the following details match your agreed Enterprise terms:
Plan status
Payment amount
If anything looks different from what you discussed with the BizCrush sales team, do not complete payment. Contact your BizCrush representative first.
After payment is completed, your Enterprise plan will be activated, and the admin account will be able to manage team members.
Important
Enterprise plan details and the payment button are only shown in the admin account that was configured by the BizCrush team. If you do not see the payment button, check whether you are logged in with the correct admin email address.
5. Confirm that your Enterprise plan is active
After completing payment, return to the Payment & Billing page and check your Enterprise plan status.
If payment was successful, the Enterprise details section should show that your plan is active. You should also be able to see the usage overview, member list, and Add member button.
After payment, check the following:
The Enterprise plan status is shown as active.
The billing period is correct.
The usage overview is visible.
The member list and Add member button are visible.
The admin account is shown as the owner or as an active member.
Important
Make sure you complete payment using the Enterprise payment button shown in the admin account. If you purchase an individual Basic or Pro Plan separately, team-wide shared usage and member management will not be applied.
6. Add team members
After your Enterprise plan is active, the admin account can add team members.
Go to the member section on the Payment & Billing page and click Add member.
6-1. Click Add member
In the member list, click the Add member button on the right.
6-2. Enter team member email addresses
When the Add member window opens, enter the email addresses of the team members you want to add.
Enter one email address per line. To add multiple members at once, separate each email address with a line break.
Example:
After checking the email addresses, click Add member.
When adding multiple members, separate email addresses using a line break, such as Shift + Enter or Alt + Enter.
6-3. Confirm that members were added
Once members are added, you will see a confirmation message saying that the members have been added.
Close the message and check the member list to make sure the newly added team members appear.
Added members may appear with one of the following statuses:
Invited: The team member has not accepted the invitation yet or has not logged in with that email address.
Active: The team member has logged in with that email address and is connected to the Enterprise group.
Important
When adding a team member, enter the email address they will actually use to log in to BizCrush. If the email address entered by the admin is different from the email address the team member uses, the account may not connect to the Enterprise group correctly.
7. Remove team members
If a team member no longer needs access to the Enterprise plan, the admin can remove them from the team.
When a team member is removed, they will no longer be able to use the Enterprise group’s shared usage.
7-1. Find the team member you want to remove
On the Payment & Billing page, go to the member list and find the team member you want to remove.
Before deleting a member, double-check their email address and username.
Click the Remove button on the right side of the member you want to remove.
7-2. Confirm deletion
When the confirmation window opens, check that you are removing the correct team member, then click Remove.
Once deletion is complete, the team member will be removed from the Enterprise member list.
Important
Removed members cannot use the Enterprise group’s shared usage. If you remove someone by mistake, you can add them again using the Add member feature.
8. What to do if a team member already has an individual paid plan
If a team member is already using an individual Basic or Pro Plan and needs to move to the Enterprise plan, check their current subscription status first.
Keeping both an individual subscription and Enterprise access active at the same time may result in duplicate billing.
This is especially important if the team member subscribed through the Apple App Store or Google Play Store. In that case, they may need to cancel their existing subscription directly through the relevant store’s subscription management page.
Recommended steps:
Check the team member’s current individual subscription status.
Confirm whether the subscription was purchased on the web, through the App Store, or through Google Play.
Cancel the existing individual subscription if needed.
Confirm that the account switches to the Free Plan after the current billing cycle ends.
Have the admin add that same email address as an Enterprise team member.
If you are not sure whether the existing subscription should be kept or canceled before moving to Enterprise, contact your BizCrush representative.
Important
Individual Basic or Pro Plans do not include team-wide shared usage or member management. To use BizCrush as a team, users must log in with the email address added to the Enterprise plan.
FAQ
Can I purchase an Enterprise plan directly from the pricing page?
No. The Enterprise plan is configured after you discuss your usage terms with the BizCrush sales team.
Once setup is complete, you can review the price and payment button on the Billing page of the configured admin account.
Why can’t I see the payment button?
First, check whether you are logged in with the email address that was set as the admin account.
If you are logged in with a different email address, the payment button may not appear.
If you are using the correct admin account but still cannot see the button, contact your BizCrush representative.
What should I do if the plan details look different from what we discussed?
Do not proceed with payment.
Enterprise plans are configured based on the terms agreed in advance. If the plan details do not look correct, contact your BizCrush representative before completing payment.
Do team members need to pay separately?
No. Team members do not need to purchase separate individual subscriptions.
Once the admin adds their email addresses to the Enterprise plan, team members can log in with those same email addresses and connect to the Enterprise group.
The email address added by the admin must match the email address the team member actually uses to log in.
Can I share usage with my team by purchasing an individual Basic or Pro Plan?
No. Shared usage and member management are only available through the Enterprise plan.
To use BizCrush as a team, discuss your plan with the BizCrush sales team and complete payment using the Enterprise payment button configured in the admin account.
Need help?
If you need help with Enterprise payment or team member management, contact us anytime at:
BizCrush
Growth
June 12, 2026
5
min
Product
Introducing the BizCrush STT Benchmark
BizCrush compares speech-to-text services using real apps, real audio, and transparent results.
Comparing speech-to-text accuracy through actual app workflows
“Which STT service is more accurate?”
It sounds like a simple question, but the answer often depends on the audio, environment, app behavior, and post-processing. Different users experience different conditions, which makes it difficult to compare speech-to-text services based on impressions alone.
BizCrush built this benchmark to make STT results easier to compare under the same conditions.
Instead of testing only recognition engine APIs, the BizCrush Benchmark runs the actual apps users interact with. The same audio is played through the same input path, and the transcripts produced by each app are compared against a reference transcript.
We publish not only the scores, but also the source audio, reference transcript, app-generated transcript, and error analysis so readers can inspect the results directly on the benchmark page.
June 12, 2026. Please visit the benchmark page for the latest results.
Why we built it
Many speech-to-text services highlight high accuracy.
But it is often difficult to compare how accurate they are, where they perform well, and where they struggle under the same conditions. In quiet office environments, most services perform reasonably well. The harder cases are the ones users often face in practice: multiple people speaking, background noise, overlapping speech, or speakers at different distances.
BizCrush created this benchmark to compare how STT services perform in these more realistic conditions.
BizCrush is also included in the benchmark. That is why we publish more than just the final score. We also provide the reference transcript, app output, scoring method, and known limitations. When a benchmark includes the company that built it, the results need to be easy to inspect.
What makes this benchmark different?
Most STT benchmarks test recognition engines by calling their APIs directly. That approach is useful for evaluating engine-level performance.
But many users do not experience the engine directly. They experience the full app built around it. Meeting note apps and transcription services often add their own audio handling, noise reduction, formatting, and post-processing on top of the recognition engine. As a result, API performance and the transcript users actually see in the app can differ.
The BizCrush Benchmark is designed to test that app-level path.
We play the reference audio, run the actual STT app in an Android emulator, send the audio through the microphone input path, and collect the transcript generated by the app. That transcript is then compared against the reference transcript.
This does not reproduce every possible real-world variable. Device type, physical microphone quality, room acoustics, network conditions, and app versions can all affect results. What this benchmark provides is a same-condition comparison: the same audio, the same input method, and the same scoring criteria across services.
How the test works
The test follows these steps:
Launch each target app, including BizCrush, and start recording.
Send the reference audio through the microphone input path.
Collect the real-time transcript generated by the app.
Save the final result after playback ends.
Compare the app transcript with the reference transcript and calculate WER or CER.
Review the result manually to separate formatting differences from actual recognition errors before publishing.
All test results go through human review before publication. This review is not used to arbitrarily adjust scores. It is used to check whether differences such as casing, punctuation, spacing, number formatting, or unit formatting were incorrectly counted as recognition errors during automated scoring.
Real-time and post-processed transcripts are reported separately
Many services revise transcripts after recording ends. They may add punctuation, clean up sentence structure, or correct words that were initially recognized incorrectly.
This post-processing can improve the user experience. However, the transcript users see during a live meeting and the transcript they receive after recording ends should be evaluated separately.
That is why BizCrush measures two types of output.
Real-time transcript
This measures what users actually see on screen during a meeting or live recording.
Post-processed transcript
This measures the final transcript after post-processing has been applied.
When a service provides both results, we publish them separately. This makes it easier to see how much post-processing changes the final output. Post-processed results for meeting note and note-taking services are being added gradually.
How scores are calculated
Scores are calculated using WER, or Word Error Rate, and CER, or Character Error Rate. For both metrics, lower numbers indicate higher accuracy.
WER measures the rate of changed, missing, or added words compared with the reference transcript. CER applies the same idea at the character level.
Errors are classified into four categories:
Substitution: a spoken word is recognized as a different word
Deletion: a spoken word is missed
Insertion: a word that was not spoken is added
Correct: the word is recognized correctly
For example, if the reference transcript is:
We have a meeting tomorrow at three.
and the app transcript is:
We have a meeting tomorrow at four.
then “three” has been recognized as “four,” which counts as one substitution error.
In real transcripts, however, there may be differences that are not directly related to speech recognition accuracy. These include casing, punctuation, spacing, number formatting, currency formatting, and unit formatting. For languages where spacing, segmentation, or writing conventions can vary, CER can also provide an additional view alongside WER.
Because these formatting differences can be counted as errors by automated scoring, BizCrush reviews the results after automatic calculation to distinguish formatting differences from actual recognition errors.
The same criteria are applied across all test results. They are not applied selectively to a specific language or service.
Why noisy environments matter
In quiet environments, most services produce strong results. But when there is background noise or when multiple people speak at the same time, the differences between services become much more visible.
That difference matters in real usage.
Meeting rooms, conference halls, cafés, trade shows, lectures, customer interviews, and networking events are rarely silent. A speaker may be far from the microphone. Several people may react at once. Other conversations and background sounds may be present.
The BizCrush Benchmark reflects these conditions by publishing results across different noise conditions. The most important point is not a single score in isolation, but how each service performs with the same audio, the same input path, and the same scoring criteria.
The latest results are available on the benchmark page.
Separating formatting differences from recognition errors
To evaluate speech recognition performance more accurately, formatting differences are separated from actual recognition errors whenever possible.
For example, the following differences are not counted as errors when the meaning is the same:
Casing differences
Punctuation differences
HTML entities
Currency formatting
Percentage formatting
Number formatting
Spacing differences
Different spellings that preserve the same pronunciation and meaning
These cases are reviewed manually. If the difference is not considered an actual recognition error, it is treated as a match.
This process is not applied to favor any particular service. The same criteria are applied to all service results.
What data is published?
The current test set is built around audio that BizCrush has permission to use or that can be inspected publicly on the benchmark page.
Each test detail page includes:
Source audio
Reference transcript
App-generated transcript
Error analysis
WER/CER calculation results
Scoring and review criteria
Test data is added gradually after quality and licensing conditions are reviewed. The latest test list and results are available on the benchmark page.
June 12, 2026. The runs page layout may change in future updates.
Transparency and usage limitations
All public tests include the source audio, reference transcript, app-generated transcript, error analysis, and WER/CER calculation results.
This allows readers to inspect the results directly on the page and recalculate them if needed.
Some comparison services may be anonymized when necessary. The purpose is not to identify or criticize specific vendors, but to compare actual outputs under the same conditions. Even when a service is anonymized, the same input, scoring criteria, and disclosure rules apply.
Source audio can be reviewed directly on each benchmark page. However, to prevent unauthorized saving, redistribution, or reuse, audio file downloads are not provided.
June 12, 2026. Please visit the benchmark page for the latest test list and results.
For third-party source audio, we provide links to the original materials where applicable. BizCrush-produced test data is made available for on-page verification only. Unauthorized saving, redistribution, or reuse is not permitted. If a school, research institution, company, or any external organization would like to use the data, please contact BizCrush for separate approval.
How to interpret the results
This benchmark does not represent every possible real-world environment. Actual results may vary depending on the device, microphone quality, network conditions, app version, speaker position, room acoustics, and type of background noise.
The BizCrush Benchmark should therefore be read as a same-condition comparison, not as a universal measure of performance in every environment.
A single score is not the whole story. It is also important to look at where errors occur, what type of errors they are, and how the app output compares with the source audio and reference transcript. That is why BizCrush publishes the score together with the audio, transcript, and error analysis.
What’s next
The current benchmark focuses on app-based testing. Going forward, we plan to add:
More diverse noise conditions
Direct API testing
More language coverage
Direct API testing will be added as a complementary view, not as a replacement for app-based testing. It will help show the difference between engine-level performance and the app experience users actually see.
We also plan to expand language coverage over time. However, each language requires reliable reference transcripts and a review process that can be applied consistently. Rather than adding languages for the sake of volume, we will expand in a way that keeps the data inspectable and reliable.
A useful benchmark starts with trustworthy data built over time. BizCrush will continue developing STT evaluation criteria that stay close to how people actually use transcription apps.
BizCrush
Growth
June 8, 2026
5
min
Usecase
Turning a Korean Developer Conference into a Global Event with Real-Time AI Subtitles
At the Changbal Dev Conference, BizCrush provided real-time overlay subtitles, providing English captions for Korean presentations.
On May 16, the Seattle Changbal Dev Conference brought together developers, founders, researchers, and technology leaders for a full day of technical talks and networking.
The event featured eight presentations delivered primarily in Korean. However, nearly 30% of attendees were English speakers.
For the organizers, this created a familiar challenge:
How do you make technical content accessible to a multilingual audience without adding interpretation booths, expensive equipment, or a dedicated operations team?
At many conferences, solving this problem requires interpreters, specialized hardware, separate displays, and additional staff.
At Changbal Dev Conference, the solution was much simpler.
The entire event ran with real-time English subtitles using only the presenter’s MacBook and BizCrush.
Event at a Glance
8 Korean-language presentations
30% English-speaking attendees
1 MacBook running BizCrush
1 event operator
0 interpretation booths and dedicated subtitle staff
The result was a fully bilingual conference experience without changing the event's existing setup.
Why Real-Time Translation Is Difficult at Developer Conferences
Developer conferences create a unique challenge for real-time translation systems.
Unlike traditional business meetings, presentations often include:
Rapid speaker pacing
Technical terminology
Mixed Korean and English expressions
Code snippets and pseudocode
Product names and proper nouns
Live audience questions
Frequent topic switching
Many translation solutions struggle in these environments.
Common issues include:
Subtitle delays that disrupt the flow of the presentation
Incorrect translation of technical terms
Complex audio infrastructure requirements
Additional staffing needs
Attendee-side app installation requirements
The Changbal organizers wanted to create an experience where global attendees could follow every session without increasing operational complexity.
Running the Entire Event from One MacBook
BizCrush approached the problem differently.
Instead of requiring dedicated interpretation infrastructure, the presenter simply connected their MacBook to the venue display and enabled Presentation Overlay Mode.
Real-time English subtitles appeared directly over the presentation slides.
No secondary display was needed.
No interpretation booth was needed.
No separate subtitle operator was needed.
The subtitles remained stable throughout slide transitions and animations while preserving the overall presentation design.
One of the most impressive parts of the event was how simple the operation became. The entire subtitle workflow was managed directly by Changbal President Hyesun An.
After a brief walkthrough, she was able to:
Start and stop sessions
Adjust subtitle placement
Manage presenter transitions
Monitor recordings
Keep the conference running smoothly
without requiring technical assistance.
For community-driven events with limited staffing, this simplicity proved just as important as the translation itself.
Translation Quality That Held Up on Stage
The conference covered a wide range of topics, from software engineering and AI to startup building and developer productivity.
During one session, Ju An Kang, Senior Software Engineer at Microsoft, delivered a Korean-language presentation rich in nuanced explanations and references. English-speaking attendees were able to follow the presentation in real time through the subtitles displayed on the main screen.
Another session featured Minseok Jeong discussing highly technical topics, including Reflection-Augmented Scaling, algorithm design, and pseudocode structures.
Rather than producing literal word-for-word output, BizCrush generated subtitles that preserved the technical context of the discussion.
Even in situations involving:
Technical jargon
Mixed-language speech
Fast presentation speed
Audience participation
Product-specific terminology
The subtitles remained consistent and readable throughout the sessions.
Capturing Context, Not Just Words
One moment particularly stood out to the event organizers.
During a presentation, a uniquely Korean expression appeared that would have sounded awkward if translated literally.
Instead of forcing a direct translation, BizCrush preserved the original phrase and presented it in a way that maintained its cultural context.
After the event, the operations team commented:
"It preserved the nuance of unique Korean proper nouns without distortion."
For global audiences, this distinction matters. Good subtitles do more than convert speech from one language into another. They help preserve the speaker's intent, context, and meaning.
No Wireless Microphones. No Audio Mixers.
Another standout for attendees was BizCrush's speech recognition.
The event did not rely on wireless microphones for audience participation.
Questions from attendees were often asked directly from their seats.
Even so, BizCrush was able to recognize and subtitle audience questions using only the MacBook's built-in microphone.
This flexibility makes the system particularly useful for community events, hackathons, university programs, startup demo days, and meetups where professional AV infrastructure may not be available.
The Feature Everyone Asked About
Throughout the conference, organizers repeatedly received the same question from attendees:
"What tool is generating those subtitles?”
Many participants noticed the subtitles almost immediately.
Some assumed a dedicated translation team was operating behind the scenes. Others were surprised to learn that the entire system was running from a single laptop.
For the organizers, this reaction validated an important point:
When multilingual support becomes effortless, it stops feeling like an extra feature and starts feeling like a natural part of the event experience.
What's Next: Seattle Changbal Innovation Hackathon
Following the success of the conference, the Changbal team plans to continue using BizCrush at future events.
Attendees will also be able to experience BizCrush again at the upcoming Changbal Hackathon in Seattle on June 20.
To support teams building voice-powered products, all participants will receive BizCrush Voice API credits during the event.
The team that creates the most impactful voice application using BizCrush technology will receive the BizCrush Best Problem Solver Award, along with one year of unlimited BizCrush access for every member of the winning team.
Making Global Events Practical
Global audiences are no longer limited to large enterprise conferences.
Today, multilingual communities exist everywhere:
Developer meetups
Startup demo days
University programs
Hackathons
Technical workshops
Community-led events
The challenge is no longer whether multilingual experiences are needed. The challenge is making them practical.
At the Seattle Changbal Dev Conference, organizers delivered a fully bilingual experience with one laptop and no specialized interpretation infrastructure.
As global participation becomes the norm, we believe that simplicity will become the new standard for event communication.
And that's exactly what BizCrush is building.
BizCrush
Growth
May 27, 2026
5
min
Tutorials
BizCrush Event Host Operations Guide
This guide covers how to run BizCrush at an event, including setup tips, checklists, FAQs, and live multilingual captions with voice translation.
This guide walks you through everything you need to run BizCrush smoothly at an event—from pre-event setup and live caption display to on-site checklists, MC announcement scripts, and frequently asked questions.
With just a laptop or smartphone and Wi-Fi, you can provide real-time multilingual captions and voice translation—no special equipment or professional interpreter required.
1. Getting the Most Out of BizCrush
With BizCrush, you can offer the following features at your event:
Real-time captions: Converts the presenter's voice into text and displays it on screen.
Multilingual translation: Provides captions in multiple languages, including Korean, English, Japanese, and more.
Easy access for attendees: Attendees can scan a QR code and view captions instantly on their own smartphones.
Audio translation: Attendees can listen to translated audio in their preferred language in real time.
How BizCrush Works
Microphone pickup — the device microphone captures the presenter's voice.
AI translation — speech is converted to text and translated into the selected language.
On-screen captions — the recognized speech appears as real-time captions.
You do not need a separate microphone. BizCrush uses the built-in microphone on the smartphone or laptop running the app, so place the device where it can hear the sound clearly.
Good placement options include:
Near the presenter on stage
Close to the venue's loudspeaker
Anywhere the presenter's voice can be heard clearly
2. Pre-Event Setup
Preparing these items beforehand will make event-day operations much easier.
A. Create a Meeting Room in Advance
Creating a meeting room ahead of time allows you to prepare the attendee QR code for signage, printed materials, or a waiting screen before the event begins.
In the BizCrush app, tap the microphone button to start a new meeting.
Once the room is created, immediately tap Stop Recording. This saves the prepared meeting room without leaving the recording active.
Rename the meeting room to match the event name. This will make it easier to find on the day of the event.
B. Invite and Assign Co-Host Access
If you invite your BizCrush support contact to the meeting room in advance and assign them as a co-host, they can help you remotely on the day of the event.
Open the ☰ Side Menu in the top-right corner.
Tap + Add Participant and enter the support contact's email address.
In the participant list, press and hold the support contact's name for about 3 seconds, then assign Co-Host access.
👉 For the full step-by-step walkthrough with screenshots, see [Setup Guide, Section 4: Assigning Co-hosts].
C. Upload Presentation Materials
To help the AI recognize technical terms, proper nouns, and other event-specific vocabulary more accurately, upload your presentation materials and extract Context from them.
Open the ☰ Side Menu in the top-right corner.
Tap Manage Context.
Use the Upload PDF / DOCX File at the top to automatically extract Context, or manually add Context in the input field.
Need to upload multiple files?
Currently, the system supports uploading only one file at a time. If you have multiple presentation files, combine them into a single PDF before uploading.
👉 For the full walkthrough with screenshots, see [Setup Guide, Section 5: Registering Custom Keywords].
D. Day-of-Reminder
On the day of the event, do not create a new meeting room. Open the meeting room you prepared above and start recording from there.
Find the meeting room you created earlier (using the event name to locate it quickly).
Confirm the meeting room name.
Start recording from that room.
3. Caption Display Options for Different Event Setups
There are two main ways to display captions on the event screen. Choose the option that best fits your venue setup and equipment.
Which Option Should You Use?
A. Presentation Mode
Setup: Uses two devices
How it works: Displays captions on a separate full-screen caption view
Best for: Mid-sized to large events with a dedicated caption screen
Requirement: Open the shared link in a browser
Advantage: More stable operation because the caption screen is separate. The presentation laptop does not need the BizCrush app installed.
B. Overlay Captions
Setup: Uses one device
How it works: Displays a semi-transparent caption window over the presentation slides
Best for: Small events with a single display
Requirement: Run the desktop app on the presentation laptop
Advantage: Captions can appear directly on top of the slides, so you do not need a separate caption screen.
Feature | A. Two Devices: Presentation Mode | B. One Device: Overlay Captions |
|---|---|---|
What it is | A dedicated, full-screen caption view. | A semi-transparent caption window floating over your slides. |
Best for | Medium-to-large events with a separate, dedicated screen for captions. | Small events with only one main screen or projector. |
Requirements | Any web browser (via a Share Link). | BizCrush Desktop App must be running. |
Pros | No app installation needed on the display device; just open the link. | Stays on top of everything; freely adjustable size and position. |
Watch out for | Needs a second device dedicated to running the app. | Anything that disrupts the presentation laptop affects both slides and captions at once. |
A. Use Two Devices: Presentation Mode
Presentation Mode is the recommended option when you prefer not to touch or modify the presentation laptop.
1. Sound Recognition: Place the Device Running BizCrush
Open the BizCrush app on a staff member's smartphone or an extra laptop, then start the meeting.
Place this device near the presenter on stage or right in front of the venue's loudspeaker.
Once the event starts, avoid moving or touching the device unless necessary.
2. Display: Set Up the Output Screen
The presentation laptop or monitor connected to the display does not need the BizCrush app installed.
Open an internet browser, such as Chrome, and paste the share link for the BizCrush meeting that is currently recording.
The captions will appear on screen.
👉 For instructions on copying links and displaying screens, see [Setup Guide, Section 3.B: Presentation Mode Setup].
B. Use One Device: Overlay Captions
Use Overlay Captions when you need to show both the presentation slides and captions on the same screen.
Install and run the BizCrush desktop app on the presentation laptop connected to the screen.
Start a meeting in the app, then tap Open Overlay Captions to turn it on.
Make sure the presentation laptop can clearly hear the presenter's voice. Ideally, place it near the front of the stage or close to a loudspeaker.
Note: The desktop app can be downloaded from the BizCrush main homepage.
👉 For instructions on enabling overlays, see [Setup Guide, Section 3.A: Overlay Subtitle Setup].
4. Pre-Event Checklist
To keep the event running smoothly, check the following items before the event starts.
Basic Installation and Permissions
Install the app on the devices you will use for the event.
Allow the installed app to access the microphone.
If you allowed permissions during the first launch and a test recording works properly, your setup is complete.
If recording does not work, check the Microphone section in your device settings and confirm that BizCrush has permission.
Prevent the Screen from Turning Off
If the recording device screen turns off during the event, especially on a laptop, recording may stop.
Make sure to disable auto screen lock, display sleep, or power-saving mode in the device settings.
Language Settings
Select the presenter's language and the language you want captions to be translated into.
If your event requires multiple languages, check the necessary language combinations in advance.
👉 For instructions on setting the language, see [Setup Guide, Section 3 → Common Setup Steps, Steps 2–3].
Keyword Registration
Add frequently used proper nouns, organization names, presenter names, and technical terms before the event.
You can upload a presentation PDF or DOCX, or add Context manually.
👉 For instructions on registering keywords, see [Setup Guide, Section 5: Registering Custom Keywords].
Microphone Test
Place the device in its actual event location, then test it using the stage microphone.
Confirm that text appears on screen and that the caption response speed feels appropriate.
QR Code Placement
Display the QR code at the venue entrance or on the waiting screen so attendees can view captions on their own smartphones.
👉 For instructions on finding the QR code, see [Setup Guide, Section 6: Sharing Subtitles with Attendees].
Final Rehearsal
Under conditions similar to the actual event, test the full flow once: start recording → display captions → share the QR code.
5. MC / Host Announcement Script
If you would like to introduce BizCrush at the beginning of the event, you can use the script below.
Today's event offers real-time multilingual captions and voice translation for our global attendees.
Please scan the QR code shown on screen using your smartphone camera.
You can choose your preferred language and view captions instantly without installing an app.
If you use personal earphones, you can also listen to translated audio in real time.
Q&A
Q. How do I stop the recording? Can I stop it from any device that is logged in?
A. A session recording can only be stopped from the device that started the recording.
For example, if you started the meeting on a smartphone, you cannot stop the recording from a laptop. Plan accordingly during the event.
Q. The presenter is talking, but captions are not appearing on screen.
A. The device may not be hearing the sound clearly.
Try moving the recording device, whether it is a smartphone or laptop, closer to the venue loudspeaker or to a location where the sound is clearer.
Also, check that recording is actually in progress and that microphone access has been allowed.
Q. Captions are showing, but the translation language is wrong.
A. Check whether the correct translation language is selected in the real-time transcript panel.
Change it back to the language you need.
Q. I am using the real-time caption overlay feature, but the caption text is too small.
A. For Overlay Captions, change the caption size to Large or Extra Large in the caption settings.
For Presentation Mode, you can adjust the display size using your browser shortcuts: Cmd/Ctrl + +/-.
Q. Can I run the event without recording for privacy reasons?
A. Yes — click the Padlock icon in the bottom toolbar to enable Privacy Mode. Real-time translation continues to work, but no voice data or transcripts are saved to your device or BizCrush servers.
If the issue is not resolved, please contact us anytime at business@bizcrush.ai.
👉 For more troubleshooting scenarios, see [Setup Guide, Section 7: Event Day Checklist & Troubleshooting].
BizCrush
Growth
May 7, 2026
5
min
Tutorials
BizCrush Event Host Setup Guide
Host multilingual events effortlessly with BizCrush—live interpretation, captions, AI summaries, and instant sharing in one app. This guide helps you run events smoothly from start to finish.
Host global conferences and seminars seamlessly — with no expensive equipment or live interpreters required.
With just the BizCrush app, you can handle real-time translation, live subtitles, AI summaries, and instant sharing all at once.
This guide walks event hosts through the entire process — from pre-event setup to live execution — so your session runs flawlessly.
1. What BizCrush Offers at Your Event
BizCrush captures spoken audio in real time, converts it to text, translates it into your preferred language, and displays it as subtitles on screen.
For the Host (Presenter's Screen)
Display live subtitles directly over your presentation screen (Overlay Subtitle Mode).
Subtitles remain on top even when you switch between slides, browsers, or other apps.
Fully customizable subtitle display (Transcript + Translation, Transcript only, Translation only, font size, and number of lines).
For Attendees (Audience Devices)
Attendees simply scan a QR code or click a link to view live transcripts and translations on their own devices.
No app installation or sign-up required for attendees.
Live Audio Translation: Attendees can listen to the translated audio in real time (personal earphones strongly recommended).
Language Support
Supports 45 languages in total.
Speech Recognition: Recognizes up to 3 spoken languages simultaneously.
Real-time Translation: Outputs up to 2 translated languages simultaneously.
2. Pre-Event Preparation Checklist
To ensure a smooth event, please complete the following steps before event day.
Host's Preparation Checklist
Create a BizCrush account (both Host and Co-hosts)
Install the Desktop App (Windows or macOS)
Decide on your languages (Spoken Language + Translation Language)
Register Custom Keywords (add event-specific jargon and presentation materials → see Section 5)
Assign Co-hosts (if you have staff assisting you → see Section 4)
Do a Dry Run (test subtitle mode in advance)
Create an Account
Search for "BizCrush" on the App Store or Google Play and download the app. You can sign up using Google, Apple, or email.
Install the Desktop App
Go to bizcrush.ai and click [Download PC Version] (available for both Windows and macOS) to install the desktop app.
Note: Real-time Overlay Subtitles are only available on the Desktop App.
3. Setting Up Real-Time Subtitle Modes
First, choose the subtitle display method that best fits your venue's screen setup.
Feature | A. Overlay Subtitles | B. Presentation Mode |
|---|---|---|
What it is | A semi-transparent subtitle window floating over your slides. | A dedicated, full-screen subtitle view. |
Best for | Small events with only one main screen or projector. | Medium-to-large events with a separate, dedicated screen for subtitles. |
Requirements | BizCrush Desktop App must be running. | Any web browser (via a Share Link). |
Pros | Stays on top of everything; freely adjustable size and position. | No app installation needed on the display device — just open the link. |
Common Setup Steps
Complete these steps on the presenter's desktop computer on event day.
Step 1. Create a Meeting & Start Recording
From the home screen, click the Microphone icon to create a new meeting room and start recording.
Step 2. Open Language Settings
As soon as the meeting starts, the Live Transcript panel opens. Click the language icon at the top of the panel to open language settings.
Step 3. Select Spoken & Translation Languages
Manage both transcription and translation settings here. Select the language the speaker will use, and the language you want to display on screen.
A. Overlay Subtitle Setup
Follow these steps if you want subtitles to float over your presentation slides.
A-1. Open the Overlay Subtitle Menu
Click the Subtitle icon at the top right of the Live Transcript panel to open the Overlay options.
A-2. Customize Overlay Settings
Adjust the options below to fit your screen size and event environment:
Display: Transcript + Translation / Transcript only / Translation only
Size: Small / Medium / Large / Extra Large
Height: 2 lines / 3 lines / 5 lines / Unlimited
A-3. Adjust Overlay Position
Once configured, turn on the Overlay toggle. The subtitle window will appear on your screen — drag and drop it to any location.
Tip: For large projectors, we recommend Large text and 3 lines. For smaller monitors, Medium and 2 lines work best.
A-4. Close Subtitles
When you no longer need the subtitles, hover over the subtitle window and click the [X] button to close.
B. Presentation Mode Setup
Follow these steps if you have a separate, dedicated monitor or browser window just for subtitles.
B-1. Create a Meeting & Start Recording
As with Overlay mode, click the Microphone icon on the home screen to start a meeting.
B-2. Copy the Share Link
Click [Share Meeting].
Then click [Copy Link].
B-3. Open the Share Link in a Browser
Open a web browser on the device connected to your dedicated subtitle screen, and paste the copied link into the address bar.
B-4. Open the Presentation Menu
Once the live transcript page loads, click the [▶ Presentation] button in the top right corner to open the settings panel.
B-5. Configure Subtitle Settings
Adjust display, size, and other options in the panel to fit your venue.
B-6. Launch Presentation Mode
Once you are done configuring, click the [Present] button at the bottom. A dedicated subtitle screen will launch, and real-time translated text will appear as soon as audio is recognized.
B-7. Enter Full-Screen Mode
For a clean look on the venue screen, switch your browser to full-screen mode so the address bar disappears.
Chrome (Windows): Press F11.
Chrome (macOS): Press Control + Command + F.
Safari (macOS): Press Control + Command + F. (Note: Uncheck "Always Show Toolbar in Full Screen" in the View menu so the top bar doesn't block subtitles.)
4. Assigning Co-hosts
If the host needs to focus purely on presenting, you can delegate meeting management to your staff by assigning them as Co-hosts.
Note: Co-hosts must create a BizCrush account before the event.
What Co-hosts Can Do
Edit live transcripts, start and stop recording, change meeting names, assign speaker labels, and generate and send follow-up emails.
How to Assign a Co-host
Open the [☰ Side Menu] in the top right corner.
Select [+ Add Participant].
Enter your staff member's email address to invite them.
Long-press (click and hold for 3 seconds) on the invited user's name to open the Co-host menu.
Select [Add to Co-Hosts].
5. Registering Custom Keywords
Pre-registering industry jargon, proper nouns, or acronyms dramatically improves speech recognition and AI summary quality.
How to Register Keywords
Open the [☰ Side Menu] in the meeting room.
Click [Manage Context] at the bottom.
Choose your preferred method:
Upload PDF File: Upload your presentation deck, event agenda, or briefing doc. Key terms are extracted automatically.
Add Note: Type specific words directly into the Enter keyword field and click [Confirm].
Tip: Focus on unique proper nouns — event names, speaker names, and specific acronyms (e.g., GSKA, K-Fest).
6. Sharing Subtitles with Attendees
BizCrush allows attendees to view subtitles directly on their own smartphones or laptops without downloading any app.
Note: There are two QR codes depending on the experience you want to provide.
Feature | Meeting Room QR | Presentation Mode QR |
|---|---|---|
Where to find it | Bottom toolbar → Share options | Presentation Settings → Show QR |
What attendees can do | Change translation languages themselves, view summaries, access full transcript history, use Live Audio Translation. | Only view the exact subtitles being shown on the main projector (read-only). |
Best used when… | Attendees want to choose their own translation language and follow translated audio. | Audience members in the back of the room need a mirrored view of the main screen on their own devices. |
How to Share the Meeting Room
Click the [Sharing Menu].
Either copy the link to send via email or chat, or display the generated QR code on your screen for attendees to scan.
Tip: Put this QR code on your opening presentation slide or print it on flyers at the venue entrance.
Attendee Screen — Meeting Room
When an attendee scans the meeting room QR code or joins via a shared link, the screen below appears.
They can switch between the Live, Summary, and Transcript tabs in their browser to view the content.
They can choose the original transcript, translation, and display format in their preferred language.
When they select a language using the Live Audio Translation feature, the translated audio plays in real time.
They can stay connected for up to one hour after the meeting ends.
How to Share Presentation Mode
When attendees scan the Presentation Mode QR code, they are directed to a dedicated viewer for the subtitles.
To enable access, turn on the [Show QR] option in the settings panel.
Attendees can then scan the QR code to view the subtitles via a browser on their preferred device.
Attendee Screen — Presentation Mode
When an attendee scans the Presentation Mode QR code, the screen below appears.
They are redirected to the dedicated subtitle viewer in their browser.
They cannot adjust settings such as language.
They see the same subtitles as the main screen, mirrored on their own device.
7. Event Day Checklist & Troubleshooting
Pre-Session Checklist
Desktop App launched and logged in
Meeting created, and recording started
Spoken Language and Translation Language confirmed
Custom keywords registered
Overlay turned on and positioned (if using Overlay mode)
Share link / QR code tested and displayed for attendees
Microphone audio check (speak into the venue mic and confirm text appears)
Common Issues & Solutions
Q. The microphone is blocked / no text is appearing.
A.Go to your computer's OS settings → Privacy/Security → Microphone and ensure BizCrush has permission to access your microphone. Also, move the laptop or phone closer to the venue's PA speakers or the presenter.
Q. The Overlay subtitles aren't showing up.
A.Make sure you are using the Desktop App — Overlay does not work on the mobile app or web browser version. Then check that the Overlay toggle is turned ON in the settings.
Q. Presentation Mode isn't working.
A.Ensure that the meeting is actively recording on the host device. If the link was opened before recording started, refresh the browser page.
Q. Accuracy drops because the venue is too noisy.
A.BizCrush uses AI noise cancellation, but in highly reverberant rooms, physical placement matters. Place the recording device as close to the PA speaker output or the presenter as possible.
Q. I have privacy concerns about recording.
A.Click the Padlock icon in the bottom toolbar to turn on Privacy Mode. When enabled, no voice data or transcripts are saved to your device or our servers — only real-time translation will function.
Need Help?
If you have any questions or require technical support for your event, please contact us anytime at business@bizcrush.ai.
BizCrush
Growth
May 6, 2026
5
min
Tutorials
[BizCrush API] Quick Start Guide
Discover how to integrate BizCrush's real-time AI transcription and translation into your platform in just a few simple steps.
What You Can Build
🎙️ Real-time Speech-to-Text via WebSocket (15 languages, auto-detected)
📁 File transcription + speaker diarization (who said what + timestamps)
🤖 AI meeting summaries + Q&A (Claude-powered, custom prompts)
🔗 MCP server — control BizCrush from Claude or Cursor with natural language
⚡ Zapier — push meeting data to Slack, Notion, and Google Docs automatically
STEP 1 — Get Your API Key
Go to https://bizcru.sh → Sign up (Google login supported)
Navigate to Settings → https://bizcru.sh/en/settings
Scroll down to the API Keys section
Click the purple "Issue API Key" button
⚠️ Copy it immediately — it will NOT be shown again!
Save it:
BIZCRUSH_API_KEY=sk-prod-xxxxxx
You can issue up to 5 keys per account.
QUICK START — File Transcription
Base URL: https://extapi-stt.bizcrush.aiAuth: ?api_key=YOUR_API_KEY (query parameter)
curl -X POST "<https://extapi-stt.bizcrush.ai/stt?api_key=YOUR_API_KEY>" \\\\

  -H "Content-Type: application/json" \\\\

  -d '{"audio_url": "<https://example.com/audio.mp3>", "enable_diarization": true}'
Response includes:
text— full transcriptdetected_language— auto-detected language codeutterances[]— speaker-diarized segments withstart_ms,end_ms,speaker,confidence
Set the timeout to 600+ seconds for long audio files.
QUICK START — Live STT via WebSocket (Python)
pip install websockets
import asyncio, json, websockets

async def live_stt(api_key):
    url = f"wss://extapi-stt.bizcrush.ai/?api_key={api_key}&format=json"
    async with websockets.connect(url) as ws:
        # 1. Send config
        await ws.send(json.dumps({"encoding": "pcm16"}))
        resp = json.loads(await ws.recv())
        print("Connected:", resp)  # {"connected": true}

        # 2. Stream PCM16 audio as binary frames (640 bytes = 20ms chunks)
        # 3. Receive interim + final results:
        async for msg in ws:
            data = json.loads(msg)
            if "chunk" in data:
                status = "FINAL" if data["chunk"]["is_final"] else "interim"
                print(f"[{status}] {data['chunk']['text']}")

asyncio.run(live_stt("YOUR_API_KEY"))
Audio format: PCM16 — 16kHz, mono, 16-bit little-endian, 640 bytes/chunk (20ms)
QUICK START — Live STT (JavaScript / Browser)
const ws = new WebSocket(
  "wss://extapi-stt.bizcrush.ai/?api_key=YOUR_API_KEY&format=json"
);

ws.onopen = () => ws.send(JSON.stringify({ encoding: "pcm16" }));

ws.onmessage = (event) => {
  const data = JSON.parse(event.data);
  if (data.connected) console.log("Connected! Start sending audio...");
  if (data.chunk) {
    console.log(`[${data.chunk.is_final ? "FINAL" : "interim"}] ${data.chunk.text}`);
  }
};

// Send raw PCM16 audio as binary frames
function sendAudioChunk(pcmData) {
  if (ws.readyState === WebSocket.OPEN) ws.send(pcmData);
}
QUICK START — Meeting REST API
Base URL: https://extapi.bizcrush.aiAuth: X-API-Key: YOUR_API_KEY (header)
# Create a meeting
curl -X POST <https://extapi.bizcrush.ai/v1/create-meeting> \\
  -H "X-API-Key: YOUR_API_KEY" \\
  -H "Content-Type: application/json" \\
  -d '{"title": "Hackathon Demo", "participant_ids": ["<em:teammate@email.com>"]}'

# AI Summary with custom prompt
curl -X POST <https://extapi.bizcrush.ai/v1/summarize-meeting> \\
  -H "X-API-Key: YOUR_API_KEY" \\
  -H "Content-Type: application/json" \\
  -d '{"meeting_id": "MEETING_ID", "user_prompt": "List action items only"}'

# Ask AI about a meeting
curl -X POST <https://extapi.bizcrush.ai/v1/ask-ai-for-meeting> \\
  -H "X-API-Key: YOUR_API_KEY" \\
  -H "Content-Type: application/json" \\
  -d '{"meeting_id": "MEETING_ID", "message": {"text": "What were the key decisions?"}}'

# Get live transcription (poll every 1s)
curl -X POST <https://extapi.bizcrush.ai/v1/get-live-transcription-chunks> \\
  -H "X-API-Key: YOUR_API_KEY" \\
  -H "Content-Type: application/json" \\
  -d '{"meeting_id": "MEETING_ID", "last_updated_at": "1970-01-01T00:00:00Z", "limit": 100}'
MCP SETUP — Use BizCrush from Claude or Cursor
Add to your .mcp.json:
{
  "mcpServers": {
    "bizcrush": {
      "type": "sse",
      "url": "<https://bizcrush-mcp-1071354765717.us-central1.run.app/sse>"
    }
  }
}
Then just talk to Claude naturally:
"Summarize my last meeting."
"Get the transcript from today's call."
"Send a message to meeting XYZ."
Supported Languages (auto-detected)
Code | Language | Code | Language |
| English |
| Japanese |
| Korean |
| Chinese |
| Hindi |
| Spanish |
| French |
| Portuguese |
| Arabic |
| Russian |
| Indonesian |
| German |
| Vietnamese |
| Italian |
| Thai |
API Endpoints Overview
STT API (https://extapi-stt.bizcrush.ai)
Method | Endpoint | Description |
|
| File transcription with speaker diarization |
|
| Real-time streaming STT |
Meeting REST API (https://extapi.bizcrush.ai)
Endpoint | Description |
| Create meeting + invite participants |
| List meetings (paginated) |
| Real-time STT polling |
| Final utterances with speaker diarization |
| AI summary (custom prompt supported) |
| AI Q&A about meeting content |
| Get cached summary |
| Push summary to Notion |
| Send chat message to meeting |
| Add participants |
Links
📖 Full API Docs | |
🔑 Get API Key | https://bizcru.sh/en/settings → API Keys → Issue API Key |
🌐 Homepage | |
💬 Questions | DM Kelly — kelly@bizcrush.ai |
BizCrush Inc.
Support: help@bizcrush.ai
Business: business@bizcrush.ai
BizCrush
Growth
April 16, 2026
5
min
Tutorials
Quick Start Guide
Getting Started with BizCrush: From Conversation to Connection in Minutes
BizCrush turns real conversations into clear notes, follow-ups, and next steps — in minutes. This guide walks you through your first recording and follow-up.
Before You Start
Note: This walkthrough is based on the mobile app. BizCrush is also available on Windows and macOS desktops.
Mobile: Search for BizCrush in the App Store or Google Play and download the app.
Desktop: Go to bizcrush.ai and click Get BizCrush on Any Device to download the desktop version.
1. Create Your Account
Sign up with your Google, Apple, or email account.
Once you log in, you'll see the home screen where all your meeting rooms are listed.
What's a Meeting Room?
A Meeting Room organizes your recordings, transcripts, and participants in one place.
You can create separate rooms for different meetings, or keep multiple recordings in the same room.
2. Record Your First Meeting
There are two ways to get started. Choose the one that fits your situation.
Option A: Record a Live Meeting
First, make sure microphone access is enabled. When prompted, tap Allow to grant permission.
Note: If you've already denied microphone access, go to Settings > Apps > BizCrush > Permissions and enable it.
Tap the microphone button on the home screen to create a new meeting and start recording.
Once recording starts, tap View Live Transcript at the top to see real-time transcription and translation.
When the meeting is over, tap the Stop button to end and save the recording.
Note: To generate the post-meeting transcript and summary, you must tap the stop button to end and save the meeting.
Tip: You can edit the transcript directly by tapping any line, even while recording is still in progress.
Option B: Import an Existing Recording
Use this option if you already have a recorded audio file, such as .mp3 or .m4a.
Tap the + icon in the meeting room toolbar.
Select <Upload audio>, then choose the file you want to import.
BizCrush will automatically transcribe the file and generate a summary.
3. Set Up Translation
For multilingual meetings, tap the globe icon in the meeting room to open Language Settings.
BizCrush can detect up to 3 spoken languages at once and translate into up to 2 preferred languages in real time.
You can also change the translation language directly from the transcript view.
4. Review Your Transcript and Summary
After the meeting ends, BizCrush automatically generates a refined post-meeting transcript and summary.
Note: Summary generation may take a few minutes depending on the recording length.
View the Summary
Tap the AI Summary card in the meeting room to view the full summary, including key discussion points and structured sections.
Tap any referenced section to jump directly to that part of the transcript.
Swipe for Live Summary
During recording, you can swipe right on the transcript view to check the live summary as each discussion topic wraps up.
Assign Speaker Names
Tap a speaker label to assign names. This makes follow-up emails more personalized and helps you review conversation history by person.
Tip: Register your voice in Settings
BizCrush can better identify who's speaking.
Go to Settings > Meeting Settings > Voice Enrollment
Get Your Summary by Email
As soon as the recording ends, BizCrush automatically creates a structured summary and sends it to all invited participants in the meeting rooms via email.
If you have a preferred summary format, you can customize it on the desktop version. Drag the meeting record into the <Ask AI> feature and request a tailored summary.
Depending on recording length, this may take a few minutes.
5. Generate a Follow-Up Email
Once the summary is ready, tap the email icon in the meeting room toolbar. BizCrush will generate a follow-up email based on your meeting content.
Open the email draft to review, edit, or send it.
You can also ask the AI to adjust the tone or style — for example, type "Please make the tone more polite" in the request field.
6. Export and Share
Export to HubSpot or Notion
Tap the menu icon (☰) in the top-right corner of the meeting room to open the settings menu.
From there, you can sync your meeting to HubSpot or save it to Notion.
Note: You'll need to log in to HubSpot or Notion the first time you connect.
Share a Live Meeting
Share your live meeting with anyone — no app install or sign-up required
Tap the share icon in the toolbar to copy a link or display a QR code.
Recipients can view the live transcription and translation directly in their browser.
With <Anyone with the link can view> enabled,
Anyone can view the live transcript during the meeting or for up to one hour after the meeting ends.
No login or sign-up required—access available through a web browser.
Tip: If a participant signs up through the shared meeting room:
The host receives additional BizCrush meeting usage credits
The new user can access and revisit the meeting anytime from their logged-in account
Live Audio Translation for Viewers
Anyone viewing the shared meeting in their browser can hear real-time audio translation. They simply select their preferred language from the Live Audio Translation menu.
Use Privacy Mode for Confidential Meetings
For meetings that involve private or confidential discussions, you can enable Privacy Mode.
Privacy Mode allows you to use real-time transcription and translation without retaining any voice recordings.
To enable Privacy Mode, tap the lock icon in the toolbar before or during the meeting.
As long as Privacy Mode is enabled before the recording is completed, audio will not be stored.
When Privacy Mode is enabled:
Real-time transcription and translation function as usual during the meeting.
No voice recording files are saved anywhere.
If you delete the meeting room after the meeting, no data remains on the server.
For organizations with stricter data requirements, BizCrush also supports:
Private cloud deployment.
On-premises deployment.
Enterprise configurations where data is stored only within the organization’s internal systems (e.g., internal wiki), and not on our private servers.
FAQ
What do I do if microphone access is blocked?
When you first open the app, a permission pop-up appears.
If you denied it, go to Settings > Apps > BizCrush > Permissions and allow microphone access.
Does BizCrush send meeting summaries by email?
BizCrush sends the meeting summary automatically after you end the meeting.
For longer recordings, summary generation may also take a few minutes.
Why didn’t I receive a meeting summary email?
Tap Stop to end the recording before closing the app—otherwise, the summary won’t be generated.
Summary emails are sent to the email address linked to your sign-in account from: no-reply@mail.bizcrush.ai
If you don't see it in your email, check your spam folder and add the sender to your contacts.
What is Privacy Mode?
Privacy Mode allows you to use live transcription and translation without retaining any voice recordings.
No audio data is stored on your device or on the server.
If the meeting room is deleted after the meeting, no data remains on the server.
Can BizCrush be used for confidential or security-sensitive meetings?
Yes. With Privacy Mode enabled, no voice recordings are stored. Only real-time transcription is provided during the meeting.
Does BizCrush comply with recording consent laws?
Recording consent laws vary by location. In the United States, requirements differ by state.
We recommend informing all participants and obtaining consent before recording.
What languages are supported?
BizCrush supports up to 45 languages.
Live Translation can recognize up to 3 languages at once and translate into 2 languages in real time.
Which CRMs does it integrate with?
BizCrush currently integrates with HubSpot and Notion.
You can export meeting notes automatically and share them with teammates.
For enterprise, we also support options like storing meeting records in your internal wiki.
If you need any additional integrations, feel free to email us.
Can I use it on both mobile and desktop?
Yes. BizCrush supports iOS, Android, Windows, and macOS.
With the same account, you can view and edit your data across devices.
Where are my recordings stored?
Original recordings are stored on your device only.
For multi-device sync, an encrypted copy is temporarily stored on the server for 48 hours and then automatically and permanently deleted.
Can I upload existing recordings?
Yes. You can upload audio files you already have, transcribe them, and generate summaries.
What file formats can I upload?
BizCrush supports common audio formats, including MP3, M4A, WAV, and OGA.
What's the difference between live transcription and post-meeting transcription?
Live transcription captures speech as it happens in real time.
Post-meeting transcription is generated after the recording ends, with AI refining the text for better readability and accuracy.
Where is the meeting summary?
As soon as the recording ends, BizCrush automatically organizes the meeting content into a structured summary, which is sent via email to all invited participants and to each meeting room.
If you have a preferred summary format, you can customize it on the desktop version. Drag the meeting record into the <Ask AI> feature and request a tailored summary.
Depending on recording length, this may take a few minutes.
How does email follow-up work?
BizCrush analyzes the conversation and creates a personalized follow-up email draft based on the meeting content.
You can edit it or ask the AI to adjust the tone before sending.
If you skip this step, the summary won't be created.
Can I use BizCrush for free?
Yes. BizCrush offers up to 7 hours of use with a free subscription, but advanced features like translation and live audio translation use tokens faster.
You're All Set
Start your first meeting with BizCrush today — BizCrush handles the notes and follow-up.
Questions or Partnership? Reach us anytime at business@bizcrush.ai.
BizCrush
Growth
April 1, 2026
5
min
Usecase
From Noisy Job Sites to Global Events: How BizCrush Works in the Real World
From Noisy Job Sites to Global Events: How BizCrush Works in the Real World
When people think about communication tools, they imagine quiet offices or Zoom calls.
But that’s not where communication actually breaks. It breaks in real-world environments — on job sites, at crowded in-person events, and in fast-moving situations where you can’t pause and type something into Google Translate.
Recently, we’ve seen BizCrush used in places like this — where conventional tools simply don’t work.
On a Construction Site — One Phone, No Setup
A Portuguese-speaking worker on a U.S. construction crew struggled with daily communication.
Instructions were fast. The environment was loud. And there was no room for misunderstanding.
This wasn’t just about translating words, but it was about keeping up with real-time coordination.
Using BizCrush on his phone — no setup required — he got:
real-time translation
audio playback in his preferred language
real-time summary and records, even in a noisy environment
For the first time, he could follow conversations as they were happening.
He didn’t slow the team down anymore. He became part of it.
Construction is one of the most linguistically diverse industries in the U.S.
But almost no tools are built for it.
The Cross-Border Event — 80+ People, Bilingual Captions on Screen
At the K-Initiative launch event hosted by the Korean Consulate General and KSC Seattle, the challenge was different — language barriers in cross-border, multicultural settings.
More than 80 people. Two languages: Korean and English.
Usually, organizers have two options:
Hire interpreters (expensive and limited)
Or accept that some people won’t fully understand
Instead, BizCrush was used to provide during the session:
real-time Korean–English translation
bilingual subtitles on a shared screen
Now, over 80 attendees followed every speaker in both languages, in real time—no interpreters, extra hardware, or pre-event setup beyond a screen.
Everyone in the room could follow every speaker in real time. It worked at the event scale.
What These Cases Have in Common
The environments were completely different:
a noisy construction site
a formal international event
But the core problem was the same:
People needed to understand each other in real time under pressure
And BizCrush worked without:
extra devices
extra hardware
or complicated setup
Why This Matters
For people working across languages — in the field, at events, or in global teams —
The real question isn’t “how advanced is the feature?”
It’s: Does it work where I actually need it? These cases show that it does.
If This Sounds Familiar
If you’re dealing with similar challenges, such as running cross-border events, managing multilingual teams, or operating in environments where communication can’t slow down, we’d love to hear from you. BizCrush is built for real-world communication where things move fast, environments are unpredictable, and understanding can’t wait.
📩 business@bizcrush.ai
Kelly Oh
Co-founder & CMO
March 27, 2026
5
min
Tutorials
How to Upgrade Your BizCrush Plan
A quick visual guide to switching from Free to a paid BizCrush plan. Simple steps with clear screenshots.
Upgrading to a paid BizCrush plan takes only a few steps.
Here is how to upgrade in just a few clicks.
1. Log in to Your BizCrush Account
Start by signing in from the BizCrush homepage. You’ll need to be logged in to access your billing dashboard.
2. Open the Payment & Billing Page
Once you’re in, head to the Payment & Billing section. This is where you can view your current plan and manage upgrades.
3. View Available Plans
On the Billing page, you’ll see a button to explore available plans. Click View Plans to continue.
4. Select Your Paid Plan
Choose the plan that best fits your needs. Click the plan you’d like to upgrade to.
Save 17% when you choose annual billing instead of paying monthly.
⚠️ Note
Annual billing is only available on web — not through the
mobile.
5. Complete Your Payment Through Stripe
When you select a paid plan, you’ll be redirected to a secure Stripe payment page. Follow the steps to enter your billing details and finalize your subscription.
That’s it!
Once payment is complete, your account switches to the new plan immediately.
Important: Switching from Mobile?
If you previously subscribed via the Apple App Store or Google Play Store, you must cancel that subscription first to avoid duplicate charges.
Cancel your subscription in the App Store or Play Store.
Wait for your current billing cycle to end and your account to return to the Free Plan.
Once your account is free, follow the steps above to upgrade via the web.
Need more help?
Contact us at business@bizcrush.ai
BizCrush
Growth
February 14, 2026
2
min
Tutorials
How to Use BizCrush Live Subtitle Mode
Real-time subtitles in a floating window that stays on top of any app. Perfect for meetings, presentations, and multitasking.
BizCrush’s Real-Time Subtitle PIP (Picture-in-Picture) Overlay lets you keep live captions (and translation) visible while you work in any app—slides, docs, browser tabs, or online meetings.
Here's a short video showing how to use real-time subtitles.
Or here's a simple visual to get you started.
1. Install the BizCrush Desktop App
PIP subtitles are a desktop-only feature. If you haven't already, head to our website to download the version for your OS.
2. Open the Real-Time Script Panel
Start a meeting and open your live transcript panel to set things up.
3. Set Your Languages
Choose your spoken language and the language you want subtitles translated into.
4. Open Subtitle Menu
Next, open the subtitle menu from the script panel’s top-right area.
5. Customize Your Overlay Settings
The dropdown lets you choose display mode, text size, and how many lines appear.
6. Turn On PIP Subtitles
Once you enable overlay mode, subtitles appear instantly in a floating window.
7. Move the Subtitle Window Anywhere
Drag the overlay to wherever it’s most comfortable on your screen.
8. Use It While Presenting or Multitasking
Your subtitles stay visible on top of slides, browsers, or any app.
Great for presenters, trainers, and meetings.
9. Turn Off Anytime
Turn off the overlay window when you’re done.
Need more help?
Contact us at business@bizcrush.ai
Explore More updates
We’re making BizCrush smarter, faster and more connected every week.
See everything new → Change log
BizCrush
Growth
February 14, 2026
2
min